Panasonic PT-53WX54 User manual

PT-53WX54
PT-47WX54
PT-47WX34
TQB2AA0507-1 40301
PRINTED IN USA

[r_l he Class _Iinsulation symbol (squarewithin a square) indicates that this product has been evaluated
and tested to comply with Class _Iinsulation requirements.
WARNING: TO REDUCE THE RISKOF FIRE OR ELECTRICSHOCK;DO NOT EXPOSE THIS 1
70MINORM0 S UREDONOTPLACEANy0BjEC SF LLEDw, M /
LIQUIDS;SUCH AS VASES;ON THIS;APPARATUS. /
IMPORTANT SAFETY INSTRUCTIONS
1. Read these instructions.
2. Keep these instructions.
3. Heed all warnings.
4. Follow all instructions.
5. Do net use this apparatus near water.
6. Clean only with dry cloth.
7. Do net block any ventilation openings. Install in accordance with the manufacturer's instructions.
8. Do not install near any heat sources such as radiators, heat registers, stoves, or other apparatus (including
amplifiers) that produce heat.
9. Do not defeat the safety purpose of the polarized or grounding type plug. A polarized plug has two blades with
one wider than the other. A grounding type plug has two blades and a third grounding prong. The wide blade
or the third prong are provided for your safety. If the provided plug does not fit into your outlet, consult an elec-
trician for replacement of the obsolete outlet.
10. Protect the power cord from being walked on or pinched particularly at plugs, convenience
receptacles, and the point where they exit from the apparatus.
11. Only use attachments/accessories specified by the manufacturer.
12. Use only with the cart, stand, tripod, bracket or table specified by the manufacturer, or sold
with the apparatus. When acart is used, use caution when moving the cart/apparatus combi ...................
nation to avoid injury from tip-over.
13. Unplug this apparatus during lightning storms or when unused for long periods of time.
14. Refer all servicing to qualified service personnel. Servicing is required when the apparatus has been dam-
aged in any way, such as power-supply cord or plug is damaged, liquid has been spilled or objects have fallen
into the apparatus, the apparatus has been exposed to rain or moisture, does not operate normally, or has
been dropped.

Important Information
IMPORTANT INFORMA TfON
FCC CAUTION: ANY CHANGES OR MODIFICATIONS TO THIS TV RECEIVER NOT EXPRESSLY
APPROVED BY MATSUSHITA ELECTRIC CORPORATION OF AMERICA COULD CAUSE
HARMFUL INTERFERENCE, WHICH WOULD VOtD THE USER'S AUTHORITY TO
OPERATE THIS EQUIPMENT,
ENVIRONMENTAL NOTICE: THIS PRODUCT UTtLtZES CATHODE RAY TUBES (CRT) AND OTHER
COMPONENTS THAT CONTAIN LEAD. DISPOSAL OF THESE MATERIALS
MAY BE REGULATED tN YOUR COMMUNITY DUE TO ENVIRONMENTAL
CONSIDERATIONS, FOR DISPOSAL OR RECYCLING INFORMATION
PLEASE CONTACT YOUR LOCAL AUTHORITIES, OR THE ELECTRONICS
INDUSTRIES ALLIANCE: <HTTP:/_.EtAE,ORC_>
The Energy Star label, a symbol for energy efficiency, was created by the U.S.
Environmental Protection Agency (EPA) and the U.S. Department of Energy
(DOE) to help customers identify products that can save them money and protect
the environment by saving energy. Energy Star compliant products generally
consume less energy than similar standard products.
High Definition Sound
Manufactured under license from BBE Sound, Inc.
Licensed by BBE Sound, Inc. under USP4638258, 5510752 and 5736897.
BBE and BBE symbol are registered trademarks of BBE Sound, Inc.
BBE High Definition Sound restores clarity and presence for better speech
intelligibility and music realism.
Read these instructions completely before operating television.
Contents are subject to change without notice or obligation.
Copyright 2004 by Matsushita Electric Corporation of America Att rights reserved
Unauthorized copyingand distribution isa vioIation of law
10

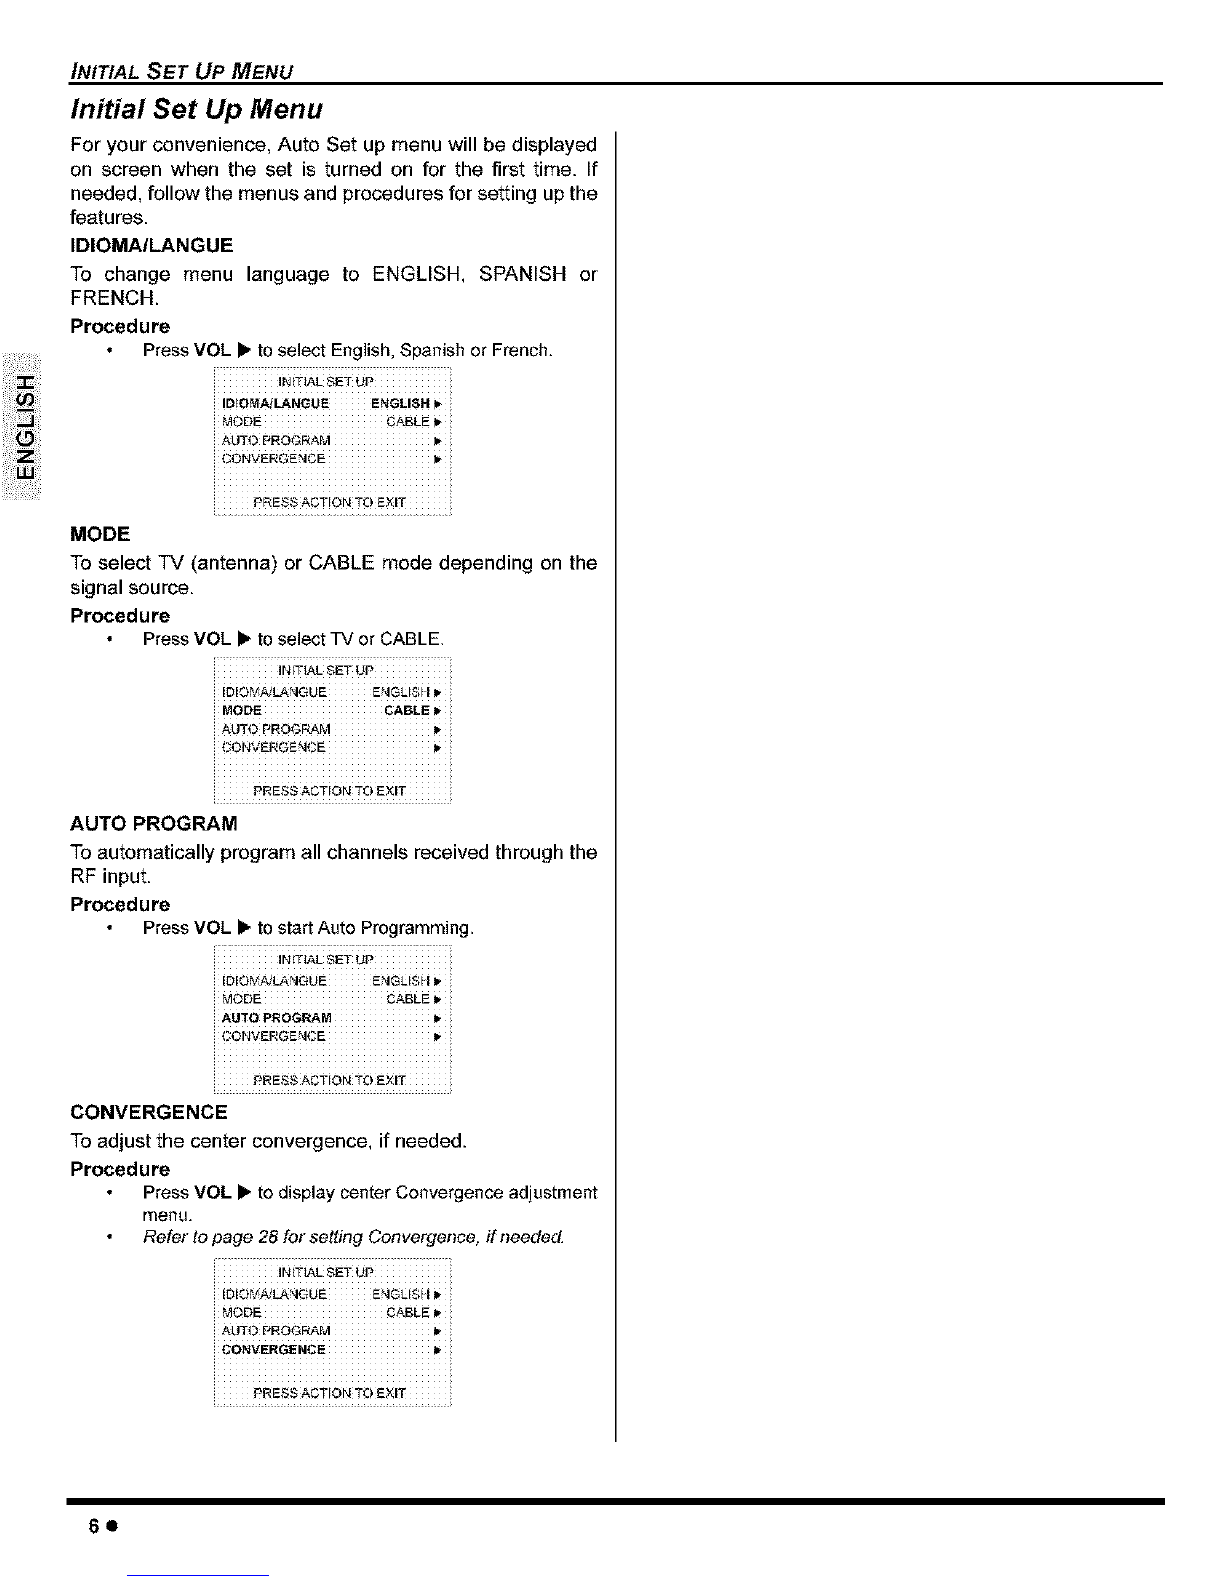
IMPORTANT INFORMATION
Important Information (contd.)
Information Regarding Convergence
In the projection television, the image is formed by
projecting 3 different color images (red, green and blue)
onto the projection screen. Convergence refers to the
alignment of red, green and blue images on the
projection screen. When these images are properly
aligned (converged), you see a sharp and vibrant color
image. Sometimes, the three images may require
alignment. This is due to the effect of earth's magnetic field
on the projection tubes. Normally, adjustment is not
necessary after the initial alignment at the center of the
screen. It is possible to correct the color fringing on other
areas of the screen by using the buttons on the remote
control and by following the on-screen instructions in the
set-up menu. Please converge the images before using the
television for the first time. The following diagram shows
examples of a misaligned image and a properly aligned
image. Please refer to pages 28 and 29 for detailed
procedure on how to adjust convergence.
Miscenverged image
Notes:
Properly aligned image
Make sure that the set is on for at least 20 minutes
before adjusting convergence as described on pages 28
and 29.
Convergence adjustment is independent for each format
(480i, 1080i or zoom). Setting in one format does not
affect the other.
Important Information Regarding The Use Of
Video Games, Computers, Or Other Fixed
Image Displays.
WARNING: The marking or retained image on the
p!cture tube resulting fro m viewing fixed !mage is
not an operating defect and as such is not covered
by Warranty_
The projection television is designed to display
C0nstant!y m0ving images on the screen continuous
viewing ef stationary images such as letterbox pictures
on standard screen TVs (with top/bottom bars), non÷
expan ded standard (413) pictures on Wide screen ws
(wit h Side bars ShOWn on each side Of an image)i StoCk
market report bars(ticker running at the bottom of the
screen)i Video game pa_erns, fixed Scereb0ardsi
bdght station loges; onqine (!nternet) or repetitive
computer style patterns should be
The extended use of fixed image program material can
cause permanent picture tube damage, shown as a
"shadew image'viewableennormalpregrams:This
_pe of irreversible picture tube deterioration can be
!imited bY perf0rming the fo!!owing stepsl
, Limit the display offixed imageprogram material to
no m0rethan !5% oftotal viewing time per week
•,Turnthe power0ff Whe_n0t in use.
FCC INFORMATION
This equipment has been tested and found to comply with
the limit for a Class B Digital Device in accordance with the
specifications in Part 15 of the FCC Rules. The limits are
designed to provide reasonable protection against radio
and television interference in a residential installation. This
equipment generates, uses and can radiate radio
frequency energy and, if not installed and used in
accordance with the instructions, may cause harmful
interference to radio communications, However, there is no
guarantee that interference will net occur in a particular
installation.
If this equipment does cause interference to radio or
television reception (which you can determine by turning
the equipment off and on), try to correct the interference by
one or more of the following measures.
Reorient or relocate the receiving antenna.
_ncrease the separation between the equipment and the
receiver.
Connect the equipment into an outlet on a circuit
different from that to which the receiver is connected.
Consult the dealer or an experienced radioFrV
technician for help.
20

Table of Contents
Important Information ..................................... 1
Information Regarding Convergence .......................... 2
Information Regarding The Use Of Video Games
Computers, Or Other Fixed Image Displays ............ 2
Customer Record ........................................................ 4
Care and Cleaning ...................................................... 4
Specifications .............................................................. 4
Feature Chart .............................................................. 4
Installation ........................................................ 5
Television Location ..................................................... 5
Optional Cable Connections ....................................... 5
AC Power Supply Cord ............................................... 5
Cable /Antenna Connection ....................................... 5
Remote Control Battery Installation ............................ 5
Initial Set Up Menu ..................................................... 6
Optional Equipment Connections .................. 7
VCR ........................................................................... 7
Cable Box .................................................................. 7
VCR and Cable Box................................................... 7
Amplifier (TO AUDIO AMP) ........................................ 8
Program Out Connection (PROG OUT) ..................... 8
Digital TV- Set-Top Box (DTV-STB) or DVD Players 8
Front Control Panel ..................................................... 8
DVI (Digital Visual Interface) input connection ........... 9
Special Remote Buttons ............................................. 9
PIP And Split Operation ................................. 10
PIP Operation ........................................................... 10
Split Operation .......................................................... 10
PIP and Split Operation With a Cable Box ............... 10
PIP And Split Operational Buttons ................ 10
TV/Video Button ........................................................ 10
TABLE OF CONTENTS
Search Button .............................................................. 10
Move Button ................................................................ 11
PIP MIN and PIP MAX Buttons ................................... 11
Freeze Button ............................................................. 11
Main Picture Freeze Feature ....................................... 11
PIP, Split and Freeze Mode Buttons
Operational Chart ..................................................... 11
Remote Control Operation
(For model PT-47WX34 only) ..................... 12
Operating Components with Remote Control ............. 13
Programming the Remote Control .............................. 14
Programming Without a Code .................................... 14
Component Codes ..................................................... 14
Remote Control Operation (For models
PT-47WX54 and PT-53WX54 only) ............ 16
Operating Components with Remote Control ............. 17
Programming the Remote Control .............................. 19
Programming Without a Code .................................... 19
Component Codes ..................................................... 20
Basic Menu Navigation ................................. 22
Icon Menus Operation .................................. 23
Picture ........................................................................ 23
Audio .......................................................................... 23
Channels .................................................................... 24
Timer .......................................................................... 24
Lock............................................................................ 25
Set Up ........................................................................ 28
Troubleshooting Chart ................................. 30
Index ............................................................... 31
30

CONGRA TULA T/ONS
Congratulations
Your new Projection Television (PTV) features state-of-the-
art technology for high quality picture and sound with
complete audio/video connections for your home theater
system. Your PTV is designed to give you many years of
enjoyment. It was thoroughly tested and tuned at the
factory for best performance.
Customer Record
The model and serial number of this product are located on
the back of the TV. You should note the model and serial
number in the space provided and retain as a permanent
record of your purchase. This will aid in identification in the
event of theft or loss. Product registration for U.S. customers
is available at: www.prodreg.com/panasonic.
Model
Number
Serial
Number
Care and Cleaning
Projection Screen (Turn PTV Off)
The projection screen is a high precision lens system which
has a protective screen. The protective screen is fully
washable with the following precautions:
Use a mild soap solution or window cleaner and a clean
cloth.
DO NOT USE ABRASIVE CLEANERS.
Do not use laundry detergent or automatic dishwasher
soap.
Do not use alcohol, ammonia, or petroleum based
products.
Avoid excessive moisture and wipe dry.
Prevent solution from running into the receiver below.
Avoid bumping or scraping the screen.
Warning: Do not spray any type of cleaning fluid directly on the
screen.
Cabinet and Remote Control
For cabinets and remote control, use a soft cloth
dampened with water or a mild detergent solution. Avoid
excessive moisture and wipe dry.
Do not use benzene, thinner or other petroleum based
products.
Specifications
Specifications are subject to change without notice or
obligation.
P0wer S0ut_
PT.4?WZ_ (4_A} ,
Video 0ut jack
b_put Jacks SbVideo (YC)
Feature Chart
MODELS
IL O.
FEATURES
PROTECTIVE SCREEN
I.......
2RF I
I
!_80i ;!08_i
#80#: #SOp
NTSC LINE-DOUBLER . 480p480p _SOp
i
? ,
I
......................................_3m (m) :(_n¢
bWiNPUt '. =,"
i i i
40

Installation
Television Location
This unit can be used as part of an entertainment center. Consult
your dealer for available options.
Avoid excessive sunlight or bright lights, including
reflections.
Keep away from excessive heat or moisture. _nadequate
ventilation may cause internal component failure.
Fluorescent lighting may reduce remote centre]
transmitting range.
Keep away from magnetic equipment, including motors,
fans and external speakers.
Optional Cable Connections
Shielded audio and video cables should be used between
components. For best results:
Use 75-ohm coaxial shielded cables.
Use appropriate input and output connectors, that match
your component connectors.
Avoid long cables to minimize interference.
AC Power Supply Cord
CAUTION: TO PREVENT ELECTRIC SHOCK,
MATCH WIDE BLADE OF PLUG TO W_DESLOT
OF AC OUTLET AND FULLY INSERT DO NOT _olarizedplug
USE A PLUG W_THA RECEPTACLE OR OTHER
OUTLET UNLESS THE BLADE CAN BE FULLY INSERTED TO
PREVENT BLADE EXPOSURE.
PROTECT POWER CORDS FROM BEING WALKED ON, ROLLED
OVER, CRIMPED, BENT, OR PINCHED, PARTICULARLY AT PLUGS,
CONVENIENCE RECEPTACLES,AND THE POINTWHERE THEY EXIT
FROMTHE APPARATUS.
Cable /Antenna Connection
For proper reception, either a cable or antenna connection
is required.
Cable Connection rncom_ngCablefrom
Cable Company
Connect the cable supplied by your local
cablecempany to ANTi connection on _.
back of television. Select ANT1 and Cable
mode in SET UP menu.
Note: A cable converter box may be 75OhnIVHF/UHF
On baCJ_ Of IV
required for proper reception.
Check with your local cable
company for compatibility requirements.
Antenna Connection
For proper reception of VHF/UHF channels, an external antenna
is required. For best reception an outdoor antenna is
recommended.
Connect home antenna to ANT1 enc0mingCablefr0m
connection on back of television. HomeAntenna
Select ANT1 and TV mode in the
SET UP menu. :
Note: Cable Mode is preset at the
factor_ Antenna users must
change to TV Mode and ANT 1 it)
the Set Up menu.
/NS TALLA T/ON
Remote Control Battery Installation
Requires two AA batteries (supplied).
Procedure
1. Turn the remote control face down. Remove battery
cover by pressing down on the marking on the cover
and sliding itoff in the direction indicated.
2. Install batteries matching (+) and (-) polarity signs.
3. Replace the battery cover by sliding in reverse until the
lock snaps.
Note: Incorrect installation cat) cause battery leakage and
corrosion that will damage the Remote Control
Precautions
Replace batteries in pairs.
Do not mix batterytypes (zinc carbon with alkaline).
Do not recharge, heat, short-circuit, disassemble, or
bum batteries.
50

INITIAL SET UP MENU
Initial Set Up Menu
For your convenience, Auto Set up menu will be displayed
on screen when the set is turned on for the first time. If
needed, follow the menus and procedures for setting up the
features.
IDIOMAILANGUE
To change menu language to ENGLISH, SPANISH or
FRENCH.
Procedure
PressVOL b"to select English,Spanish or French.
IDIOMAiLANGUE ENGLISH
ceNVERGENCE I_
PRESS ACTION T_t EXIT
MODE
To select TV (antenna) or CABLE mode depending on the
signal source.
Procedure
PressVOL _ to select TV or CABLE.
IDIO_AJLANGUE ENGL_S_I I_
A_ITO PReGFtAM iJ,
PRESS ACTFeN Te EXIT
AUTO PROGRAM
To automatically program all channels received through the
RF input.
Procedure
PressVOL _ to start Auto Programming
MQDE CABLEI_
ceNVERGENCE I_
PRESS ACTIQN TO EXIT
CONVERGENCE
To adjust the center convergence, if needed.
Procedure
Press VOL b"to display center Convergence adjustment
menu.
Refer to page 28 for setting Convergence, if needed.
INIT_ SET UP
iCiS#A/LANGUE ENGI-(Sii
AUTO PFIC)GFtAM I_
CONVERGENCE I=
P_ESS A_Ti¢iN T_)
60

Optional Equipment Connections
Note: The remote control must be programmed with supplied
codes to operate the optional equipment.
VCR Connection
Follow this diagram when connecting your television to a
VCR only.
Viewing a television program
Procedure
Select ANT1 in the SET UP menu.
Tune the television to the program you want to view.
Viewing a video
Procedure
O Option A
Select ANT1 in the SET UP menu.
Press the TVNIDEO button on the remote control to
select the video input (VIDEO 1, VIDEO 2, etc.)
connected to your VCR.
Begin the video.
O Option B
Select ANT2 in the SET UP menu.
Tune the television to Channel 3 or 4, depending on your
VCR.
Begin the video.
Recording atelevision program
Procedure
O Option A (Recording and viewing the same program)
Select ANT2 in the SET UP menu.
Tune the television to Channel 3 or 4, depending on your
VCR.
Using the VCR, tune to the television program you want
to record.
Begin recording.
O Option B (Recording one program while viewing another
program)
Select ANT1 in the SET UP menu.
Press the TVNIDEO button on the remote control to
select the video input (VIDEO 1, VIDEO 2, etc.)
connected to your VCR.
Using the VCR, tune to the television program you want
to record.
Begin recording.
Press the TVNIDEO button on the remote control to
switch back to TV mode.
Tune the television to the program you want to view.
OPTIONAL EQUIPMENT CONNECTIONS
Cable Box Connection
Follow this diagram when connecting your television to a
cable box only.
Viewing a premium (scrambled) cable channel
Procedure
Select ANT2 in the SET UP menu.
Tune the television to Channel 3.
Using the cable box, tune to the premium cable channel
you want to view.
Note: To use special features such as Favorite Channels and
Chain)el Captions ANT1 must be selected in the SET UP
menu.
VCR and Cable Box Connection
Follow this diagram when connecting your television to
both a VCR and a cable box.
'I_t_MINAL_ _ _K Or pROJEC_ON f [L[VIS_OI_
Viewing a premium (scrambled) cable channel
Procedure
Select ANT2 in the SET UP menu.
Tune the television to Channel 3.
Using the cable box, tune to the premium cable channel
you want to view.
Note: To use special features such as Favorite Channels and
Chain)el Captions ANT1 must be selected in the SET UP
menu.
7@

OPTIONAL EQUIPMENT CONNECTIONS
Optional Equipment Connections (cont.)
VCR and Cable Box Connection (Cont.)
Recording a premium (scrambled) cable channel
Procedure
Select ANT2 in the SET UP menu.
Press the TVNIDEO button on the remote control to
select the video input (VIDEO 1, VIDEO 2, etc.)
connected to your VCR.
Turn the VCR ON.
Tune the VCR to Channel 3 or 4, depending on the
switch setting on the back of VCR.
Using your cable box, tune to the premium cable channel
you want to record.
Begin recording.
[3 To view a different channel while recording:
Select ANT1 in the SET UP menu.
Press the TVNIDEO button on the remote centre] to TV
mode.
Tune the television to a program (except another
premium cable channel).
Amplifier Connection (TO AUDIO AMP)
To listen through a separate stereo system, connect an
external audio amplifier TO AUDIO AMP outputs on back of
television.
Note: TO AUDIO AMP terminals cannot be connected directly
to external speakers.
Audio Adjustments
Select SPEAKERS ON located in the enscreen AUDIO
menu.
Set amplifier volume to minimum.
Adjust television volume to desired level.
Adjust amplifier volume to match the television.
Select SPEAKERS OFF & VARIABLE AUDIO OUT from
AUDIO menu.
Volume, mute, bass, treble and balance are now
controlled through the television.
Note: Select SPEAKERS OFF & FIXED AUDIO OUT to control
audio functions through the external amplifie_
Program Out Connection (PROG OUT)
To use the television audio and video with optional equipment,
connect the PROG OUT and TO AUDIO AMP connections on the
back of the television.
;MONITOR VCR
0
Note: ff the ma#) picture signal is DVI er Component video
#)put, no Program Out function is available.
Procedure
Connect optional equipment to PROG OUT and TO
AUDIO AMP terminals. PROG OUT display is same as
onscreen display. See optional equipment manual for
further instructions for recording and monitoring.
Digital TV -Set-Top Box (DTV-STB) or DVD
Con nection
This television is capable of displaying 1080i and 480p DTV
signals when connected to a DTV tuner set-top-box (STB). in
order to view DTV programming, the STB must be connected
to the component video inputs (Y,PB,PR) of the television. A
DTV signal must be available in your area. Select the output of
the STB to either 1080i or 480p.
This television also utilizes a progressive scan doubler, which
de-interlaces the NTSC signal and progressively scans the
image. This allows you to sit close to the TV and not see the
thin black horizontal lines (venetian blind effect) associated
with interlaced TV pictures.
Use this diagram to connect the DTV-STB or DVD player to
the back of your projection television.
Note: There are two sets of three video lacks, Y, PB, and PR.
Separate component color #)puts provide luminance and
color separation. Use the L (left) and R (right) audio
#)puts.
Front Control Panel
The front control panel can be used to access menus and
switch video mode when the remote control is net available.
The ON/OFF indicator LED (red) will be lit when set is on.
OPt_O FR
A second VCR, Camcorder, a video disc player, video game
equipment or DSS equipment can also be connected to the
video inputs. See the optional equipment manual for details.
Procedure
Connect equipment to front Audio/Video input jacks.
Press TV/VIDEO button to select VIDEO 4 input mode.
Operate optional equipment as instructed in equipment
manual.
8o

Optional Equipment Connections (cont.)
DVI (Digital Visual Interface) input connection
The DVI/HDCP 1 input on your PTV can accommodate copy
protected digital programming. The DVI/HDCP input
terminal complies with the EIA-861 Profiles 2 standard and is
not intended for use with personal computers. The DVI/
HDCP input can be connected to an EIA/CEA 861
compliant consumer electronic device, such as a set top
box or DVD player equipped with a DVI output connection 3.
The DVl/HDCP input is designed for best performance with
HDTV signals, such as 1080i. The DVl/HDCP input will
also accept and display 480i and 480p picture signals.
Notes:
1. DVI/HDCP = Digital Visual Interface /High-Bandwidth
Digital Copy Protection.
2. EIA/CEA-861 Profiles compliance covers profiles for
transmission of uncompressed digital video including
high bandwidth digital content protection.
3. Consult your consumer electronics dealer for availability
details.
Follow the diagram below to connect the PTV to a set top
box or a DVD player.
TE_M_¢,_ SO_ BA{_ O_ PROJEGT_N I EL_V_FON _ PLAYER
ProcedurePress TV/VIDEO button on the remote control to select
DIGITAL-IN input.
Connect the DVI output from the set top box or aDVD
player to the DIGITAL IN input on the beck of the PTV.
Connect the Audio Out signal from the set top box or
DVD player to the L and R Audio inputs associated with
the DIGITAL iN input.
OPTIONAL EQUIPMENT CONNECTIONS
Special Remote Buttons
BBE Button
Press this button to turn BBE sound feature On or Off.
SAP Button
Press this button to let you cycle through different audio modes.
For example: ff receiving STEREO, SAP and MONO or receiving
STEREO and MONO only, pressing SAP button,
the audio will toggle as follows:
,=,.-STEREO -> SAP -> MONO -q/
ASPECT Button
Customer Options depending on Component input Signal
480i 43, E011i3dst0r
ZO_m (Se_below)
The ASPECT button on the remote control lets you choose
one of four display modes, depending on the formats of the
received signal and your preferences.
This will display a 4:3 picture
p_olonged period of fime.)
This will expand the 4:3
_ _,,ii _ picture uniformly (width and
height) to fu!! screen w!dth
,,_ _-_ _nd then repositien the
(Recommended fo_ !etterbox
pictures.)
Note: if menu is displayed while _nzoom mode the aspect
will Cha_e to Fall to display Complete menu.
,3:_, I This Will Sh0w picture at full
_,_,s,._, Iscreens_ze.(Recommended
_* _r_,'_, _ i_----'4 for anam0rphic pictures.)
This wilt stretch the right and
is_ _ ...... _,;_ ....... leff edges of a 4:3 picture to
i_,_s,-_,_4 fiil the scr_n, The _nt_ of
_-- _. ---L the screen will have aspect
_ C0rrecti0n applied The size
the odgiaa! signal ...............
{Re¢omrnended for regu!ar
_viewing.)
90

PICTURE IN PICTURE AND SPLIT OPERATION
Picture In Picture and Split Operation
Note: The shapes of PIP and SPLIT function bu_ons may va/y
depending on _#eremote cotWeL
PIP Operation
This television includes a two-tuner Picture In Picture (PIP)
feature. This allows you to watch two (2) live broadcasts at
the same time with or without an external video source
such as a VCR, cable box, etc.
Procedure
Connect incoming cable to ANT 1 input on back of TV.
PIP
Press Q to display P_P frame.
Select channels for the PIP frame by pressing
PIP CH
Select channels for the Main picture by pressing
Or
or use the remote control numeric keypad.
SWAP
Press Q to switch the P_P and MAIN P_CTURE
source.
RECALl.
Press 0 to view picture source status.
PIP
Press @ to cancel PIP frame.
Note: Audio is florn Main Picture only:
Split Operation
This feature lets you watch two different channels side by
side with or without an external video source.
Procedure
SPLIT
Press _ to display Split screen.
Select channels for the Split picture by pressing
PIP CH
Select channels for the Main picture by pressing
or or use the remote control numeric keypad.
SWAP
Press @ to switch the SPLIT SCREEN and MAiN
PICTURE source.
RECALL
Press O to view picture source status.
SPLIT
Press _ to cancel Split screen.
PIP and Split Operation With a Cable Box
To view premium (scrambled) cable channels through your
cable box in the Main Picture:
Note: Use this procedure if you want to watch premium cable
channels in the Main Picture while viewing a television
program or video in the PIP or Split frame.
Procedure
Select ANT 2in the SET UP menu.
Tune TV to Channel 3.
PiP SPLIT
Press _ or Q on the remote control to display
the PIP or Split frame.
Note: Audio is from the Main Picture only.
Verify the Cable box is ON.
Choose channels for the Main Picture by tuning the
cable box.
Choose channels for the PIP frame by pressing
PIPCH
Note: Swap is not available when using the cable box to tune
channels. If your cable box has video output, it can be
connected to the 73/to allow you to use all PIP or SPLIT
functions. See the equipment manual for more
#fformation.
PIP and Split Operational Buttons
TVNIDEO Button
Press when PIP or Split frame is displayed to select
desired input mode.
MainPicture
÷
Main Picture
CH# -IL COMPONENTI .II_COMPONENT2 -_]
_PIP Frame
÷_ _ OOMPONENT1._OOMPONENT2
Frame
Search Button (PIP and Split)
This feature lets you scan through all available channels.
Procedure
PIP SPLIT
Press _ or _ to display P_P or Split frame.
10e

PIP Operation (cont.)
to display search frames.
SEARCH
OPEN/CLOSE
Press
SEARCH
OPEN/CLOSE
Press _ again to stop search feature. P_P or
Split frame channel will be the last active search frame.
PIP SPLIT
Press Q or Q to cancel PIP or Split frame
MainPicture ___
Move Button (PIP only)
This feature is used to move PiP frame to one of four
corners.
Procedure PiP
Press _ to display P_Pframe.
MOVE
Press _ to position PIP frame to desired comer.
PIP
Press _ to cancel PIP frame.
PiP Frame
PIP MIN and PIP MAX Buttons
While PIP frame is displayed, press PIP MIN or PIP MAX
button to vary the size of PIP frame.
Procedure PIP
Press @ to display PtP frame.
PIP MIN PIP MAX
Press _ or _ to size PIP frame.
PIP
Press @ to cancel PtP frame.
MAX
Main Picture -- •
Freeze Button PIP and Split)
This feature is used to stop action in PIP or Split frame.
Procedure
PIP SPLIT
Press _ or Q to display PIP or Split frame
PICTURE IN PICTURE AND SPL/T OPERATION
FREEZE
Press _ to stop P_P or Split frame action.
FREEZE
Press _ again to continue action.
PIP SPLIT
Press _ or _ to cancel PIP frame.
Main Picture PIP freeze frame Split freeze frame
Note: Audio is horn Main Picture only.
Main Picture Freeze Feature
This feature is used to stop action of the Main Picture and
display it on a Split or PIP freeze frame.
Procedure FREEZE
TVNCR
To stop action for Main picture, press O while
PIP or Split frame is net displayed.
Main Picture freeze will be displayed in a PIP or Split
frame, depending on the selection in the Freeze menu
located in Picture Other ADJ. section (refer to page 17).
FREEZE
Press _ again to cancel Main Picture freeze
frame.
Note: While Main Picture freeze frame is displayed, only
MOVE button is active for PIP, all other PIP and Split
buttons have no effect (see chart).
PIP, Split and Freeze Mode Buttons Operational chart
This chart indicates the buttons that are operational with
PIP, Split or Main Picture Freeze mode.
PI_MIN ,Size Smaller . No Effect .NoEffect
size Larger NO Effect NOEffect
Freeze PIP Freeze Split DiSplay or
frame Frame Delete
change change NEff
Ch bee , Channnel, o
DiSplayS DiSplays NO Effect
search Frame Search frame
Displays PIP DiSplays PIP No Effect
....... , Frame , frame,
DiSplays Split Displays Split No Effect
Frame frame
Move PiP No Effect MOve
Frame .................... Frame
swap With Main swap With No Effect
SWAP Picture, Main Picture
11e

REMOTE CONTROL OPERATION (FOR MODEL PT-47WX34 ONLY)
Remote Control Operation (For model PT-47WX34 only)
®
12e

REMOTE CONTROL OPERATION (FOR MODEL PT-47WX34 ONLY)
Operating Components with Remote Control
Note: Refer to page 14 for programming Remote Control
procedure.
Operating aVCR
Program the remote control to use with VCR.
Changech_nnels_ptdown
Operating aCABLE BOX
Program the remote control to use with Cable Box.
Operating aDBS
Program the remote control to use with DBS.
i ii ii iiiiiiiiiiiiiiiiiiiiiiiiii iiiii iiiiiiiiiiiiiiiiiiiiiiiiiiiiiiiiiiiiiiiiiii iiiiiiiiiii iiiiiiiiiiiiiiiiiiiiiiiiiiiiiio ii!iiiiiiiiiiiiiiiiiiiiiiiiiiiiiiiiiiiiiiii
.... _ _ _ _ _i_ _ _!__ __i_i__!_i_! ii!_i_iii_i:_!ili__i_ii_i_ii_i_ii_i_i__i!_i!i_ !_!i__ i_i_ i_i
i
Men_ NaVigation
CH
0
Operating aDVD
Program the remote control to use with DVD
FF
Sk!p Search Fast Forward
W/VCR
DVD OpenlCIose
STO_
13e

REMOTE CONTROL OPERATION (FOR MODEL PT-47WX34 ONLY)
Programming The Remote Control
The Universal Remote Control can be programmed to
operate many manufacturers' components, using the
component function buttons for VCR, DVD, CABLE or
DBS. Follow the procedures for programming your Remote
Control with or without a code for the component.
DVD DMD(Preset)Panasonic C0de
Note: Determine the manufacturer of the component and look
in the table for the code (found on page 15}.
Procedure
1. Confirm that the external component is plugged in and
operating.
2. Turn the component off.
ACTION
3. Press O and O together, for at least 5
seconds. After 5 seconds, the illuminated mode
(component) buttons will begin to flash. Release the
ACTtON and POWER buttons.
4. Press appropriate component button on the Remote
Control VCR, DVD, CABLE or DBS. The component
button will illuminate steadily and all others will go out.
5. Enter the 3-digit component code using the Remote
Control numeric keypad (0 ~ 9 buttons). The component
button will blink twice.
6. Press the Remote Control to test the
component. If the procedure was successful, the
component will turn on and the component key will blink
twice and then go out.
Note: If the component does not operate with the Remote
Control, repeat the steps 3 through 6 using another code
(some brands have multiple codes.). If an incorrect code
is entered, or if the procedure takes longer than 30
seconds, the programming will fail.
Programming Without ACode
This procedure searches all codes and is called the
%equence method."
1. Confirm that the external component is plugged in and
on.
2. Turn the component off.
ACTION
3. Press O and together, for at least 5
seconds. After 5 seconds, the illuminated mode
(component) buttons will begin to flash. Release the
ACTtON and POWER buttons.
4. Press appropriate component button on the Remote
Control. The component button will illuminate steadily
and all others will go out.
5. Press the _ button to set the remote control into
the step and set mode.
6. Point the remote control towards the component.
7. Press VOL I_ (the mode key will blink three times), then
the Remote Control O button to test thepress
component. Continue this process until the proper code
is found, ffthe procedure was successful, the component
will turn on.
Note: Each time you press the VOL I_ bul_on, make suro thai lhe
componen_ key blinks twice before pressing lhe POWER
bul_on.
ACTfON
8. Once the device responds, press _ to store the
code. The mode (component) button will blink twice.
Note: it may take many attempts before the correct code
is found. If you miss a code, press <1 VOL then press
the _button to test the component.
Cam ponent Codes
The Universal Remote Control is capable of operating
many component brands after entering a code. Some
components may not operate because the codes are not
available due to limited memory. The Universal Remote
Control does not control all features found in each model.
VCR CABLE DVD
iiiiiiiii iiiiiiii iiiiiiii iiiiiii
....... DBS
14e

Gem portent Codes (cont.)
REMOTE CONTROL OPERATION (FOR MODEL PT-47WX34 ONLY)
re=* •_ •
31_ 315 3_329
.i=
_Ude
!
_hi!i_
323
Br0ks0nio 3201326 Quasar '32i 322i 323_ 324
................. _5 _9 32_ 33_
aCE 343
)imet',sia, 345 SanY_
1305307303309 : i_ _
Eisher 13_3 II
.......................................................................IIs_a_ 3oo
308
GE, 324 3_3i 3_5
nSbiutorn ,317
33_....................................
Singer
Instant .................323 324............. SOn
Replay ,, ,,
sytvania 331324331
3IQ _11 334339
....Tatung
321; 322i 323_ 324
Marantz 3101311,339 301346
_8
................................_ ,,
356344
Multitec_ 30_ _47
Olympic 323324
Orion 320_ 326
_24
Archer 225232
Citizen .205;222
Eastern ,234
2_2; 218,
Memel_x ,230
206i 207i
F'hilips .228; 22&
205232
RCA 12!5
212; 2"18i
2._9
S_i_tifi_Xi_ 2_2_=,.........
SprUce_ 205210
Teleview .201; 205
Tocom 1235
Unika 225i 232
¢id_O_aY 206
200;217
_t_iii_6 ...........
DJshNetwOtk _05 115_tt6
E×presS _U 105, !15
;E
_,!,(Genera!............o8.........................
112
_agaavox
_hilips ,I01; t02
_r#Scaa _06;]09 110
[oshiba 100
-- m
Denon , t00
JVC , 109
_!_#i_ i .
Nerdmend_
_hilips .t03
_CA , 101
30ny
Thomson .101
famaha 100
15e

REMOTE CONTROL OPERATION (FOR MODELS PT-47WX54 AND PT-53WX54 ONLY)
Remote Control Operation (For models PT-47WX54 and PT-53WX54 only)
ASPECT TVN|DEQ
SAP
ACTION
MENU
EXIT
O
EUR7603Z9A
\
16e

REMOTE CONTROL OPERATION (FoR MODELS PT-47WX54 AND PT-53WX54 ONLY)
Operating Components with Remote Control
Note: Refer to page 19 for programming Remote Control
procedure.
Operating aVCR
Program the remote control to use with VCR.
i_i_;i_i;_i_i!_!;_Ri ¸ :_ _
PtPCH
' ¸¸¸¸¸¸¸¸¸¸¸¸¸¸¸¸¸¸¸¸¸¸¸¸¸¸¸¸¸¸¸¸¸pLAy¸¸¸¸¸¸¸¸¸¸¸¸¸¸¸¸¸¸¸¸¸¸¸¸¸¸¸¸¸¸¸¸¸
i
iF_t_iF_i_iiiii_ii_ii_ii_ii_ii_i_i_i_i_i_i_i_i_i_i_i_i_i_i_i_ii_i_i_iiiii_ii_ii_ii_ii_ii_ii_ii_ii_ii_ii_ii_ii_ii_i_iiiii_ii_ii_ii_ii_ii_ii_ii_ii_ii_ii_ii_ii_ii_i
I PAUSE
ii_;iiiiii°°ii_ii_;!i;_iiiiiiiiiiiiiiiiiiiii'ii!iiiiiiiiiiiiiiiiiiiiiiiiiii"_Liiiiiiiiiiiiiiiiiiiiiiiiiiiii
Operating aCABLE BOX
Program the remote control to use with Cable Box.
, i_i_ I_I
!iiiiiiiil!!i!!!iiili!ii!!iii!iii!i!ii!ii!ii!_iiii¸¸¸flailii_i!_!iii_i_ii!_i!ii_Oii_!_iii_!®ii_iiii_!ii_ii@_iliiiii_iii_i_i!i_ililiiii
iis_i_ _ilc!_ __i¸ililiiliiliiii_ii!!¸iiiiii!_ill
Change chasnels Upl[:)0Wn CH
i i
Operating aDBS
Program the remote control to use with DBS.
Operating a DVD
Program the remote control to use with DVD.
17e

REMOTE CONTROL OPERATION (FOR MODELS PT-47WX54 AND PT-53WX54 ONLY)
Operating a DTV Set Top Box
Pro ram the remote control to use with DTV.
::,,
II R-TUFt_
Operating a Cassette Deck
To operate a cassette deck, the remote control must be in
AUX mode and be programmed with the appropriate code
for your equipment.
PAUSE
P_u_ I...........
Operating aReceiver
Pro ram the remote to operate audio receiver.
Press Remote numeric
AV _ress;2
AM3
compo_nts TUNER PreSS6
PHONO PreSS7
FAPE PreSS8
', AU× PreSs9
PIP MAX
ii
I
Operating a PVR (Personal Video Recorder)
Program the remote control to use with aPVR.
........... PLAY
i
!i! ! i ili! i ii ilililil ¸ !iii !_ ! i ¸
18e
This manual suits for next models
2
Table of contents
Other Panasonic Projection Screen manuals