manuals.online logo
Brands
  1. Home
  2. •
  3. Brands
  4. •
  5. Panasonic
  6. •
  7. Security Camera
  8. •
  9. Panasonic BB-HCM381 User manual

Panasonic BB-HCM381 User manual

MNVKDBH24050_0707
Il produttore declina ogni responsabilità per eventuali danni derivanti da un uso improprio delle
apparecchiature menzionate in questo manuale. Si riserva inoltre il diritto di modificarne il contenuto senza
preavviso. Ogni cura é stata posta nella raccolta e nella verifica della documentazione contenuta in questo
manuale, tuttavia il produttore non può assumersi alcuna responsabilità derivante dall’utilizzo della stessa.
Lo stesso dicasi per ogni persona o società coinvolta nella creazione e nella produzione di questo manuale.
The manufacturer declines all responsibility for any damage caused by an improper use of the
appliances mentioned in this manual. Furthermore, the manufacturer reserves the right to modify
its contents without any prior notice. The documentation contained in this manual has been collected
with great care, the manufacturer, however, cannot take any liability for its use. The same thing can
be said for any person or company involved in the creation and production of this manual.
Le producteur décline toute responsabilité pour les dommages éventuels dus à une utilisation non appropriée
des appareils mentionnés dans ce manuel. On réserve en outre le droit d’en modifier le contenu sans préavis.
La documentation contenue dans ce manuel a été rassemblée et vérifiée avec le plus grand soin, cependant,le
producteur ne peut pas s’assumer aucune responsabilité dérivante de l’emploi de celle-là. La même chose
vaut pour chaque personne ou société impliquées dans la création et la production de ce manuel.
Der Hersteller lehnt jede Haftung für eventuelle Schäden ab, die aufgrund unsachgemäßer Anwendung
der in diesem Handbuch erwähnten Geräte entstanden ist. Ferner behält er sich das Recht vor, den Inhalt
ohne Vorkündigung abzuändern. Die Dokumentation in diesem Handbuch wurde sorgfältig ausgeführt und
überprüft, dennoch kann der Hersteller keine Haftung für die Verwendung übernehmen. Dasselbe gilt für jede
Person oder Gesellschaft, die bei der Schaffung oder Produktion von diesem Handbuch miteinbezogen ist.
ITALIANO ENGLISH
FRANCAIS DEUTSCH
7
10
9
11
12
13
Fig. 5
230V AC IN
230V AC
POWER SUPPLY OUT
230V AC OUT
Fig. 6
Bedienungsanweisung
Manuel d’instructions
Operating instructions
Manuale istruzioni
Kit d’installazione per telecamera network PTZ
PANASONIC BB-HCM381
Installation kit for PTZ network camera
PANASONIC BB-HCM381
Kit d’installation pour PTZ caméra réseau motorisée
PANASONIC BB-HCM381
Installationskit für PTZ Netzwerk Kamera
PANASONIC BB-HCM381
INSTALLAZIONE:
È necessario collegare il cavetto di messa a terra (giallo-verde) dalla
scheda elettrica alla connessione predisposta all’interno della custodia a.
Evitare che il cavo di alimentazione sia vicino alla resistenza del
riscaldamento.
Sulla linea di alimentazione della telecamera, occorre inserire a monte
un interruttore generale onnipolare 1 0 (con distanza di apertura dei
contatti d>3 mm). Tale interruttore deve essere utilizzato come mezzo
di separazione dell'alimentazione prima di eseguire qualsiasi operazione
di manutenzione o apertura dell'involucro.
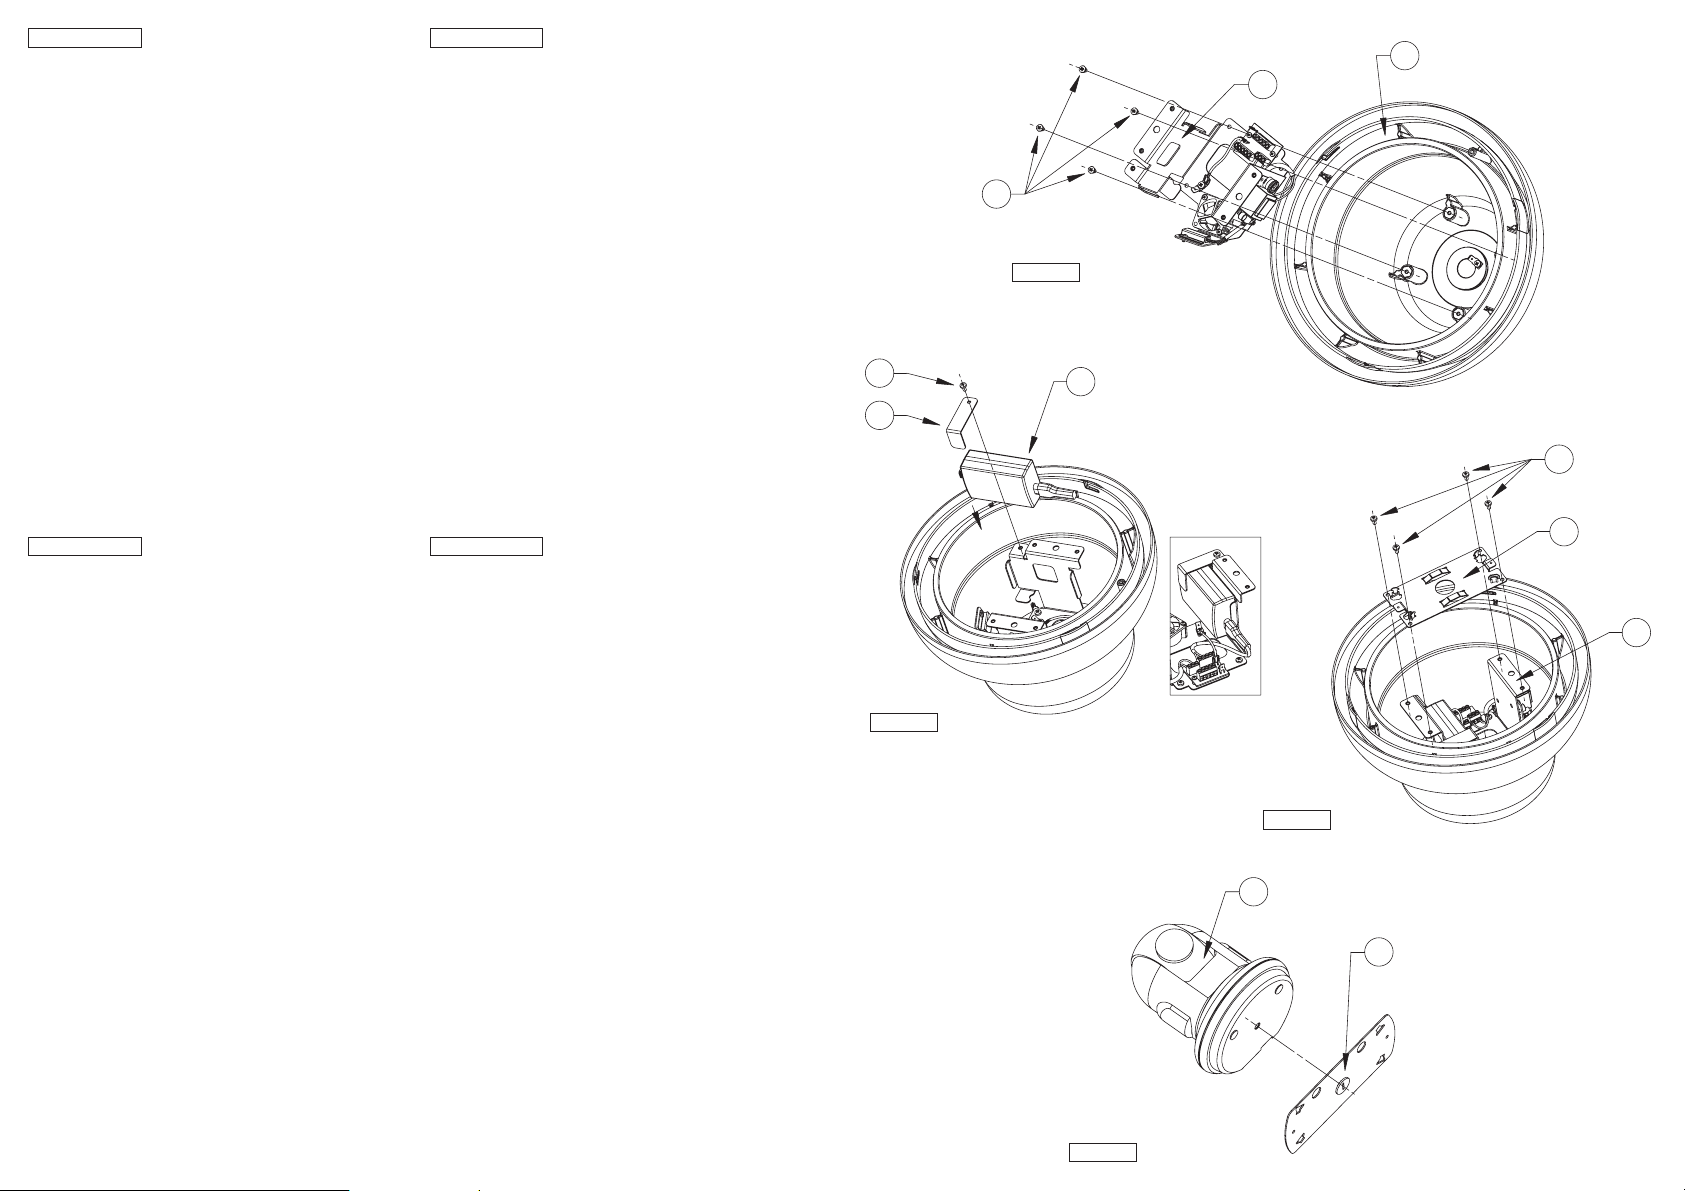
L'alimentatore (4) e le piastre (7 e 10) sono in dotazione con la
telecamera network.
• Fissare la piastra di riscaldamento (2), con i circuiti precedentemente cablati, alla
custodia a sfera (1) tramite le viti di fissaggio (3)
• Inserire l’alimentatore (4) nell’apposito alloggiamento e fissarlo tramite l’apposita
piastrina (5) e vite (6). L’alimentatore e il circuito risulteranno connessi tramite i
morsetti indicati nello schema in Fig. 6.
• Fissare la piastra B (7) alla piastra di riscaldamento (2) tramite le viti (8).
• Fissare la telecamera network (9) sulla piastra A (10).
• Allineare le 4 lamelle (13) sulla piastra B (7) con le 4 asole (12) della piastra A
(10). Una volta centrate effettuare una leggera rotazione della telecamera network
finche’ le lamelle verranno bloccate nelle rispettive asole. A questo punto è possibile
fissare le viti di sicurezza (11).
INSTALLATION:
The earth cable (yellow-green) must be connected from the electrical
board to the connection provided inside the housing a.
Keep the power supply cable well away from the heating
resistance.
Upstream of the power supply line dedicated to the camera, it is
necessary to insert a universal omnipolar 1 0 switch (with open
contact distance d>3 mm). This switch must be used to disconnect
the power supply before carrying out any maintenance operation or
opening the case.
The power supply (4) and the plates (7 and 10) are supplied with the
camera network.
• Fix the heater plate (2), with the previously wired circuits, to the dome housing (1)
using the fastening screws (3).
• Insert the heater (4) in the specific holder and fix it using the plate (5) and the
screw supplied (6). The heater and the circuit will be connected by the terminals
shown in the diagram in Fig. 6.
• Fix the B plate (7) to the heater plate (2) using the screws (8).
• Fix the network camera (9) to the A plate (10).
• Align the 4 blades (13) on the B plate (7) with the 4 keyhole slots (12) of the
A plate (10). When they have been centred, turn the network camera slightly
until the blades are locked into their respective slots. At this point fix the safety
screws (11).
INSTALLATION:
Il est nécessaire de connecter le câble de mise à la terre (jaune-vert) de
la carte électrique à la connexion prévue à l’intérieur du caisson a.
Éviter que le câble d’alimentation se trouve à proximité de la
résistance.
En amont de la ligne d’alimentation spécifique de la caméra, installer un
interrupteur général omnipolaire 1 0 (distance d’ouverture des contacts
d>3 mm). Cet interrupteur doit être utilisé comme moyen de séparation
de l’alimentation avant de procéder à toute intervention d’entretien ou
d’ouverture du caisson.
L'alimentation (4) et les plaques (7 et 10) sont fournis avec la caméra
réseau motorisée.
• Fixer la plaque de chauffage (2) avec les circuits prè-câblés au caisson sphérique (1)
au moyen des vis de blocage (3).
• Insérer l’alimentation (4) dans le logement prévu et le fixer en utilisant la plaquette
(5) et la vis (6). L’alimentation et le circuit sont connectés au moyen des bornes
indiqués comme dans le schema en Fig. 6.
• Fixer la plaque B (7) a la plaque de chauffage (2) en utilisant les vis (8).
• Fixer la caméra réseau motorisée (9) sur la plaque A (10).
• Aligner les 4 lamelles (13) sur la plaque B (7) avec les 4 orifices-fentes (12) de la
plaque A (10). Après les avoir centrées, faire subir au caméra réseau motorisée
un léger mouvement de rotation jusqu'à bloquer les lamelles dans les fentes
correspondantes. Fixer ensuite la vis de sûreté (11).
INSTALLATION:
Man muß das Erdungskabel (gelb-grün) von der Elektrokarte zum
vorbereiteten Anschluß im Gehäuseinnern gelegt werden a.
Es sollte vermieden werden, daß das Versorgungskabel in der Nähe des
Heizwiderstandes liegt.
Der kameraeigenen Versorgungsleitung ist ein allpoliger Hauptschalter
1 0 (mit Kontaktabstand d>3 mm) vorzuschalten. Mit diesem Schalter
ist die Versorgung zu unterbrechen, bevor Wartungen ausgeführt oder
die Hülle geöffnet wird.
Das Netzteil (4) und die Heizplatten (7 und 10) werden mit der
Netzwerk Kamera vorgesehen.
• Die Heizplatte (2), mit den zuvor verdrahteten Schaltungen, mit den
Befestigungsschrauben (3) am Kugelgehäuse (1) fixieren.
• Das Netzteil (4) im dazu bestimmten Sitz einfügen und das mit dem
mitgelieferten Plättchen (5) und Schraube (6) fixeren. Das Netzteil und der
Schaltkreis sind durch den Klemmen angeschlossen, die im Schema der Fig. 6
dargestellt sind.
• Die Platte B (7) an der Heizplatte (2) durch die Schrauben (8) fixieren.
• Die Netzwerk Kamera (9) an der Platte A (10) fixieren.
• Die 4 Lamellen (13) der Platte B (7) mit den 4 Löcher (12) der Platte A (10)
ausrichten. Wenn die zentriert sind, eine leichte Drehung der Netzwerk Kamera
machen, bis die Lamellen in den betreffenden Löcher blockiert werden sein. Jetzt ist
es möglich, die Sichereitsschrauben (11) zu befestigen.
ITALIANO ENGLISH
FRANCAIS DEUTSCH
1
2
3
Fig. 1
4
6
5
Fig. 2
2
7
8
Fig. 3
10
9
Fig. 4

Other manuals for BB-HCM381

4

Other Panasonic Security Camera manuals

Panasonic WV-CF284T User manual

Panasonic

Panasonic WV-CF284T User manual

Panasonic Super Dynamic III WV-CP484 User manual

Panasonic

Panasonic Super Dynamic III WV-CP484 User manual

Panasonic WV-SW458 User manual

Panasonic

Panasonic WV-SW458 User manual

Panasonic WV-SPW531AL Operating manual

Panasonic

Panasonic WV-SPW531AL Operating manual

Panasonic WV-NF302E User manual

Panasonic

Panasonic WV-NF302E User manual

Panasonic BL-C1A - Network Camera User manual

Panasonic

Panasonic BL-C1A - Network Camera User manual

Panasonic WV-CW324LE Series User manual

Panasonic

Panasonic WV-CW324LE Series User manual

Panasonic WV-SW316 User manual

Panasonic

Panasonic WV-SW316 User manual

Panasonic WV-CS580 User manual

Panasonic

Panasonic WV-CS580 User manual

Panasonic aw-he40 series User manual

Panasonic

Panasonic aw-he40 series User manual

Panasonic WV-CP300 Series User manual

Panasonic

Panasonic WV-CP300 Series User manual

Panasonic WV-CL930 Series User manual

Panasonic

Panasonic WV-CL930 Series User manual

Panasonic Super Dynamic III WV-CW960 User manual

Panasonic

Panasonic Super Dynamic III WV-CW960 User manual

Panasonic WV-CW970 User manual

Panasonic

Panasonic WV-CW970 User manual

Panasonic WV-SW395 User manual

Panasonic

Panasonic WV-SW395 User manual

Panasonic BL-C10A - Network Camera - Pan User manual

Panasonic

Panasonic BL-C10A - Network Camera - Pan User manual

Panasonic WV-BS500 User manual

Panasonic

Panasonic WV-BS500 User manual

Panasonic WV-NP304 User manual

Panasonic

Panasonic WV-NP304 User manual

Panasonic WV-CP504 User manual

Panasonic

Panasonic WV-CP504 User manual

Panasonic WV-SUD638 User manual

Panasonic

Panasonic WV-SUD638 User manual

Panasonic WV-CP240EX User manual

Panasonic

Panasonic WV-CP240EX User manual

Panasonic WV-SUD638 Operating manual

Panasonic

Panasonic WV-SUD638 Operating manual

Panasonic BL-VT164W User manual

Panasonic

Panasonic BL-VT164W User manual

Panasonic WV-TW310L User manual

Panasonic

Panasonic WV-TW310L User manual

Popular Security Camera manuals by other brands

Novus NVIP-2VE-4201/PIR quick start guide

Novus

Novus NVIP-2VE-4201/PIR quick start guide

Steren CCTV-197 instruction manual

Steren

Steren CCTV-197 instruction manual

Iget HGNVK-48302 quick start guide

Iget

Iget HGNVK-48302 quick start guide

Novus NVIP-4VE-4202M user manual

Novus

Novus NVIP-4VE-4202M user manual

Vivotek FD8179-H Quick installation guide

Vivotek

Vivotek FD8179-H Quick installation guide

Camsoy Smart Life Camera S1 user manual

Camsoy

Camsoy Smart Life Camera S1 user manual

LG LVC-SX701OC instruction manual

LG

LG LVC-SX701OC instruction manual

TBK vision TBK-MD5707IR36 user manual

TBK vision

TBK vision TBK-MD5707IR36 user manual

Time2 Outdoor Camera PC Quick setup guide

Time2

Time2 Outdoor Camera PC Quick setup guide

Messoa SCB290-HN5 instruction manual

Messoa

Messoa SCB290-HN5 instruction manual

Airlink101 AIC250 user manual

Airlink101

Airlink101 AIC250 user manual

Bolin Technology FEX30BHD-RNP2 user manual

Bolin Technology

Bolin Technology FEX30BHD-RNP2 user manual

Tellur TLL331391 user manual

Tellur

Tellur TLL331391 user manual

TKH security TKIP55F5S user manual

TKH security

TKH security TKIP55F5S user manual

ACTi Q115 Hardware manual

ACTi

ACTi Q115 Hardware manual

Honeywell VSD-361P Operation manual

Honeywell

Honeywell VSD-361P Operation manual

Axis Axis 210A Specifications

Axis

Axis Axis 210A Specifications

Hitachi KP-D5010 Specifications

Hitachi

Hitachi KP-D5010 Specifications

manuals.online logo
manuals.online logoBrands
  • About & Mission
  • Contact us
  • Privacy Policy
  • Terms and Conditions

Copyright 2025 Manuals.Online. All Rights Reserved.