Owner’s Manual
Amplifier Speaker System
Model No. SC-HTE1
Thank you for purchasing this product.
For optimum performance and safety, please read these instructions carefully.
Please keep this manual for future reference.
If you have any questions, contact:
U.S.A. and Puerto Rico : 1-800-211-PANA (7262)
P
Panasonic Corporation 2012
Printed in China
One Panasonic Way, Secaucus,
New Jersey 07094
http://www.panasonic.com
Panasonic Consumer Marketing
Company of North America,
Division of Panasonic Corporation
of North America
Limited Warranty
(ONLY FOR U.S.A. AND PUERTO RICO)
Panasonic Consumer Marketing Company of North America,
Division of Panasonic Corporation of North America
One Panasonic Way, Secaucus, New Jersey 07094
Panasonic Home Audio Products Limited Warranty
Limited Warranty Coverage
(For USA and Puerto Rico Only)
If your product does not work properly because of a defect in materials or
workmanship, Panasonic Consumer Marketing Company of North America (referred
to as “the warrantor”) will, for the length of the period indicated on the chart below,
which starts with the date of original purchase (“warranty period”), at its option either
(a) repair your product with new or refurbished parts, (b) replace it with a new or a
refurbished equivalent value product, or (c) refund your purchase price. The decision
to repair, replace or refund will be made by the warrantor.
During the “Labor” warranty period there will be no charge for labor. During the
“Parts” warranty period, there will be no charge for parts. This Limited Warranty
excludes both parts and labor for non-rechargeable batteries, antennas, and
cosmetic parts (cabinet). This warranty only applies to products purchased and
serviced in the United States or Puerto Rico. This warranty is extended only to
the original purchaser of a new product which was not sold “as is”.
Carry-In or Mail-In Service
To find a service center please visit http://www.panasonic.com/help or call
1-800-211-PANA (7262).
When shipping the unit, carefully pack, include all supplied accessories listed in
the Owner’s Manual, and send it prepaid, adequately insured and packed well in
a carton box. When shipping Lithium Ion batteries please visit our Web Site at
www.panasonic.com/BatteryHandling as Panasonic is committed to
providing the most up to date information. Include a letter detailing the
complaint, a return address and provide a daytime phone number where you
can be reached. A valid registered receipt is required under the Limited
Warranty.
IF REPAIR IS NEEDED DURING THE WARRANTY PERIOD, THE
PURCHASER WILL BE REQUIRED TO FURNISH A SALES RECEIPT/
PROOF OF PURCHASE INDICATING DATE OF PURCHASE, AMOUNT
PAID AND PLACE OF PURCHASE. CUSTOMER WILL BE CHARGED
FOR THE REPAIR OF ANY UNIT RECEIVED WITHOUT SUCH PROOF OF
PURCHASE.
Limited Warranty Limits And Exclusions
This warranty ONLY COVERS failures due to defects in materials or
workmanship, and DOES NOT COVER normal wear and tear or cosmetic
damage. The warranty ALSO DOES NOT COVER damages which occurred in
shipment, or failures which are caused by products not supplied by the
warrantor, or failures which result from accidents, misuse, abuse, neglect,
mishandling, misapplication, alteration, faulty installation,
set-up adjustments, misadjustment of consumer controls, improper
maintenance, power line surge, lightning damage, modification, introduction of
sand, humidity or liquids, commercial use such as hotel, office, restaurant, or
other business or rental use of the product, or service by anyone other than a
Factory Service Center or other Authorized Servicer, or damage that is
attributable to acts of God.
THERE ARE NO EXPRESS WARRANTIES EXCEPT AS LISTED UNDER
“LIMITED WARRANTY COVERAGE”.
THE WARRANTOR IS NOT LIABLE FOR INCIDENTAL OR
CONSEQUENTIAL DAMAGES RESULTING FROM THE USE OF THIS
PRODUCT, OR ARISING OUT OF ANY BREACH OF THIS WARRANTY.
(As examples, this excludes damages for lost time, travel to and from the
servicer, loss of or damage to media or images, data or other memory or
recorded content. The items listed are not exclusive, but for illustration only.)
ALL EXPRESS AND IMPLIED WARRANTIES, INCLUDING THE
WARRANTY OF MERCHANTABILITY, ARE LIMITED TO THE PERIOD OF
THE LIMITED WARRANTY.
Some states do not allow the exclusion or limitation of incidental or
consequential damages, or limitations on how long an implied warranty lasts, so
the exclusions may not apply to you.
This warranty gives you specific legal rights and you may also have other rights
which vary from state to state. If a problem with this product develops during or
after the warranty period, you may contact your dealer or Service Center. If the
problem is not handled to your satisfaction, then write to the warrantor’s
Consumer Affairs Department at the addresses listed for the warrantor.
PARTS AND SERVICE, WHICH ARE NOT COVERED BY THIS LIMITED
WARRANTY, ARE YOUR RESPONSIBILITY.
As of January 2012
Product or Part Name Parts Labor
Audio Products (except items below) 1 year 1 year
DVD Home Theater System 1 year 1 year
Home Theater Audio System 1 year 1 year
SD Memory Cards, Rechargeable Battery
Packs (defective exchange)
90 days Not
Applicable
Customer Services Directory (United States and Puerto Rico)
Obtain Product Information and Operating Assistance; locate your
nearest Dealer or Service Center; purchase Parts and Accessories;
or make Customer Service and Literature requests by visiting our
Web Site at:
http://www.panasonic.com/help
or, contact us via the web at:
http://www.panasonic.com/contactinfo
You may also contact us directly at:
1-800-211-PANA (7262)
Monday-Friday 9am-9pm,
Saturday-Sunday 10am-7pm EST
For hearing or speech impaired TTY users, TTY: 1-877-833-8855
Accessory Purchases (United States and Puerto Rico)
Purchase Parts, Accessories and Instruction Books online for all Panasonic
Products by visiting our Web Site at:
http://www.pstc.panasonic.com
Or, send your request by E-mail to:
You may also contact us directly at:
1-800-332-5368 (Phone) 1-800-237-9080 (Fax Only)
(Monday-Friday 9am-9pm EST)
Panasonic National Parts Center
20421 84th Ave. S., Kent, WA 98032
(We accept Visa, MasterCard, Discover Card, American Express)
For hearing or speech impaired TTY users, TTY: 1-866-605-1277
The model number and serial number of this product can be found on
the back of the unit.
Please note them in the space provided below and keep for future
reference.
MODEL NUMBER SC-HTE1
SERIAL NUMBER
User memo:
DATE OF PURCHASE
DEALER NAME
DEALER ADDRESS
TELEPHONE NUMBER
IMPORTANT SAFETY INSTRUCTIONS
Read these operating instructions carefully before using the unit. Follow the safety instructions on the unit and the applicable safety
instructions listed below. Keep these operating instructions handy for future reference.
1 Read these instructions.
2 Keep these instructions.
3 Heed all warnings.
4 Follow all instructions.
5 Do not use this apparatus near water.
6 Clean only with dry cloth.
7 Do not block any ventilation openings. Install in accordance
with the manufacturer’s instructions.
8 Do not install near any heat sources such as radiators, heat
registers, stoves, or other apparatus (including amplifiers)
that produce heat.
9 Do not defeat the safety purpose of the polarized or
grounding-type plug. A polarized plug has two blades with
one wider than the other.
A grounding-type plug has two blades and a third grounding
prong. The wide blade or the third prong are provided for
your safety. If the provided plug does not fit into your outlet,
consult an electrician for replacement of the obsolete outlet.
10 Protect the power cord from being walked on or pinched
particularly at plugs, convenience receptacles, and the point
where they exit from the apparatus.
11 Only use attachments/accessories specified by the
manufacturer.
12 Use only with the cart, stand, tripod,
bracket, or table specified by the
manufacturer, or sold with the apparatus.
When a cart is used, use caution when
moving the cart/apparatus combination to
avoid injury from tip-over.
13 Unplug this apparatus during lightning
storms or when unused for long periods of time.
14 Refer all servicing to qualified service personnel. Servicing is
required when the apparatus has been damaged in any way,
such as power-supply cord or plug is damaged, liquid has
been spilled or objects have fallen into the apparatus, the
apparatus has been exposed to rain or moisture, does not
operate normally, or has been dropped.
Unit
≥To reduce the risk of fire, electric shock or product damage,
jDo not expose this unit to rain, moisture, dripping or
splashing.
jDo not place objects filled with liquids, such as vases, on this
unit.
jUse only the recommended accessories.
jDo not remove covers.
jDo not repair this unit by yourself. Refer servicing to qualified
service personnel.
Button-type battery (Lithium battery)
≥Risk of fire, explosion and burns. Do not disassemble, heat
above 60 oC (140 oF) or incinerate.
Unit
≥Do not place sources of naked flames, such as lighted candles,
on this unit.
Placement
≥To reduce the risk of fire, electric shock or product damage,
jDo not install or place this unit in a bookcase, built-in cabinet
or in another confined space. Ensure this unit is well
ventilated.
jDo not obstruct this unit’s ventilation openings with
newspapers, tablecloths, curtains, and similar items.
Button-type battery (Lithium battery)
≥Danger of explosion if battery is incorrectly replaced. Replace
only with the type recommended by the manufacturer.
≥When disposing the batteries, please contact your local
authorities or dealer and ask for the correct method of disposal.
≥Insert with poles aligned.
≥Do not touch the terminals (iand j) with metal objects.
≥Do not recharge, disassemble, remodel, heat or throw into fire.
≥Keep out of reach of children.
≥Mishandling of batteries can cause electrolyte leakage and
may cause a fire.
jRemove the battery if you do not intend to use the remote
control for a long period of time. Store in a cool, dark place.
≥Do not heat or expose to flame.
≥Do not leave the battery(ies) in a car exposed to direct sunlight
for a long period of time with doors and windows closed.
-If you see this symbol-
WARNING
If any electrolyte should come into contact with your hands or
clothes, wash it off thoroughly with water.
If any electrolyte should come into contact with your eyes, never
rub the eyes. Rinse eyes thoroughly with water, and then
consult a doctor.
<For USA-California only>
This product contains a CR Coin Cell Lithium Battery which
contains Perchlorate Material sspecial handling may apply.
See www.dtsc.ca.gov/hazardouswaste/perchlorate.
CAUTION
FCC Note:
This equipment has been tested and found to comply
with the limits for a Class B digital device, pursuant to
Part 15 of the FCC Rules.
These limits are designed to provide reasonable
protection against harmful interference in a residential
installation. This equipment generates, uses, and can
radiate radio frequency energy and, if not installed and
used in accordance with the instructions, may cause
harmful interference to radio communications.
However, there is no guarantee that interference will
not occur in a particular installation. If this equipment
does cause harmful interference to radio or television
reception, which can be determined by turning the
equipment off and on, the user is encouraged to try to
correct the interference by one or more of the following
measures:
≥Reorient or relocate the receiving antenna.
≥Increase the separation between the equipment and
receiver.
≥Connect the equipment into an outlet on a circuit
different from that to which the receiver is connected.
≥Consult the dealer or an experienced radio/TV
technician for help.
FCC Caution: To assure continued compliance, follow
the attached installation instructions and use only
shielded interface cables when connecting to
peripheral devices.
Any changes or modifications not expressly approved
by the party responsible for compliance could void the
user’s authority to operate this equipment.
This device complies with Part 15 of the FCC Rules.
Operation is subject to the following two conditions:
(1) This device may not cause harmful interference,
and
(2) this device must accept any interference received,
including interference that may cause undesired
operation.
Responsible Party:
Panasonic Corporation of North America
One Panasonic Way, Secaucus, NJ 07094
Support Contact:
Panasonic Consumer Marketing Company of North
America
Telephone No.: 1-800-211-PANA (7262)
Information on Disposal in other Countries outside the European Union
This symbol is only valid in the European Union.
If you wish to discard this product, please contact your local authorities or dealer and ask for
the correct method of disposal.
The lightning flash with arrowhead symbol, within an
equilateral triangle, is intended to alert the user to the
presence of uninsulated “dangerous voltage” within
the product’s enclosure that may be of sufficient
magnitude to constitute a risk of electric shock to persons.
CAUTION
CAUTION :
TO REDUCE THE RISK OF ELECTRIC
SHOCK, DO NOT REMOVE SCREWS.
NO USER-SERVICEABLE PARTS
INSIDE.
REFER SERVICING TO QUALIFIED
SERVICE PERSONNEL.
The exclamation point within an equilateral triangle is
intended to alert the user to the presence of important
operating and maintenance (servicing) instructions in
the literature accompanying the appliance.
RISK
OF
ELECTRIC
SHOCK
DO
NOT
OPEN
Caution
≥The amplifier and supplied speakers are to be used only
as indicated in these instructions. Failure to do so may
lead to damage to the amplifier and/or the speakers, and
may result in the risk of fire. Consult a qualified service
person if damage has occurred or if you experience a
sudden change in performance.
≥Do not attempt to attach these speakers to a wall using
methods other than those described in this manual.
As an ENERGY STAR Partner,
Panasonic
has determined that this product meets the
ENERGY STAR guidelines for energy
efficiency.
®
®
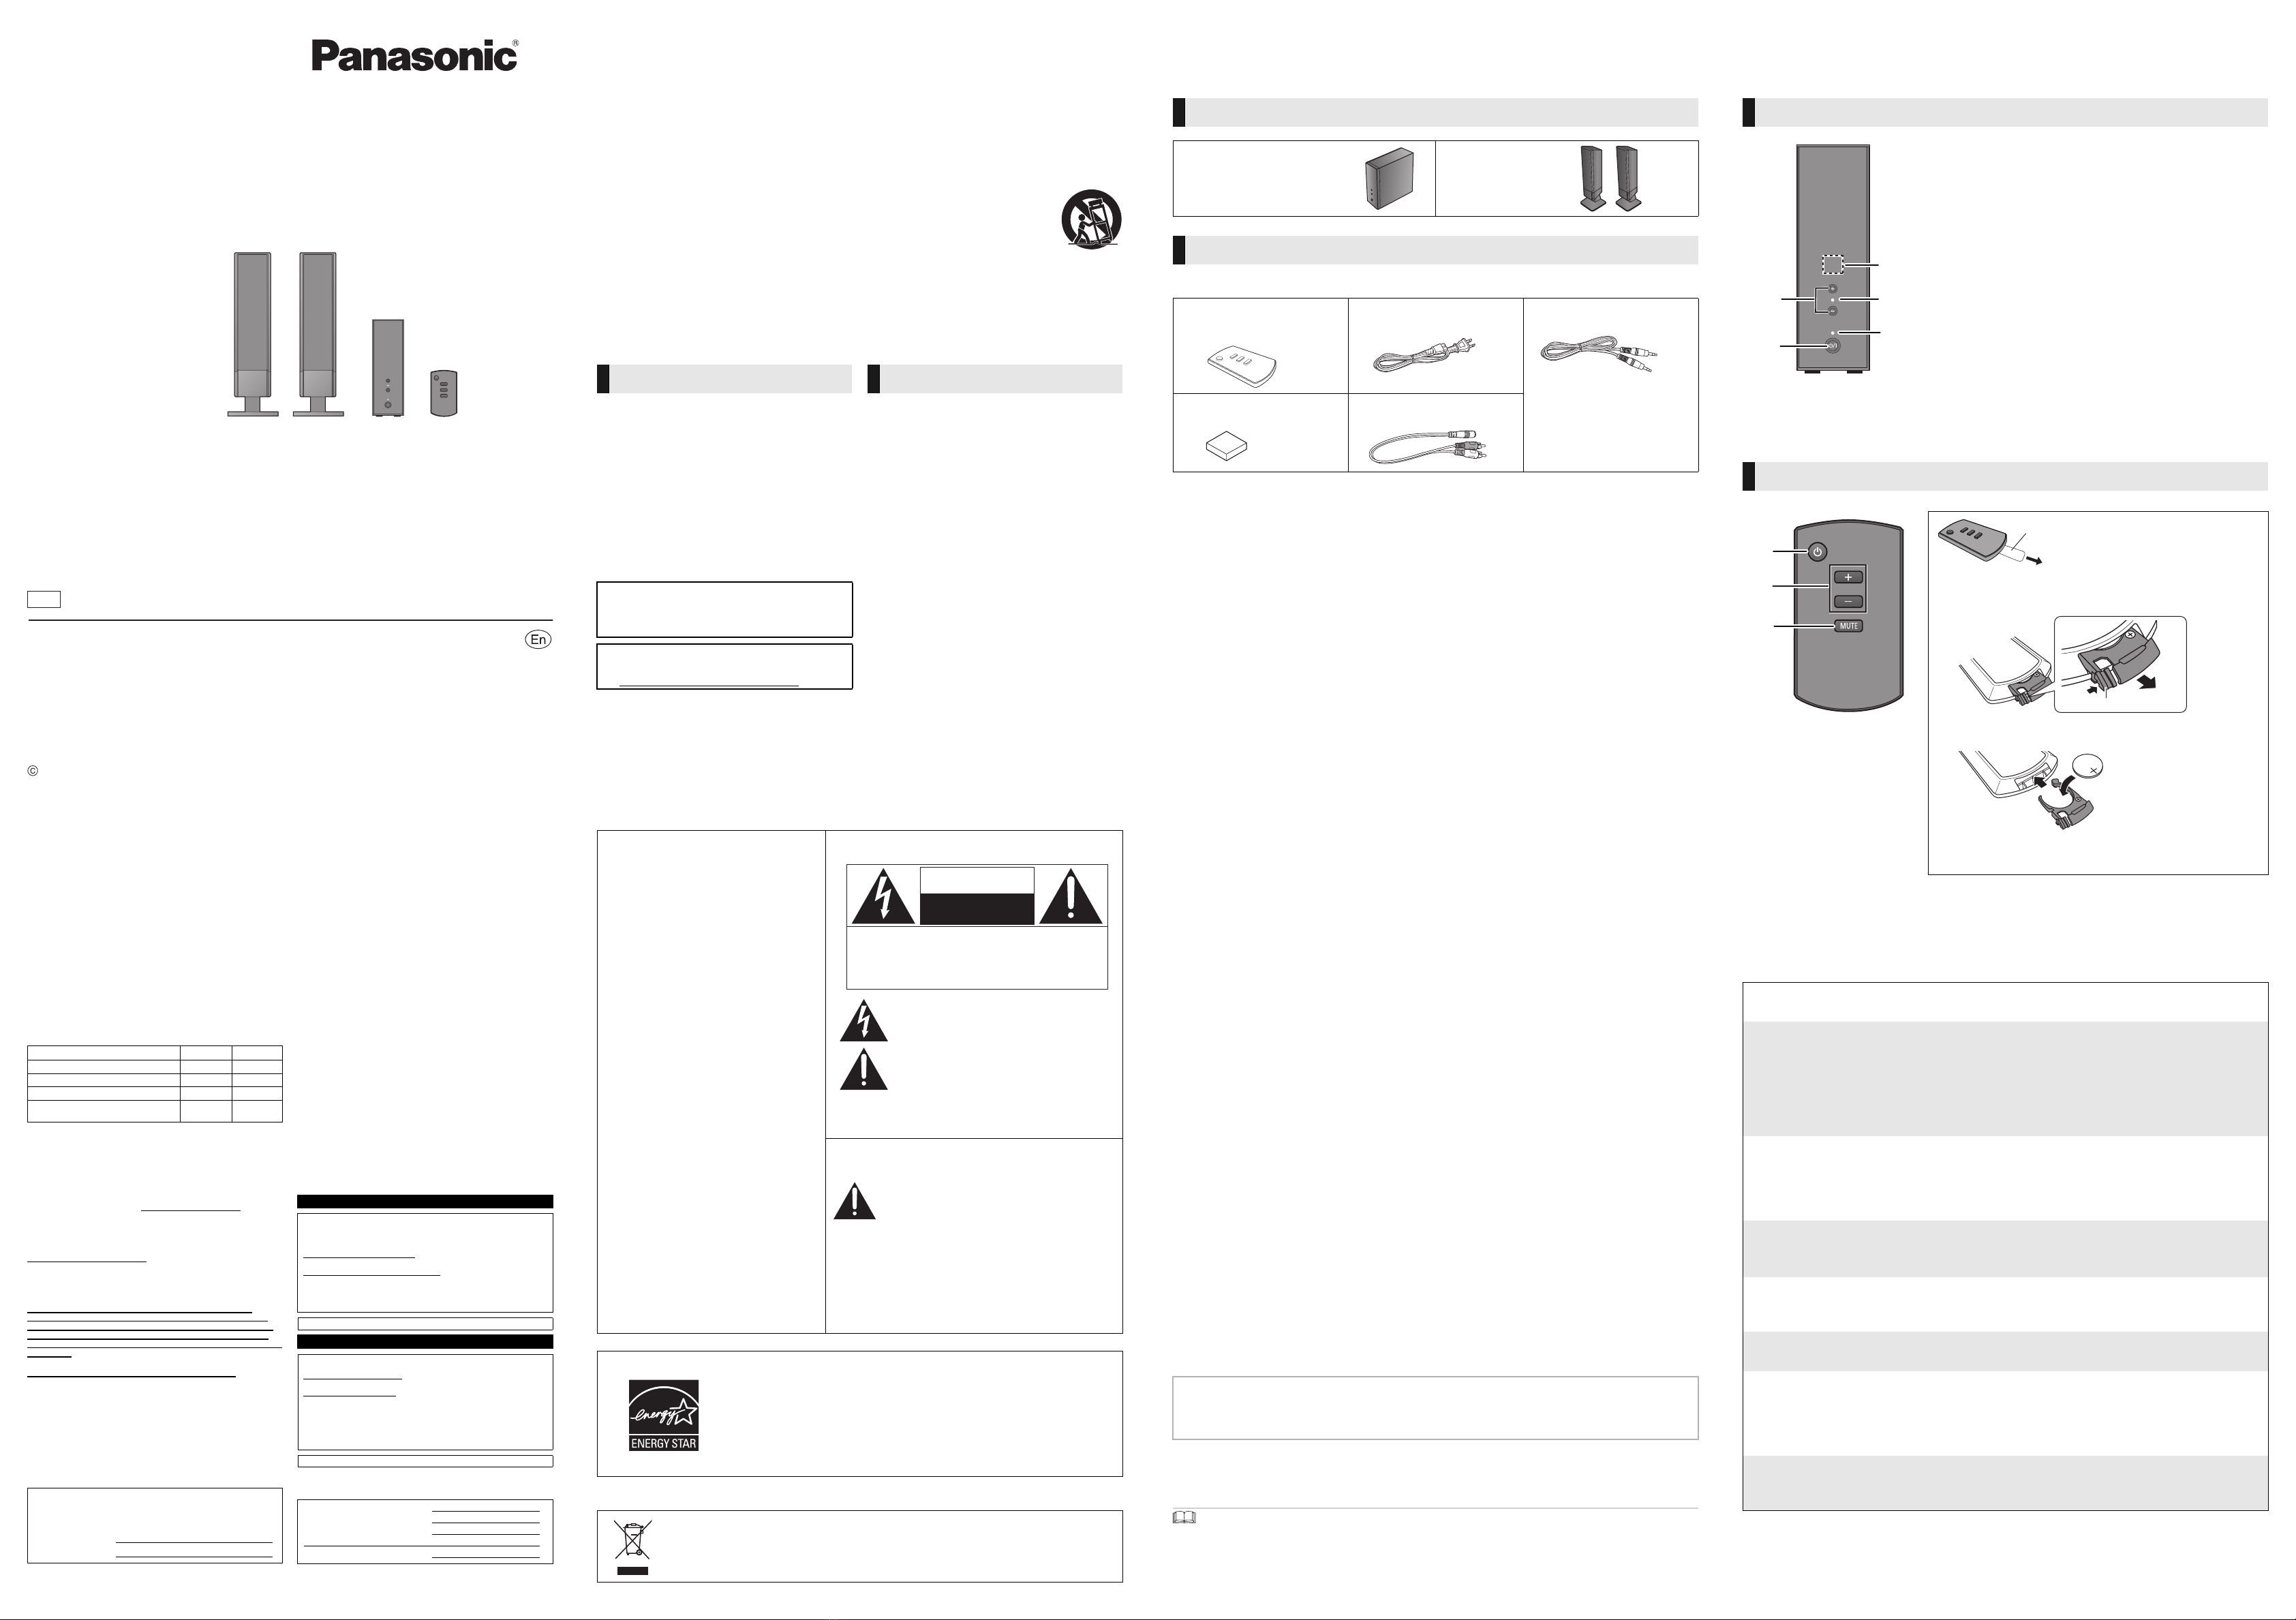
Supplied items
Check the supplied accessories before using the unit.
≥Product numbers are correct as of March 2012. These may be subject to change.
≥To order accessories, refer to “Accessory Purchases (United States and Puerto Rico)”
in “Limited Warranty
(ONLY FOR U.S.A. AND PUERTO RICO)”
.
≥The supplied AC power supply cord is for use with the amplifier. Do not use it with other equipment. Also, do
not use cords for other equipment with the amplifier.
≥Properly dispose of the packaging materials after taking out the products.
≥Keep the small parts out of reach of children.
≥The illustrations shown may differ from the actual unit.
Unit care
≥Unplug the AC power supply cord from the household AC outlet, and clean the unit with a soft, dry cloth.
≥When dirt is heavy, wring a cloth moistened in water tightly to wipe the dirt, and then wipe it with a dry cloth.
≥Never use alcohol, paint thinner or benzine to clean the unit.
≥Before using a chemically-treated cloth, carefully read the instructions that came with the cloth.
Specifications
∫AMPLIFIER SECTION
<SU-HTE1P-K>
∫SPEAKER SECTION
<SB-HTE1P-K>
∫GENERAL
≥Specifications are subject to change without notice.
System (SC-HTE1)
∏1 Amplifier (main unit)
(SU-HTE1)
∏2 Speakers
(SB-HTE1)
Accessories
∏1 Remote control
(with a battery)
(RAK-SC990WK)
∏1 AC power supply cord
(K2CB2CB00021)
∏1 Stereo cable
(RJL2S005B20)
∏12 Cushion feet
(RKA0248-K)
∏1Plugadaptor
(RJL2P011X30)
RMS output power 40 W
Lch 20 W (6 ≠, 1 kHz, 10 % THD)
Rch 20 W (6 ≠, 1 kHz, 10 % THD)
FTC output power 15 W per channel 6 ≠, 20 Hzs16 kHz, 10 % THD
Total FTC power 30 W
Audio in
Terminal Stereo, ‰ 3.5 mm (1/8q) jack
Sensitivity 450 mV/47 k≠
Vertical Setting
Dimensions (W kH kD) (Main Set) 59 mm k187 mm k200 mm (2 11/32qk7 3/8qk 7 7/8q)
Mass (Weight) (Main Set) Approx. 0.93 kg(2.1 lbs)
Horizontal Setting
Dimensions (W kH kD) (Main Set) 187 mm k61 mm k200 mm (7 3/8qk2 13/32qk 7 7/8q)
Mass (Weight) (Main Set) Approx. 0.93 kg(2.1 lbs)
Type 1 WAY 1 SPEAKER Bass-ref.
Full range 6.5 cm (2 1/2q) CONE TYPE
Impedance 6≠
Vertical Setting
Dimensions (W kH kD) (With stand)
109 mm
k
341 mm
k
110 mm (4
5
/
16
q
k
13
7
/
16
q
k
4
11
/
32
q
)
Mass (Weight) Approx. 0.82 kg(1.8 lbs)
Horizontal Setting
Dimensions (W kH kD) 235 mm k77 mm k86 mm (9 9/32qk3 1/16qk 3 13/32q)
Mass (Weight) Approx. 0.64 kg(1.4 lbs)
Wall mount
Dimensions (W kH kD) 74 mm k235 mm k83 mm (2 15/16qk9 9/32qk 3 9/32q)
Mass (Weight) Approx. 0.64 kg(1.4 lbs)
Power supply AC 120 V, 60 Hz
Power consumption 10 W
Standby Power consumption
Power off and Auto off Approx. 0.1 W
Operating temperature range 0oC to 40 oC (i32 oF to i104 oF)
Operating humidity range 20 %s80 % RH (no condensation)
Control reference guide
Troubleshooting guide
Before requesting service, please perform the following checks.
If the problem remains unresolved, consult your dealer for instructions.
* If you have connected the stereo cable to the headphone jack of your TV, raise the volume of the TV.
Amplifier
1 Power button (Í/I)
≥
Press to switch the unit from on to standby mode or vice versa. In
standby mode, the unit is still consuming a small amount of power.
2 Volume buttons
≥Volume range: 0 (mute) to 50
≥When the volume reaches its maximum (50) or minimum (0),
the unit beeps.
3 Power indicator (red light)
≥Lights when the unit is activated. The red light dims out after
the unit automatically switches to standby mode. (See
“Automatic standby function” in “3 Using this unit”.)
4 Volume indicator (green light)
≥Blinks fast when the volume is adjusted.
≥Blinks slow while muted. (See “To mute the sound” in “Other
operations”.)
≥
Lights for 10 seconds after you change the remote control code.
(See “Remote control code” in “Other operations”.)
5 Remote control signal sensor
≥Remote control operation range
Distance: Within approx. 7 m (23 ft.) directly in front.
Angle: Approx. 30eleft and right
Remote control
1 Power button (Í)
2 Volume buttons
3 Mute button
∫To replace a button-type battery
1While pressing the stopper, pull out the battery holder.
2Set the button-type battery with its (i) mark facing
upward and then put the battery holder back in place.
≥When replacing the battery, use: CR2025 (Lithium battery)
≥Keep the button-type battery out of reach of children to prevent
swallowing.
No power
≥Insert the AC power supply cord securely.
The remote control does not work properly.
≥The battery is depleted. Replace it with a new one. (>Control reference guide)
≥It is possible that the insulation sheet has not been removed. Remove the insulation sheet.
(>Control reference guide)
≥It may be necessary to set the code of the remote control again after changing the battery in
the remote control. (See “Remote control code” in “Other operations”.)
≥Use the remote control within the correct operation range. (>Control reference guide)
No sound.
≥Turn on the TV and the unit.
≥Check the connections. (>2 Connections)
≥Turn off mute on the unit. (See “To mute the sound” in “Other operations”.)
≥Raise the volume of the unit.*
Sound is output from only one speaker.
≥If you are using a monaural TV, use a commercially available mono-to-stereo adaptor
(monaural mini plug
⇒
stereo mini plug
). Identical sound will be output from both speakers.
Low volume.
≥Check the connections. (>2 Connections)
≥Raise the volume of the unit.*
Distorted sound/Noise is heard/Sound is interrupted.
≥Check the connections. (>2 Connections)
Irregular coloring occurs on the TV.
≥Move the speakers away from the TV. Irregular coloring may be caused by the way you place
the unit. In that case, turn off the TV, and then turn it on 15 to 30 minutes later. The self-
demagnitization function of the TV reduces irregular coloring. If the problem persists, move
the speakers further away from the TV.
The power indicator keeps blinking and no sound is output.
≥Turn off the unit, pull out the AC power supply cord, and then consult your dealer for
instructions.
VOLUME
1
2
3
Remove the insulation sheet before using.
SC-HTE1P_VQT4G64_eng.fm 5 ページ 2012年3月23日 金曜日 午後3時21分


