NAMESANDOPERATION
1-1OFTHEPARTS •It'sa goodideatokeepthese
OperatingInstructionsopenat
thispagewhenusingtheunit.
a.Names and Operation of
the Function Keys
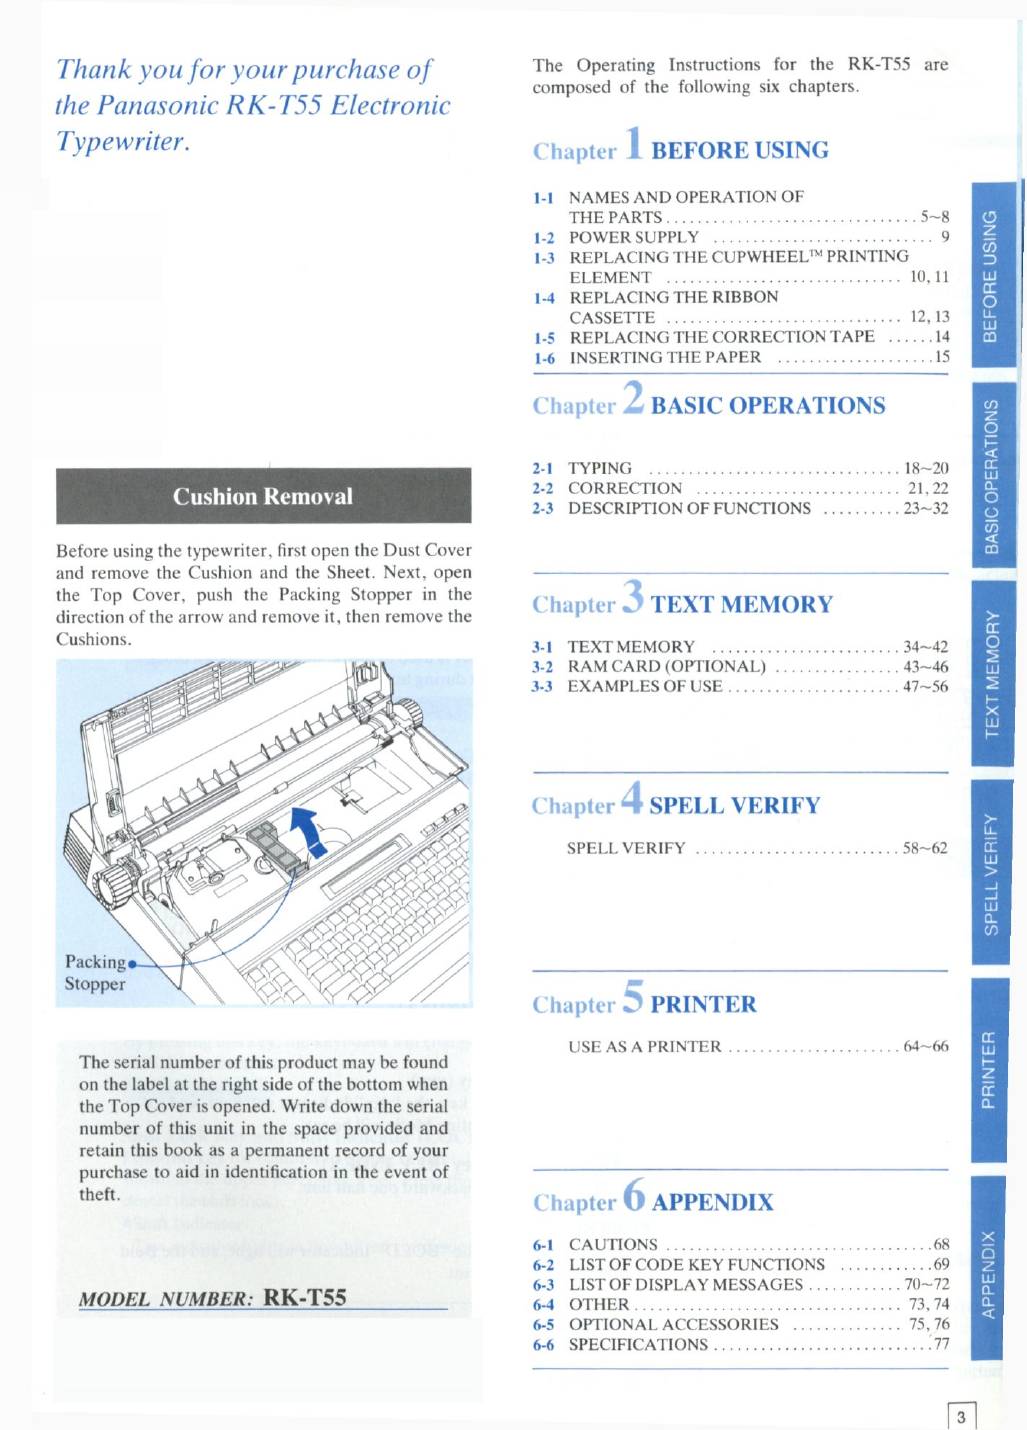
DustCover
Tousetheunitfirst removetheDust
Cover,asshowninthefigure.
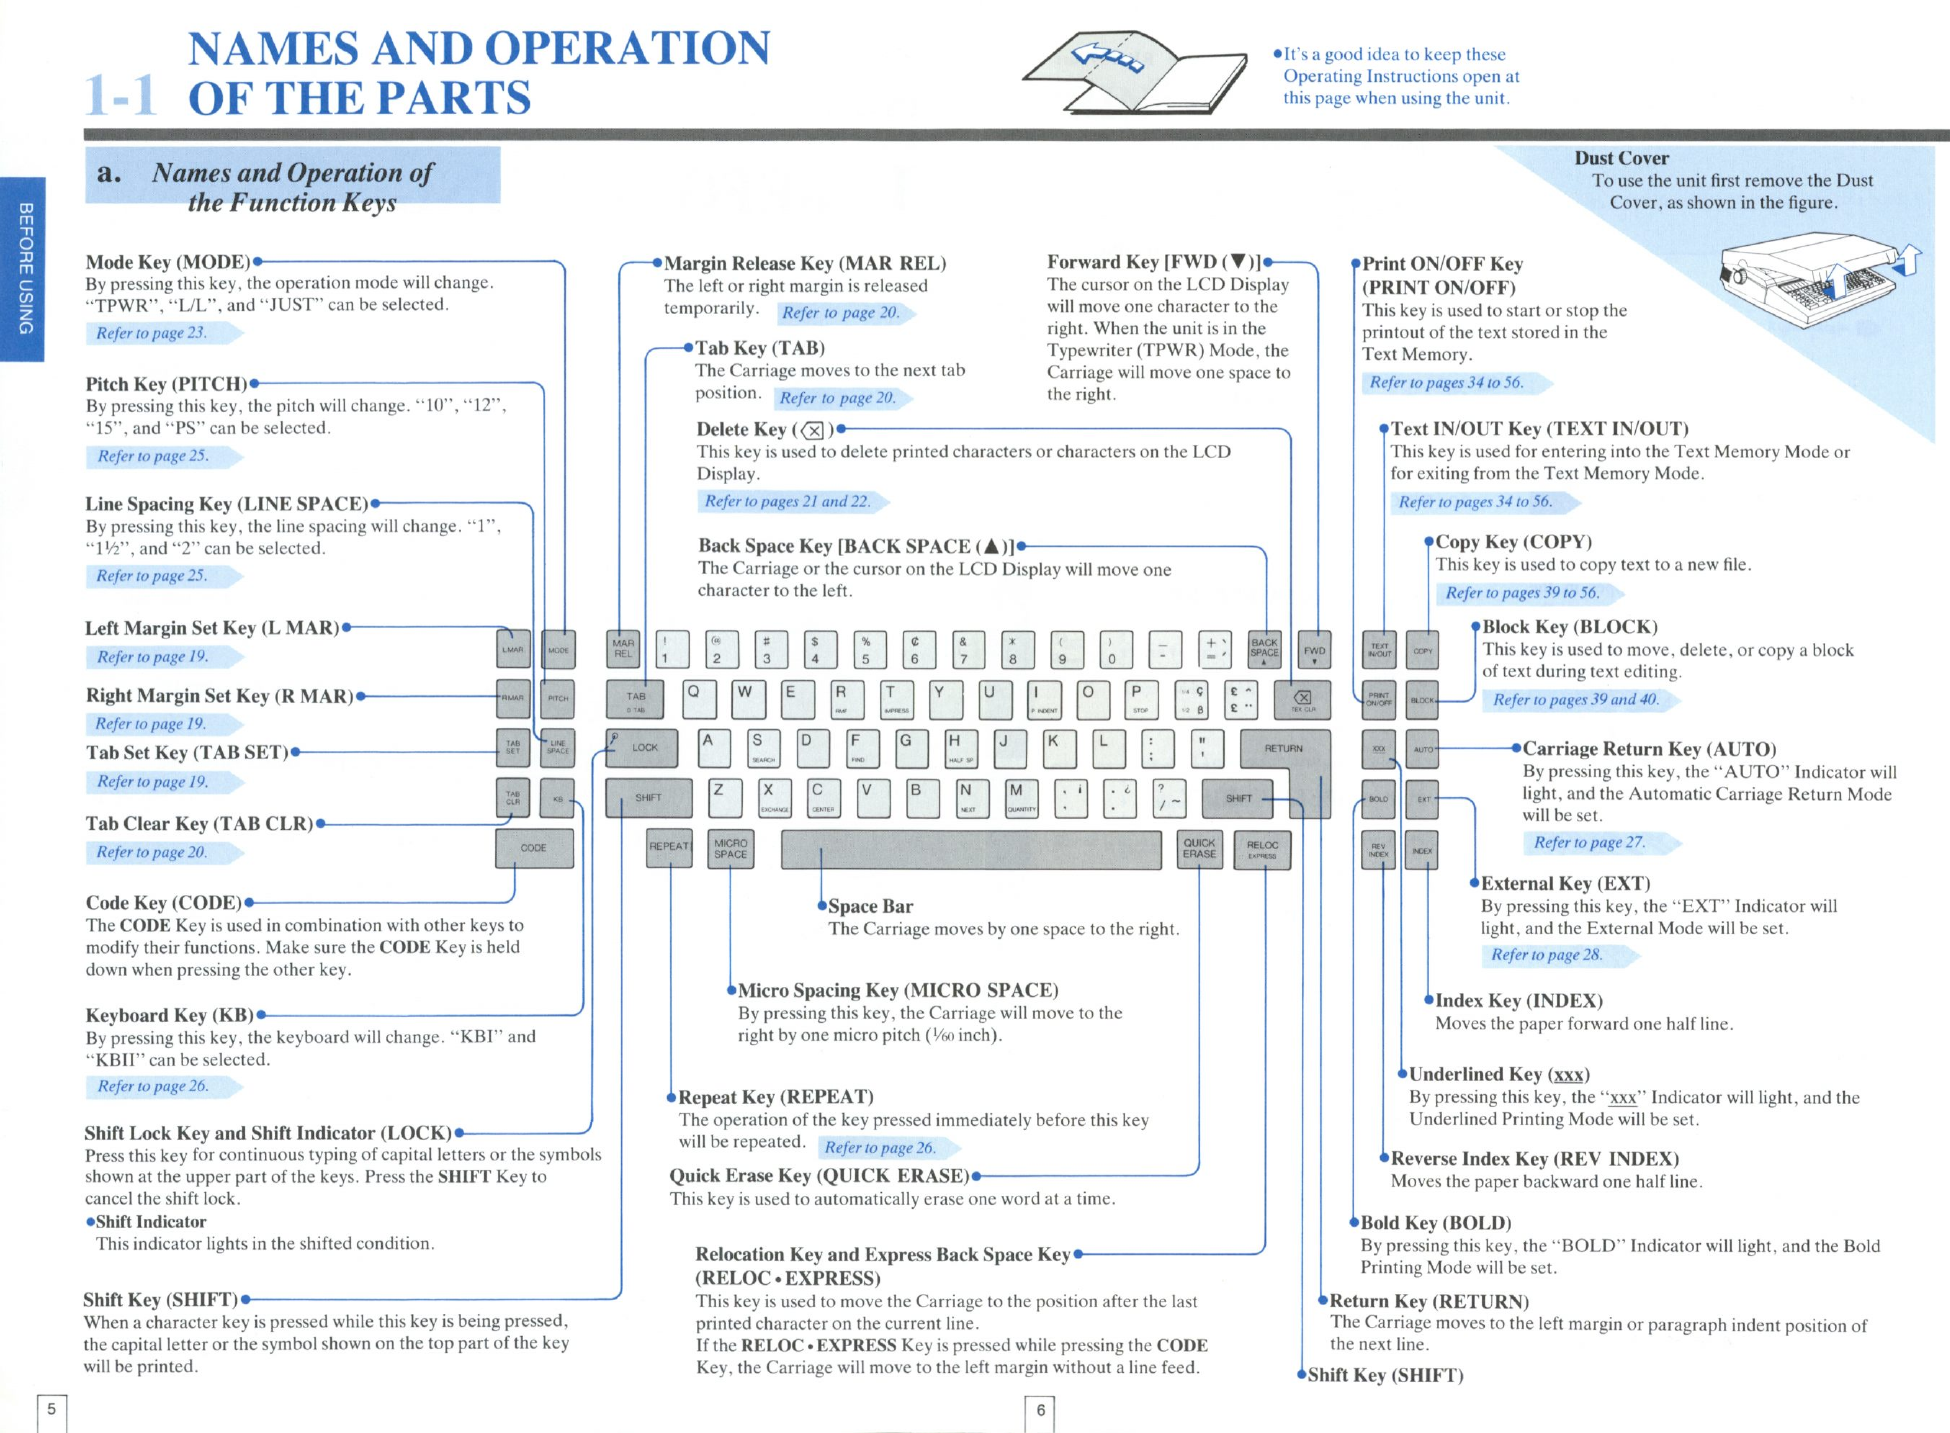
ModeKey(MODE)*
Bypressingthiskey,theoperationmodewillchange.
"TPWR","L/L",and"JUST"canbeselected.
Refer to page 23.
PitchKey(PITCH)*
Bypressingthiskey,thepitchwillchange."10","12",
"15",and"PS"canbeselected.
Refer to page 25.
LineSpacingKey(LINESPACE)*
Bypressingthiskey,thelinespacingwillchange."1
"IVi",and"2"canbeselected.
Refer to page 25.
LeftMarginSetKey(LMAR)*-
Refer to page 19.
RightMarginSetKey(RMAR)«
Refer to page 19.
TabSetKey(TABSET)*
Refer to page 19.
TabClearKey(TABCLR)*
Refer to page 20.
•MarginReleaseKey(MARREL)
Theleftorrightmarginisreleased
temporarily.Refer to page 20.
—*TabKey(TAB)
TheCarriagemovestothenexttab
position.Referlopage20
ForwardKey[FWD(•)]*—
ThecursorontheLCDDisplay
willmoveonecharactertothe
right.Whentheunitisinthe
Typewriter(TPWR)Mode,the
Carriagewillmoveonespaceto
theright.
DeleteKey«x])*
ThiskeyisusedtodeleteprintedcharactersorcharactersontheLCD
Display.
Refer to pages 21 and 22.
BackSpaceKey[BACKSPACE(A)]*
TheCarriageorthecursorontheLCDDisplaywillmoveone
charactertotheleft.
CodeKey(CODE)*
TheCODEKeyisusedincombinationwithotherkeysto
modifytheirfunctions.MakesuretheCODEKeyisheld
downwhenpressingtheotherkey.
KeyboardKey(KB)*
Bypressingthiskey,thekeyboardwillchange."KBI"and
"KBII"canbeselected.
Refer to page 26.
•• •
IT]
0 • • B • E • Id
]•BDQDBDDQDQ
<H)
ShiftLockKeyandShiftIndicator(LOCK)*
Pressthiskeyforcontinuoustypingofcapitallettersorthesymbols
shownattheupperpartofthekeys.PresstheSHIFTKeyto
canceltheshiftlock.
•ShiftIndicator
Thisindicatorlightsintheshiftedcondition.
ShiftKey(SHIFT)*
Whena characterkeyispressedwhilethiskeyisbeingpressed,
thecapitalletterorthesymbolshownonthetoppartofthekey
willbeprinted.
1
11
MICRO
SPACE
"SpaceBar
TheCarriagemovesbyonespacetotheright.
MicroSpacingKey(MICROSPACE)
Bypressingthiskey,theCarriagewillmovetothe
rightbyonemicropitch
(Vfeo
inch).
RepeatKey(REPEAT)
Theoperationofthekeypressedimmediatelybeforethiskey
willberepeated.Refertopage26
QuickEraseKey(QUICKERASE)*
Thiskeyisusedtoautomaticallyeraseonewordata time.
RelocationKeyandExpressBackSpaceKey*
(RELOC.EXPRESS)
ThiskeyisusedtomovetheCarriagetothepositionafterthelast
printedcharacteronthecurrentline.
IftheRELOC• EXPRESSKeyispressedwhilepressingtheCODE
Key,theCarriagewillmovetotheleftmarginwithouta linefeed.
•PrintON/OFFKey
(PRINTON/OFF)
Thiskeyisusedtostartorstopthe
printoutofthetextstoredinthe
TextMemory.
Refer to pages 34 to 56.
TextIN/OUTKey(TEXTIN/OUT)
ThiskeyisusedforenteringintotheTextMemoryModeor
forexitingfromtheTextMemoryMode.
Refer to pages 34 to 56.
CopyKey(COPY)
Thiskeyisusedtocopytexttoa newfile.
Refer to pages 39 to 56.
BlockKey(BLOCK)
Thiskeyisusedtomove,delete,orcopya block
oftextduringtextediting.
Refer to pages 39 and 40.
C
^CarriageReturnKey(AUTO)
Bypressingthiskey,the"AUTO"Indicatorwill
light,andtheAutomaticCarriageReturnMode
willbeset.
Refer to page 27.
ExternalKey(EXT)
Bypressingthiskey,the"EXT"Indicatorwill
light,andtheExternalModewillbeset.
Refer to page 28.
IndexKey(INDEX)
Movesthepaperforwardonehalfline.
•UnderlinedKey(xxx)
Bypressingthiskey,the"xxx"Indicatorwilllight,andthe
UnderlinedPrintingModewillbeset.
ReverseIndexKey(REVINDEX)
Movesthepaperbackwardonehalfline.
iBoldKey(BOLD)
Bypressingthiskey,the"BOLD"Indicatorwilllight,andtheBold
PrintingModewillbeset.
^ReturnKey(RETURN)
TheCarriagemovestotheleftmarginorparagraphindentpositionof
thenextline.
ShiftKey(SHIFT)
PI