Panasonic RK-T25 User manual

Readtheseinstructionscompletelybeforeoperatingthisset.

PRINTOUTSAMPLES
Thevariousfunctionsshownbelowareprovidedwiththisunit.Fordetails,refertotherelevantpagesinthisbook.
...Referencepage
LeftMargin RightMargin
RightMarginI AlU.Caneet,Director
FlushE5V ....
[MarketResearchDivision
To:AllAccountExectives
Re:TakeoverProjections]^-Centeringg>
Tab
I
!Asmentioned-atlastweek'smeeting,thiscompanyis
consideringa secrettakeoverofFrankfurtNutrition
BoldPrinting^^
Collegeforresearchontastepreferencesamongcollege
UnderlinedPrinting^^
ageconsumers.Discreteinvestigationoftheschoolhas-
allowedustomakethefollowingtentativeprojections:
ParagraphIndentDecimalTab
Costoftakeover: 20, 854, 000 .00
Yearlyoperatingexpenses: 2, 210, 000 00
Yearlytuitionincome: It 235, 900 .00
Fastfoodincome: 612, 000 p00
Confidentialresearchincome: 19, 300, 000 .00
Basedontheabovefigures,wehopetorealizeconsiderableprofitswithin^1g
thefirsttwoyears,evenwithoutdonations,thetraditionalsourceofthe^>
college'ssupplementalincome. E>
you<tviem on thi& matte* aie welcome.The next
ta.ke.ovei
H 12
>Pitcl
Attategy meeting will be held on Wednesday, Kpiil 23. J
COURIER
10
GOTHIC
15
SCRIPT
1012

NAMESANDOPERATION
OFTHEPARTS
•
It'sa goodideatokeepthese
OperatingInstructionsopenat
thispagewhenusingtheunit.
a.
CD
m
n
O
XI
m
c
CO
z
O
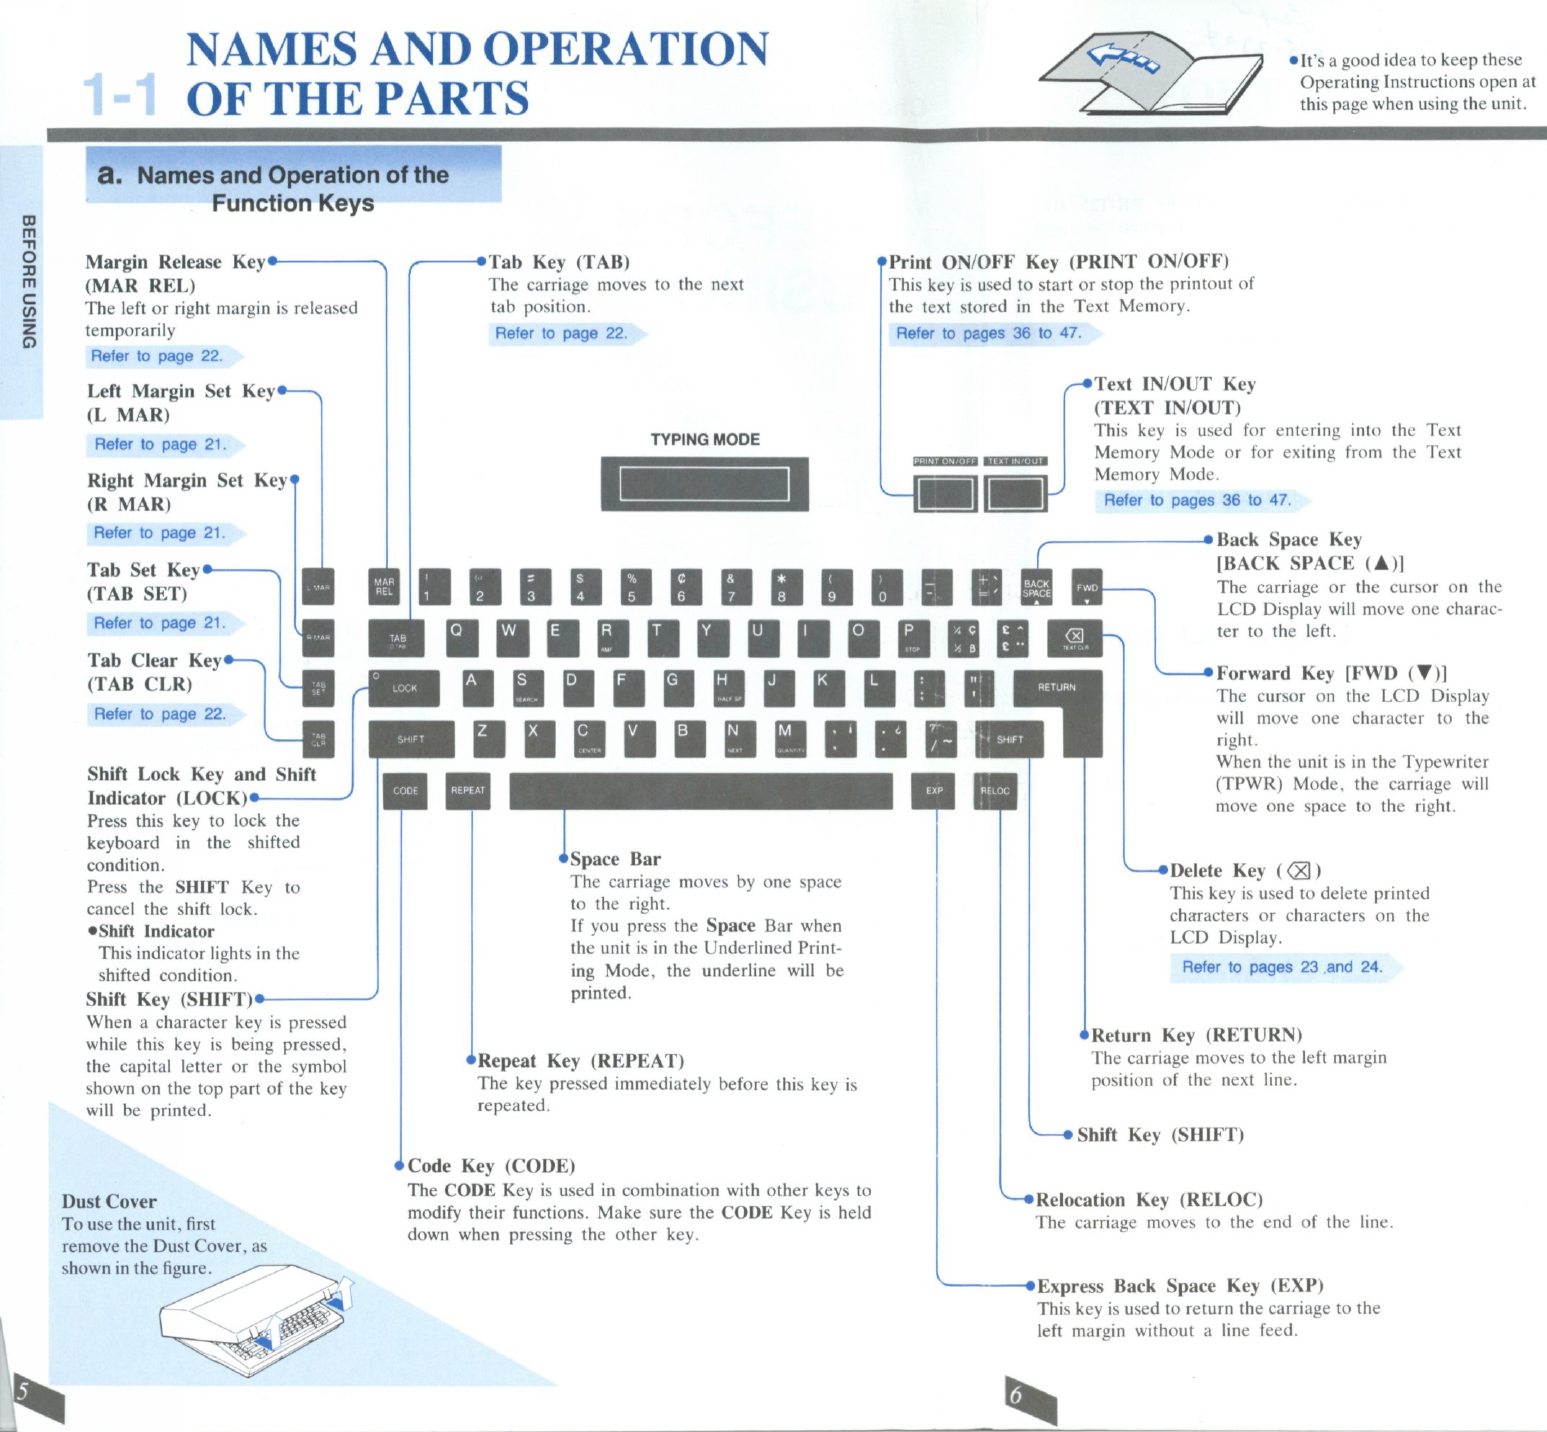
NamesandOperationofthe
FunctionKeys
MarginReleaseKey*
(MARREL)
Theleftorrightmarginisreleased
temporarily
Refertopage22.
LeftMarginSetKey
(LMAR)
Refertopage21.
RightMarginSetKey
(RMAR)
Refertopage21.
TabSetKey
(TABSET)
Refertopage21.
TabClearKey
(TABCLR)
Refertopage22
ShiftLockKeyandShift
Indicator(LOCK)*
Pressthiskeytolockthe
keyboardintheshifted
condition.
PresstheSHIFTKeyto
canceltheshiftlock.
•ShiftIndicator
Thisindicatorlightsinthe
shiftedcondition.
ShiftKey(SHIFT)•-
-•TabKey(TAB)
Thecarriagemovestothenext
tabposition.
Refertopage22.
fPrintON/OFFKey(PRINTON/OFF)
Thiskeyisusedtostartorstoptheprintoutof
thetextstoredintheTextMemory.
Refertopages36to47.
Whena characterkeyispressed
whilethiskeyisbeingpressed,
thecapitalletterorthesymbol
shownonthetoppartofthekey
willbeprinted.
DustCover
Tousetheunit,first
removetheDustCover,as
showninthefigure.
•SpaceBar
Thecarriagemovesbyonespace
totheright.
IfyoupresstheSpaceBarwhen
theunitisintheUnderlinedPrint-
ingMode,theunderlinewillbe
printed.
•RepeatKey(REPEAT)
Thekeypressedimmediatelybeforethiskeyis
repeated.
•CodeKey(CODE)
TheCODEKeyisusedincombinationwithotherkeysto
modifytheirfunctions.MakesuretheCODEKeyisheld
downwhenpressingtheotherkey.
^-•TextIN/OUTKey
(TEXTIN/OUT)
ThiskeyisusedforenteringintotheText
MemoryModeorforexitingfromtheText
MemoryMode.
Refertopages36to47.
«BackSpaceKey
[BACKSPACE(•)]
Thecarriageorthecursoronthe
LCDDisplaywillmoveonecharac-
tertotheleft.
-•ForwardKey[FWD(•)]
ThecursorontheLCDDisplay
willmoveonecharactertothe
right.
WhentheunitisintheTypewriter
(TPWR)Mode,thecarriagewill
moveonespacetotheright.
•DeleteKey(<Xj)
Thiskeyisusedtodeleteprinted
charactersorcharactersonthe
LCDDisplay.
Refertopages23and24.
•
ReturnKey(RETURN)
Thecarriagemovestotheleftmargin
positionofthenextline.
ShiftKey(SHIFT)
RelocationKey(RELOC)
Thecarriagemovestotheendoftheline.
-•ExpressBackSpaceKey(EXP)
Thiskeyisusedtoreturnthecarriagetothe
leftmarginwithouta linefeed.

Chapter1
b.NamesandOperationof
theMainParts
PaperSupport PaperBail
Thisisusedtoholdthepaperdown.
Platen•
PaperReleaseLever
Thisleverisusedtoreleasethepaper.
Pullthislevertowardsyoutoadjustthe
paperposition,andthenmoveitback
tolockthepaper.
WhenyoupullthePaperReleaseLever
towardyou,thePaperBailLeverwill
alsomoveawayfromthePlaten.
Carriage
TheRibbonCassettes,the
CorrectionTapeandthe
CupwheelPrintElement
areinstalledontheCar-
riage.Thismechanism
movestotheleftandright
forprinting,erasing,etc.
whenthekeyboardkeys
arepressed.
Accessories(included)
•CupwheelPrintElement
•CorrectableFilmRibbonCassette
(RP-T132)
Lift-OffCorrectionTape
(RP-T131)
O
z
(j)
D
W
cc
o
LI.
Ill
m
•ACAdaptor
(RP-K942)
•DustCover
LCDDisplay»
PlatenKnob
Thisisusedtomanuallyfeedthepaperupordown.
BypressingthePlatenKnobinwardyoucanrotatethe
Plateninsmallincrements.
Refertopage17.
•PaperBailLever
Whenthisleverispulledtowardsyou,thePaperBailwill
moveawayfromthePlaten.Thisallowsthepapertoeasily
insertedandpositionedfortyping.
•PitchScale
Threepitchgraduations,10,12,and15,areprovided.Use
thesegraduationstosetthemarginsortabs.
LCDContrastAdjustor
(CONTRAST)
Thisisusedtoadjustthecontrastofthe
LCDDisplay.
ExternalPowerInputJack
[DCIN15V (©-§>-©)]
ThisunitcanbeconnectedtotheAC
Adaptor(RP-K942,included)toenable
ittobepoweredwithhouseholdAC
power.
Refertopages8 to10.
Ni-CdRechargeableBatteryCompartment
Refertopages8 to10.
BottomCover
Byslidingthislidtotheright,it
canberemovedtoexchangethe
CupwheelPrintElement.
Refertopages12and13.
•PowerSwitch(ON/l-OFF/o)
Refertopage11.
v• InterfaceConnector
Youcanusethisunitasa printerbyconnecting
theoptionalInterfaceAdaptorRP-K100and
receivedatafroma Computer.
Refertopage48.

Thank you for your purchase of
the Panasonic RK-T25 Electronic
Typewriter.
TheOperatingInstructionsfortheRK-T25are
composedofthefollowingfourchapters.
1ChapterI BEFOREUSING
o
z
U)
D
Lii
CC
o
u.
LU
m
Refertopages4 to17.
Chapter£.BASICOPERATIONS
Refertopages19to34.
ChapterO TEXTMEMORY/PRINTER
Theserialnumberofthisproductmaybe
foundonthelabelattherightbottom
whenthePaperSupportandthePitch
Scaleareopened.Writedowntheserial
numberofthisunitinthespaceprovided
andretainthisbookasa permanentrecord
ofyourpurchasetoaidinidentificationin
theeventoftheft.
MODEL NUMBER: RK-T25
Refertopages35to50.
ChapterH APPENDIX
><
o
z
LU
0.
CL
<
SERIAL NUMBER: Refertopages51to60.

1-2POWERSUPPLY
a.UsingHouseholdACPower
ConnecttheACAdaptorasshowninthefigure.
ACSocket
b.Charging
ThePanasonicRP-K901Ni-CdBatteryPack(option-
al)canbeChargedbyinsertingitintotheNi-Cd
RechargeableBatteryCompartmentandconnecting
thePanasonicRP-K942ACAdaptor(included).
•BeforeusingtheNi-CdBatteryPackforthefirst
time,besuretochargeit.
•ThetimerequiredtofullychargetheNi-CdBattery
Packisabout8 hours.
•TheRK-T25canbeoperatedevenwhiletheNi-Cd
BatteryPackisbeingchargedhowever,thecharging
timewillbegreatlyincreased.Thiswillpreventthe
Ni-CdBatteryPackfrombeingcompletelycharged.
Forthisreason,Panasonicrecommendsthatthe
POWERSwitchbeinthe"OFF"positionwhen
chargingtheNi-CdBatteryPack.
•DonotunderanycircumstancesuseanNi-Cd
BatteryPackotherthanthespecifiedtype(RP-
K901).
•IftheNi-CdBatteryPackquicklyrunsdownafterit
hasbeencompletelycharged,ithasreachedtheend
ofitslife.Inthiscase,replacetheNi-CdBattery
Packwitha newone.
•TheNi-CdBatteryPackwilldischargenaturally
evenwhenitisnotused.
Topreventdeteriorationofthebatteries,itis
recommendedthatyouusetheNi-CdBatteryPack
atleastonceortwiceeverythreemonths.
•DonotstoretheNi-CdBatteryPackinareasprone
tohigh-temperatureorhigh-humidity.
•AlwaysusethePanasonicRP-K942ACAdaptor
(included)andnoothermodel.
•A breakdownorfailuremayresultwhenanadaptor
witha differentvoltageorpolaritiesisused.

Chapter1
o
ChargingMethod
7SetthePOWERSwitchinthe"OFF"position.
f^ n n
o
OFF ONJ
/
2OpentheNi-CdRechargeableBatteryCompart-
mentCover.Toloosenthescrewsusea coin,a
key,ora similarobject.
3PlugtheconnectorofthePanasonicRP-K901
Ni-CdBatteryPack(optional)totheterminals
insidetheNi-CdRechargeableBatteryCompart-
mentofthemainunit.
PanasonicNi-CdBatteryPack
(RP-K901,optional)
(/)
D
Ul
DC
o
UL
Ul
CD

POWERSUPPLY
00
m
-n
O
x
m
c
tn
z
o
4 InserttheNi-CdBatteryPackandsecurethe
Ni-CdRechargeableBatteryCompartmentCov-
erbytighteningthetwoscrews.
PanasonicNi-CdBattery
Pack(RP-K901,optional) til
.
/
ConnectthePanasonicRP-K942ACAdaptor
(included)asshowninthefigure.
X
•Whenchargingthebattery,besuretousethe
PanasonicRP-K942ACAdaptor(included).
DonotuseanyotherACAdaptor.
•Donotchargethebatteryfora longerperiodthan
necessary.
Thiswillnotonlyreducetheperformanceofthe
Ni-CdBatteryPackbutmayshortenitslifeaswell.
•ChargetheNi-CdBatteryPackwithinanambient
temperaturerangeof32°F(0°C)to104°F(40°C).
IfyouchargetheNi-CdBatteryPackoutsidethis
range,theperformanceoftheNi-CdBatteryPack
maybereducedorinextremecasesitmaybe
completelyimpossibletochargeit.
•Donotunderanycircumstancesdisassembleor
modifytheNi-CdBatteryPack.
DonotshortcircuittheNi-CdBatteryPack.
•DonotapplyshocktotheNi-CdBatteryPackor
dropit.
Donotunderanycircumstancespulltheconnecting
cordhardorsplicethewires.
•IftheNi-CdBatteryPackisdamagedandelectro-
lyte(dilutesulfuricacid)getsontoskinorclothing,
washitawayimmediatelyusinga largequantityof
water
WeakBattery
Whenthebatteryrunsdown,theLCDDisplaywill
flash, informingyouthattheNi-CdBatteryPackmust
berecharged.Atthistime,rechargetheNi-Cd
BatteryPackandthenuseitagain.
ACSocket
y)
ExternalPowerInput
[DCIN15V ( CHsHB)]
PanasonicACAdaptor
(RP-K942,included)

Chapter1
C. PowerSwitch e.MemoryBack-upFunction
WhenthePOWERSwitchissetto"ON",the
carriagemovestotheleftmarginwhichwaslastset
andtheunitisreadyfortyping.
^n n
Thefollowingwillremainmemorizedevenafterthe
POWERSwitchhasbeensetto"OFF":
•StoredText
•Margins
•Tabs
•Pitches(10.12.15)
•LineSpacing(1•
IV2
• 2)
•Keyboard(KBI*KBII)
•OperationModes(TPWR• L/L
•
JUST)
O
z
</>
3
UJ
tr
o
LL
UJ
m
/
/
/
Io
\OFF
\
\ X
\ \
\
II
ONI
/
/
/
Thebuilt-inlithiumbatterythatisusedtostorethese
functionscanbeusedforabout15years.
d.AutomaticPower"OFF"
Function
Whenthereisnokeyinputforabout10minutes,the
powerwillbeswitchedoffautomatically.
Toresumetyping,turnthePOWERSwitch"OFF"
andthen"ON".
•AutomaticPower"OFF"Functioncannotbe
performedwhileintheExternalMode.
IfthePOWERSwitchisturnedonwhiletheSHIFT
Keyispressed,theAutomaticDemonstrationwillbe
printed.

REPLACINGTHECUPWHEEL
1-cPRINTELEMENT
•3
m
Tl
°7
1SetthePOWERSwitchtothe"OFF"position.
cWhentheplugoftheACAdaptorisconnected,
disconnecttheplugfromtheExternalPower
qInputJack.
2RaisethePaperSupport,andopenthePitch
Scale.
PaperSupport
PitchScale
4ClosethePitchScaleandPaperSupportand
placetheTypewriteronitsback.
RemovetheBottomCoverLidbyslidingit
totherightside.
3Usingyourhand,gentlymovetheCarriagetothe
rightside. GrasptheLeveroftheCupwheelPrinting
Elementbetweenyourfingers toreleasethelock.
Thenpullitdirectlyoutasshowninthefigure.
Cupwheel
PrintElement
Lever

Chapter1
•Ifa CupwheelPrintElementwithoutthelever_ ..... •
•,...,•j-. / Conhrmthatthegearisengagedandthenpushin
isused,graspitsknobandpullitdirectlyout........, . ® , r
br r untila clickingsoundisheard.
Gear
8HoldtheknoboftheCupwheelPrintElement
andturnitslightlytocheckthatitrotatesfreely.
Knob
InsertanotherCupwheelPrintElementsothat
theshaftenterstheholeinthecenterofthe
element.
•Inserttheelementsothatitwillnotgetcaught
bytheRibbon.
SlidetheBottomCoverLidtoitsclosedposition.
10 BeforesettingthePOWERSwitchto"ON",
confirmthattheCupwheelPrintElementhasnot
ShaftbeencaughtbytheRibbon.
IftheElementhasbeencaught,removethe
RibbonCassetteandinstallitagain.
Refertopages14and15.
IfthepowerisswitchedonwhiletheCupwheelPrint
Elementisincorrectlyinstalled,thebuzzerwill
sound.
Inthiscase,setthePOWERSwitchto"OFF"and
installtheCupwheelPrintElementcorrectly.
Cupwheel
PrintElement

REPLACINGTHERIBBON
1-4CASSETTE
00
m
-n
°7
*1 SetthePOWERSwitchtothe"OFF"position.
cRaisethePaperSupport,andopenthePitch
Scale.
O*DonottouchtheCarriagewhilethepoweris
switchedon.
PaperSupport
PitchScale
3HoldtheRibbonCassettewithbothhandsand
removeitbyfirst raisingthefrontendandthen
liftingtheentireRibbonCassette.
2Usingyourhand,gentlymovetheCarriagetothe
centerofthePlaten.
3S
4TurntheRibbonFeedWheel(onthenew
RibbonCassette)clockwisetotightentheRib-
bon.

Chapter1
5 PositionthenewRibbonCassetteoverthe
CassetteHoldersothattheWindow(through
whichthetapecanbeseen)isonthetop,then
placetheProjectionontherearofthecassette
intotheSlotatthefrontoftheCassetteHolder.
RibbonGuides CardHolder
Carriage
Cover
Cassette
Holder
SettheRibbonbetweentheCarriageCoverand
theRibbonGuidesandthengentlypressthe
frontofthecassettewithbothhandsuntilthe
cassetteislocked.TurntheRibbonFeedWheel
clockwiseuntila clickingsoundisheard.
•Witha newribbon,turntheRibbonFeed
Wheeluntiltheblackribboncanbeseen.
O
z
CO
D
UJ
DC
O
LL
UJ
m
7ConfirmthatthereisnoslackintheRibbon.If
thereisslack,turntheRibbonWeedclockwiseto
removeit.
Donotapplyexcessiveforcetoorbendtheflat cable
comingoutfromtheCarriage.

REPLACINGTHECORRECTION
TAPEfiinfl-W.c
RP-T 131
1RemovetheRibbonCassettebyfollowingsteps
1,2 and3 of"REPLACINGTHERIBBON
CASSETTE".
2RemovetheusedCorrectionTapebypullingthe
TapeSpoolsoutwardsonbothsides.
TapeSpool Tape
Spool
3PlacethenewCorrectionTapewiththeFull
Spoolontheleftside,andthenpassthetape
betweentheCardHolderandtheRibbon
Guides.
RibbonGuides CardHolder
»FullTapeSpool EmptyTape
Spool
•Makesurethattheinnersurfaceofthetapeonthe
spoolfacestowardthePlaten.
4Turntherightspoolclockwiseuntilthewhite
tapeappearsatthecenteroftheCardHolder.
Empty
TapeSpool
5InstalltheRibbonCassetteproperly.(Followthe
steps5 through7 of"REPLACINGTHERIB-
BONCASSETTE".)
AlwayssetthePOWERSwitchto"OFF"before
exchangingtheCorrectionTape.
DonottouchtheCarriagewhilethepoweris"ON".

-6INSERTINGTHEPAPER
a.PaperInsertion
RaisethePaperSupport. FeedthepaperunderneaththePaperBail,pull
thePaperReleaseLever,andadjustthepaper.
2, Insertthepaperstraightdownbehindthebackof
thePlaten.
3PullthePaperBailLevertowardsyou.
RotatethePlatenKnobtofeedthepapertothe
desiredposition.
i^)
PaperBail
Lever
5ReturnthePaperReleaseLeverandPaperBail
Levertotheiroriginalpositions.
PaperBail
Properprintingandcorrectionwillnotbe
possibleifthereisanyslackinthepaper.
Holdthepaperbythetopedgesandpull
uptoremoveanyslack.
PaperSupport
PaperRelease
Lever


Chapter2
BASIC
OPERATIONS
2-1TYPING20-22
a.ProcedureforTyping20
b.MarginandTabSettings21
c.MarginRelease22
d.HotZone22
e.TabClearing22
f.ClearingAllTabs22
2-2CORRECTION23,24
a.AutomaticCorrection23
b.ManualCorrection24
•CorrectionTape24
2-3DESCRIPTIONOFFUNCTIONS25-34
a.ModeIndications25
b.OperationMode25-27
•Typewriter(TPWR)Mode26
•LinebyLine(L/L)PrintingMode..26
•Justify(JUST)PrintingMode27
C.LineSpacing27
d.Keyboard28
•RepeatFunctions28
e.Pitches28
f.PrintingMode29
•UnderlinedPrinting29
•BoldPrinting29
g.CarriageReturnMode29
•PermanentHyphenandSpace29
h.ParagraphIndent30
i.ExternalMode30
j.DecimalTab31
k.Centering32
I.RightMarginFlush33
m.HalfSpace34
0

TYPING
a.ProcedureforTyping
1OperatetheTypewriterusingeithertheAC
Adaptor(included)ortheNi-CdBatteryPack
(optional).
2SetthePOWERSwitchtothe"ON"position.
Thecarriagewillmovetotheleftmarginwhich
waslastset.
3InsertthepaperbehindthebackofthePlaten
androtatethePlatenKnobtofeedthepaperto
thedesiredposition.
Typingmaynowproceed.
Checkthatthe"A"markappearsunderneaththe
"TPWR"operationmodeindicationontheLCD
Display.
TYPINGMODE
TPWRLAJUST1
1 Vft
2 KBIKBII101215
TPWRNODE
XXXXAUTOP INDENTEXT
Ifthe"T"markappearsabove"EXT"atthebottom
rightoftheLCDDisplay,presstheCODEKeyand
thenpressthe8 Keyatthesametimetodeletethe
mark.
Ifthe"A"markappearsbelow"L/L",pressthe
CODEKeyandthenpresstheMARRELKeyatthe
sametimesothatthemarkappearsunderneath
"TPWR".
•Trytypingthefollowingword:
Typewriter
•Thecharactershavenowappearedonthepaperas:
Typewriter
TheTypingofonecharacterata timeontothepaper
iscalledtheTypewriter(TPWR)Mode.
Younowknowhowtoproceedwithsimpletyping.
Readthroughthefollowingdescriptioninorderto
makefulluseoftheunit'sfunctions.

Chapter2
b.MarginandTabSettings
Leftmargin Tab Tab Tab Rightmargin
1PresstheSpaceBaror
BACKSPACEKeyto
movethecarriagetothe
desiredleftmargin.
2PresstheL MARKeyto
settheleftmargin.
Thepreviousleftmargin
isautomaticallycleared. SpaceBar
5Repeatsteps3 and4 to
setotherdesiredtabposi-
tions.
•Upto16tabscanbeset
inoneline.
PresstheSpaceBarto
movethecarriagetothe
desiredrightmargin.
3PresstheSpaceBarorthe
BACKSPACEKeyto
movethecarriagetothe
desiredtabposition.
7PresstheR MARKeyto
settherightmargin.
Thepreviousrightmargin
isautomaticallycleared.
PresstheTABSETKey
tosetthefirst tab. Thiscompletesthesettingsfortheleftandright
marginsandforthetabs.Tosettheleftandright
marginsonly,skipsteps3,4 and5 andproceed.Press
theRETURNKeytomovethecarriagetotheleft
marginonthenextlineandbegintyping. 01

TYPING
C. MarginRelease
Tosettheleft(orright)mar-
ginbeyondthecurrentlyset
left(orright)marginortotype
charactersbeyondtheright
margin,presstheMARREL
Keywiththecarriageposi-
tionedatthemargininques-
tion.
Themarginistemporarilyre-
leasedandthecarriagecanbe
moved,ortypingcanbeper-
formed,beyondthemargin.
Atthistime,ifyouwishtoset
theleft(orright)margin,press
theL MARKey(orR MAR
Key)tosetthemargin.
Whenthecarriagereachestherightmargin,the
buzzersoundsandthekeysarelocked.
Thekeyscanbereleasedbyfollowingeitherofthe
stepsbelow:
•PresstheRETURNKeytomovethecarriagetothe
leftmarginonthenextline.
•PresstheMARRELKeytotemporarilyreleasethe
marginandcontinuetyping.
TabClearing
PresstheTABKeyto
movethecarriagetothe
tabpositionwhichistobe
cleared.
2Thetabisclearedwhen
theTABCLRKeyis
pressed.
ClearingAllTabs
Ci.HotZone
TheHotZoneistheareathatstartswiththesoundof
thebuzzerandendswiththerightmargin.Whenthe
carriageenterstheHotZone,thebuzzersoundsto
indicatethatonlyanother8 characterscanbetyped.
ThesameappliesforboththeDP,L/LandJUST
Mode.
PresstheTABCLRKey
togetherwiththeCODEKey
toclearallthetabs.
Thebuzzersounds Rightmargin
Table of contents
Other Panasonic Typewriter manuals

Panasonic
Panasonic KX-W50TH User manual

Panasonic
Panasonic KX-E2000 Assembly instructions

Panasonic
Panasonic KX-R520 User manual

Panasonic
Panasonic KX-700m Assembly instructions

Panasonic
Panasonic KX-E7000 User manual

Panasonic
Panasonic KX-E50 Assembly instructions

Panasonic
Panasonic KX-E4500 Assembly instructions

Panasonic
Panasonic KX-E2500 Assembly instructions

Panasonic
Panasonic KX-R530 - Electronic Typewriter User manual

Panasonic
Panasonic KX-R340 User manual