PANJIT Lighting LNF Series User manual

Copyright © 2014, PANJIT Lighting Technology (Shenzhen) Co., Ltd.
NO.20 FACTORY, FUMIN INDUSTRIAL ZONE , PINGHU COMMUNITY PINGHU SUB-DISTRICT, LONGGANG DIST., SHENZHEN, CHINA.
Tel : +86-755-84686621 Fax : +86-755-84679570 http :// www.panjitlighting.com (Panjit Lighting) of 4
LNF Series Floodlight Installation Instruction
Ver. 1.1
Image Description
Water proof cable connector
Part no: PJWCM2015
Material: silicone
Image Description
Cut-off mount kit
Part no:LON-SSL-LStand-A11
Material: steel
Pole mount kit
LON-SAL-BackPlate-A11
Material: steel
1
Accessory List (Optional to Purchase)
Panjit Lighting ® PanjitHT Series Floodlight is designed for use indoors and outdoors in industrial locations where moisture, dirt, corrosion, vibration, and
rough usage may be present. Typical applications include process areas, storage areas, loading docks, rail yards, building perimeters, parking areas, sports
applications, etc.
Warning: To reduce the risk of death, injury or property damage from fire, electric shock, cuts, abrasions, falling parts, and other hazards:
1. Product must be installed in accordance with your local electrical code. If you are not familiar with these codes and requirements, consult a qualified
electrician. DO NOT INSTALLED BY YOURSELF.
2. To avoid the possibility of electrical shock, turn off power supply before installation or servicing.
3. Wear gloves to prevent cuts or abrasions from sharp edges when removing from carton, handling and installing this equipment.
4. When in use the floodlight become extremely hot. Do not touch the floodlight with your bare hands.
5. The standard finishing cannot be used in heavy industrial, chemical, petrochemical or pharmaceutical facilities. For above application and special
requirement please contact Panjit lighting or your local Panjit lighting Distributor.
6. These instructions do not cover all installation, service, and maintenance situations. If your situation is not covered, or if you do not understand these
instructions or additional information is required, contact Panjit lighting or your local Panjit lighting Distributor.
Product Dimensions
566
546
500
Double Module
LNF-KS3XXX / LNF-KD3XXX LNF-KD6XXX LNF-KD4XXX
566
646
600
Double Module
566
406
360
376
406
360
Single Module
READ THESE INSTALLATION INSTRUCTIONS CAREFULLY BEFORE INSTALLING
Cannot be used in the application where has heavy chemical & corrosive condition.
Double Module

Copyright © 2014, PANJIT Lighting Technology (Shenzhen) Co., Ltd.
NO.20 FACTORY, FUMIN INDUSTRIAL ZONE , PINGHU COMMUNITY PINGHU SUB-DISTRICT, LONGGANG DIST., SHENZHEN, CHINA.
Tel : +86-755-84686621 Fax : +86-755-84679570 http :// www.panjitlighting.com (Panjit Lighting) of 4
LNF Series Floodlight Installation Instruction
Ver. 1.1
s
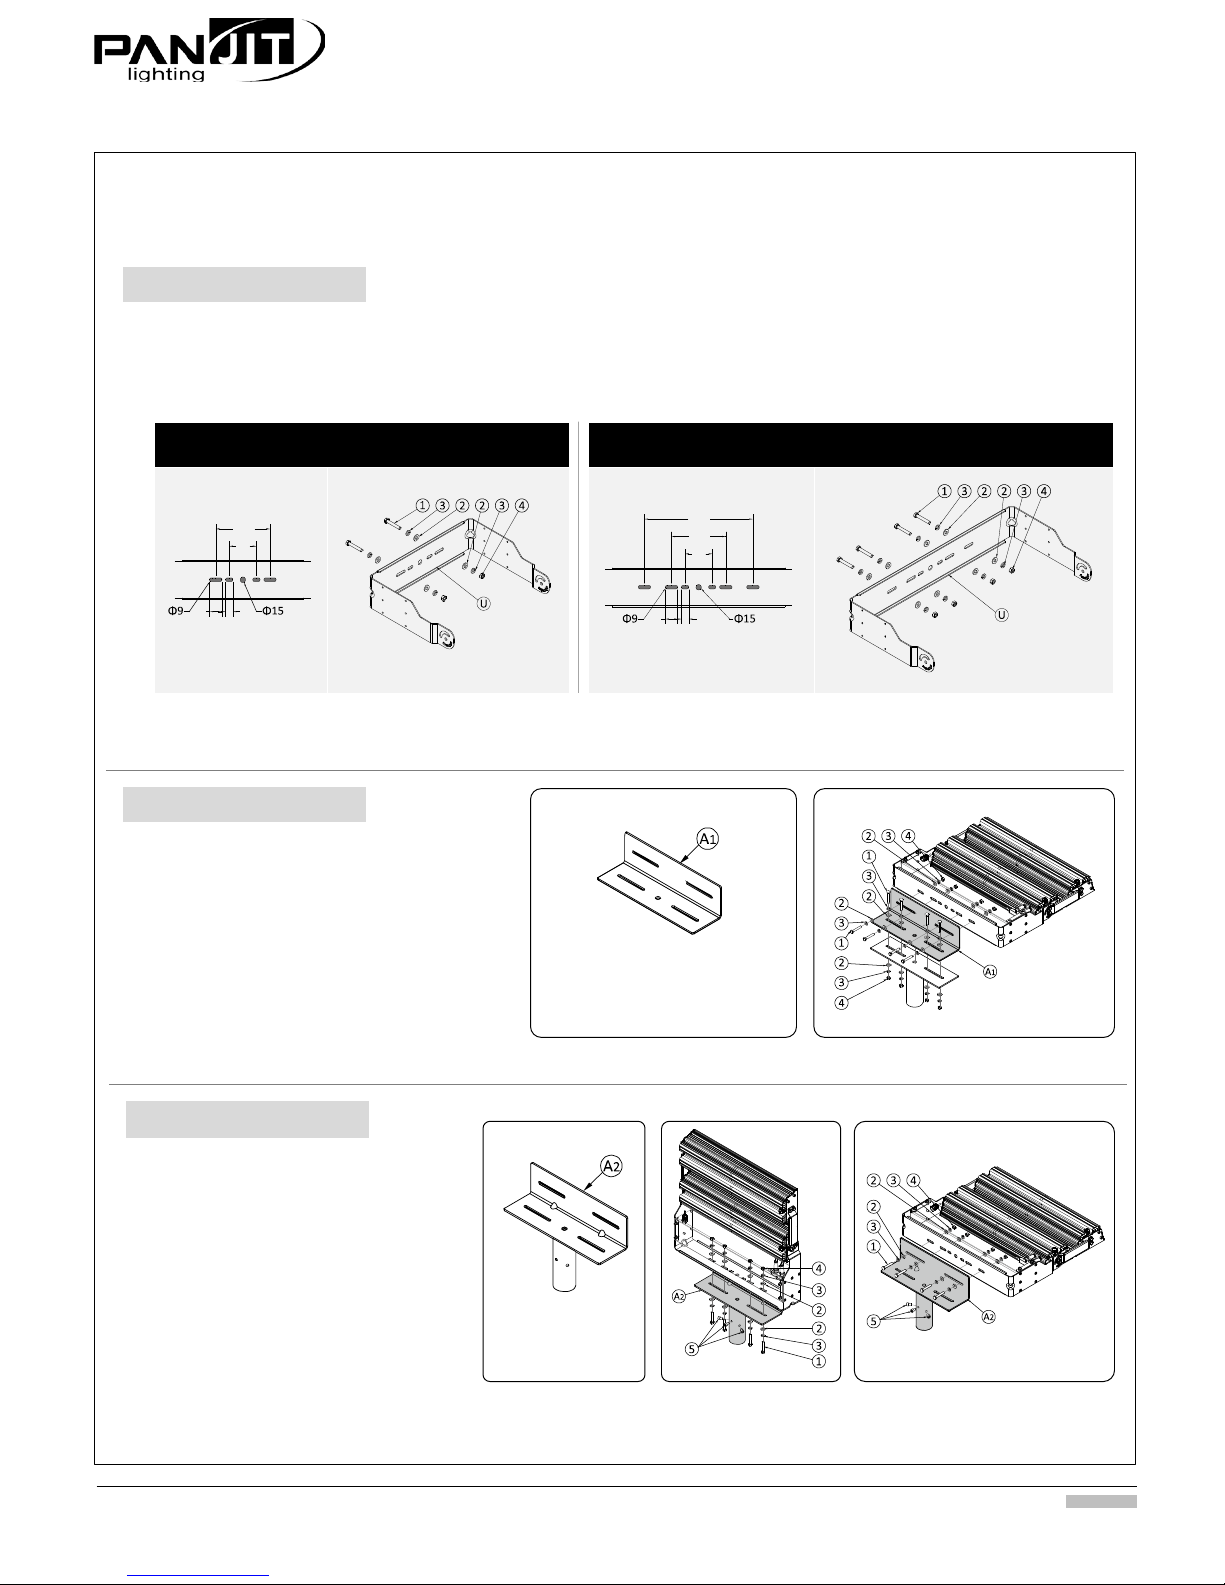
Include: LNF-KD6340, LNF-KD4420
Include: LNF-KS3095, LNF-KS3120, LNF-KD3240
2
Installation
A. Trunnion Mount
1. Identify correspondent trunnion arm of install model, see Fig. A-1 and Fig. A-2. Using trunnion arm as a template, mark and drill desired location
on mounting surface.
2. Secure trunnion arm to mounting surface using M8 bolt set ①②③④.
3. Secure M14 bolt set ⑤at the central hole if needed.
* L-type wrench is recommended during installation.
Component parts: ①M8 Bolts ; ②M8 Flat Washer ; ③M8 Spring Meson ; ④M8 Nut
1. Place Cut-off Mount Kit A1 against housing.
2. Install 4 x M8 bolt sets ①②③ through L plate,
the hole on the trunnion arm. Tighten bolts sets
②③④ at the another side of trunnion.
3. Secure Cut-off Mount Kit A1 and luminare to
mounting surface by using M8 bolts set and nut.
* L-type wrench is recommended during installation.
Important: read aiming limitation on page 3 to determine whether L mount kit (see section B, optional) is needed for
desired angle adjustment.
Apply for: LNF-KS3095, LNF-KS3120, LNF-KD3240,
LNF-KD6340, LNF-KD4420
Fig. B-2
A-1 A-2
B. Trunnion Mount (Cut-off)
C. Pole mount
1. Determine desired mounting direction,
see Figure Fig. C-1 and Fig. C-2.Place Pole
mount kit A2 against housing.
2. Install 4 x M8 bolt sets ①②③ through L
plate, the hole on the trunnion arm.
Tighten bolts with M8 bolt sets ②③④ at
the another side of trunnion.
3. Insert mast arm (Φ 60mm, not included).
Insert 3 x M8 bolt bolts ①through Pole
mount kit A2 and mast arm then tighten
them securely.
* L-type wrench is recommended during
installation.
Fig. C-2 Fig. C-3
Cut-off Mount Kit
Fig. B-1
Pole mount kit
Fig. C-1
Component parts: ①M8 Bolts ; ②M8 Flat Washer ; ③M8 Spring Meson ; ④M8 Nut ;
⑤M8 *12 Bolts
2034
75
150
20
34
300
75
150
Apply for: LNF-KS3095, LNF-KS3120, LNF-KD3240

Copyright © 2014, PANJIT Lighting Technology (Shenzhen) Co., Ltd.
NO.20 FACTORY, FUMIN INDUSTRIAL ZONE , PINGHU COMMUNITY PINGHU SUB-DISTRICT, LONGGANG DIST., SHENZHEN, CHINA.
Tel : +86-755-84686621 Fax : +86-755-84679570 http :// www.panjitlighting.com (Panjit Lighting) of 4
LNF Series Floodlight Installation Instruction
Ver. 1.1
3
1. Loosen 4 x M8 hex bolts (2 on each side) on fixture side arm using
14mm wrench, see Fig.D-1.
2. Make vertical adjustment to desired angle. Make sure the vertical
angle is within aiming range shown on Fig.D-3 and Fig. D-4.
3. To compete adjustment, reinstall 4 x M8 hex bolts (2 on each side)
and tighten them securely.
D. Luminaire Aiming
Aiming Limit: horizontal installation
s
Fig. D-1 Fig. D-3
Fig. D-2
MAX30
MAX 90
Typical Mounting position Aiming Limit: vertical installation
0°

Copyright © 2014, PANJIT Lighting Technology (Shenzhen) Co., Ltd.
NO.20 FACTORY, FUMIN INDUSTRIAL ZONE , PINGHU COMMUNITY PINGHU SUB-DISTRICT, LONGGANG DIST., SHENZHEN, CHINA.
Tel : +86-755-84686621 Fax : +86-755-84679570 http :// www.panjitlighting.com (Panjit Lighting) of 4
LNF Series Floodlight Installation Instruction
Ver. 1.1
4
Driver Maintenance
1. Open back cover ⑨using 5mm hex wrench to loosen 4 X M6 socket hex bolts ⑥,see Fig. G-1 and Keep bolt set aside.
2. Remove driver tray from junction box by using 3.5mm hex wrench to loosen 4 X M4 socket hex bolt set ⑦(Keep bolt set aside).
3. Separate driver from driver tray by using 3.5mm hex wrench to loosen 4 X M4 socket hex bolt set ⑦(Keep bolt set aside).
4. Disconnect waterproof connectors of DC supply end: rotate seal nut then draw out male connector.
5. Rotate stainless M16 connector to right and draw out AC wire.
6. install new driver and undo step 6 to 1 to complete driver replacement and securely tighten all screws.
Electrical Connection
1. Open back cover ⑨using 5mm hex wrench to loosen 4 X M6 socket hex bolt sets⑥,see Fig.
F-1 and Keep bolt set aside.
2. Rotate stainless M18 connector⑧to right and draw out AC wire.
3. Pull 3x1.5mm portable cord(not provided, or use other extra hard usage portable cord)
supply wire from customer power supply through stainless M18 connector ⑧.
4. Using the PJWCM2015 cable connector to connect driver and supply wire (see Fig. F-2 ):
4.1. Tread seal nut, seal clamp and seal ring onto both power supply and driver AC cable.
4.2. connect and lock supply ground wire to ground wire from green wire of the driver onto
connector and secure 2X side screws by flathead screw driver.
4.3. connect and lock supply line conductor to black wire of driver onto connector, and
secure 2X side screws by flathead screw driver.
4.4 . connect and lock supply neutral conductor to white wire. of driver onto connector, and
secure 2X side screws by flathead screw driver.
4.5. rotate to tighten seal clamp and seal nut
5. Reinstall back cover to complete the installation.
Make sure the seal ring is
positioned as shown
Warming! To reduce the risk of electrocution:
•Luminaire must be power off during lamp installation
•Make sure the equipment is properly grounded
Fig. G-2
Fig. G-1
Fig. F-1
Wiring Diagrams
Fig. F-3
Component parts:
⑥M6 socket hex bolts + Flat Washer
⑧M18 connector
⑨Back cover
Component parts:
⑥M6 Socket Hex Bolt + Flat Washer
⑦M4 Socket Hex Bolt + Flat Washer
⑧M18 Connector
⑨Back Cover
⑩Power Driver
Driver Tray
s
Fig. F-2
Seal Nut Seal Nut
Seal RingSeal Ring
Seal Clamp
O-RingO-Ring
Housing Connector
AC
Cable
AC
Cable
Seal Clamp
⑨
Table of contents
Popular Floodlight manuals by other brands

Lithonia Lighting
Lithonia Lighting ESXF3 ALO SWW2 YS DDB installation instructions

Kogan
Kogan NBLTFSLM2DA user guide

Eterna
Eterna FL157BPC Safety and installation instructions

NightSearcher
NightSearcher SOLOSTAR user manual

Haneco
Haneco PROXIMA-TRI installation guide

Ibiza
Ibiza DJLIGHT65 instruction manual