PANTRYCHIC PC01 User manual

PANTRYCHIC™ Smart
Storage System
INSTRUCTION MANUAL
PANTRYCHIC™ SMART STORAGE SYSTEM PC01
Foryoursafetyandcontinuedenjoymentofthisproduct,alwaysreadtheinstruction
bookcarefullybeforeusing.
Table of Contents

PANTRYCHIC™SMARTSTORAGESYSTEMCAPACITIES
BASE UNIT SCALE
Base unit digital scale can hold up to 11 pounds
LARGE SMARTCANISTER™
The large canister can hold a full 5-pound bag of all purpose flour
SMALL SMARTCANISTER™
The small canister can hold up to 1½ pounds of all purpose flour
NOTE:Remembertoreturnyourcompletedproductregistrationcardwithall
informationcarefullyfilledout.

TABLEOFCONTENTS
Recommended Capacities
Table Of Contents
Important Safeguards
Introduction
Machine Includes
Assembly Instructions
Initial Use Preparation
Machine Functions
Operating Instructions
Insert/Remove SmartCanister™
Assign SmartCanister™
Auto Dispensing
Manual Dispensing
Reassign SmartCanister™
SmartCanister™ Information
Preferences
Digital Scale
Error Messages
Cleaning And Storing
For Your Safety
Technical Data
Bluetooth® Setup and Pairing with Chefling™ App
Warranty
IMPORTANTSAFEGUARDS
Always follow these safety precautions when using this appliance.
Getting Ready
1. Read all instructions.
2. Always unplug from outlet when not in use and before cleaning. To unplug, grasp the
plug and pull from electrical outlet. Never pull the cord.
3. Do not use outdoors.
4. Do not let the cord hang over the edge of a table or counter, or touch hot surfaces.
5. Do not operate any appliance with a damaged cord or plug, or after the appliance has
been dropped or damaged in any way. Return the appliance to the nearest authorized
service facility for examination, repair, or electrical or mechanical adjustment.
Operation
1. Always operate the dispensing system with the SmartCanister™ lid in place. The
motor will stop if the lid is removed from the Large SmartCanister™.
2. Never try to override or tamper with lid interlock mechanism.
3. Keep hands as well as spatulas and other objects away from moving augers while
actively dispensing, to prevent the possibility of personal injury or damage to the

SmartCanister™. A utensil may be used to clear any blockages, but only when the
system motor is stopped.
4. Avoid contact with moving parts. Never push food down into the auger by hand
when actively dispensing.
5. Make sure the motor has completely stopped before removing the lid. (If machine
does not stop within 4 seconds after you remove the lid (on Large SmartCanister™
only) assembly, email customer service at customerservice@pantrychic.com for
assistance. Do not use the machine.)
Cleaning
To protect against the risk of electrical shock, do not put the base in water or other
liquids
.
General
1. Close supervision is necessary when any appliance is used by or near children.
2. Do not operate this, or any other motor-driven appliance, while under the influence
of alcohol or other substances that affect your reaction time or perception.
3. This PANTRYCHIC™ System is UL listed for household use. Use it only for food
preparation as described in this instruction manual.
4. The use of attachments/canisters that are not recommended or sold by
PANTRYCHIC™ may cause fire, electrical shock, personal injury, or damage to your
PANTRYCHIC™ System.
5. Maximum rating of 5.2 amperes is based on attachment that draws greatest current.
Other recommended attachments may draw significantly less current.
NOTICE: A short power supply cord is provided to reduce the risk of personal injury
resulting from becoming entangled in or tripping over a longer cord. If a longer cord is
required, extension cords are available from local hardware stores and may be used if
care is exercised in their use. If an extension cord is used:
● The marked electrical rating of the extension cord should be at least as great
as the electrical rating of the appliance.
● The longer cord should be arranged so that it will not drape over the
countertop or tabletop where it can be pulled on by children or tripped over
accidentally.
This appliance has a polarized plug (one blade is wider than the other). As a safety
feature, this plug will fit in a polarized outlet only one way. If the plug does not fit fully
in the outlet, reverse the plug. If it still does not fit, contact a qualified electrician. Do
not attempt to defeat this safety feature. Do not modify the plug in any way.
This appliance is not intended for use by persons (including children) with reduced
physical, sensory or mental capabilities, or lack of experience and knowledge, unless

they have been given supervision or instruction concerning use of the appliance by a
person responsible for their safety.
Children should be supervised to ensure that they do not play with the appliance.
SAVETHESEINSTRUCTIONSFORHOUSEHOLDUSEONLY
INTRODUCTION
Congratulations on your purchase of the revolutionary PANTRYCHIC™ Store &
Dispense System. This product is the Smart solution that will set a new standard for
storing, measuring, dispensing and tracking your dry ingredients.
MACHINEINCLUDES
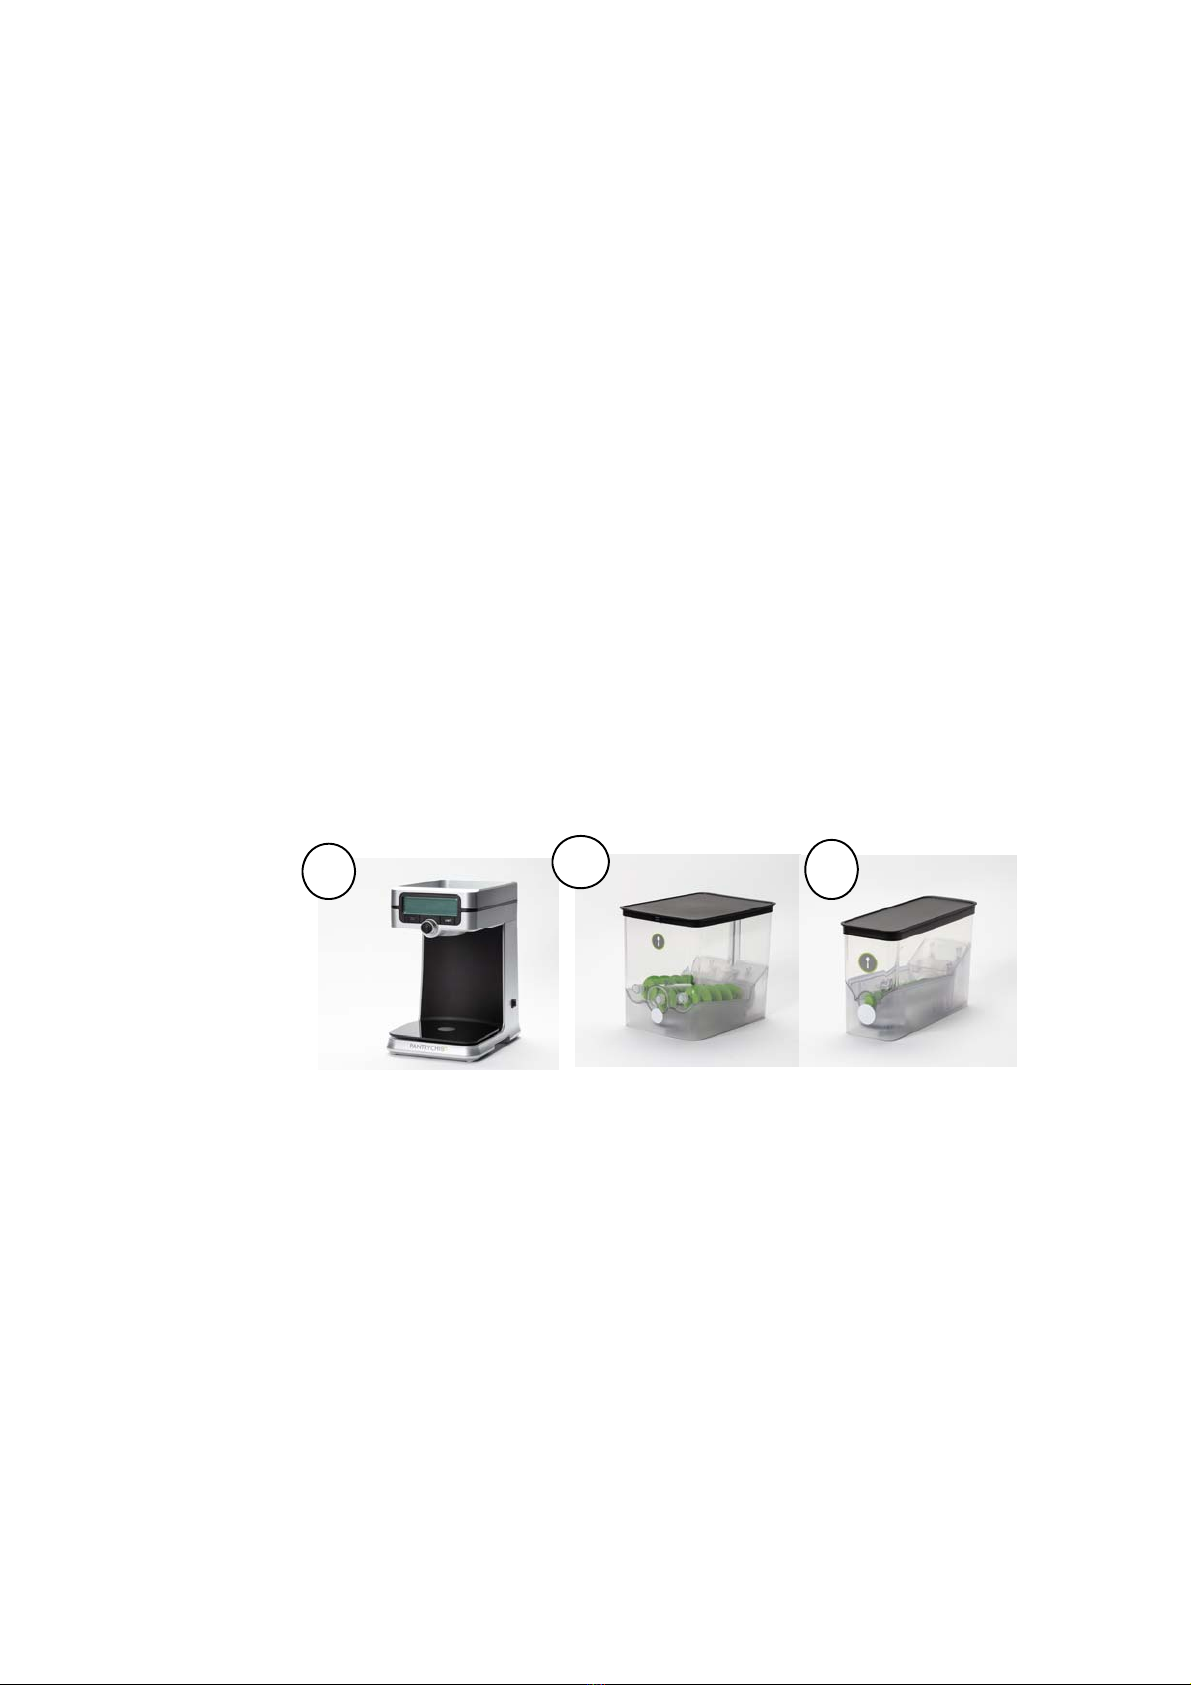
Description(Fig.A)
1. Lid of Canister
2. Auger
3. SmartCanister™
4. Base tray
5. Motor
6. Base
7. Power Switch
8. Scale
9. Cable storage box
10. Bottom plate
11. Cap (Insert graphic to illustrate)
● Base Unit (A)
o Motor, PCB boards, Digital Scale, NFC, Receiving tray, Interface, Master
dial & button, Unit of Measure (UOM) button, back button, cord box
● Large SmartCanister™ (B)
o Self-contained gear box, NFC tag, 3 augers, cover, safety interlock,
dispensing hole/cap, airtight lid
● Small SmartCanisters™(C)
o Self-contained gear box, NFC tag, 1 auger and cover, dispensing hole/cap,
airtight lid
C
B
A
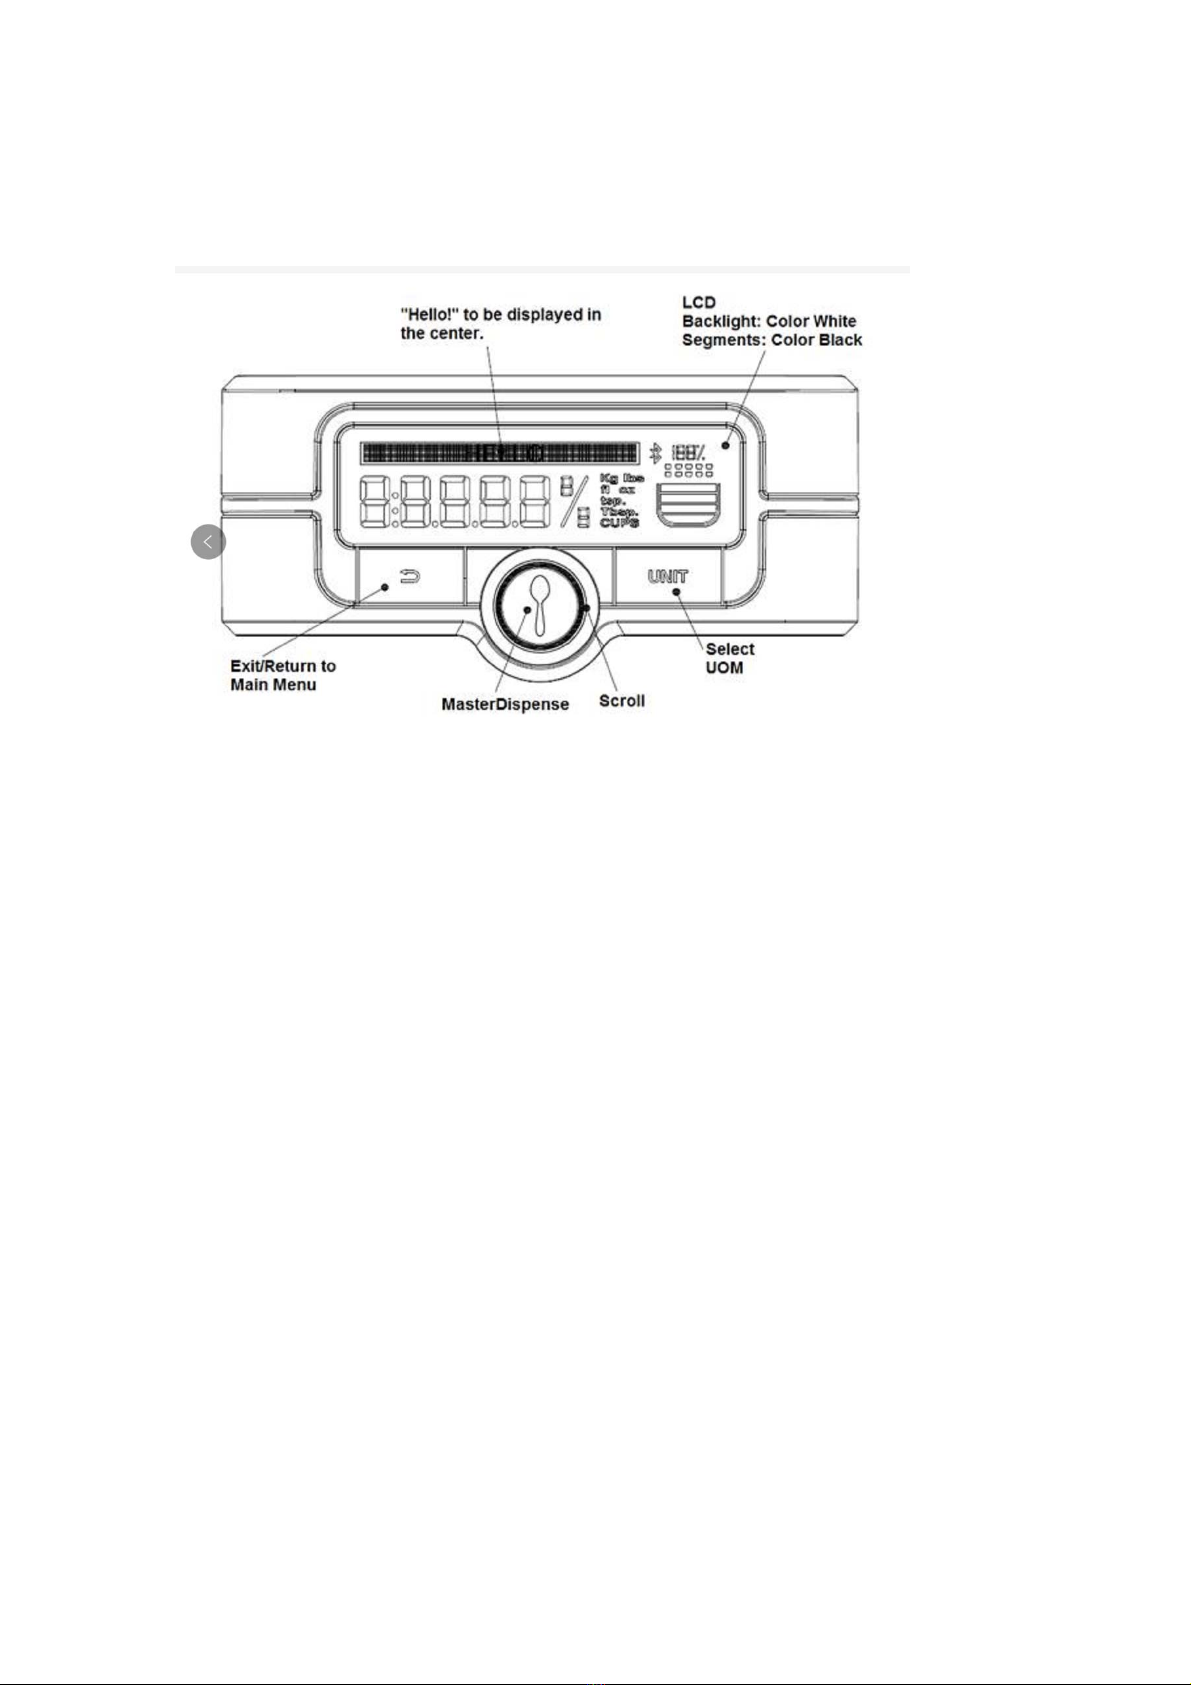
BASEUNITINTERFACECOMPONENTS
RATING:120V60Hz,12VAC.
The maximum capacity of the appliance is 5lb of all purpose flour or the equivalent
volume of other ingredients. The appliance is suitable for indoor use only. The
appliance is suitable for domestic use only. Before you proceed, we need you to pay
attention to the following notes:
MACHINEFUNCTIONS:
INGREDIENT STORAGE
After properly cleaning and completely drying the SmartCanisters™, store dry
ingredients in canisters to maintain freshness. SmartCanisters™ are airtight. Refer to
below for the complete list of validated dry ingredients:


INGREDIENT INFORMATION STORAGE
SmartCanisters™ contain NFC (Near-field Communication) tags that store the following
ingredient information: Name, weight conversions, SmartCanister™ Size.
AUTOMATIC VOLUME TO WEIGHT CONVERSIONS
Ingredient conversions were determined by using the USDA Food Composition
Database (https://ndb.nal.usda.gov/ndb/search/list).
Standard Volume to Weight Conversion Chart:
1 Cup = X grams (Data entry from USDA)
Ounces = X grams/28
Tablespoons = X grams/16
teaspoons = X grams/48
lbs = X grams/454
AUTOMATIC DISPENSING BY WEIGHT
The PANTRYCHIC™ System automatically converts an inputted quantity into grams
and accurately dispenses directly from its airtight SmartCanisters™.
DISPENSING: First In First Out (FIFO) METHOD
SmartCanisters™ utilize the FIFO method as they are filled from the top and dispense
from the bottom to maximize ingredient freshness.
Large SmartCanister™: Holds up to 5 pounds of all purpose flour.
Small SmartCanister™: Holds up to 1.5 pounds of all purpose flour.
LCD Display: Displays menu, ingredient, weight and dispensing information.
CONSECUTIVE DISPENSING FOR BATCH PREPARATION
Make measuring multiple batches more efficient by dispensing the same quantity of an
ingredient consecutively into several bowls or bag with the press of a button.
BLUETOOTH® ENABLES A CONNECTED EXPERIENCE WITH THE CHEFLING™ RECIPE
APP
Use your PANTRYCHIC™ System with the Chefling™ App to:
● Access thousands of recipes and do guided recipe walk-throughs
● Manage ingredient inventory in your SmartCanisters™ and overall pantry
● Create weekly meal plans
● Create Shopping lists and purchase directly from the app
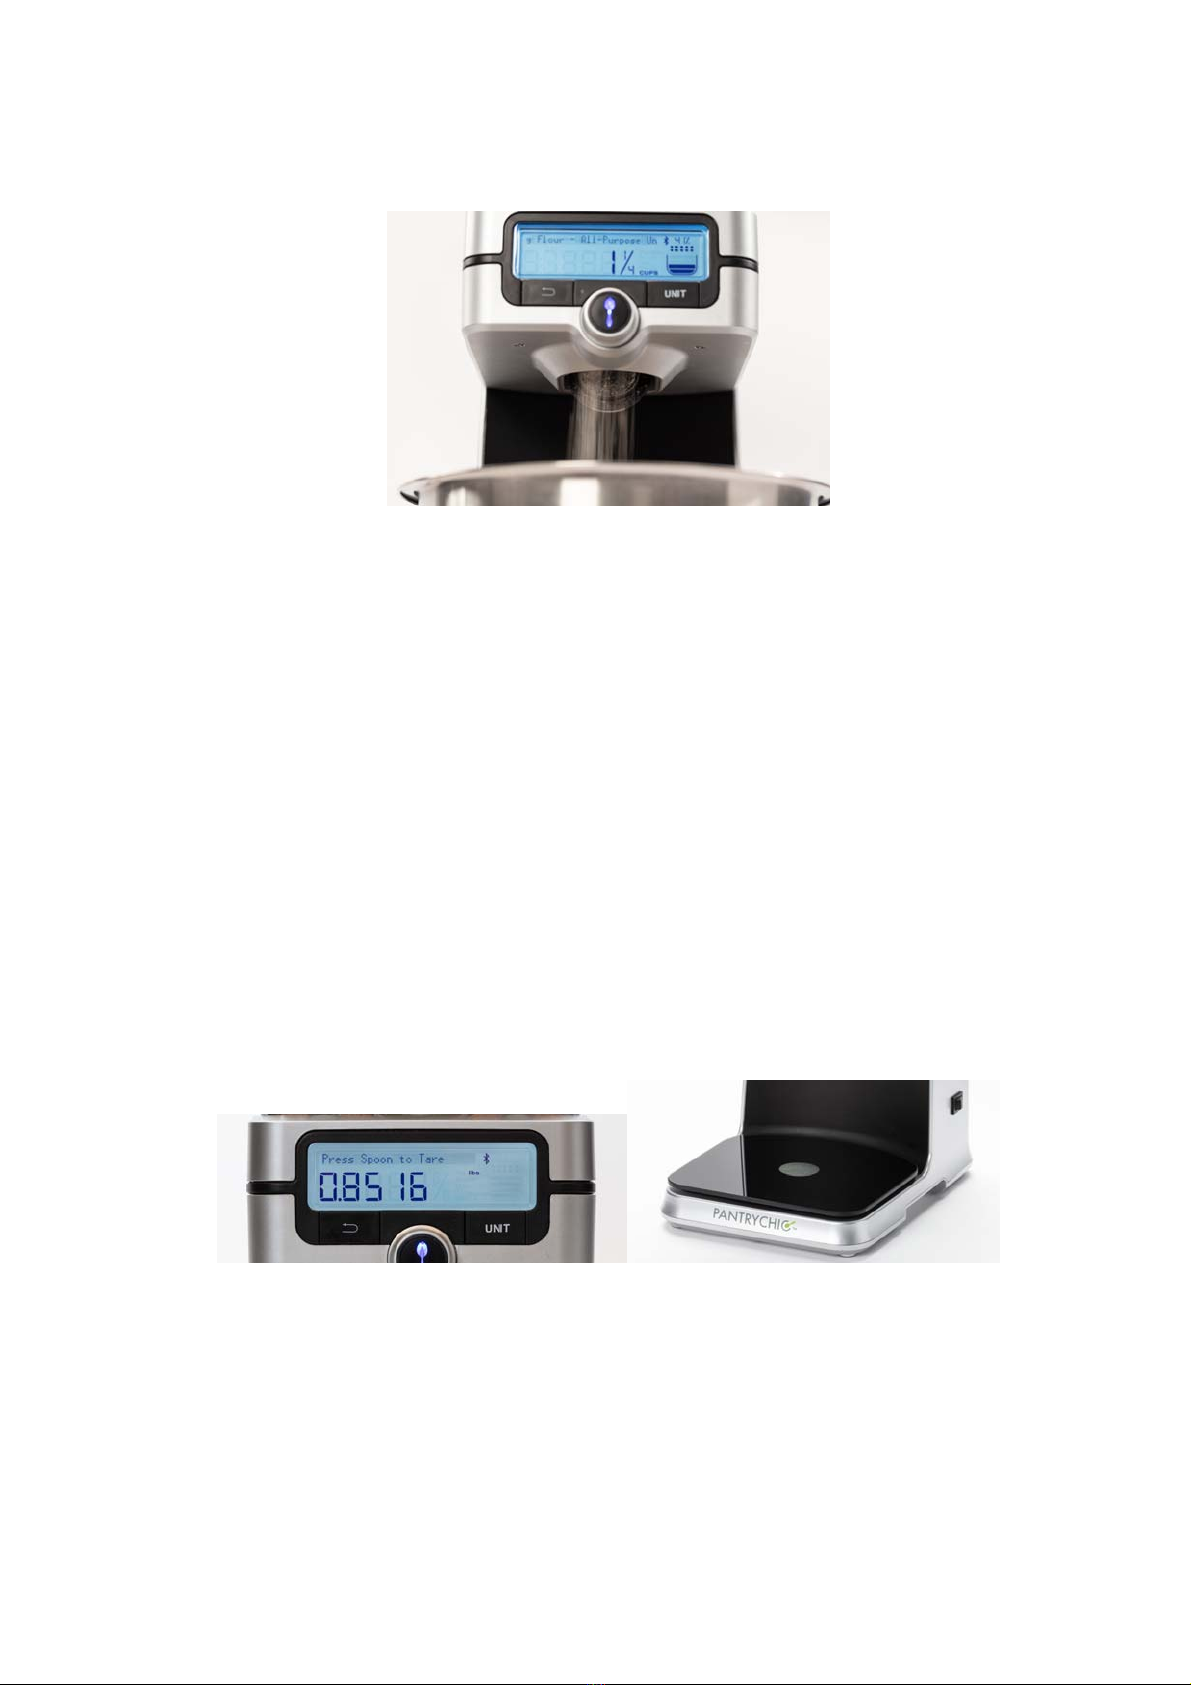
DIGITAL SCALE
Base unit can be used as a traditional digital scale to measure meats, liquids, dry
ingredients, etc.
ASSEMBLYINSTRUCTIONS
BASE UNIT
Place base unit on a sturdy table or countertop, locate the cord in the cord box and
plug it into the wall socket.
Table of contents
Other PANTRYCHIC Storage manuals


