manuals.online logo
Brands
  1. Home
  2. •
  3. Brands
  4. •
  5. Paradise Datacom
  6. •
  7. Landscape Lighting
  8. •
  9. Paradise Datacom M52731 User manual

Paradise Datacom M52731 User manual

READ, FOLLOW AND SAVE THESE INSTRUCTIONS
Solar pathlight
with Remote
MODEL #M52731
CUSTOMER SERVICE
1-888-867-6095 • customer[email protected] • www.paradisegardenlighting.com
5007-M52731-EN_011317
DEAR CUSTOMER,
Congratulations on your purchase of a PARADISE® lighting product. Our products will help to enhance the beauty of your home and provide many
years of enjoyment. PARADISE® offers a wide selection of lighting products of the highest professional quality. Ask your dealer about the many
other PARADISE® products that will help to create your own paradise.
To ensure the maximum performance of your garden light, please read and save these instructions.
Replacement parts may be ordered by using the fixture model number and the part’s name.
1. How your solar powered fixture works
During the day, the solar panel converts sunlight into electricity and recharges the battery / batteries. At night, the light turns on automatically
using the electricity stored during that day.
The number of hours the light stays on depends on your geographical location, weather conditions and seasonal sunlight availability.
Place the solar light fixture in an area where it can receive direct sunlight for at least 8 hours each day. Shadowed locations will not allow the
battery / batteries to charge fully and will reduce the hours of nighttime lighting. The selected location should not be near nighttime light sources,
such as porch lights, street lights or pool lights, as these may cause the solar light to turn off prematurely.
CC
CC
CC
Remote
Pathlight
CC
3. Fixture Assembly
Top Cap
Post
Lens
Pull-tab
Spike
• Install the top cap on the lens by turning it
clockwise.
• Attach the spike to the post by pressing them
together and press the post into the bottom of
the lens base.
2. First time use
If the solar panel is covered by a protective film, remove it before using the product. Remove the pull-tab. Place the solar light in a location where
it can receive a full 8 hours of sunlight to allow the rechargeable battery/batteries to reach maximum capacity.
5. Troubleshooting
If the light does not turn on at dusk after 8 hours of charging :
• Ensure that the solar light is in a bright sunny location and not in a shady area during the day.
• Make sure that the light’s photocell is not affected by other light sources at night.
• Verify that the battery/batteries are making contact with the terminal and that they have been inserted in the correct polarity.
4. Installation tips for spike
• If the soil is of a loose, sandy or organic type, grasp the post with both hands near the spike and firmly push into the ground.
• If the soil is hard, pour some water onto the ground to soften it.
• If the soil is stony, soften the ground with a rake or shovel and remove large rocks. Dig a small hole, insert the fixture spike, replace the soil and tap down.
• Never push fixture into the ground by the fixture head.
• Warning: When planting the spike ensure that there are no underground utility lines or pipes.
ATTENTION
TO REMOVE SPIKE
FROM POST
PULL DOWN
ATTENTION
LE PIQUET
EST INSÉRÉ
DANS LE POTEAU
6. Battery Replacement
NOTE : This operation should be done in the morning
on a sunny day. This will allow the light to receive a full
8 hours of sunlight so that the rechargeable
battery can reach maximum capacity.
• Remove the battery cover.
• Remove the old battery and replace with
1 new AA size 1.2V NI-Mh rechargeable battery
of same or greater mAh.
(USE RECHARGEABLE BATTERIES ONLY).
Note : Clean the battery contacts and those of the
device prior to battery installation.
• Be sure to insert the battery in proper direction.
• Replace the battery cover.
CC
Battery Compartment
Cover
Battery
8. CAUTION
• Safe for outdoor operation.
• Failure to insert battery/batteries in the correct polarity, as indicated in the battery compartment, may shorten the life of the battery/batteries or
cause battery/batteries to explode or leak.
• Do not mix old and new batteries. Replace all batteries of a set at the same time.
• Do not mix Alkaline, Standard (Carbon-Zinc) or Rechargeable (Nickel Cadmium) or (Nickel Metal Hydride) batteries.
• Do not dispose of batteries in fire.
• Batteries must be recycled or disposed of as per state or local guidelines.
• Remove battery/batteries if consumed or if product is to be left unused for a long period.
• REPLACEMENT PARTS MAY BE ORDERED BY USING THE FIXTURE MODEL NUMBER AND THE PART’S NAME.
ONE (1) YEAR LIMITED WARRANTY
This product is guaranteed to be free from defects in material and workmanship for one (1) year following the date of purchase (excluding the battery/batteries). Should a defect occur within the warranty
period, please contact our customer service line at 1-888-867-6095 or at the following email address : customer[email protected] or by mail at Northern International Inc., P.O. Box 82327 Burnaby
B.C., Canada V5C 5P8. A proof of purchase (sales receipt) will be required. Damage to any parts as such by accident, misuse, or improper installation is NOT covered by this warranty. Our policy does not
include liability for incidental or consequential damages. Some states or provinces do not allow the exclusion or limitation of consequential damages; therefore, the above exclusion may not apply to you.
This warranty gives you specific legal rights and you may also have other rights that vary from state to state.
MADE IN CHINA
CUSTOMER SERVICE
1-888-867-6095 • customer[email protected] • www.paradisegardenlighting.com
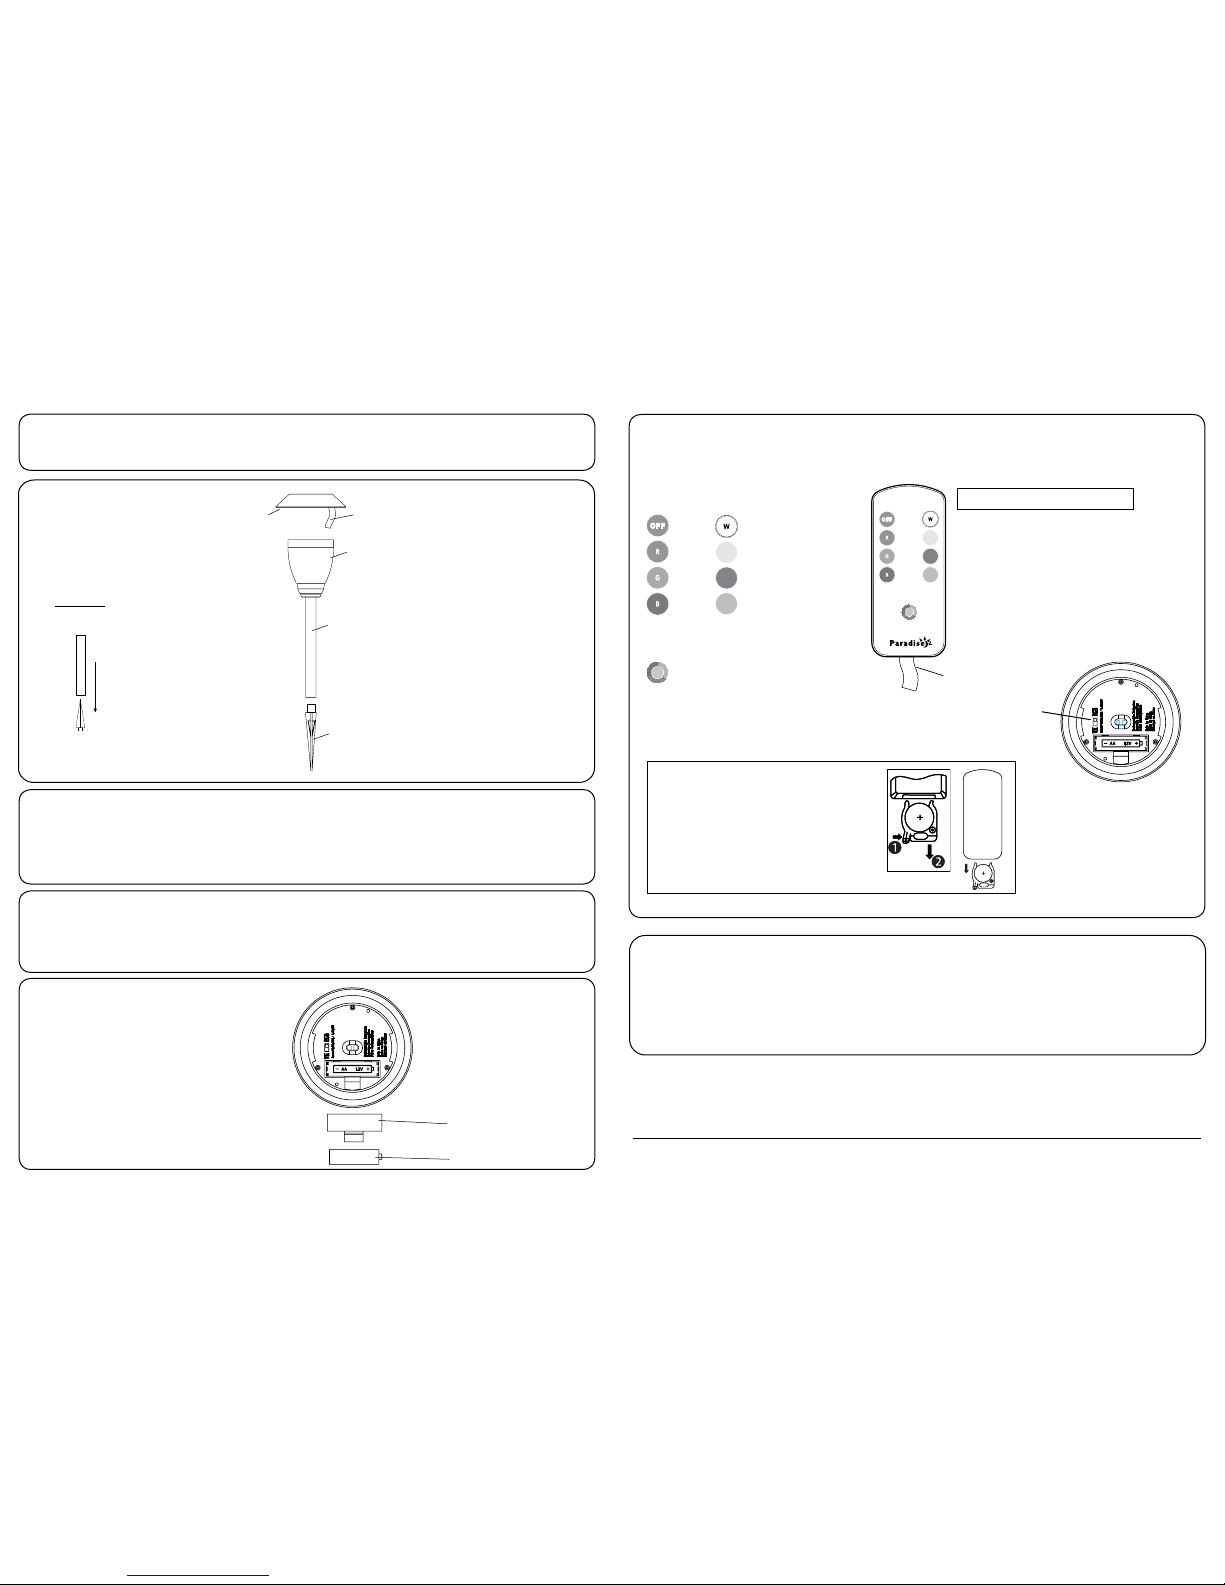
Note: Remove the pull-tab to allow the remote control to function.
7.1 FIXED COLOR SELECTION
Sets the fixtures on the desired color.
7.2 COLOR CHANGING MODE
Press this button for the color changing mode.
7.3 IN THE EVENT YOU LOSE THE REMOTE
You can manually select white or color changing using the switch beneath the light fixture lid.
7. Remote Operation
WHITE
YELLOWRED
OFF
MAGENTAGREEN
BLUE CYAN
Note: Do not expose remote to wet locations
CC
C C
CC
C C
CC
Switch
Remove pull-tab
REMOTE CONTROL BATTERY REPLACEMENT
1. Push tab inward (ill.1), while pulling out battery
compartment as shown.
2. Remove used battery and replace with a new CR2025
3V Lithium battery in proper polarity as indicated. (ill.1)
Clean the battery contacts.
3. Close battery door on the remote control.
Note: Battery must be recycled as per state and local
guidelines.
ill.1
CC

Other Paradise Datacom Landscape Lighting manuals

Paradise Datacom GL28988 User manual

Paradise Datacom

Paradise Datacom GL28988 User manual

Paradise Datacom GL28220 User manual

Paradise Datacom

Paradise Datacom GL28220 User manual

Paradise Datacom GL28106 User manual

Paradise Datacom

Paradise Datacom GL28106 User manual

Paradise Datacom U000-1011 User manual

Paradise Datacom

Paradise Datacom U000-1011 User manual

Paradise Datacom GL33010 User manual

Paradise Datacom

Paradise Datacom GL33010 User manual

Paradise Datacom U000-1010 User manual

Paradise Datacom

Paradise Datacom U000-1010 User manual

Paradise Datacom GL33315 User manual

Paradise Datacom

Paradise Datacom GL33315 User manual

Paradise Datacom U000-1294 User manual

Paradise Datacom

Paradise Datacom U000-1294 User manual

Paradise Datacom GL33912BK User manual

Paradise Datacom

Paradise Datacom GL33912BK User manual

Paradise Datacom GL23158 User manual

Paradise Datacom

Paradise Datacom GL23158 User manual

Paradise Datacom GL22720 User manual

Paradise Datacom

Paradise Datacom GL22720 User manual

Paradise Datacom U000-1295 User manual

Paradise Datacom

Paradise Datacom U000-1295 User manual

Popular Landscape Lighting manuals by other brands

Novolink Lightscape LS-101B-WLVCTL Installation and use

Novolink

Novolink Lightscape LS-101B-WLVCTL Installation and use

Malibu Boats LZ418-2SM quick start guide

Malibu Boats

Malibu Boats LZ418-2SM quick start guide

Volt VPL-3024-BBZ installation instructions

Volt

Volt VPL-3024-BBZ installation instructions

AMP Lighting DecoPro ADL-2012-4-B-BZ Installation & maintenance guide

AMP Lighting

AMP Lighting DecoPro ADL-2012-4-B-BZ Installation & maintenance guide

Cooper Lighting Landau MFT91MWWFT4 Specification sheet

Cooper Lighting

Cooper Lighting Landau MFT91MWWFT4 Specification sheet

Malibu Boats LZ25030RB instructions

Malibu Boats

Malibu Boats LZ25030RB instructions

LIGMAN VANCOUVER 28 VA-30031 installation manual

LIGMAN

LIGMAN VANCOUVER 28 VA-30031 installation manual

LIGMAN NYB-80345 installation manual

LIGMAN

LIGMAN NYB-80345 installation manual

Volt BRASS BULLY VWL-5 Series installation instructions

Volt

Volt BRASS BULLY VWL-5 Series installation instructions

Cooper Lighting Vision AVM40MWW3S Specifications

Cooper Lighting

Cooper Lighting Vision AVM40MWW3S Specifications

Cooper Lighting Breckenridge MPB50SR255 Specification sheet

Cooper Lighting

Cooper Lighting Breckenridge MPB50SR255 Specification sheet

LIGMAN NYB-80357 installation manual

LIGMAN

LIGMAN NYB-80357 installation manual

LIGMAN TEXAS 1 installation manual

LIGMAN

LIGMAN TEXAS 1 installation manual

SLV SOLASTO 227680 instruction manual

SLV

SLV SOLASTO 227680 instruction manual

LIGMAN LE-40601-S installation manual

LIGMAN

LIGMAN LE-40601-S installation manual

LIGMAN HAM-30002 installation manual

LIGMAN

LIGMAN HAM-30002 installation manual

Kanlux INVO TR manual

Kanlux

Kanlux INVO TR manual

PondMAX 24PL694 instruction manual

PondMAX

PondMAX 24PL694 instruction manual

manuals.online logo
manuals.online logoBrands
  • About & Mission
  • Contact us
  • Privacy Policy
  • Terms and Conditions

Copyright 2025 Manuals.Online. All Rights Reserved.