Pard NV007V User manual

Digital night vision
PARD
NV007V
Operation Manual
Important note
—2——3—
—1—
2.Indicator adjustment
4.Red dot indication
1.Stretchable fill light
3.Battery compartment cap
5.Sleeve base
1) Please do not look directly into the infrared light from the IR Torch
as this may result in permanent eye damage.
2) Due to the power of the Infrared light, DO NOT project the beam
onto any flammable object as this may result in a fire. When not in use,
switch off the device or place it in sleep mode.
3) This product can be used with any rifle scope that is parallax
adjustable however to get the best performance from this product use a
rifle scope that can parallax below 50m.
4) Caution –Use of controls, adjustments or performance of
procedures other than those specified herein may result in hazardous
radiation

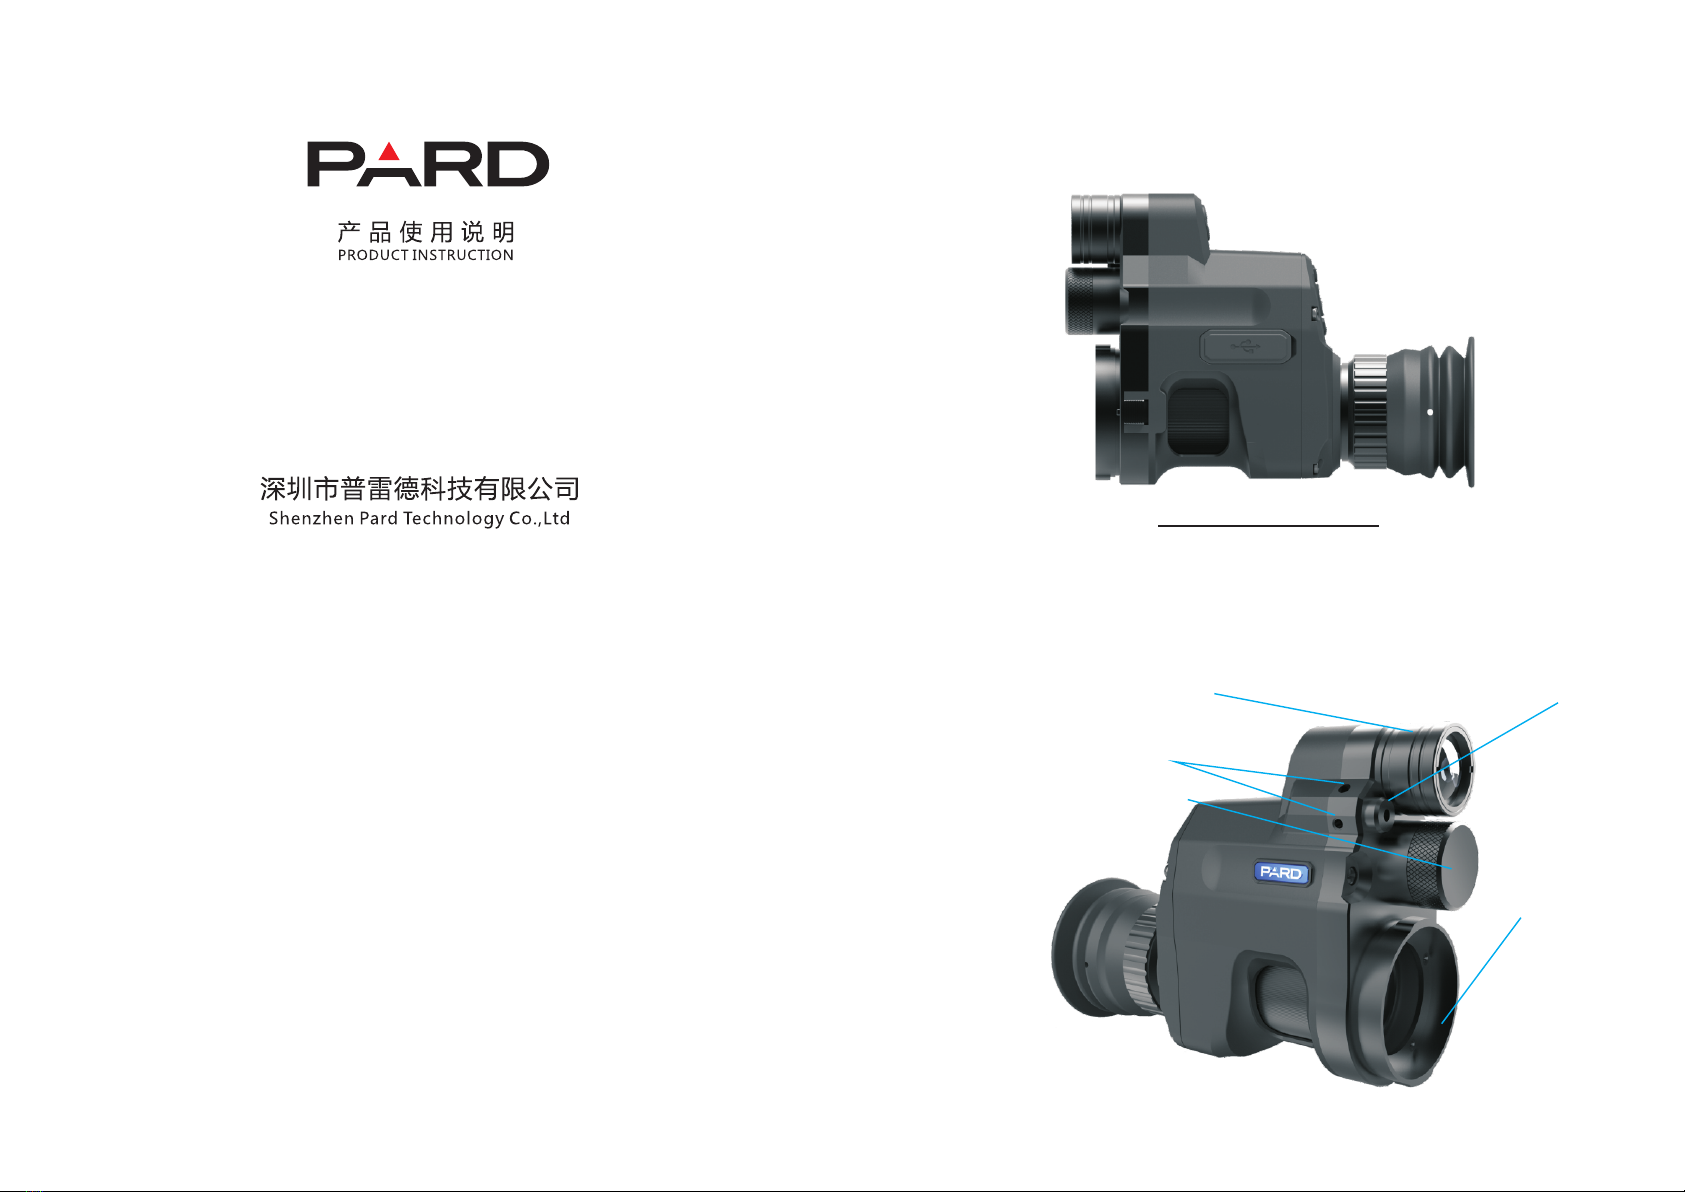
7.IR fill light brilliance control
/ Color or BW mode
6.Sleep/Power
8.Red dot switch
9.Menu / Playback
10.OK/Photo/Recording
11.Zoom / WiFi
15.Eyepiece Dioptric adjustment ring
13. SD slot/ USB / HDMI
12.Sleeve lock
14.Objective lens Focusing adjustment ring
—4—
Contents Includes:
This box contains a night vision optics with,
Installation
1.Battery Installation
2.Operational instruction
—5—
—7—
1x Pard 007V 1x Hexagon wrenches
1x USB Data Cable; 1x Software package.
; ;
—6—
Storage card is not included. Please prepare a TF card (128g maximum)
for data storage.
The unit is supplied with 3.7V 18650 Lithium re-chargeable flat
batteries.
To Load the battery remove the battery compartment cap, slide the
battery (positive + polar end first) into the battery compartment. Replace
the cap and tighten firmly to ensure the battery is fully contained and both
ends of the battery are in contact with the battery terminals. Failure to do
so may result in intermittent fault.
●Turn on the power and wait for the menu to appear in the image
screen. After the menu is present adjust the diopter to ensure you can
clearly view the screen and the information and icons contained on it.
●To adjust the diopter first adjusts the eyepiece dioptric adjustment
ring until the menu and icon characters appearance become sharp in the
screen. (N.B this part of the start-up process does not mean you will have a
clear long range image in your view.)
●Ensure that the rifle is unloaded and pointed in a safe direction.
●Fit the NV007V to your rifle scope. Insert the unit into a bayonet of
the correct size for your rifle scope, rotating clockwise and ensuring the
sleeve lock clicks into place. Adjust the packing / shim on the rifle scope
so that the bayonet is a tight sliding fit. Slide the whole assembly onto the
eyepiece of the rifle scope. Adjust the barrel focus of the NV007V so that
the reticule is in sharp focus. Move the assembly forwards and backwards
to obtain a full image of the rifle scope view on the display. The object is to
get a satisfactory field of view with pushed as far forward as possible.
Align the assembly so that the reticule is centered and level within the
display of the NV007V. Tighten the bayonet clamp bolts while checking
that the alignment is still centered and level. It is worth spending some
time to get this as perfect as possible as it only needs doing once.
●Place the eye piece of the rifle scope into the QR sleeve. Ensure you
slide the QR over the eye piece and lock it in place tightly. Adjust the
connection angel if necessary and once the rifle scope and Pard unit are
aligned perfectly to your personal requirements, tighten the fastening
screw on the QR ring for a strong and stable connection.
●Now that the Pard unit is locked on to your rifle optic then please
turn the rifle scopes objective lens focusing adjustment ring until a crystal
clear image of your cross hairs appears in the center of the screen.
●To disconnect the unit from your rifle optic turn the Pard unit
through a half turn and the unit will disconnect from the rifle scope.

—8—
—11—
—10—
—9—
3.Eye piece adjustment
4.The objective lens focusing
5.IR power control
6.Laser ranging
7.Menu operation
1>Color
2>Brilliance control
Reticle Center Position Adjustment
Color
Brightness Of IR
Brightness
autorecording
Looprecording
Date Stamp
The dioptric adjustment is designed to ensure a clear visual image
through the unit for people with varying levels of focused vision. Turn the
eyepiece dioptric to bring the menu into sharp focus as you require. The
unit once set up is set to your personal needs and no further adjustment
should be need.
Focus the unit on the intended object and turn the objective lens ring
accordingly until you have the object in clear focus. (Please ensure that
you have adjusted the dioptric eyepiece before focusing the Objective
lens adjustment.)
Press and hold zoom in/red laser switch button to turn on or off the
laser ranging function
Do not look directly at the IR infrared light as this could cause your
eye damage! Switch on the unit. The units display screen will illuminate
into black and white mode. In black & White mode press repeatedly the IR
fill light control button to 8 increase the IR light levels as required. The
unit has 3 power levels 1, 2, 3 and Off. All of which can be adjusted to
increase or decrease the focus of the beam as required. Also within the
top right hand corner of the screen the letters IR will be visible as another
visual warning that the IR is switched on. The IR light also has a zoom head
so this can be pulled out to enable a tighter further reaching beam.
Press Menu button to call up the menu the option. Press +/- button to
select each sub menu. Press OK/photo/ recording to enter the settings :
Press "+/-" button repeatedly and select"Color" in roll-up menu.
Press "OK" to enter setting. Press "+/-" repeatedly to select color or BW
mode in turn. Press"OK" to set.
Select "IR brilliance control" and press "OK" to enter. Press "+/-"
repeatedly to make switch among "off, 1,2,3". Press"OK"to set.
Please note that the setting you've made will only take effect in your
next starting up. This is Not for your instant setting.
Instructions for use
1.Turn On/Off:
2.Sleep / Wake-up mode:
●Daytime use: Use the rifle scope side wheel or adjustable objective
to bring the target into sharp focus.
●Night-time use: Set your rifle scope to its lowest magnification,
switch to night mode. Adjust the beam angle of the IR so that the beam
just fills the field of view. Focus the reticule with the barrel adjuster on the
NV007V and then use the rifle scopes side wheel or adjustable objective
to bring the target into sharp.
Press and hold the power button (about 1 second) to turn on/off. The
Sleep/power indicator light will be either illuminated constantly which is
when the unit is powered on or if non illuminated then the unit is off.
To activate the sleep/wake up mode: with the power on ( the sleep
/power light constantly illuminated) press the sleep/wake-up button
once to enter sleep mode then push once again to activate wake-up
mode and power up the unit.

—12——13—
8>WiFi
9>Exposure compensation 12>Formatting
—14——15—
7>Keyboard press sound
11>Date/Time
10>Languages
13>Factory setting
Record Audio
Beep Sound
WiFi
Exposure
Language
Date/Time
Format
Select "Keyboard press sound" and press "OK"for keyboard press
setting. Select "on" or "off". Press "OK" to confirm. This setting allows
Select "WiFi"and press "OK" for WiFi setting. Select"on" or "off"to turn
on / off WiFi. Please note you cannot call out menu when WiFi is On. Press
and hold"WiFi" button.
Select "Exposure compensation"and press "OK"for exposure compe-
sation setting. Options "+2/3、"+1/3"、"+0.0"、"-1/3"are available.
Select "language setting"and press"OK" for language setting. Options
include"English""Francais""Espanol""Portugurs""Deutsch""Italino""简 体 中
文""Pyccknn"and"日本语""Cesky".Choose your preferred language for your
system.
Select "Date/Time"and press "OK" to set up date and time. Select
respectively "Year", "Month", "date", "Hour". "Minute" and "Second",and
press "+/-" for designated value. Press "OK" to save change.
Also select "Date display format", press"+/-" for preferred date
display format among "YY/MM/DD"" MM/DD/YY""DD/MM/YY".
Select "Formatting"and press "OK"for formatting setting. You can
select"Memory" or SD card". When tend to apply operation system will
prompts "all data will be erased!" Please take extreme caution to perform
this operation. All data could not be restored if formatted.
Select "Factory setting" and press "OK" for factory setting. Select "OK"
or "Cancel"to restore factory setting or not. Please take extreme caution
to perform this setting.
3>Auto Recording
4>Circulating recording
5>Time stamp
6>Audio synchronization
Select "Auto Recording" and press "OK" for auto recording setting.
Select "on" or"off" . This setting determines auto recording is on or not in
your next starting up.
Select "Circulating recording"and press "OK" for circulating
recording setting.Select "off", "1min", "3 min", "5 min"or "10 min". Press
"OK"to confirm. This setting determines circulating recording is on or not
in your next starting up.
Select "Time stamp"and press "OK" for time stamp setting. Select"on"
Select "Synchronized audio video" and press "OK" . Select"on" or "off".
Press "OK"to confirm. This allows audio synchronization when recording.
Please enter into BW mode and press "IR fill light brilliance
control"button for instant brilliance control.
or"of". Press "OK" to confirm. This determines time stamp is set or not
when recording.
keyboard press sound is also recorded when making recordings.

Model No.
Magnifying
power IR power
IR wave length
IR illuminate
distance
Sleeve size
Video
resolution
Eyepiece
resolution
Voltage
Output type
Battery Dimension
Weight
NV 007V
4x-14x 5w
850/940nm
<45mm
18650x1
1920*1080
>8h
Battery life
Storage type T F Card
Focusing
1024*768
300m
106*97*47
Specifications
—19—
Frame rate 30fps
Transmission
method WiFi
MP4
3.7V
250g
Photo
resolution 2608*1944
3cm-∞
—18—
After sales support
PARD provides users with after-sales support services for the
company's products. If you need after-sales service support, please log on
to our official website www.pard-tech.com/support to fill in and submit
the information. We will get back to you within one working day.
In order to provide you with better service, we need you to fill in and
submit the following information:
1. Where you bought the machine
2. Your country/name/email address/telephone number
3. Machine models that need after-sales support
4. The SN code of the machine
5. Describe the problem encountered
14>Center Position Adjustment
Press the "OK" button to enter the sub-page, press "+" or "-" to adjust
the Y value; press the IR menu button to adjust the X value to adjust the
sub-line in the optical telescope to the center of the display. Press "OK" to
save and exit.
8.Shortcuts
On the user interface,
Press and hold IR fill light brilliance control / Color or BW mode
button to make switch between color / BW mode;
Press and hold WiFi button to turn on/off WiFi;
Press playback button to playback video clips stored in SD card;
Press OK/photo/recording button to make photo and video recording
mode switch;
Press - to zoom in or zoom out. Press + to turn on/off Red dot
indication.
—17—
—16—
Warranty
This product is warranted against defects in materials and workman-
ship for a period of one year from the date of purchase.
This warranty is for the original purchaser only!
Notice:
Operate this device in daylight or view any strong radiation source
like the Sun, electric welding and Laser directly may cause permanent
damage to internal parts of this device and this is not covered by the
Warranty.

Telephone:+86-755-29484438
Website:www.pard-tech.com
Add:B78,18/F,Guangyin building,38 Futian South Road, port
community, Futian street, Futian District, Shenzhen
Warning:
Changes or modifications to this unit not expressly approved by the
party responsible for compliance could void the user’s authority to
operate the equipment.
NOTE:
This device complies with part 15 of the FCC Rules. Operation is subject
to the following two conditions: (1) This device may not cause harmful
interference, and (2) this device must accept any interference received,
including interference that may cause undesired operation.
FCC Statement:
This equipment has been tested and found to comply with the limits for
a Class B digital device, pursuant to part 15 of the FCC Rules. These
limits are designed to provide reasonable protection against harmful
interference in a residential installation. This equipment generates, uses
and can radiate radio frequency energy and, if not installed and used in
accordance with the instructions, may cause harmful interference to
radio communications. However, there is no guarantee that interference
will not occur in a particular installation. If this equipment does cause
harmful interference to radio or television reception, which can be
determined by turning the equipment off and on, the user is
encouraged to try to correct the interference by one or more of the
following measures:
—Reorient or relocate the receiving antenna.
—Increase the separation between the equipment and receiver.
—Connect the equipment into an outlet on a circuit different from that
to which the receiver is connected.
—Consult the dealer or an experienced radio/TV technician for help.
In normal use, the wifi module away from the human body at least 5mm
Other manuals for NV007V
1
Table of contents
Other Pard Camera Accessories manuals