Park Pilots DHC-2 Beaver User manual

de Havilland DHC-2 Beaver
DHC-2 BeaverDHC-2 BeaverDHC-2 BeaverDHC-2 Beaver
OPERATION MANUALOPERATION MANUAL
This model is not a toy. We advise you read
the manual carefully before flying in order to
ensure the safe and proper operation of your aircraft.

DHC-2 Beaver www.kmp.ca DHC-2 Beaver www.kmp.ca
47" (120cm)
30.5" (77cm)
22oz
20 A Brushless ESC
Brushless Out-Runner SP2830-26
11.1 V 1500 mAh Li-Polymer
8x6 Three Blade
Thank you for choosing our Park Pilots 4 channel
DHC-2 Beaver. Please read these instructions carefully and
thoroughly before assembly and use in order to ensure safe
operation. Also save these instructions for later reference,
in case your model needs to be adjusted or serviced.
1
BASIC SPECIFICATIONS
ELECTRONIC SPECIFICATIONS
12V
(4) 8G mini servos
2.4ghz, 4 Channel Radio

DHC-2 Beaver www.kmp.ca DHC-2 Beaver www.kmp.ca
2
Set of propellers 6*3
Right wing
Left wingFuselage
Charger
Stabilizer
Battery (4) 8g mini servos 2.4ghz 4ch Transmitter
(RTF version only)
Landing gear
Carbon fibre wing rods
and centre spar brace
Wing struts and
wheel struts
INCLUDED COMPONENTS

DHC-2 Beaver www.kmp.ca DHC-2 Beaver www.kmp.ca
3
1. Before each flight check both your aircraft and transmitter battery power levels. Make
sure that all batteries are fully charged.
2. Always turn on your transmitter before connecting the aircraft battery. When finished
flying disconnect the battery before turning the transmitter off. This is important with all
radio controlled aircraft, as aircraft without signals may respond unintentionally, causing
control surfaces and throttle to move.
3. Before turning on your transmitter, check to ensure that the throttle is in the off /
down position.
4. After switching the transmitter and aircraft on, check to ensure that the control
surfaces are initially in the neutral position.
5. Check to ensure that the control surfaces are moving in the proper direction. Check all
four channels of the aircraft (see figure below for recommended deflection).
6. Avoid flying in bad weather conditions. Since you are flying a relatively light aircraft it
is suggested not to fly in windy or rainy conditions. Wind can cause you to lose control of
the aircraft. We recommended flight only when wind speed is under 5mph. (8 km/h)
7. Always consider wind speed before flight, to ensure that you take of and land into the
wind.
8. Always keep the aircraft within visual range (500 yards), or you may lose signal,
causing the aircraft to crash or fly away.
9. If you notice that the plane is losing power, land as soon as possible, and recharge
battery. If the battery is overly discharged it may become damaged.
10. Before your initial flight, perform a range check to ensure that the transmitter and
receiver are functioning properly. To perform a range check, have a friend hold the model
and walk 50 paces, then ensure that all control surfaces and the throttle are functioning,
without glitching.
Do not fly aircraft in areas similar to those pictured in fig 2.
Populated area's, strong winds, in between high buildings, near utility
lines, playgrounds, railways, or roads.
fig 1

4
DHC-2 Beaver www.kmp.ca DHC-2 Beaver www.kmp.ca
1. Only fly aircraft in areas that are suitable for remote control aircraft as some areas
may not be suitable for radio controlled aircraft flight.
2. Keep your aircraft away from high power / high voltage cables, as they may cause
interference with the radio system, causing the model to lose control.
3. Avoid using you aircraft in near salt water, as salt in the air may cause corrosion to
mechanical components leading to malfunction.
4. Keep away from high traffic areas, as flying in these areas can distract drivers from
their attention from the road.
5. Do not fly model near airports or near commercial aircraft routes. In some emergency
cases it is possible that full scale aircraft may land in your area. In such a case land your
aircraft as quickly as possible. Commercial aircraft always have priority over model
aircraft.
Check Your C of G Position
Do not fly before confirming the correct C of G Position. If the
C of G is incorrect, you may lose control of your model and crash.
fig 2
fig 3

5
DHC-2 Beaver www.kmp.ca DHC-2 Beaver www.kmp.ca
To avoid damaging the aircraft, do not connect the power until assembly is
complete.
1. Test fit horizontal stabilizer before gluing
2. Apply glue to all contact surfaces
3. Check for proper alignment before glue sets
4. Insert landing gear into bottom of fuselage
5. Add wing strut before adding on strut covers
6. Use provided screw to secure strut and gear strut to fuselage

6
DHC-2 Beaver www.kmp.ca DHC-2 Beaver www.kmp.ca
Picture3 暠3Picture3 暠3Picture4 暠4Picture4 暠4
Picture5 暠5Picture5 暠5
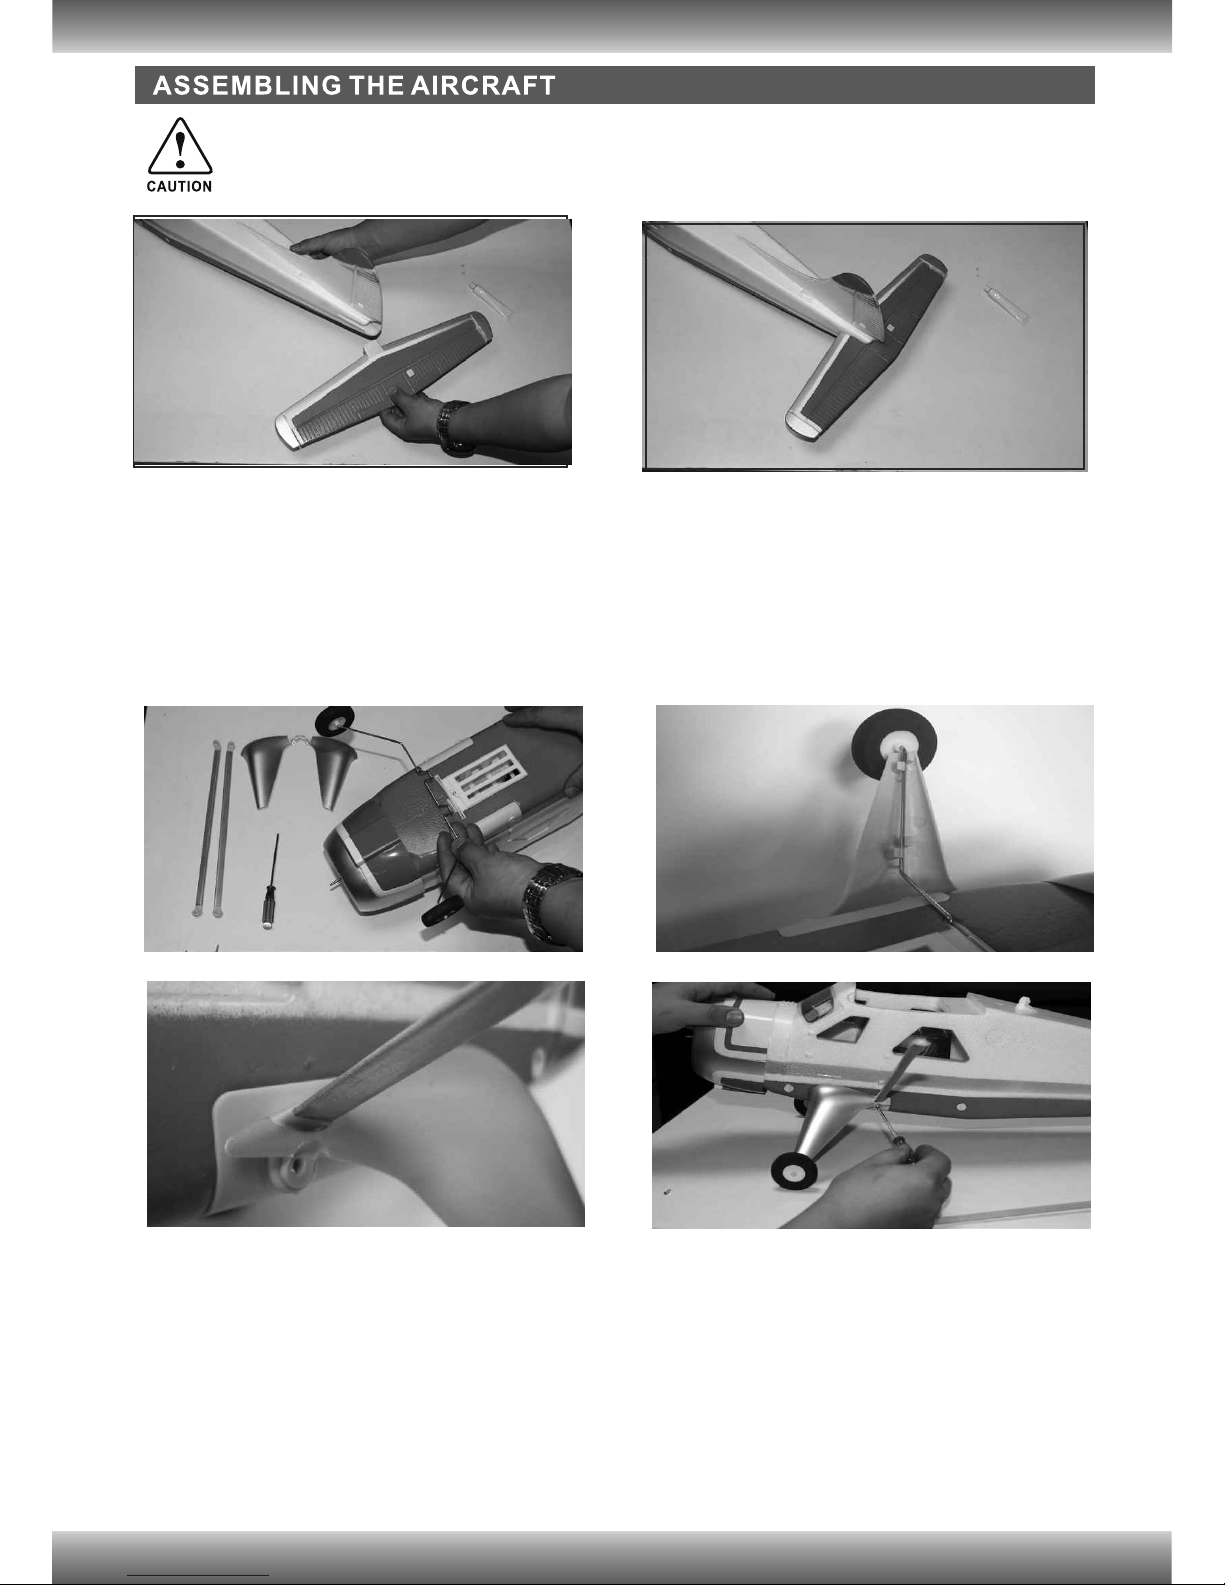
3.Please take out the main landing gear, and then take the landing
gear to insert the trough which is lied the back of battery cabin,
moreover it will be fixed by fastener.( picture 5)Note: If install
the landing gear incline the orientation of head cover, it will lead the
trail strength get shorter, so couldnt take off from the land.
2.After adjust the steel wire implement moderately,
then use hexagonal key to lock the screw tightly.
(Picture 4)
Picture6 暠6Picture6 暠6Picture7 暠7Picture7 暠7
Picture8 暠8Picture8 暠8
5.Battery:al l o w 2 S lip o o r 7 S N IMH b a tte r y , exo r b i tan t p r essu r e w ill l e a d t o the m o t o r bur n t .
5.든넥:連넣2S轉든샀7S퀑향든넥,법멕든箕삔돔鈴쯩댐쁑。
Picture9 暠9Picture9 暠9
4. Please take the foreside of wing insert the bolt position
of fuselage accurately( picture6), then the magnet in the
back of wing will catch up the magnet in the fuselage,
so the wing installing procedure is finished( picture 7).
And if make the magnet in back of wing separated from
the fuselage lightly( picture8), after wards take out the
foreside of wing from the bolt position of fuselage, so
uninstalling procedure is finished( picture9).
1. If you have bought 4 channel transmitter of
ANL Cessna 182 Park Flyer, please take the BNC
connector plugs of wing auxiliary servo signal
string to insert the socket of the first vacant
channel on receiver.
2. Please install the batteries of transmitter, then
Picture1 暠1Picture1 暠1Picture2 暠2Picture2 暠2
1. Insert carbon fibre rod into plastic centre spar brace
2. Glue carbon fibre rod and brace into left wing
3. Add right carbon fibre rod into brace
4. Connect wings together, while gluing right carbon fibre rod into wing,
as well as apply glue to all points of contact where spar and wing
halves meet
5. Check for proper alignment before glue sets
1. Use provided Y-lead servo extension to connect aileron servos
2. Align wing with top of fuselage
3. Attach wing strut to fuselage with the provided screws
4. Attach wing with the provided screw
5. If flaps are not used, apply tape to both sides of flap hinge line to
prevent flap movement
to receiver. (RTF Version only)

7
DHC-2 Beaver www.kmp.ca DHC-2 Beaver www.kmp.ca
1. Remove the first nut off of motor shaft.
(Do not remove remaining washer and nut off shaft.)
2. Press the nut into front of propeller (front is side with writing)
3. Slowly spin propeller onto shaft, until snug with inner washer
(ensure propeller does not contact cowling.)
You may need to ream out the centre hole diameter to fit
propeller on shaft.
4. Attach white plastic spinner adapter to shaft
5. Attach chrome spinner to adapter with the provided screw

8
: 1: Aileron 2: Elevator 3::Throttle 4: Rudder
DHC-2 Beaver www.kmp.ca DHC-2 Beaver www.kmp.ca
Ensure that all the control surfaces move in the proper direction.
See following diagrams for proper control surface direction.

DHC-2 Beaver www.kmp.ca DHC-2 Beaver www.kmp.ca
9

DHC-2 Beaver www.kmp.ca DHC-2 Beaver www.kmp.ca
10
1. Ensure no parts are missing in the float kit. The kit should contain the following
items: (2) Pontoons, (4) Struts, (2) Cross Bars and (8) Screws.
2. If your aircraft already has wheels installed, remove them before assembling the
float kit, as you will need the aircraft to properly line up the floats the first time.
3. First place the cross bars in between the float struts. Do not glue the cross bar in
place until you have successfully screwed the struts to the aircraft fuselage.
4. Secure bottom of struts to the pontoons with 5 minute epoxy or foam safe ca.
(The front float contains a notch which should line up with the front struts before
glueing.
5. Optional vertical tail fin may be attached on tail. However if you wish to change
between wheels and floats it is recommended to not glue this piece in.
NOTE: WHEN USING FLOATS ON THIS MODEL IT IS RECOMMENDED TO ADD 2oz
OF WEIGHT TO THE NOSE OF THE AIRCRAFT.

The ParkPilots® brand is distributed exclusively by
Kondor Model Products.
A-960 Alloy Drive, Thunder Bay, ON P7B 6A4
© 2012 Kondor model products
www.kmp.ca
Table of contents