Parker MM40-107 User manual


Technical Publication
Component
Maintenance Manual
With
Illustrated Parts List
MM40-107/30-107
Wheel & Brake Assembly
Main Wheel Assembly
Part No. 40-107
Part No. 40-107A
Main Brake Assembly
Part No. 30-107
Part No. 30-107A
Part No. 30-107B
Part No. 30-107C
Part No. 30-107D
Part No. 30-107E


Technical Publication
Component
Maintenance Manual
With
Illustrated Parts List
Parker Hannifin Corporation
Aircraft Wheel & Brake
Avon, Ohio 44011 Cage Code 33269
Page T-1
February 01,2002
MM40-107/30-107
Wheel & Brake Assembly
Main Wheel Assembly
Part No. 40-107
Part No. 40-107A
Main Brake Assembly
Part No. 30-107
Part No. 30-107A
Part No. 30-107B
Part No. 30-107C
Part No. 30-107D
Part No. 30-107E
Used On
Rockwell 690, 695, 840, 980 Series
Initial Issue January 23, 1978


MM40-107/30-107 COMPONENT MAINTENANCE MANUAL WITH IPL
FOR MAIN WHEEL ASSEMBLY PART NO. 40-107 SERIES AND
MAIN BRAKE ASSEMBLY PART NO. 30-107 SERIES
Page LR-1/1
Feb 01/02
LIST OF REVISIONS
REV
DATE PAGE DESCRIPTION APPROVAL
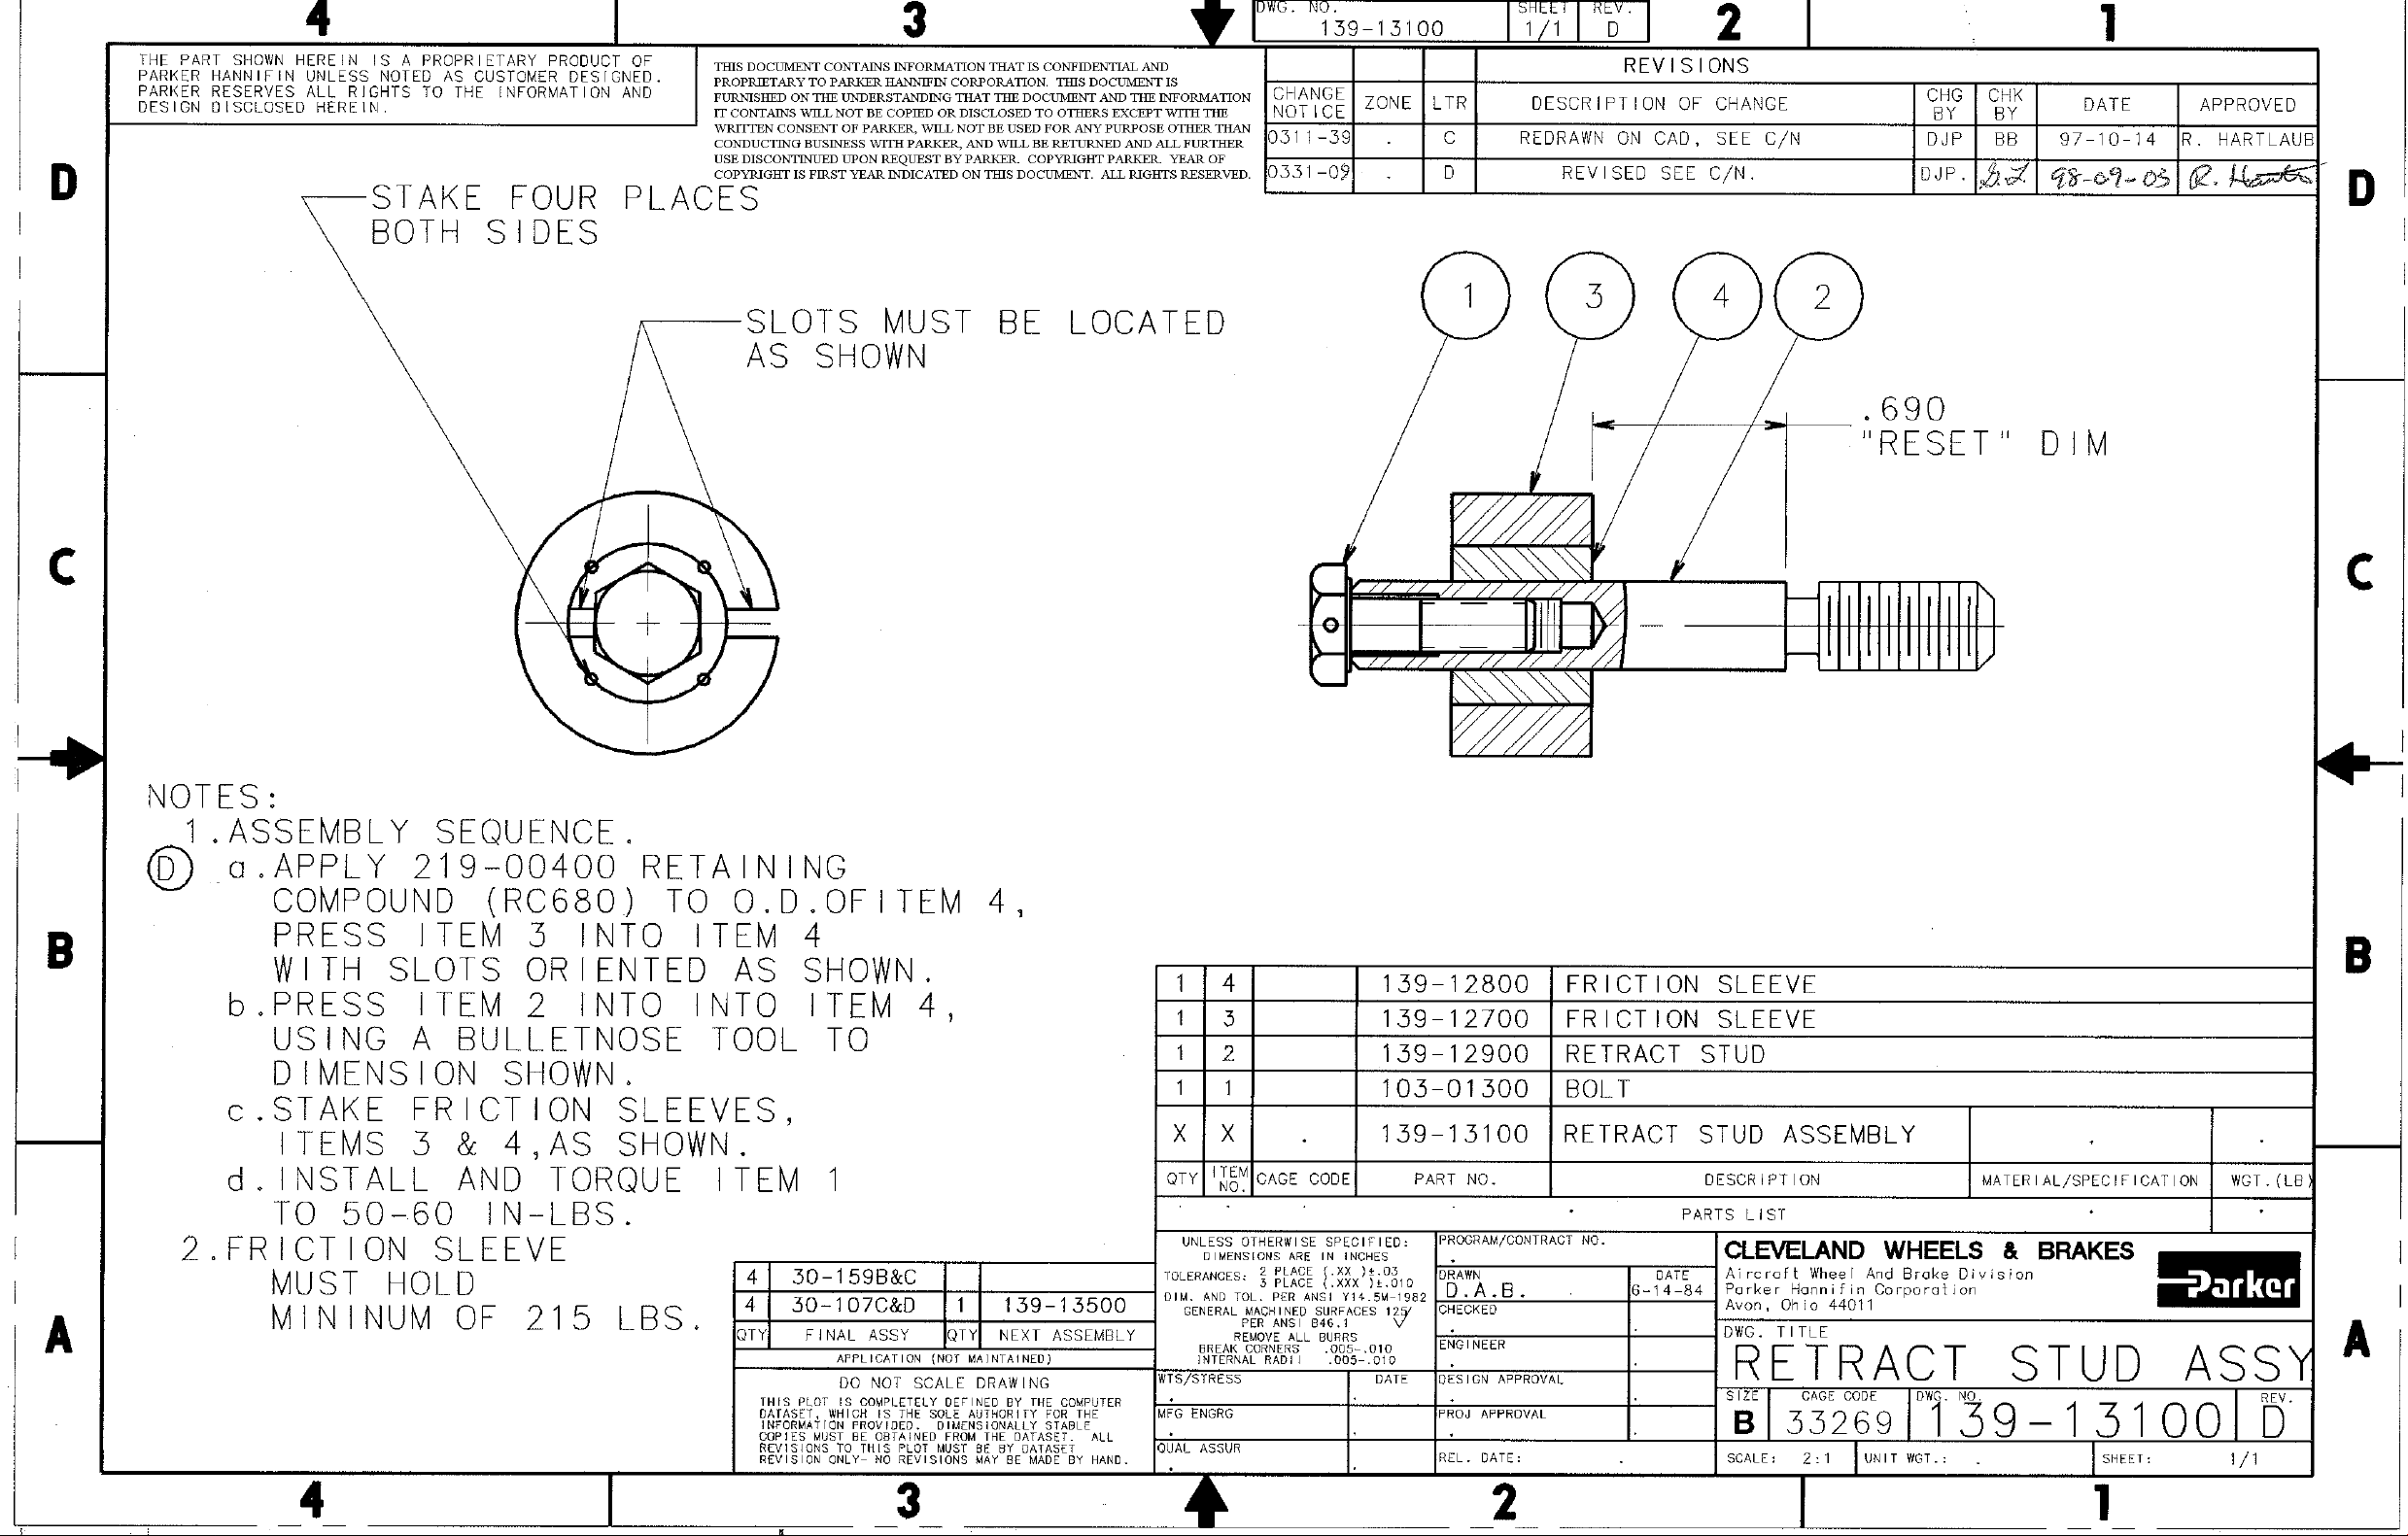
A5-5-82 7.1 B,2) & B,5)…Changed to call out removal
and installation of stud assembly from
piston instead of bolt from stud. Added
“torque stud assembly at 60-70 in-lbs.”
B.B.
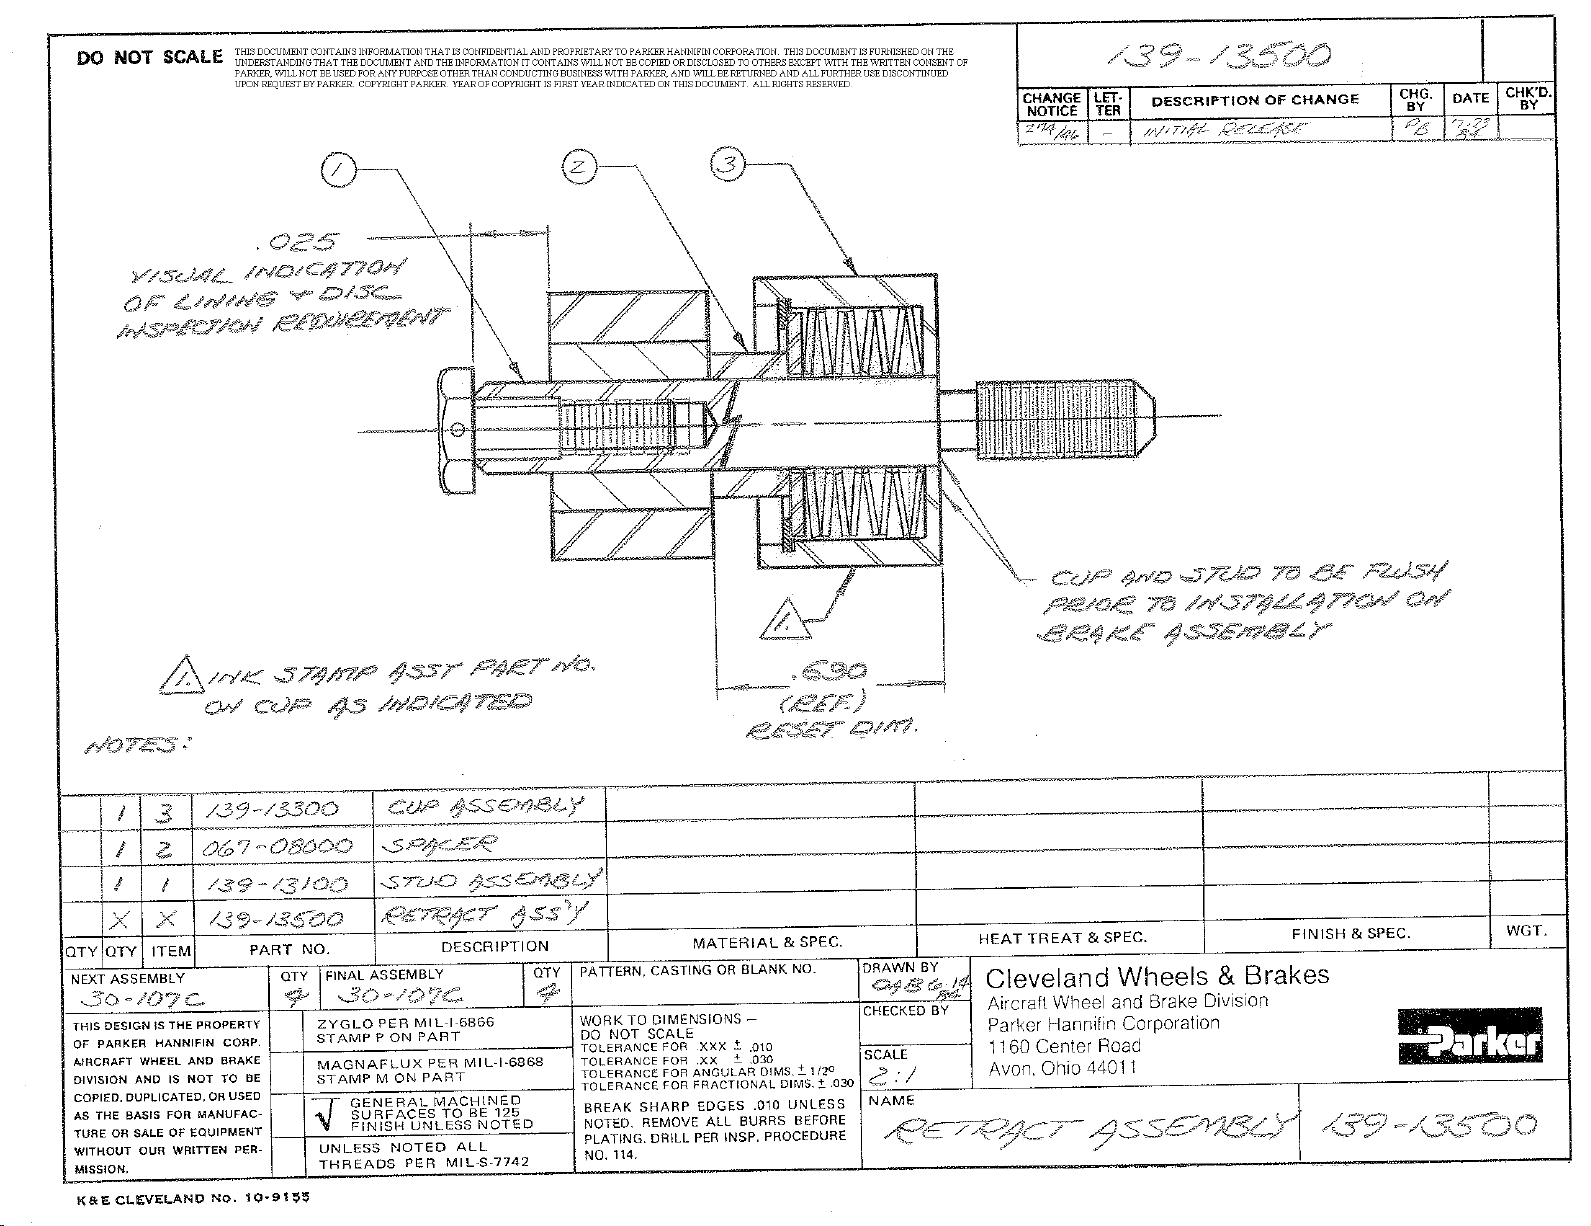
7.2 …Added call out of 110-04900 stud assy.
B7-29-83 45.2.0…Changed to call out removal and
installation of center rivet. Delete appli-
cation of glue to backside of lining.
B.B.
7.1 …”SERIES” was “/30-107A”
…Added line B,2A) B,5)…Added “(or bolt
and spring guide, if used).” Added “(or
bolt P/N 103-15300, is used).”
7.2 …Added footnote *
…Added footnote **
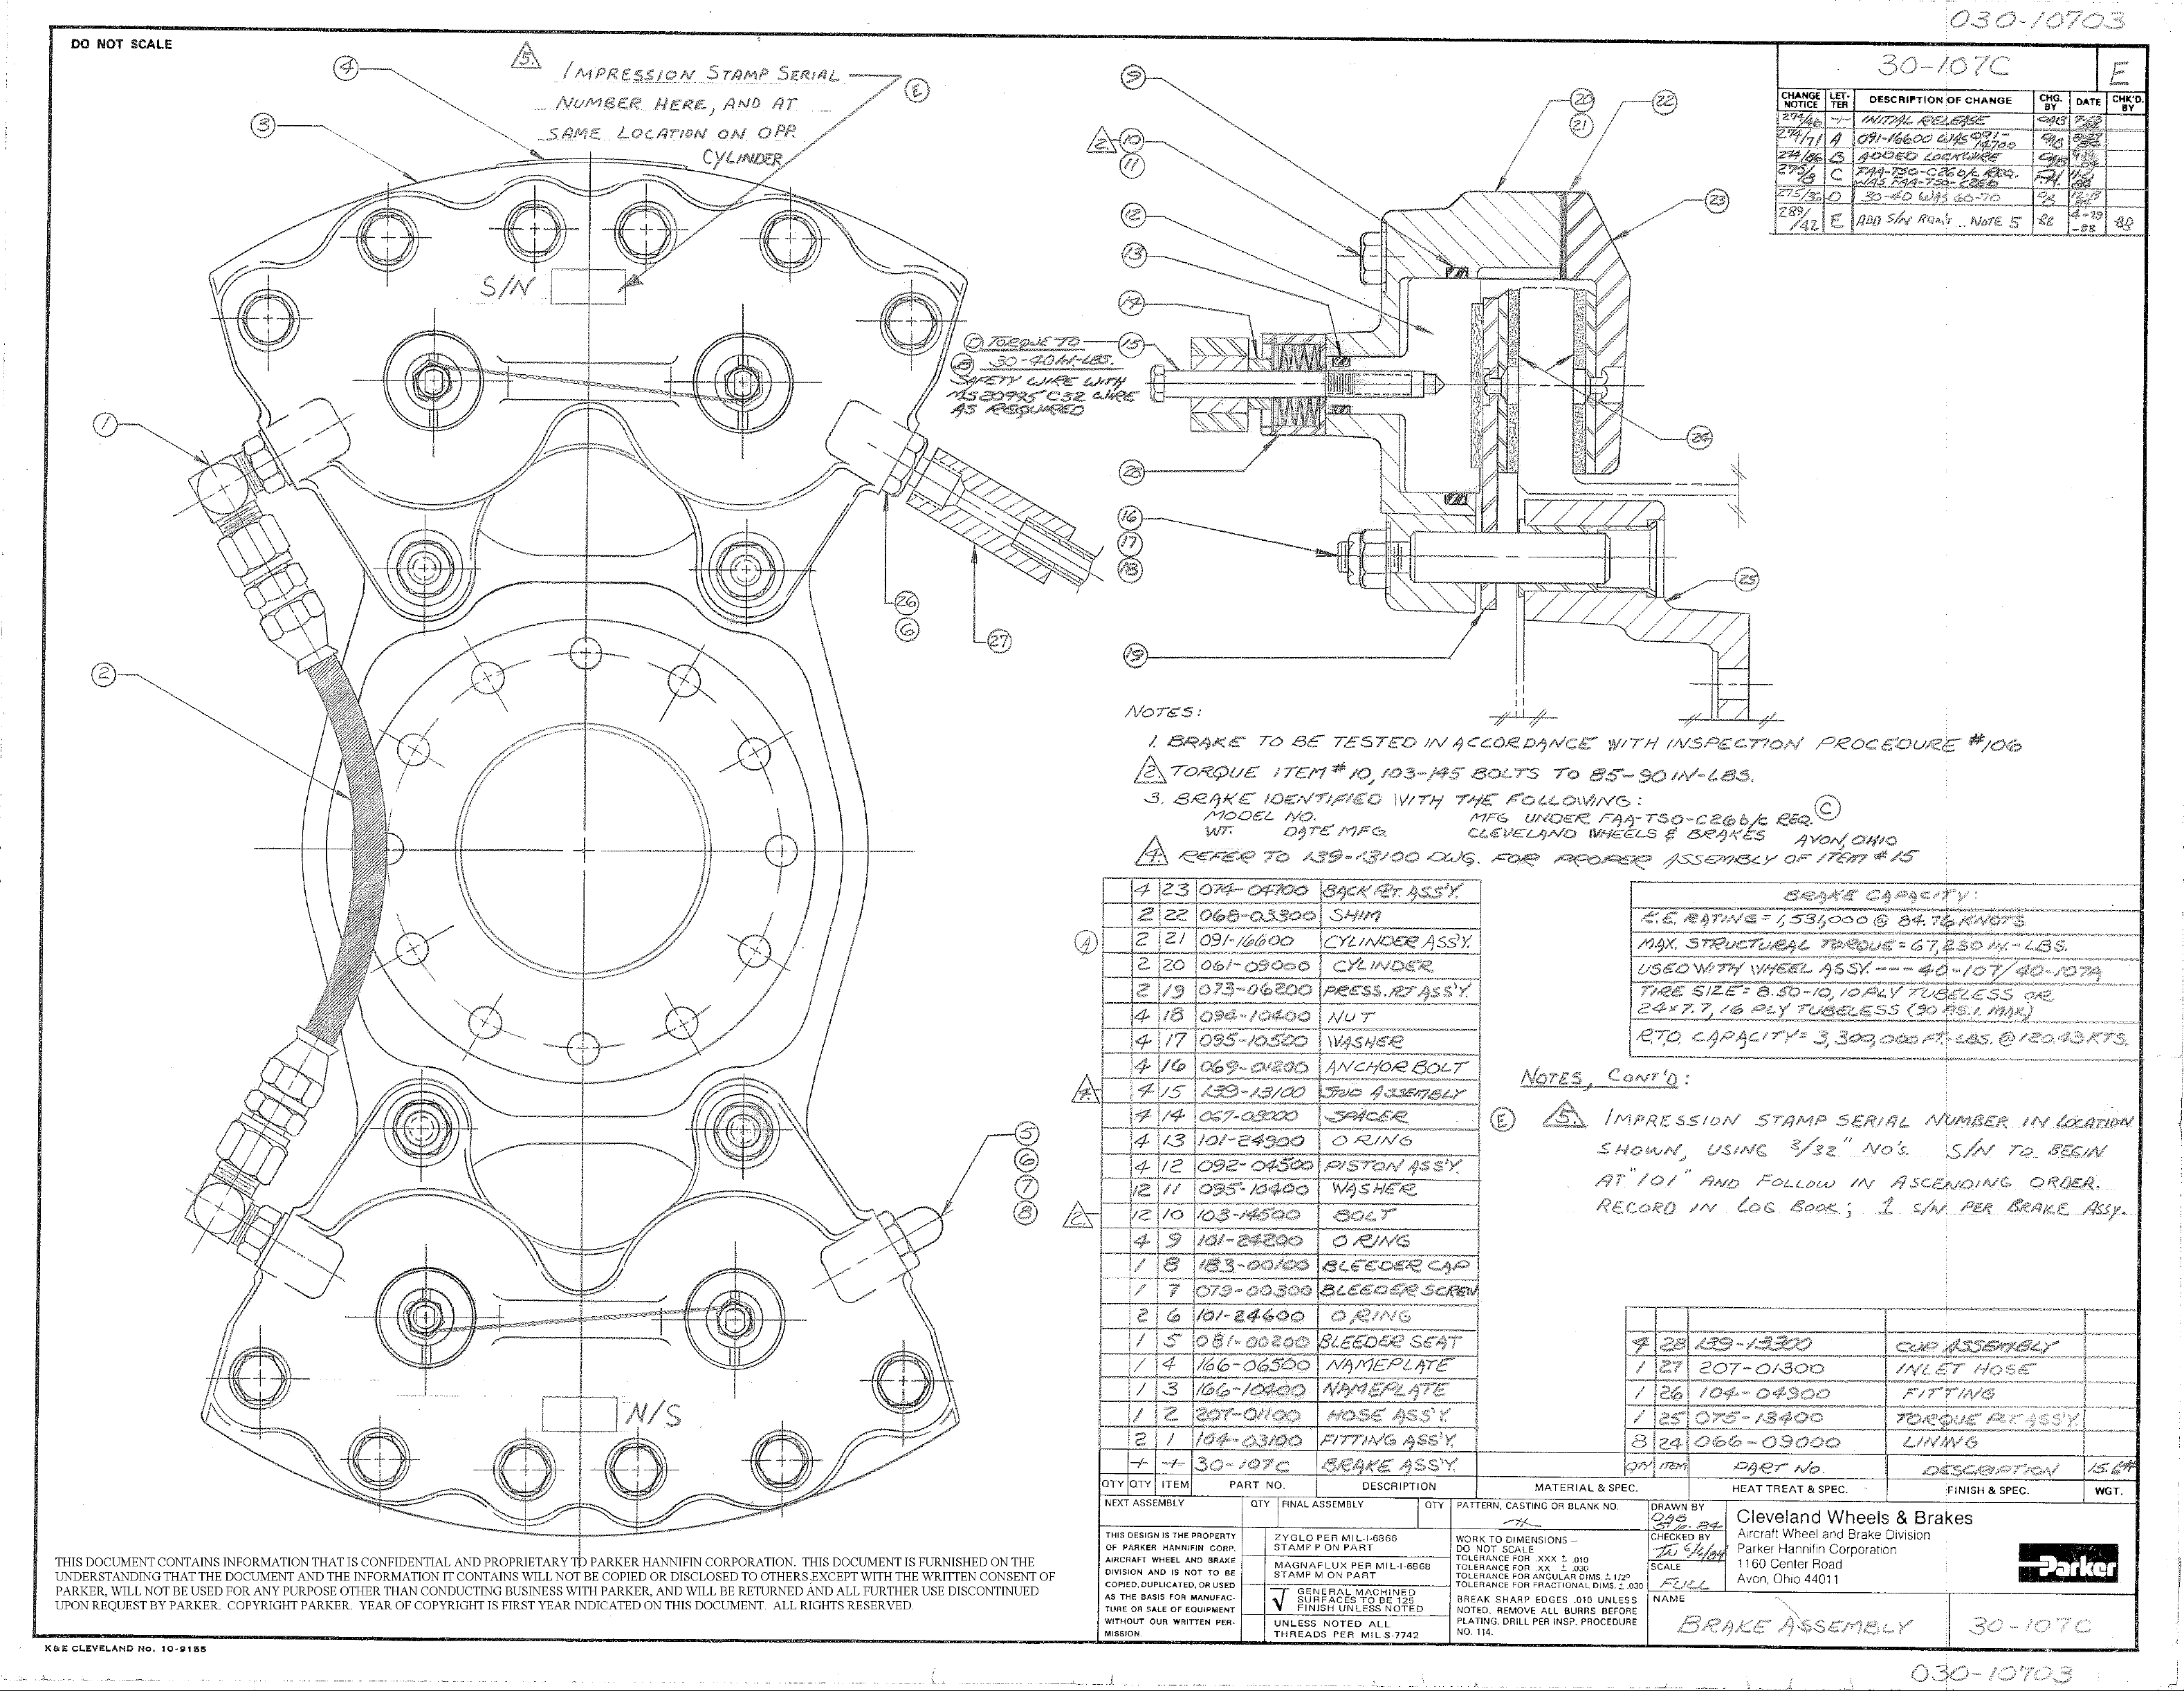
C9/27/84 7.3 …Added Section 7.3, Maintenance
Instructions, 30-107C Brake Assembly B.B.
D12/10/84 7.3 …Added 30-107D
Para. 7.3, 1.: Added “199-13001” and
“38”.
Para. 7.2, 1.< 16): “30-40” was “60-70”.
B.B.
E3/18/87 6“.492” was “:.502” B.B.
F1/10/89 2Sec. 3.1.2 Add “…300 in-lb.” B.B.
G02/01/02 ALL Add instructions for 30-107E and Update
formatting B.B.


MM40-107/30-107 COMPONENT MAINTENANCE MANUAL WITH IPL
FOR MAIN WHEEL ASSEMBLY PART NO. 40-107 SERIES AND
MAIN BRAKE ASSEMBLY PART NO. 30-107 SERIES
Page T/C-1/1
Feb 01/02
TABLE OF CONTENTS
SECTION PAGE
1. MAIN WHEEL.......................................................................................................
1
1.1 Disassembly.................................................................................................
1
1.2 Cleaning, Inspection and Repainting............................................................
1
1.3 Reassembly..................................................................................................
3
2. MAIN BRAKE.........................................................................................................
3
2.1 Disassembly.................................................................................................
3
2.2 Cleaning, Inspection and Repainting............................................................
5
2.3 Reassembly..................................................................................................
7
3. WEAR LIMITS........................................................................................................
8
4. AXLE NUT TORQUE REQUIREMENTS & PROCEDURE..................................
8
5. SERVICING RETRACT SPRING STACK (30-107, 30-107A, 30-107B)...............
9
6. SERVICING RETRACT MECHANISM (30-107C, 30-107D, 30-107E).................
12
7. ILLUSTRATED PARTS LIST.................................................................................
19
8. DETAILED PARTS LIST –MAIN WHEEL (40-107, 40-107A)...............................
23
9. DETAILED PARTS LIST –MAIN BRAKE (30-107, 30-107A, 30-107B)................
27
10. DETAILED PARTS LIST –MAIN BRAKE (30-107C, 30-107D, 30-107E)............
31


MM40-107/30-107 COMPONENT MAINTENANCE MANUAL WITH IPL
FOR MAIN WHEEL ASSEMBLY PART NO. 40-107 SERIES AND
MAIN BRAKE ASSEMBLY PART NO. 30-107 SERIES
Page INTRO-1/1
Feb 01/02
INTRODUCTION
This manual is published for the guidance of personnel who are responsible for the maintenance
functions of the Parker Wheel & Brake Assembly(ies) covered in this publication. The instructions
published herein contain the necessary information to perform maintenance checks “on aircraft” as
well as complete shop repair of the assemblies.
NOTE: For information not specifically covered in this manual, refer to the Component
Maintenance Manual, AWBCMM0001, current issue. It is a reference publication
generically written to address the common practices and procedures used to inspect,
troubleshoot and overhaul most General Aviation external type wheels and brakes.
While Parker Hannifin Corporation represents that information contained in this manual was current
at the time of publication of this issue, the user is cautioned to inquire as to whether a more recent
revision is in existence before proceeding with maintenance operations. To accomplish this, users
can contact Parker directly at the following:
Parker Hannifin Corporation
Aircraft Wheel and Brake
1160 Center Road
Avon, Ohio 44011 U.S.A. Attn: Customer Service
1-800-272-5464 (Phone)
(440) 937-5409 (Fax)
NOTICE
The procedures outlined in this manual may be altered if better and/or more economical methods
can be employed by the individual facilities. However, the alternate procedures must not lessen the
efficiency of operation of the assembly, and all torque and specific limits or values contained herein
must be strictly observed. If deviations are questionable, contact Parker Engineering at the above
number.


MM40-107/30-107 COMPONENT MAINTENANCE MANUAL WITH IPL
FOR MAIN WHEEL ASSEMBLY PART NO. 40-107 SERIES AND
MAIN BRAKE ASSEMBLY PART NO. 30-107 SERIES
Page 1
Feb 01/02
1. MAIN WHEEL
Refer to IPL Figure 8 for identification of wheel assembly components.
1.1 Disassembly
1.1.1 Properly jack up aircraft and fully deflate tires.
1.1.2 Remove bolts and washers from brake assembly to remove back plates.
1.1.3 Remove wheel from axle.
CAUTION: DO NOT USE TIRE IRONS.
1.1.4 Double check to make sure tire is fully deflated and break tire bead from wheel
flange. Use a mallet or non-metallic instrument.
1.1.5 Remove nuts (8-15 or 8-15A), washers (8-10 or 8-10A), and bolts (8-
5 or 8-5A) to separate wheel halves.
1.1.6 Remove and discard the O-ring (8-20).
1.1.7 Remove brake disc (8-65) from inner wheel half (8-35). If the disc
sticks, use a non-metallic instrument and pry it out.
1.1.8 Remove snap rings (8-60, 8-95) grease seal felt (8-55) grease seal
rings (8-50) and hubcap (8-90 or 8-90A) from inner and outer wheel
halves (8-35, and 8-75 or 8-75A).
1.2 Cleaning, Inspection and Repainting
1.2.1 Degrease all metallic parts and dry thoroughly.
1.2.2 Visually inspect bearing cups (8-40, 8-80) and cones (8-45, 8-85) for
damage or wear, but do not remove the cups from the wheel half
unless replacement is necessary.

MM40-107/30-107 COMPONENT MAINTENANCE MANUAL WITH IPL
FOR MAIN WHEEL ASSEMBLY PART NO. 40-107 SERIES AND
MAIN BRAKE ASSEMBLY PART NO. 30-107 SERIES
Page 2
Feb 01/02
1.2.3 If a bearing cup is to be replaced, the wheel half must be heated
either in boiling water for 30 minutes, or in an oven not to exceed
149°C (300°F) before attempting to remove or install a cup. If the
cup does not drop out, tap the cup evenly from the axle bore, using a
fiber drift pin, or a suitable arbor press.
CAUTION: NEVER EXCEED 500 WHEEL MILES BETWEEN REPACKING
INTERVALS.
1.2.4 Inspect bearing cones for grease contamination and/or solidification
at every periodic inspection. Repack wheel bearings with Aeroshell
grease 22, conforming to MIL-G-81322.
CAUTION: NEVER PAINT WORKING SURFACES OF THE BEARING CUPS.
1.2.5 Inspect wheel halves for cracks or damage. If casting is cracked, or
shows excessive corrosion, it should be replaced. Small nicks or
gouges in the castings should be blended out and polished with (400
grit) sandpaper. Inspect O-ring (8-20) seating areas for nicks or
distortion. Nicks may be lightly blended with a fine grit sandpaper.
badly distorted sections in this area will hamper O-ring sealing
Characteristics, and is cause for wheel half replacement. Areas from
which the protective coating has been removed, or that show slight
corrosion, should be thoroughly cleaned and repainted with one coat of
zinc chromate primer, and one coat of aluminum (color) polyurethane.
1.2.6 Inspect snap rings and grease seal rings for distortion. Replace
grease seal felts if badly worn or contaminated. Lightly saturate new
or reused grease seal felts with SAE 10 oil before installation (DO
NOT SOAK).
1.2.7 Inspect brake disc (8-65) for cracks, corrosion, excessive wear,
scoring or warpage. Rust may be removed by hand wire brushing
and finishing with a medium grit sandpaper or emery.
1.2.8 Inspect wheel bolts for cracks and corrosion. Cracked bolts are to
be replaced with a new bolt of corresponding part number. Inspect
metallic self-locking nuts. If the nut can be turned onto the bolt by
hand, so that the bolt will protrude past the end of the nut, it is to be
replaced.

MM40-107/30-107 COMPONENT MAINTENANCE MANUAL WITH IPL
FOR MAIN WHEEL ASSEMBLY PART NO. 40-107 SERIES AND
MAIN BRAKE ASSEMBLY PART NO. 30-107 SERIES
Page 3
Feb 01/02
1.3 Reassembly
1.3.1 Place inner wheel half (8-35) with brake disc (8-65) and bolts (8-5 or
8-5A) installed on a flat surface, with register portion of the wheel
half up. Place new O-ring (8-20) on register portion of wheel half.
Place tire over inner wheel half, and then place outer wheel half in tire,
making sure to properly align male and female registers. Install nuts
(8-15 or 8-15A) and washers (8-10 or 8-10A). Torque nuts to limits
listed on decal affixed to outer wheel half. When all nuts have been
torqued, torque a second time to make sure that the required value has
been achieved; sometimes O-ring compression will give false initial
readings. Inflate tire to desired pressure.
1.3.2 To complete wheel re-assembly, reverse steps 1.1.2 through 1.1.7
and torque wheel nuts (8-15 or 8-15A) per limits listed on decal
affixed to outer wheel half (8-75 or 8-75A): 300 in-lb.
2. MAIN BRAKE
Refer to IPL Figure 9 and Figure 10 for identification of brake assembly components.
NOTE:It is not necessary to remove the wheel from the aircraft to disassemble and service
brake.
2.1 Disassembly
2.1.1 Remove and cap hydraulic line.
2.1.2 Remove the cylinder bolts (9-5 or 10-5) and remove back plate
assemblies (9-85 or 10-85).
2.1.3 Remove the brake cylinder assemblies (9-15, -15A, -15B or 10-15, -
15A, -15B, -15C) from the torque plate (the torque plate will remain
mounted to the axle).
2.1.4 Remove the pressure plate assembly (9-60 or 10-60), inlet fitting (9-
175 or 10-215), and bleeder fitting (9-155 or 10-195).
NOTE:It will be necessary to remove the retracts prior to piston removal.
2.1.5 Refer to section 5. and 6. for removal of the retracts prior to
removing the pistons.

MM40-107/30-107 COMPONENT MAINTENANCE MANUAL WITH IPL
FOR MAIN WHEEL ASSEMBLY PART NO. 40-107 SERIES AND
MAIN BRAKE ASSEMBLY PART NO. 30-107 SERIES
Page 4
Feb 01/02
CAUTION: MARK EACH PISTON AND BORE TO ENABLE CORRECT
REASSEMBLY.
2.1.6 The pistons (9-40 or 10-40) may be removed by threading one of the
back plate attachment bolts (9-5 or 10-5) into each piston in
succession, and with hand pressure, push each piston out of the
brake cylinder.
2.1.7 Remove the O-rings (9-55, -55A or 10-55, -55A) from cylinder.
2.1.8 If necessary, the anchor bolts (9-100 or 10-100) may be removed by
using a holding fixture and arbor press. Place the anchor bolts into
the holding fixture so that the anchor bolt is piloted while being
removed.
CAUTION: CYLINDER MUST BE SQUARE WITH ARBOR IN STEPS “A”
AND “B” SO THAT THE ANCHOR BOLTS DO NOT COCK.
Anchor Bolt Removal and Installation
Figure 1

MM40-107/30-107 COMPONENT MAINTENANCE MANUAL WITH IPL
FOR MAIN WHEEL ASSEMBLY PART NO. 40-107 SERIES AND
MAIN BRAKE ASSEMBLY PART NO. 30-107 SERIES
Page 5
Feb 01/02
2.2 Cleaning, Inspection and Repainting
2.2.1 Clean all metal parts in alcohol or suitable solvent.
2.2.2 Replace O-rings.
2.2.3 Inspect brake cylinder (9-20 or 10-20) for cracks, especially in the lug
area around the anchor bolts. Cracks in this area necessitate
cylinder replacement.
CAUTION: THE LARGE DIAMETER PISTON BORE AND O-RING
GROOVE SHOULD NOT BE POLISHED WITH
ABRASIVE MATERIAL.
CAUTION: NICKS AND BURRS IN THE PILOT BORE AREA CAN
PREVENT THE PISTONS FROM PROPERLY
RETRACTING, RESULTING IN BRAKE DRAG.
2.2.3.1 Piston bores and O-ring grooves should have foreign
material loosened and flushed from all surfaces.
2.2.3.2 Small nicks and light corrosion may be blended and
removed with emery or sandpaper.
2.2.3.3 Inspect the fitting ports and piston bores for contamination.
Light scratches or nicks in the piston bores, pilot bores, or
on the chamfered surfaces within these bores may be
polished out with 600 grit emery, but the final piston bore
small diameter shall not exceed ∅0.565.
CAUTION: DO NOT PAINT INTERNAL SURFACES OF PISTON
BORES.
2.2.3.4 Thoroughly clean cylinder of all residue upon completion of
any reworking with available solvent applicable to aluminum.
Any external surfaces from which the protective coating has
been removed, should be cleaned, and painted with one coat
of zinc chromate primer and one coat of aluminum (color)
polyurethane.

MM40-107/30-107 COMPONENT MAINTENANCE MANUAL WITH IPL
FOR MAIN WHEEL ASSEMBLY PART NO. 40-107 SERIES AND
MAIN BRAKE ASSEMBLY PART NO. 30-107 SERIES
Page 6
Feb 01/02
CAUTION: DO NOT PAINT INTERNAL SURFACES OF PISTON BORES.
2.2.4 Inspect pistons (9-40 or 10-40) for nicks or burrs. Remove nicks or
burrs by polishing with 600 grit emery. The final piston large
diameter must not be smaller than ∅2.121 inch. Thoroughly clean
using available solvent applicable to aluminum before re-installation.
2.2.5 Inspect brake lining for edge chipping and surface deterioration. See
section 3. WEAR LIMITS.
2.2.6 Lining replacement can be accomplished by using a center punch to
remove the center rivet. Then pry the old segments off of the carrier
with a screwdriver. To install new pads, snap the new pad onto the
three carrier pins (9-80 or 10-80), and then attach with new center
rivet (9-75 or 10-75).
NOTE:If the linings are changed, but the pistons are not removed from the
cylinder, clean the exposed surfaces of the pistons before displacing
the pistons back into the cylinder.
2.2.7 Inspect pressure plate (9-65, 10-65) and back plates (9-90, 10-90) for
cracks or warpage. Replace if cracked or severely deformed.
Inspect pins for looseness. If loose, tighten with Parker Hannifin
Wheel & Brake rivet set and anvil, P/N 199-1A and 199-1B, or replace
back plate and pressure plate assembly.
NOTE:Slightly warped pressure plates with relief slots can be fixtured in a
vise and straightened when laid on a flat surface; flatness should be
less than .015 inches TIR. Warped pressure plates can cause brake
drag.
2.2.8 Inspect anchor bolt holes in torque plate for internal corrosion or
contamination. If present, clean with emery and apply a light coat of
dry lube.
NOTE:For best service life, the cylinders must slide freely in the torque plate.
Check the anchor bolt hole and mounting bolt hole areas for
elongation or cracks. Badly elongated or cracked parts should be
replaced with new parts or corresponding part number. Minor
corrosion on the torque plates may be removed with 600 grit emery.
NOTE:Surfaces from which the protective coating is removed, should be
painted with one coat of zinc chromate primer, and one coat of
aluminum (color) polyurethane.
This manual suits for next models
1
Table of contents
Popular Aircraft manuals by other brands

Tecnam
Tecnam P2006T Flight manual

Comco Ikarus
Comco Ikarus C42 B Pilot operating handbook

Forced Aeromotive Technologies
Forced Aeromotive Technologies FAA-STC SA10232SC instructions

Ozone
Ozone Geo 3 manual

DAVINCI GLIDERS
DAVINCI GLIDERS DUET manual

AEROPRAKT
AEROPRAKT AEROPRAKT-32L Pilot operating handbook