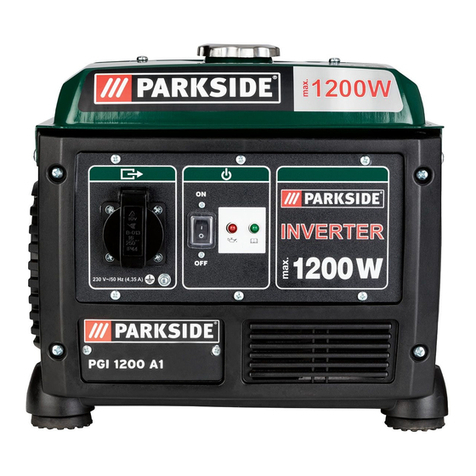
Parkside PGI 1200 A1 User manual

IAN 311314
INVERTER GENERATOR PGI 1200 A1
CHAT
INVERTER-STROMERZEUGER
Bedienungs- und Sicherheitshinweise
Originalbetriebsanleitung
DE
INVERTNÝ GENERÁTOR
Pokyny pre obsluhu a bezpečnostné pokyny
Preklad originálneho návodu na obsluhu
SK
INVERTER-ÁRAMFEJLESZTŐ
Kezelési és biztonsági útmutató
Az eredeti használati útmutató fordítása
HU
INVERTERSKI ELEKTRIČNI AGREGAT
Navodila za upravljanje in varnostna opozorila
Prevod originalnega navodila za uporabo
SI
INVERTER GENERATOR
Operating and Safety Instructions
Translation of Original Operating Manual
GB
INVERTNÍ GENERÁTOR
Pokyny pro obsluhu a bezpečnostní pokyny
Překlad originálního provozního návodu
CZ
4

GB Operating and Safety Instructions Page 01
HU Kezelési és biztonsági útmutató Oldal 10
SI Navodila za upravljanje in varnostna opozorila Stran 20
CZ Pokyny pro obsluhu a bezpečnostní pokyny Strana 29
SK Pokyny pre obsluhu a bezpečnostné pokyny Strana 38
DE / AT / CH Bedienungs- und Sicherheitshinweise Seite 47
Klappen Sie vor dem Lesen die Seite mit den Abbildungen aus und machen Sie sich anschließend mit allen Funktionen des Gerätes vertraut.
DE AT CH
Pred branjem odprite stran s slikami in se nato seznanite z vsemi funkcijami naprave.
SI
Olvasás előtt kattintson az ábrát tartalmazó oldalra és végezetül ismerje meg a készülék mindegyik funkcióját.
HU
Před čtením si otevřete stranu s obrázky a potom se seznamte se všemi funkcemi přístroje.
CZ
Pred čítaním si odklopte stranu s obrázkami a potom sa oboznámte so všetkými funkciami prístroja.
SK
Before reading, unfold the page containing the illustrations and familiarise yourself with all functions of the device.
GB

4
12
2
A B C D E F
5
13 14
3910
11
1
1
2
3
8 7 6 5 4

88
6
15
16 17 718
max 4.2l

10
11
9

1GB
Table of contents: Page:
1. Introduction..........................................................................................................................................................................................................3
2. Device description (Fig. 1-12)............................................................................................................................................................................3
3. Scope of delivery................................................................................................................................................................................................3
4. Intended use........................................................................................................................................................................................................3
5. Safety information...............................................................................................................................................................................................4
6. Technical data.....................................................................................................................................................................................................4
7. Before starting the equipment ............................................................................................................................................................................5
8. Operation............................................................................................................................................................................................................5
9. Maintenance .......................................................................................................................................................................................................6
10. Cleaning ..............................................................................................................................................................................................................6
11. Storage................................................................................................................................................................................................................6
12. Transport..............................................................................................................................................................................................................6
13. Disposal and recycling .......................................................................................................................................................................................7
14. Troubleshooting...................................................................................................................................................................................................7
15. Maintenance schedule .......................................................................................................................................................................................8
16. Warranty certificate............................................................................................................................................................................................9

2GB
Explanation of the symbols on the equipment
GB Read operator manual. Before any use, refer to the corresponding section
in this user manual.
GB Important. Hot parts. Keep your distance.
GB Important. Switch off the engine before refueling. Not refuel when operat-
ing.
GB Important. Exhaust gas is poisonous, do not operate in an unventilated
area.
GB Wear hearing protection. Wear protective gloves.
GB Take care when handling fuel and lubricants!
GB Remove the ignition cable before all maintenance work, and read the in-
structions for use.
GB Don’t expose to rain.
GB Starting engine creates sparking.
Sparking can ignite nearby flammable gases.
GB Strictly no naked flames or smoking near the appliance!
GB Guaranteed sound power level of the device.

3GB
1. Introduction
MANUFACTURER:
scheppach
Fabrikation von Holzbearbeitungsmaschinen GmbH
Günzburger Straße 69
D-89335 Ichenhausen
DEAR CUSTOMER,
we hope your new tool brings you much enjoyment and suc-
cess.
NOTE:
According to the applicable product liability laws, the manu-
facturer of the device does not assume liability for damages
to the product or damages caused by the product that occurs
due to:
• Improper handling,
• Non-compliance of the operating instructions,
• Repairs by third parties, not by authorized service techni-
cians,
• Installation and replacement of non-original spare parts,
• Application other than specified,
We recommend:
Read through the complete text in the operating instructions be-
fore installing and commissioning the device.
The operating instructions are intended to help the user to be-
come familiar with the machine and take advantage of its ap-
plication possibilities in accordance with the recommendations.
The operating instructions contain important information on
how to operate the machine safely, professionally and econom-
ically, how to avoid danger, costly repairs, reduce downtimes
and how to increase reliability and service life of the machine.
In addition to the safety regulations in the operating instruc-
tions, you have to meet the applicable regulations that apply
for the operation of the machine in your country.
Keep the operating instructions package with the machine at
all times and store it in a plastic cover to protect it from dirt and
moisture. Read the instruction manual each time before operat-
ing the machine and carefully follow its information.
The machine can only be operated by persons who were in-
structed concerning the operation of the machine and who are
informed about the associated dangers. The minimum age re-
quirement must be complied with.
In addition to the safety instructions contained in this operating
manual and the specific regulations of your country, the techni-
cal rules generally accepted for the operation of machines of
the same type must be observed.
We accept no liability for damage or accidents which arise
due to non-observance of these instructions and the safety in-
formation.
2. Device description (Fig. 1-12)
1. Handle
2. Fuel tank cap
3. Foot
4. Operating bulb
5. Oil check bulb
6. On/off switch
7. Earthing screw
8. 230 V∼ socket
9. Choke lever
10. Starter grip
11. Air filter lid
12. Air filter
13. Oil filler plug
14. Low oil trip
15. Spark plug cap
16. Spark plug
17. Fuel tap
18. Fuel filter
3. Scope of delivery
• Oil filler bottle (A) (1 pcs.)
• Handle (B) (1 pcs.)
• Screwdriver (C) (1 pcs.)
• Spark plug spanner (D) (1 pcs.)
• Socket wrench (E) (1 pcs.)
• Tool bag (F) (1 pcs.)
• Original Operating Manual (1 Stk.)
4. Intended use
The generator is suitable for devices which use a 230 AC volt-
age source. Please check the suitability for use of house hold
devices on the manufacturer information.
The equipment is allowed to be used only for its prescribed
purpose. Any other use is deemed to be a case of misuse. The
user/operator and not the manufacturer will be liable for any
damage or injuries of any kind resulting from such misuse.
An element of the intended use is also the observance of the
safety instructions, as well as the assembly instructions and op-
erating information in the operating manual.
Persons who operate and maintain the machine must be fa-
miliar with the manual and must be informed about potential
dangers.
In addition, the applicable accident prevention regulations
must be strictly observed.
Other general occupational health and safety-related rules and
regulations must be observed.
The liability of the manufacturer and resulting damages are ex-
cluded in the event of modifications of the machine.
Please note that our equipment has not been designed for use
in commercial, trade or industrial applications. Our warranty
will be voided if the equipment is used in commercial, trade or
industrial businesses or for equivalent purposes.

4GB
5. Safety information
1. No modifications are allowed to be made to the genera-
tor
2. The speed preset by the manufacturer may not be
changed. The generator or connected devices could be
damaged.
3. Risk of poisoning! Fumes, fuels and lubricants are
toxic. Do not breath in the fumes.
4. Fire risk! Petrol and petrol fumes are highly flammable
and explosive.
5. Motor exhaust gases are toxic. The generator must not
be operated in unventilated rooms. If the generator is to
be operated in well-ventilated rooms, the exhaust gases
must be discharged directly outside via an exhaust gas
hose. Additional requirements for protection against fire
and explosion must also be observed. Even when using
an exhaust hose, toxic gas can still escape. Due to the
risk of fire, the exhaust hose should never be aimed at
combustible material.
6. Never use the generator in rooms with highly flammable
materials.
7. Hot surface! Risk of burning, do not touch the exhaust
system and engine unit.
8. Do not touch any of the mechanically moving or hot parts.
Do not remove any of the protective caps.
9. Protective equipment! Use suitable ear protection
when near the device.
10. Only original parts should be used for maintenance and
accessories.
11. Repair and maintenance work must only be performed by
authorised qualified personnel.
12. Protect yourself from electric shocks.
13. Never touch the generator with wet hands
14. Only use outside with a extension cable which is suitable
for that and is appropriately marked (H07RN).
15. If extension cables or mobile distribution networks are
used, the resistance value must not exceed 1.5 Ω. When
using extension cables, the total length of cables for a
cross section of 1.5 mm2should not exceed 60 m; for a
cross section of 2.5 mm2, 100 m should not be exceeded.
16. Do not use the generator in the rain or snow.
17. Always turn off the engine when transporting or refuelling.
18. Fuel is combustible and highly flammable. Do fuel the unit
during operation. Do not fuel the unit when someone is
smoking or near open flames. Do not spill any fuel.
19. Do not refuel or empty near naked lights or flames or fly-
ing sparks. Do not smoke!
20. Put the generator on a secure and level place. Turning,
tipping or changing its position during operation is forbid-
den.
21. Install the generator at least 1 m away from the walls or
attached devices.
22. Children must be protected by ensuring that they stay a
safe distance away from the generator.
23. Some parts of the reciprocating internal combustion mo-
tor are hot and may cause burns. The warnings on the
generator must be observed.
24. Emission levels are represented in the technical data un-
der the stated values for sound power level (LWA) and
sound pressure level (LpA) and are not compulsory definite
working levels. Because there is a connection between
emission levels and immission levels, this can not reliably
used to determine the potentially necessary additional
precautions. Influencing factors on the workforce‘s cur-
rent immission level includes the properties of the work
area, other noise sources, air borne sound, etc. such as
e.g. the number of machines and other neighbouring pro-
cesses and intervals, to which the user is exposed. Also
the admissible immission levels can vary from country to
country. However, this information gives the user of the
machine the opportunity to have a better estimation of the
risks and dangers. Occasionally acoustic measurements
should be take after installation in order to determine the
sound pressure level.
25. Warning! Follow the electrical safety regulations that ap-
ply to the location where the generators are used.
26. Warning! Take into account the requirements and pre-
cautionary measures in the event of generators being re-
supplied, depending on the protective measures of this
device and the applicable directives.
27. Generator sets should only be used up to their rated out-
put under the rated ambient conditions. If the application
of the generating set is carried out under conditions which
do not comply with the reference conditions of ISO 8528-
10 (7.1), and if the cooling of the motor or generator is
impaired, e.g. as a result of operating in restricted areas,
a reduction in performance is required.
ATTENTION: Only use unleaded normal petrol as
fuel.
6. Technical data
Generator Inverter
Protection type IP23M
Continuous Power Pnenn (S1) 1000 W
Power Pmax (S2/5min) 1100 W
Power Pmax (S2/5s) 1200 W
Nominal voltage Unenn 230 V∼
Rated current Inenn 4,35 A
Frequency Fnenn 50 Hz
Type drive motor 4 stroke air-cooled
Engine displacement 54 cm³
Max. power (motor) 2.1 kW/2.85 PS
Fuel
Unleaded fuel
This device may not be
operated with E10 petrol
Tank capacity 4.2 l
5GB
Engine oil 0.25 l
(15W-40)
Use at ⅔ engine load approx. 0.88 l/h
Weight 12.8 kg
Sound pressure level LpA 74.39 dB (A)
Sound power level LWA 95 dB(A)
Uncertainty K 1.07 dB (A)
Power factor cos ϕ 1
Performance class G1
Quality class B
Spark plug MS A7RTC
Operating mode S1 (long use)
The machine can be used continuously with the indicated
power.
Operating mode S2 (Short term use)
The machine can be used in the short term with the indicated
power.
Acceptable ambient temperature:
-10 to +40 °C
Height: 1000 m above NN
rel. air humidity: 90 % (not condensed)
7. Before starting the equipment
• Open the packaging and remove the device carefully.
• Remove the packaging material as well as the packaging
and transport bracing (if available).
• Check that the delivery is complete.
• Check the device and accessory parts for transport dam-
age.
• If possible, store the packaging until the warranty period
has expired.
ATTENTION
The device and packaging materials are not toys!
Children must not be allowed to play with plastic
bags, film and small parts! There is a risk of swal-
lowing and suffocation!
Installation (Fig. 1/2)
To attach the handle (1), remove both Phillips screws M6x35
mm which are inserted. Place the handle (1) in position and
screw it tight. Attach all parts before pouring in fuel or oil in
order to prevent leaking of liquids.
Electrical safety
Prior to use, the generator and its electrical equipment (includ-
ing lines and plug connectors) should be checked to ensure
that there are no defects.
Never connect the generator to the mains (power point).
Keep the cables as short as possible.
Earthing (Fig. 1)
Earthing is needed to disperse static discharge. Connect a ca-
ble from one side of the earthing connector (7) of the generator
and from the other side to an external ground.
ATTENTION! When being used for the first time, motor oil
(15W-40, approx. 0.25 l) and petrol (unleaded normal petrol)
must be put in.
Check the fuel level and the oil, and if necessary top them
up. Make sure you have adequate ventilation. Ensure that the
spark cable is securely in the spark plug. Unplug any electric
device connected to the generator.
Putting in oil (Fig. 5)
Put the generator with its front side down and unscrew the oil
filler plug (13). Pour in 0.25 litres of engine oil (15W-40).
Close the oil filler cap (13) and stand the generator upright
Putting in fuel (Fig. 1/7)
Keep away from ignition sources! Always refuel in well-ventilat-
ed rooms or outside. Open the fuel tank cap (2) and, using a
filler pipe (not included in delivery), pour in a maximum of 4.2
litres of unleaded fuel into the fuel container. Ensure the tank
level is not exceeded and no fuel is spilled. Use the fuel filter.
Clean up spilled fuel immediately and wait until the fuel fumes
have evaporated (fire hazard). Close the fuel tank cap (2).
8. Operation
Start the engine (Fig. 1/3/6)
ATTENTION! When starting with the express start (10) you
can injure your hand with the sudden kick back.
Wear protective gloves when starting.
• Open the petrol tap (17) by turning the tap downwards.
• Put the on / off switch (6) to the “on” position. Turn the choke
lever (9) to I I (in the left position).
• Start the engine with the express start (10) by sharply pull-
ing the handle. If the engine has not started pull the handle
again.
• Push the choke lever (9) back once the engine has started
(in the right position).
• Connect the device to the 230 V∼ socket (8).
ATTENTION! This socket can be loaded continuously (S1)
with 1000 W and short term (S2) for a maximum of 5 seconds
with 1200 W.
Note: Some electric devices (sabre saws, drills etc.) can use
more electricity when doing heavy duty tasks.
Storing the engine (Fig. 1/6)
Before putting away, let the generator run without load so that
the device can „cool down“.
• Turn the on / off switch to the „OFF“ position.
• Close the petrol tap.
Overload protection 230 V∼ socket
NOTE! This generator is fitted with an overload protector.
This cuts off the sockets.
Green operating bulb:
Flashes 1 x per interval Speed too low
Flashes 2 x per interval Temperature too high

6GB
Flashes 3 x per interval Overload protection
switches on
Flashes 4 x per interval Short circuit
The socket (8) can be used again after the overload protection
has been triggered once the engine has been switched off and
restarted (See “Turning off engine” and “Starting engine”).
ATTENTION! If this happens reduce the amount of electrical
output which you are extracting from the generator or remove
defective devices which are attached.
ATTENTION! Faulty overload switches should only be re-
placed with identically constructed overload switches with the
same performance data. Please use our customer service de-
partment.
ATTENTION! Turn the device off immediately and contact
your Service Station:
• With unusual vibrations or noises.
• If the engine seems overloaded or has backfired.
9. Maintenance
Before cleaning and maintenance work, turn off the engine and
pull the spark plug connector (15) out of the spark plug (16).
WARNING! Risk of burning! Wait until the machine has
cooled down before cleaning or servicing it.
Air filter (Fig. 4)
Also refer to the service information.
Clean the air filter (12) regularly, and if necessary exchange it.
• Open the air filter cover (11) by removing the 2 Phillips head
screws M5x14 mm.
• Remove the filter element (12).
• When cleaning the element do not use any strong cleaners
or petrol.
• Clean the element by tapping it on a flat surface. If it is very
dirty wash with soapy water, rinse with clean water and
leave to dry.
• Put it back together in the opposite order.
Spark plug (Fig. 6)
Check the spark plug (16) after the first 20 hours of use for dirt
and if necessary clean it with a copper wire brush. Then service
the spark plug after every 50 hours of use.
• Remove the spark plug connector (15) with a turning move-
ment.
• Remove the spark plug (16) with the spark plug socket (D)
included.
• Put it back together in the opposite order.
Note: alternative spark plugs to
Bosch UR3AC
Petrol filter (Fig. 7)
Note: The petrol filter (18) is a filter bowl located directly under
the petrol cap (2) , filtering any petrol added.
• Turn the on/off switch (6) to the “OFF“ position.
• Open the petrol cap (2)
• Remove the petrol filter (18) and clean in a nonflammable
solvent or solvent with a high flash point.
• Reinsert petrol filter (18).
• Close the petrol cap (2).
Changing the oil, (Fig. 5)
Changing the oil should take place when the engine is warm.
WARNING! Drain fuel before replacing the oil.
Only use engine oil (15W-40).
• Place the generator on its front side on a suitable surface.
• Open the oil filler cap (13) and drain the warm engine oil
into a container by tilting the generator.
• Pour in engine oil (approx. 0.25 litres).
• Close the oil filler cap (13).
• Stand the generator upright again.
Low oil switch off
The low oil switch-off responds, if there is not enough engine oil.
The oil check bulb (5) starts to flash when there is insufficient
oil in the motor. The check bulb begins to flash when the oil
amount has gone below the safe level. The engine will turn off
independently after a short time. Restart is possible only after
pouring in more engine oil (see Chapter “Replacing the oil”).
10.Cleaning
Keep the safeguards, air vents and the engine housing as dust
and dirt free as possible. Wipe the device with a clean cloth
or blow it with compressed air with low pressure. We recom-
mend that you clean the device after every use. Regularly clean
the device with a damp cloth and a little soft soap. Do not
use any cleaning products or solvents which could attack the
plastic part of the device. Ensure that no water can penetrate
the housing.
11. Storage
Preparation for storage
• Empty the petrol tank with a petrol suction pump.
Warning notice: Do not remove fuel in closed rooms,
close to fire or whilst smoking. Vapours can cause explo-
sions or fires.
• Start the engine and leave it running until the rest of the pet-
rol has been used up.
• Change the oil after each season. To do this, remove the old
oil from the warm engine and refill with new oil.
• Remove the spark plug. Fill about 20 ml of oil into the cylin-
der using an oil can.
• Slowly pull the express start so that the oil protects the cylin-
der from the inside.
• Screw the spark plug back in
• Store the device in a well ventilated place or area.
12.Transport
Preparation for transporting
• Empty the petrol tank with a petrol suction pump or alterna-
tively using the petrol tap and a suitable canister.
• Once it is ready for use, leave the engine running until the
rest of the petrol has been used up.

7GB
• Empty the engine oil from the engine (as described).
• Remove the spark plug connector (15) from the spark plug (16).
• Secure the device with a tension belt to prevent it slipping out of place.
• The generator can be lifted and carried by using the handle (1).
13.Disposal and recycling
The equipment is supplied in packaging to prevent it from being damaged in transit. The raw materials in this packaging can be reused or
recycled. The equipment and its accessories are made of various types of material, such as metal and plastic. Defective components must be
disposed of as special waste. Ask your dealer or your local council.
The packaging is wholly composed of environmentally-friendly materials that can be disposed of at a local recycling
centre.
Contact your local refuse disposal authority for more details of how to dispose of your worn-out electrical devices.
Old devices must not be disposed of with household waste!
This symbol indicates that this product must not be disposed of together with domestic waste in compliance with the Directive
(2012/19/EU) pertaining to waste electrical and electronic equipment (WEEE). This product must be disposed of at a designated
collection point. This can occur, for example, by handing it in at an authorised collecting point for the recycling of waste electrical
and electronic equipment. Improper handling of waste equipment may have negative consequences for the environment and human
health due to potentially hazardous substances that are often contained in electrical and electronic equipment. By properly disposing of
this product, you are also contributing to the effective use of natural resources. You can obtain information on collection points for waste
equipment from your municipal administration, public waste disposal authority, an authorised body for the disposal of waste electrical and
electronic equipment or your waste disposal company.
Environmental protection
Take any contaminated maintenance material and operating materials to a collection point designated for this purpose.
When disposing of residual fluids (oils and fuel), observe the corresponding environmental regulations. We recommend taking all remain-
ing operating materials to your local collection point in a suitable sealed container. Do not pour the remaining operating materials into
waste or on the ground.
14.Troubleshooting
Fault Possible cause Remedy
Engine does not start Automatic oil cut-out has not responded Check oil level, top up engine oil
Spark plug fouled Clean or replace spark plug
No fuel Refuel / have the petrol cock checked
Generator has too little or no
voltage
Electronic defective Contact your dealer
Over-current circuit-breaker has triggered Actuate the circuit-breaker and reduce the
consumers
Air filter dirty Clean or replace the filter

8GB
15.Maintenance schedule
Please adhere to the following maintenance periods in order to ensure a failure-free operation.
IMPORTANT! The equipment must be filled with engine oil and fuel before it is started.
Before each use After an operating
period of 20 hours
After an operat-
ing period of 50
hours
After an operating
period of 100 hours
After an oper-
ating period
of 300 hours
Checking the engine oil X
Changing the engine oil For the first time, then
every 50 hours X
Checking the air filter XChange the
filter insert if
necessary
Cleaning the air filter X
Cleaning the petrol filter X
Visual inspection of the
equipment X
Cleaning the spark plug Distance: 0.6
mm, replace if
necessary
Checking andreadjusting
the throttle vale on the
carburetor
X*
Cleaning the cylinder head X*
Set the valve play X*
Important: The positions marked with “x*“ should only be carried out by an authorized dealer.
Service information
Please note that the following parts of this product are subject to normal or natural wear and that the following parts are therefore also required
for use as consumables.
Wear parts*: Spark plug
* Not necessarily included in the scope of delivery!

9GB
16.Warranty certificate
Dear Customer,
All of our products undergo strict quality checks to ensure that they reach you in perfect condition. In the unlikely event that your device
develops a fault, please contact our service department at the address shown on this guarantee card. Of course, if you would prefer to
call us then we are also happy to offer our assistance under the service number printed below. Please note the following terms under which
guarantee claims can be made:
• These guarantee terms cover additional guarantee rights and do not affect your statutory warranty rights. We do not charge you for
this guarantee.
• Our guarantee only covers problems caused by material or manufacturing defects, and it is restricted to the rectification of these
defects or replacement of the device. Please note that our devices have not been designed for use in commercial, trade or industrial
applications. Consequently, the guarantee is invalidated if the equipment is used in commercial, trade or industrial applications or
for other equivalent activities. The following are also excluded from our guarantee: compensation for transport damage, damage
caused by failure to comply with the installation/assembly instructions or damage caused by unprofessional installation, failure to
comply with the operating instructions (e.g. connection to the wrong mains voltage or current type), misuse or inappropriate use
(such as overloading of the device or use of non-approved tools or accessories), failure to comply with the maintenance and safety
regulations, ingress of foreign bodies into the device (e.g. sand, stones or dust), effects of force or external influences (e.g. damage
caused by the device being dropped) and normal wear resulting from proper operation of the device.
The guarantee is rendered null and void if any attempt is made to tamper with the device.
• The guarantee is valid for a period of 3 years starting from the purchase date of the device. Guarantee claims should be submitted
before the end of the guarantee period within two weeks of the defect being noticed. No guarantee claims will be accepted after
the end of the guarantee period. The original guarantee period remains applicable to the device even if repairs are carried out or
parts are replaced. In such cases, the work performed or parts fitted will not result in an extension of the guarantee period, and no
new guarantee will become active for the work performed or parts fitted. This also applies when an on-site service is used.
• In order to assert your guarantee claim, please send your defective device postage-free to the address shown below. Please enclose
either the original or a copy of your sales receipt or another dated proof of purchase. Please keep your sales receipt in a safe place,
as it is your proof of purchase. It would help us if you could describe the nature of the problem in as much detail as possible. If the
defect is covered by our guarantee then your device will either be repaired immediately and returned to you, or we will send you a
new device.
Of course, we are also happy offer a chargeable repair service for any defects which are not covered by the scope of this guarantee or for
units which are no longer covered. To take advantage of this service, please send the device to our service address.
Service-Hotline (GB):
+800 4003 4003
(0,00 EUR/Min.)
Service-Email (GB):
service.[email protected]
Service Address (GB):
Forest Park & Garden
Coed Court, Taffsmead Road
Treforest, Ind. Estate, Pontypridd CF375SW
At www.lidl-service.com you can download this and many more manuals, product videos plus installation
software.
The QR code takes you directly to the Lidl service page (www.lidl-service.com) and you can open your
operating manual by entering the article number (IAN) 311314.

10 HU
Tartalomjegyzék: Oldal:
1. Bevezetés...........................................................................................................................................................................................................12
2. A készülék leírása (1-12- ábra)........................................................................................................................................................................12
3. Szállított elemek ................................................................................................................................................................................................12
4. Rendeltetésszerűi használatg...........................................................................................................................................................................12
5. Biztonsági utasítások.........................................................................................................................................................................................13
6. Technikai adatok...............................................................................................................................................................................................13
7. Az üzembe helyezés előtt ................................................................................................................................................................................14
8. Használat ..........................................................................................................................................................................................................14
9. Karbantartá .......................................................................................................................................................................................................15
10. Tisztítás...............................................................................................................................................................................................................16
11. Tárolás ...............................................................................................................................................................................................................16
12. Szállítás..............................................................................................................................................................................................................16
13. Megsemmisítés és újrahasznosítás ..................................................................................................................................................................16
14. Hibaelhárításe...................................................................................................................................................................................................17
15. Karbantartási terv..............................................................................................................................................................................................17
16. Jótállási tájékoztató...........................................................................................................................................................................................18

11HU
A készüléken található szimbólumok magyarázata
HU Olvassa el az üzemeltetési kézikönyvet. A készülék használata előtt min-
den esetben lapozza fel az üzemeltetési kézikönyv megfelelő fejezetét.
HU Figyelem! Foró részek. Tartson távolságot.
HU Fontos. Tankolás előtt kapcsolja ki a motort. Járó motorba ne töltsön üzem-
anyagot.
HU Fontos. A kipufogógázok mérgezőek, a motort ezért ne működtesse nem
szellőztetett területeken.
HU Viseljen hallásvédőt. Viseljen védőkesztyűt.
HU Rendkívül körültekintően kezelje az üzemanyagokat és kenőanyagokat!
HU Karbantartási munkák előtt vegye ki az indítókábelt, és olvassa át a vonat-
kozó útmutatásokat.
HU A készüléket ne érje eső.
HU A motor beindításakor szikra keletkezik. Ez lángra lobbanthatja a közelben
található gyúlékony gázokat.
HU Nyílt láng használata és a dohányzása készülék közelében szigorúan tilos!
HU A készülék garantált hangteljesítményszintje.

12 HU
1. Bevezetés
GYÁRTÓ:
scheppach
Fabrikation von Holzbearbeitungsmaschinen GmbH
Günzburger Straße 69
D-89335 Ichenhausen
TISZTELT VÁSÁRLÓ!
Sok örömet és sikert kívánunk Önnek, amikor az új készülékét
használja.
KEDVES VÁSÁRLÓ!
A hatályban lévő termékfelelősségi törvény értelmében a be-
rendezés gyártója nem vonható felelősségre a berendezésen
vagy vele kapcsolatban keletkező károkért a következő ese-
tekben:
• szakszerűtlen kezelés,
• a használati utasítások be nem tartása,
• harmadik személy által végzett, szakképzetlen javítások,
• nem eredeti alkatrészek beszerelése és cseréje,
• szakszerűtlen használat,
Javaslatok:
Mielőtt a berendezést összeszerelné, és üzembe helyezné ol-
vassa el a használati útmutató teljes szövegét.
Az üzemelési utasítások célja a készülékkel való ismerkedésé-
nek megkönnyítése és a használati lehetőségeinek megismer-
tetése.
Az üzemelési utasítások fontos megjegyzéseket tartalmaz a ké-
szülék biztonságos, szakszerű és gazdaságos használatával
kapcsolatosan, a veszélyek elkerülésére, a javítási költségek
megspórolására, a kiesési idő csökkentésére, és a készülék
megbízhatóságának és élettartamának növelésére.
A használati útmutatóba foglalt biztonsági utasításokon kívül
mindenképpen be kell tartani a nemzeti érvényben lévő szabá-
lyozásokat a készülék üzemelésével kapcsolatosan.
Az üzemelési utasításokat helyezze egy tiszta, műanyag map-
pába, hogy megóvja a szennyeződéstől és a nedvességtől, és
tárolja a készülék közelében. A munka elkezdése előtt minden
gépkezelőnek el kell olvasnia az utasításokat és gondosan be
kell tartania őket. Csak olyan személyek használhatják a ké-
szüléket, akiket kiképeztek a gép használatáról, és a lehetsé-
ges veszélyekről, illetve kockázatokról. Be kell tartani az előírt
minimális kort.
A jelen üzemelési utasításokba foglalt biztonsági előírások és
a helyi országos különleges előírások kiegészítéseként be kell
tartani az általánosan elismert műszaki előírásokat a azonos
gépeket üzemelésekor.
Az útmutató, valamint a biztonsági előírások figyelmen kívül
hagyásából származó balesetekért és károkért nem vállalunk
felelősséget.
2. A készülék leírása (1-12- ábra)
1. Markolat
2. Tankfedél
3. Állvány
4. Üzemjelző lámpa
5. Olajszint ellenőrző lámpa
6. Be-/kikapcsoló
7. Földelőcsavar
8. 230 V∼ konnektor
9. Szivatókar
10. Indítózsinór
11. Légszűrőfedél
12. Levegőszűrő
13. Olajbetöltő-csavar
14. Olajhiány-biztosíték
15. Gyertya-dugó
16. Gyujtógyertya
17. Benzincsap
18. Benzinszűrő
3. Szállított elemek
• Olajbetöltő palack (A) (1 db)
• Markolat (B) (1 db)
• Csavarhúzó (C) (1 db)
• Gyertyakulcs (D) (1 Stk.)
• Dugókulcs (E) (1 db)
• Szerszámtáska (F) (1 db)
• Eredeti kezelési útmutató (1 db)
4. Rendeltetésszerűi használatg
A generátor 230 V-os váltófeszültséggel üzemelő készülékek-
hez készült. Háztartási készülékek esetén kérjük, ellenőrizze a
gyártói adatoknak való megfelelést.
A gépet csak a rendeltetésének megfelelően szabad használ-
ni. Minden más, ettől eltérő alkalmazás nem rendeltetésszerű-
nek minősül. Az ebből keletkező mindenféle károsodásért és
sérülésért a felhasználó/kezelő felel és nem a gyártó.
A rendeltetésszerűi használat resze a biztonsági utasítások fi-
gyelembe vetele is, valamint az osszeszerelesi es a hasznalati
utasitasban levő uzemeltetesi utasitasok.
A gepet kezelő es karbantarto szemelyeknek ezekben jarta-
saknak es a lehetseges veszelyekkel kapcsolatban kioktatot-
taknak kell lenniuk.
Ezen kivul legpontosabban be kell tartani az ervenyes baleset-
vedelmi előirasokat.
Figyelembe kell venni a munkaegeszsegugyi es a biztonsag-
technikai teren fennallo balesetvedelmi szabalyokat.
A gepen tortenő valtoztatasok, teljesen kizarjak a gyarto
szavatolasat es az ebből adodo karok megteriteset.
Vegye figyelembe, hogy a készülékeink rendetetésszerűen
nem ipari, szakmai vagy gyári alkalmazásra készültek. Nem
vállalunk szavatosságot, ha a készüléket ipari-, szakmai- gyári-
vagy ennek megfelelő tevékenységre használja.

13HU
5. Biztonsági utasítások
1. Az áramfejlesztőn nem szabad semmilyen fajta változta-
tásokat elvégezni.
2. A gyártó által előre beállított fordulatszámot nem szabad
megváltoztatni. Az áramfejlesztő, vagy a csatlakoztatott
készülékek megsérülhetnek.
3. Mérgezésveszély! A kipufogógázok, üzemanyagok
és kenőanyagok mérgezőek, a kipufogógázokat nem
szabad belélegezni.
4. Égésveszély! A benzin és a benzingőz könnyen gyúl-
ékony, ill. robbanékony.
5. A motorból távozó gázok mérgezőek. Az áramfejlesztőt
nem szabad nem szellőztetett helyiségekben üzemeltetni.
Amennyiben a készüléket jól szellőző helyiségben kíván-
ják üzemeltetni, akkor a kipufogógázokat egy kipufogó-
gáz-tömlőn keresztül kell közvetlenül a szabadba vezetni
és további tűz- és robbanásvédelmi előírásokat kell be-
tartani. Gázelvezető tömlő használata mellett is kiléphet-
nek mérgező kipufogógázok. A gyulladásveszély miatt
a kipufogótömlőt soha nem szabad éghető anyag felé
irányítani.
6. Az áramfejlesztőt soha ne üzemeltesse gyúlékony anya-
gokat tartalmazó helyiségben.
7. Forró felületek! Égésveszély, a kipufogóberendezést
és a hajtóaggregátumot ne érintse meg.
8. Ne érjen a mechanikusan mozgó, vagy forró részekhez.
Ne távolítsa el a védőborítást.
9. Védőfelszerelés! Használjon megfelelő hallásvédőt,
ha a gép közelében tartózkodjon.
10. Karbantartáskor és tartozékként csak eredeti alkatrészt
szabad használni.
11. A javítási-, beüzemelési és beállítási munkálatokat csak
engedéllyel rendelkező szakember végezheti.
12. Védje magát az elektromos veszélyektől.
13. Soha ne érjen nedves kézzel az áramfejlesztőhöz.
14. A szabadban csak az arra engedélyezett és megfelelően
jelölt hosszabbítókábelt használjon (H07RN).
15. Amennyiben a hosszabbító vezetékeket, illetve mobil el-
osztó hálózatokat használ, az ellenállás értéke nem ha-
ladhatja meg a 1,5 Ω-t. Az irányadó érték, hogy a 1,5
mm² keresztmetszetű vezetékek teljes hossza nem halad-
hatja meg a 60 m-t, 2,5 mm²-es keresztmetszet esetén
pedig a 100 m-t.
16. Az áramfejlesztőt soha ne üzemeltesse esőben, vagy hő-
esésben.
17. Szállításkor és a motor tankolásakor mindig állítsa le.
18. Az üzemanyag éghető és fokozottan tűzveszélyes. Az
üzemanyagot tilos üzemelés közben betölteni. Dohány-
zás vagy nyílt láng közelében tilos üzemanyagot betölte-
ni! Ne locsolja szét az üzemanyagot.
19. Ne tankolja, vagy ürítse a tankot nyílt láng, tűz, vagy szik-
ra közelében. Ne dohányozzon!
20. Az áramfejlesztőt helyezze egy biztonságos, sík terepre.
Az üzemelés alatt tilos elfordítani, dönteni, vagy helyét
megváltoztatni.
21. Az áramfejlesztőt legalább 1 m távolságra helyezze fa-
laktól, vagy a rácsatlakoztatott készülékektől.
22. Gondoskodni kell a gyermekek védelméről: védőtávolsá-
got kell betartaniuk az áramfejlesztő közelében.
23. A belső égégsű motorok egyes részei forrók és égési sé-
rüléseket okozhatnak. Vegye figyelembe a generátoron
található figyelmeztető utasításokat.
24. A hangteljesítmény-szint (LWA) és a hangnyomásszint (LpA)
műszaki értékeknél megadott értékek kibocsátási szinte-
ket jeleznek és nem kötelező munkaszintek. Mivel a ki-
bocsátási- és szennyezési szintek között összefüggés van,
úgy az nem vonható le megbízhatóan az esetlegesen
szükséges, további óvintézkedések megahtározásából.
A mukaerő aktuális szennyezési szintjét befolyásoló kibo-
csátási tényezők magukba foglalják a munkavégzés he-
lyének tulajdonságait, az egyéb zajforrásokat, léghango-
kat, stb., valamint pl. a gépek számát és más szomszédos
folyamatokat és az időszakot, amelyben a kezelő a zaj-
nak ki van téve. A megengedett szennyezési szint ugyan-
akkor országonként is eltérhet. Ez az információ azonban
lehetőséget ad a gép üzemeltetőjének arra, hogy jobban
megbecsülhesse a kockázatokat és a veszélyeket. Eseten-
ként szükség lehet a telepítést követő akkusztikus mérések
elvégzésére a hangnyomásszint meghatározásához.
25. Figyelmeztetés! Tartsa be az áramfejlesztő alkalmazási
helyén érvényes, az elektromos biztonságra érvényes
előírásokat!
26. Figyelmeztetés! Amennyiben egy berendezést áramfej-
lesztőkkel látnak el, a berendezésre vonatkozó védelmi
intézkedések és alkalmazandó irányelvek mellett be kell
tartani a vonatkozó követelményeket és óvintézkedéseket
is.
27. Az áramfejlesztők csak a névleges teljesítményükig hasz-
nálhatók normál, névleges környezeti feltételek mellett.
Amennyiben az áramfejlesztő berendezést olyan felté-
telek mellett üzemeltetik, amelyek nem felelnek meg az
ISO 8528-8:2016, 7.1 szerinti referenciafeltételeknek, és
csökken a motor vagy a generátor hűtése (például zárt
térben történő üzemeltetés miatt), akkor csökkenteni kell
a teljesítményt.
FIGYELEM: Kizárólag ólommentes normál benzint
használjon üzemanyagnak.
6. Technikai adatok
Generátor Inverter
Védettség IP23M
Tartós teljesítmény Pnenn (S1) 1000 W
Maximális teljesítmény Pmax
(S2/5min) 1100 W
Maximális teljesítmény Pmax (S2/5s) 1200 W
Névleges feszültség Unenn 230 V∼
Névleges áramerősség Inenn 4,35 A
Frekvencia Fnenn 50 Hz
A hajtómotor építési jellege 4-ütemű léghűtéses
Űrtér 54 cm³

14 HU
Max. teljesítmény (motor) 2,1 kW/2,85 PS
Üzemanyag
ólommentes benzin
Ezt a készüléket
nem szabad E10-es
benzinnel üzemel-
tetni
Tanktérfogat 4,2 l
Motorolaj 0,25 l
(15W-40)
Fogyasztás 2/3 ⅔ -os terhelésnél ca.0,88 l/h
Súlyok 12,8 kg
Hangnyomásszint LpA 74,39 dB (A)
Hangteljesítményszint LWA 95 dB(A)
Bizonytalanság K 1,07 dB (A)
teljesítmény-tényező cos ϕ 1
Teljesítmény-osztály G1
Minőségi osztály B
Gyújtógyertya MS A7RTC
Üzemi jelleg S1 (tartós üzem)
A gép tartósan üzemeltethető a megadott teljesítményen.
Üzemi jelleg S2 (rövid üzem)
A gép rövid ideig üzemeltethető a megadott teljesítményen.
Megengedett környezeti hőmérséklet:
-10 - +40 °C
Magasság: 1000 m NN felett
rel. páratartalom: 90 % (nem kondenzáló)
7. Az üzembe helyezés előtt
• Nyissa ki a csomagolást és óvatosan vegye ki a készüléket.
• Távolítsa el a csomagolóanyagot, valamint a csomagolási
/ szállítási biztosításokat (ha vannak ilyenek).
• Ellenőrizze, hogy teljes-e a szállítmány.
• Ellenőrizze a készülék és a kiegészítő alkatrészek szállítás
során keletkezett sérüléseit.
• Lehetősége szerint a garancia érvényességének leteltéig
őrizze meg a csomagolást.
FIGYELEM
A készülék és a csomagolóanyag nem gyerekjá-
ték! A gyerekek ne játsszanak
a műanyag zacskókkal, fóliákkal és apró alkatré-
szekkel! Fennáll a lenyelés és fulladás veszélye!
Összeszerelés (1/2. ábra)
A markolat (1) felszereléséhez, távolítsa el mindkét, már becsa-
varozott M6x35 mm-es kereszthornyos csavart. Helyezze fel a
markolatot (1), majd csavarozza be azt. Szereljen össze min-
den részt, mielőtt üzemanagot és olajat tölt bele, hogy lkerülje
a folyadékok kifolyását.
Elektromos biztonság
Használat előtt az áramfejlesztő berendezést és annak elekt-
romos berendezéseit (beleértve a vezetékeket és a dugós csat-
lakozásokat is) ellenőrizni kell, hogy megbizonyosodjon róla,
nem hibásodtak-e meg.
Soha ne csatakoztassa az áramfejlesztőt az elektromos háló-
zathoz (konnektorhoz).
A fogyasztóhoz vezető kábelek hossza legyen a lehető leg-
rövidebb.
Figyelem!
A beszennyeződött karbantartó-anyagokat és üzemanyagot
egy az erre a célra szolgáló gyűjtőhelyre adja le.
Földelés (1- ábra)
A statikus feltöltődések levezetésére a burkolatot földelni kell.
Ehhez a vezeték egyik végét kösse az áramfejlesztő földe-
lő-csatlakozójához (7), a másik oldalon egy külső tárgyhoz.
FIGYELEM! Az első használat előtt motorolajat (15W-40,
kb. 0,25 l) és üzemanyagot (ólommentes normál-Benzin) kell
beletölteni. Ellenőrizze az üzemanyag- és motorolaj-szintet.
Gondoskodjon a készülék kielégítő mértékű szellőztetéséről.
Bizonyosodjon meg róla, hogy a gyújtókábel biztosan van-e
rögzítve a gyertyához.
Az esetlegesen csatlakoztatott elektromos készülékeket válasz-
sza le az áramfejlesztőről.
Olaj betöltése (5- ábra)
A generátort elülső oldalával lefelé helyezze le, majd csava-
rozza ki az olajbetöltő csavart (13). Töltsön be 0,25 l motor-
olajat (15W-40).
Zárja vissza az olajbetöltő csavart (13), majd állítsa vissza füg-
gőleges helyzetbe a generátort.
Benzin betöltése (1/7- ábra)
Tartsa távol a gyújtóforrásokat! Kizárólag jól szellőző helyisé-
gekben vagy a szabadban töltsön be üzemanyagot.
Csavarja le az üzemanyagtartály fedelét (2), majd egy betöltő
csonk segítségével (nem képezi a szállítási terjedelem részét)
töltsön be maximum 4,2 l ólommentes benzint az üzemanyag
tartályba.
Ügyeljen rá, hogy ne töltse túl az üzemanyagtartályt és ne önt-
se mellé a benzint. Használjon benzinszűrőt. A kiömlött benzint
azonnal vegye fel, majd várjon, amíg a benzingőzök elpáro-
lognak (tűzveszély).
Zárja le a tartály fedelét (2).
8. Használat
Motor indítása (1/3/6- ábra)
FIGYELEM! A behúzózsinórral (10) történő indításkor a hirte-
len visszarántás kézsérüléseket okozhat.
Az indításhoz viseljen védőkesztyűt.
• Nyissa ki a benzincsapot (17); ehhez fordítsa lefelé a csa-
pot.
• Állítsa a Be- / kikapcsolót (6) „ON“ helyzetbe. A szivatókart
(9) állítsa I I helyzetbe (a bal pozícióba).
• Indítsa el a motort a behúzózsinórral (10) ; ehhez erősen
húzza meg a markolatot. Ha a motor nem indult el, húzza
meg ismét a markolatot.

15HU
• A szivatókart (9) a motor indítását követően tolja vissza
(jobb pozícióba).
• Az áramfejlesztő terhelése: Készülékek csatlakoztatása 230
V∼ os konnektorhoz (8).
FIGYELEM! Ezek a konnektorok tartósan (S1) terhelhetőek
1000 W-tal és rövid ideig (S2), max. 5 percig 1200 W-tal.
Útmutatás: Néhány elektromos készülék (motoros lyukfűrészek,
fúrógépek, stb.) több áramot fogyasztanak, ha nehezített körül-
mények között használják őket.
Motor leállítása (1/6- ábra)
Az áramfejlesztőt hagyja kicsit terhelés nélkül járni, mielőtt leál-
lítja, hogy az aggregátor „utánhűlhessen“.
• Állítsa a Be- / kikapcsolót (6) „OFF“ helyzetbe.
• Zárja el a benzincsapot (17).
Túlterhelés elleni védelem 230 V∼ konnektor
TUDNIVALÓ! Az áramfejlesztő túlterhelés elleni védelemmel
van ellátva.
Ez kikapcsolja a konnektorokat (8).
A zöld színű üzemjelző lámpa a következő állapotokat mutatja:
1 x villogás időközönként a motor fordulatszáma túl
alacsony
2 x villogás időközönként a hőmérséklet túl magas
3 x villogás időközönként bekapcsol a túlfeszültség
elleni védelem
4 x villogás időközönként rövidzárlat
A motor kikapcsolásával és újbóli bekapcsolásával a dugaszo-
ló aljzat (8) a túlfeszültség elleni védelem kioldását követően
újra üzembe helyezhető. (Lásd „Motor leállítása“ és „Motor
elindítása“)
FIGYELEM! Ha ez előfordulna, csökkentse az áramfejlesztő-
ről nyert elektromos teljesítményt, vagy távolítsa el a hibás csat-
lakoztatott készülékeket.
FIGYELEM! A hibás túlterhelés-kapcsolót csak azonos kivitelű
és azonos teljesítményű túlterhelés-kapcsolóval szabad kicse-
rélni. Ezzel kapcsolatban forduljon az ügyfélszolgálathoz.
FIGYELEM! Azonnal állítsa le a berendezést és forduljon szer-
vizhez:
• Szokatlan kilengések, vagy zajok esetén.
• Ha a motor túlterheltnek tűnik, vagy hibás gyújtás jeleit mu-
tatja.
9. Karbantartá
Minden tisztítási- és karbantartási munkálat előtt állítsa le a mo-
tort és húzza ki a gyertyadugót (15) a gyertyából (16).
FIGYELEM! Égésveszély! Mielőtt a tisztítást, illetve a karban-
tartást megkezdené, várjon, amíg a készülék lehűl.
Légszűrő (4- ábra)
Ehhez tartsa szem előtt a szervíz-utasításokat.
Rendszeresen tisztítsa meg és szükség esetén cserélje ki a lég-
szűrőt (12).
• Nyissa fel a légszűrő fedelét (11) a 2 db M5x14 mm-es
kereszthornyos csavar kicsavarozásával.
• Vegye ki a légszűrőt (12).
• Az elemek tisztításához nem szabad erős tisztítószert, vagy
benzint használni.
• Az elemeket tisztítsa egy lapos felületen történő kiütöge-
téssel. Erős szennyeződés esetén mossa ki szappanlúggal,
ezután öblítse ki tiszta vízzel, majd szárítsa meg a levegőn.
• Az összeszerelés fordított sorrendben történik.
Gyújtógyertya (6- ábra)
Először 20 üzemórát követően ellenőrizze a gyújtógyertyát
(16) szennyezettség szempontjából és adott esetben tisztítsa
meg egy réz drótkefével. Ezt követően 50 üzemóra után tartsa
karban a gyújtógyertyát.
• Egy fordítással húzza le a gyújtógyertya-dugót (15).
• Vegye ki a gyertyát (16) a mellékelt gyertyakulccsal (D).
• Az összeszerelés fordított sorrendben történik.
Útmutatás: Alternatív gyújtógyertya
Bosch UR3AC
Benzinszűrő (7- ábra)
Útmutatás: a benzinszűrő (18) egy közvetlenül a tankfedél (2)
alatt található szűrőtölcsér, amely megszűri a betöltött üzem-
anyagot.
• Állítsa a Be- / kikapcsolót (6) „OFF“ helyzetbe.
• Nyissa ki a tankfedelet (2).
• Vegye ki a benzinszűrőt (18) és tisztítsa meg azt egy nem
gyúlékony, vagy magas gyújtópontú oldószerben.
• Tegye vissza a benzinszűrőt (18).
• Zárja vissza a tankfedelet (2).
Olajcsere, (5- ábra)
A motorolajat üzemmeleg motornál végezzük.
FIGYELEM! Olajcsere előtt engedje le a benzint.
Csak motorolajat (15W-40) használjon.
• Az áramfejlesztőt elülső oldalával lefelé helyezze egy meg-
felelő aljzatra.
• Csavarozza ki az olajbetöltő csavart (13), majd a generátor
megdöntésével engedje le a meleg motorolajat egy gyűjtő-
tartályba.
• Töltsön be motorolajat (kb. 0,25 l)
• Zárja vissza az olajbetöltő csavart (13).
• Állítsa újra sík felületre a generátort.
Olajkapcsolási -automatika
Az olajkapcsolási automatika akkor lép működésbe, ha túl
kevés motorolaj van jelen. Ha túl kevés olaj van a motorban,
az olajszint ellenőrző lámpa (5) villogni kezd. Az ellenőrző
lámpa világít, ha az olaj mennyisége nem éri el a biztonsági
mennyiséget. A motor rövid idő elteltével magától leáll. Elindí-
tása csak a motorolaj (lásd „Olajcsere” fejezet) betöltése után
lehetséges.
Other manuals for PGI 1200 A1
7
This manual suits for next models
1
Table of contents
Languages:
Other Parkside Portable Generator manuals

Parkside
Parkside PSE 2800 A1 User manual

Parkside
Parkside PGI 1200 A1 Quick guide

Parkside
Parkside PSE 2800 B2 User manual

Parkside
Parkside PSE 2800 A1 User manual

Parkside
Parkside PGI 1200 A1 Quick guide

Parkside
Parkside PISE 3400 A1 User manual

Parkside
Parkside PGI 1200 A1 User manual

Parkside
Parkside PGI 1200 A1 Quick guide

Parkside
Parkside PSE 2800 A1 User manual

Parkside
Parkside PSE 2800 A1 User manual