manuals.online logo
Brands
  1. Home
  2. •
  3. Brands
  4. •
  5. PARSONS ADL
  6. •
  7. Bathroom Aid
  8. •
  9. PARSONS ADL LOOK 1475 User manual

PARSONS ADL LOOK 1475 User manual

Transfer Bench by
Item: 1475
ENSURE THAT ALL PUSH BUTTONS “CLICK” INTO POSITION.
DO NOT USE PRODUCT IF PUSH BUTTONS ARE DAMAGED IN ANY WAY.
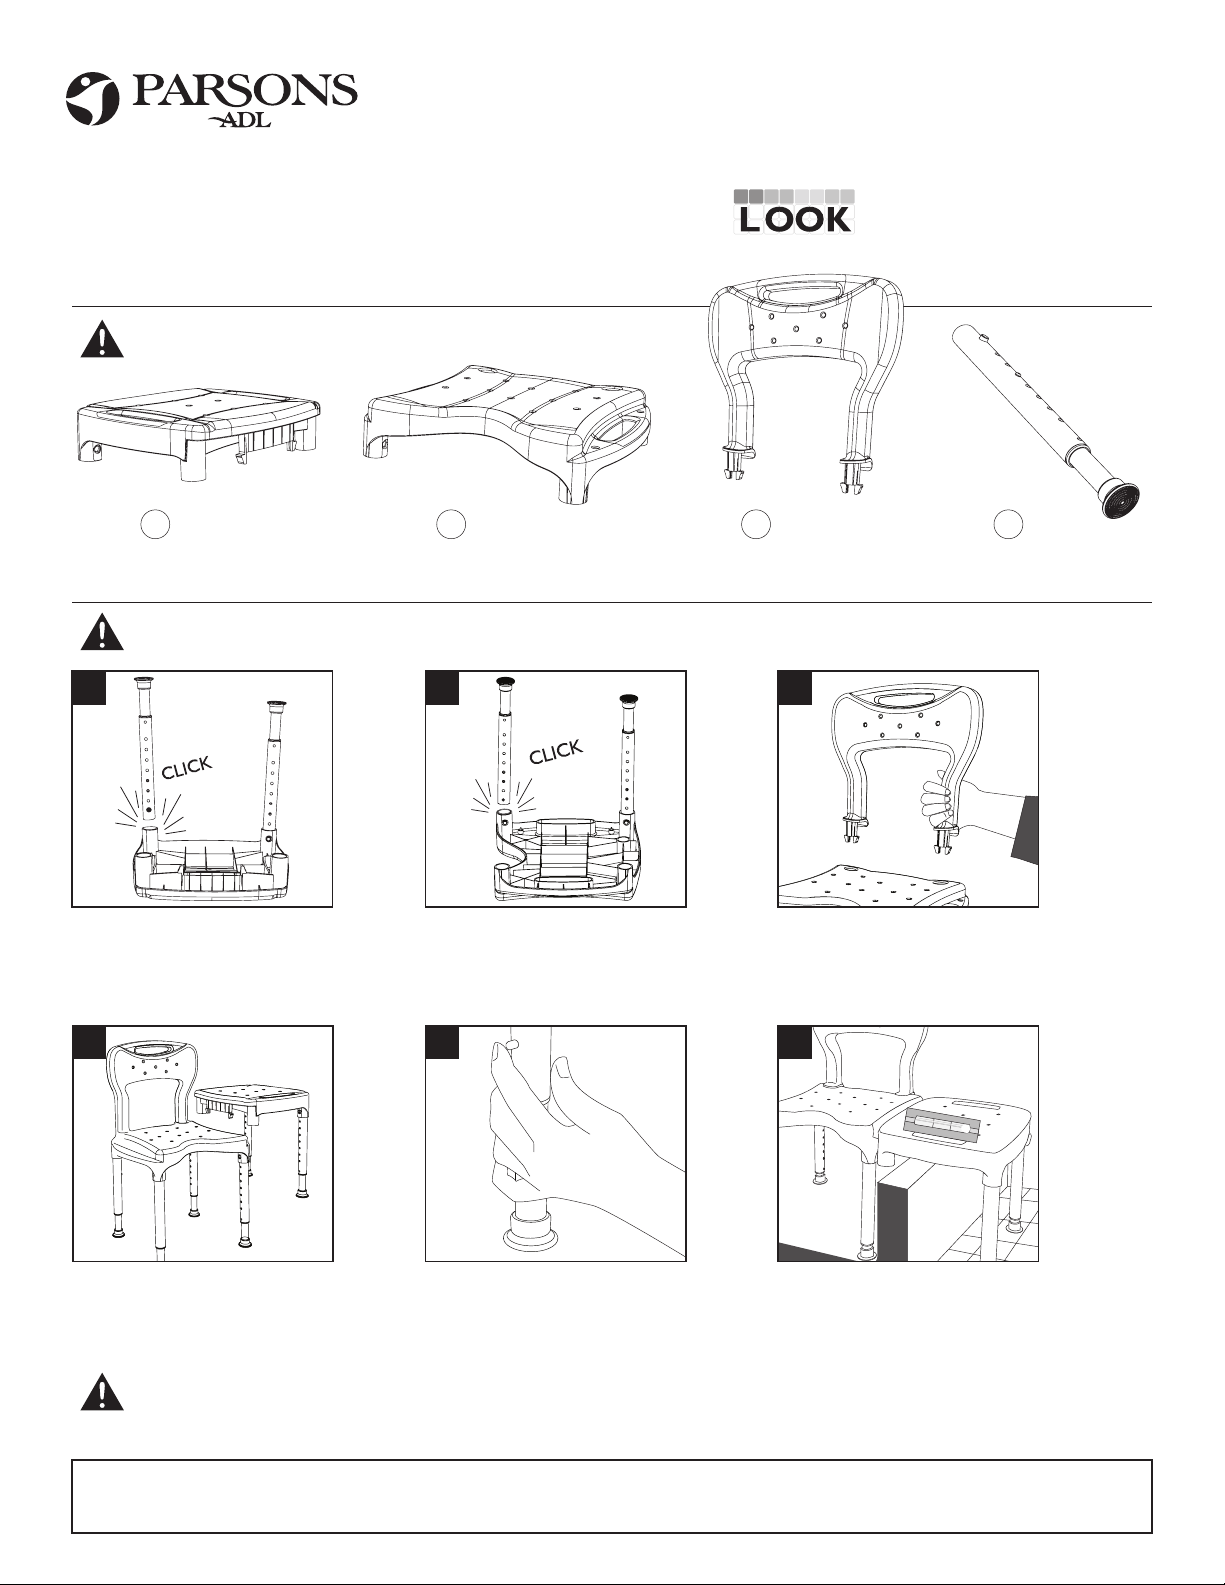
THE FOUR LEGS OF THE LARGE SEAT REST IN THE BATHTUB. THE TWO LEGS OF THE SMALL SEAT REST ON THE BATHROOM FLOOR.
ADJUST LEGS TO ENSURE THE BENCH AS A WHOLE UNIT IS LEVEL AND STABLE BEFORE USING.
ASSEMBLY
Flip over small seat and insert two
legs into holes at bottom of seat on
the side without the clips.
Flip over large seat and insert four legs
into holes at bottom of seat. Ensure
white button “clicks” into place.
Insert back rest into large seat.
Insert small seat into side slots in
large seat as shown.
Push in brass coloured button and slide
inner tube up or down to adjust to desired
height. Ensure button“clicks”into place.
Ensure transfer bench is level before use. If Easy
On/Easy O feature is not required (see over),
ensure seat clips are securely “locked” into position.
1 Small Seat 1 Large Seat 1 Back Rest 6 Legs
DO NOT USE ANY CRACKED OR DAMAGED COMPONENTS.
COMPONENTS
1 2 3
4 5 6
WARRANTY: This warranty is extended to the original purchaser of this product for a period of one year from the original purchase date against defects in materials and/or workmanship and is dependent that the product has
been used in the intended fashion as outlined in this manual. Those items not warrantied are rubber tips. Any installation, service and/or labour charges are at the discretion of the vendor and are not the responsibility of
Parsons ADL. Any parts damaged by improper installation, repair and/or alteration by an unauthorized agency or individual, or parts damaged by neglect, accident or misuse on the part of the agency or individual are not
warrantied. Parsons ADL’s sole liability extends to repair or replacement of parts or components as previously specied. The foregoing is in lieu of any other warranties expressed or implied, whether written or oral.
1-800-263-1281
www.parsonsadl.com
Parsons ADL Inc.
1986 Sideroad 15, Tottenham, ON
Canada L0G 1W0
WARNINGS Please read and heed all warnings. Save this information for future reference.
CARE AND USE
OPTIONAL ACCESSORY INSTALLATION This accessory is sold separately.
250 lbs (113.4 kg)
Ensure legs are locked
in before sitting.
DO NOT exceed
weight capacity.
DO NOT stand on seat.
Your feet must rmly touch
the oor when seated.
Only use on tub/shower oors
that are wide enough to
ensure stability of all four legs.
Ensure legs are adjusted so
the transfer bench is level
to avoid possible injury.
DO NOT use chlorine
bleach or abrasive
cleansers. To clean, wipe
down with a damp cloth
using a mild detergent only.
Rinse well after each use.
1418 Look Soap Dish
with built-in holder for left or right
hand shower hose.
Insert the pegs of the soap dish
accessory into the mating holes on
the large seat (instead of arm rest).
Supervision or assistance is
recommended for users
with limited mobility.
Periodically check the
legs to ensure that all
push buttons protrude
fully through the
adjustment holes.
Increase safety by using
a slip resistant bath mat
under the bench.
Ensure your weight is
evenly distributed when
sitting. Improper or
uneven loading may
result in the chair tipping
over and/or falling.
CL
TO ENABLE THIS FEATURE, THE CLIPS SHOWN MUST FIRST BE REMOVED.
EASY ON / EASY OFF FEATURE The small seat can be made to remove easily allowing the shower curtain/door to close.
Locate the two clips on the
bottom of the small seat section.
Using pliers, break o the clips. Place the small seat into the
larger seat as shown.
Adjust legs to ensure transfer
bench is level.
1 2 3 4
THIS TRANSFER BENCH SHOULD NOT BE USED AS A SUPPORT WHEN ENTERING OR EXITING THE BATHTUB ITSELF.
Use a safety rail (available separately) if you require a support. Contact Parsons Customer Service for recommendations.

Popular Bathroom Aid manuals by other brands

Vitea Care DRVW01 user manual

Vitea Care

Vitea Care DRVW01 user manual

Hewi 802.51.23960SD Installation and operating instructions

Hewi

Hewi 802.51.23960SD Installation and operating instructions

dynarex 10328 Assembly instructions

dynarex

dynarex 10328 Assembly instructions

Invacare Alize user manual

Invacare

Invacare Alize user manual

Mobilex 302050 user manual

Mobilex

Mobilex 302050 user manual

Santec 3966CI10 quick start guide

Santec

Santec 3966CI10 quick start guide

Galvin Engineering GalvinAssist 41992CP Installation guidelines

Galvin Engineering

Galvin Engineering GalvinAssist 41992CP Installation guidelines

Wolfen 2260105 installation manual

Wolfen

Wolfen 2260105 installation manual

Lifestyle B3125 user manual

Lifestyle

Lifestyle B3125 user manual

Franke RODX687 Installation and operating instructions

Franke

Franke RODX687 Installation and operating instructions

aidapt VR278 Usage and maintenance instructions

aidapt

aidapt VR278 Usage and maintenance instructions

Kohler K-11870 Installation and care guide

Kohler

Kohler K-11870 Installation and care guide

aidapt VR278A Usage and maintenance instructions

aidapt

aidapt VR278A Usage and maintenance instructions

Pressalit RT018 Mounting instruction

Pressalit

Pressalit RT018 Mounting instruction

Invisia INV-WSCS manual

Invisia

Invisia INV-WSCS manual

The Splash Lab TSL.GR45.600 Instruction and maintenance

The Splash Lab

The Splash Lab TSL.GR45.600 Instruction and maintenance

Aquatec Beluga Assembly instruction

Aquatec

Aquatec Beluga Assembly instruction

Easy@Home RB65489 Series user manual

Easy@Home

Easy@Home RB65489 Series user manual

manuals.online logo
manuals.online logoBrands
  • About & Mission
  • Contact us
  • Privacy Policy
  • Terms and Conditions

Copyright 2025 Manuals.Online. All Rights Reserved.