Partner OT-100 User manual

OT-100
User Manual


i
Copyright
This publication, including all photographs, illustrations and software, is protected under international
copyright laws, with all rights reserved. Neither this manual, nor any of the material contained herein, may be
reproduced without written consent of PARTNER Tech Corp.
Disclaimer
The information in this document is subject to change without notice. The manufacturer makes no representa-
tions or warranties with respect to the contents hereof and specically disclaims any implied warranties of
merchantability or tness for any particular purpose. The manufacturer reserves the right to revise this publi-
cation and to make changes from time to time in the content hereof without obligation of the manufacturer to
notify any person of such revision or changes.
Trademark recognition
All product names used in this manual are the properties of their respective owners and are acknowledged.
Federal Communications Commission (FCC)
This equipment has been tested and found to comply with the limits for a Class Bdigital device, pursuant to
Part 15 of the FCC Rules. These limits are designed to provide reasonable protection against harmful interfer-
ence in a residential installation. This equipment generates, uses, and can radiate radio frequency energy
and, if not installed and used in accordance with the instructions, may cause harmful interference to radio
communications. However, there is no guarantee that interference will not occur in a particular installation. If
this equipment does cause harmful interference to radio or television reception, which can be determined by
turning the equipment off and on, the user is encouraged to try to correct the interference by one or more of
the following measures:
Reorient or relocate the receiving antenna.
Increase the separation between the equipment and the receiver.
Connect the equipment onto an outlet on a circuit different from that to which the receiver is connected.
Consult the dealer or an experienced radio/TV technician for help.
Shielded interconnect cables and a shielded AC power cable must be employed with this equipment to ensure
compliance with the pertinent RF emission limits governing this device. Changes or modications not ex-
pressly approved by the system’s manufacturer could void the user’s authority to operate the equipment.
Important Note
This device has been SAR-evaluated for use with Laptop/Notebook computers and meets the FCC RF exposure
guidelines for an uncontrolled environment. 0.255 W/kg.
Declaration of conformity
This device complies with part 15 of the FCC rules. Operation is subject to the following conditions:
This device may not cause harmful interference, and
This device must accept any interference received, including interference that may cause undesired operation.

ii
About this manual
This manual is intended for system administrators who are familiar with setting up a new system and install-
ing programs.
The manual consists of the following sections:
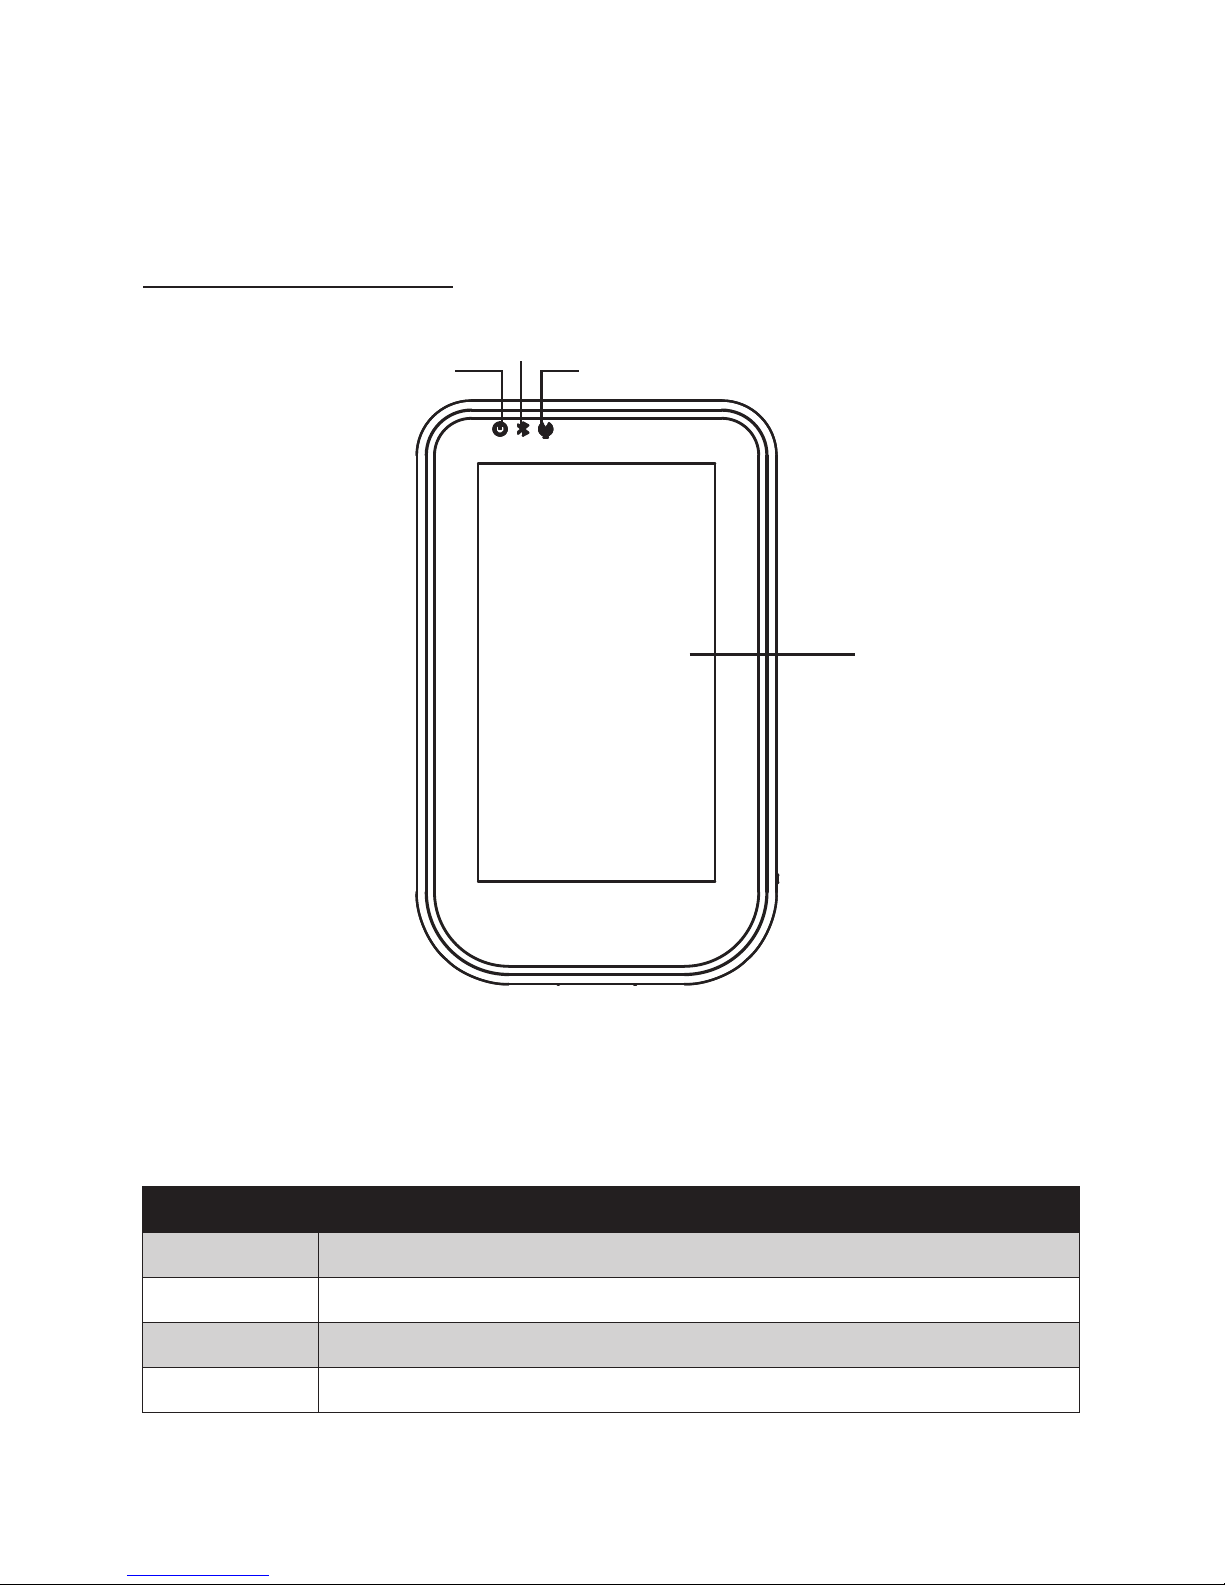
Chapter 1 Getting Started: This section covers unpacking and checking the
package contents, identifying components, charge the
battery, install the SD card and power it on..
Chapter 2 Learning The Basics: The chapter provides information how to use the basic
features.
Chapter 3 Using The Accessories: This section provides information how to use the
accessories.
Appendix: The appendix covers troubleshooting, information
on having the OT-100 serviced, and technical
specications.
Safety information
Before installing and using the OT-100, take note of the following precautions:
Request service for damaged products: Turn off the product, unplug it from the electrical outlet, and
request service from a service partner under the following conditions:
The power cord or plug is damaged.•
Liquid has been spilled into the product.•
An object has fallen into the product.•
The product has been exposed to rain or water.•
The product has been dropped or damaged.•
The product does not operate normally when you follow the operating instructions.•
Avoid hot areas: The product should be placed away from heat sources such as radiators, heat registers,
stoves, and other products (such as ampliers) that produce heat.
Allow the product to cool: Allow the product to cool before removing covers and touching internal compo-
nents.
Avoid wet areas: Never use the product in a wet location.
Avoid inserting objects into product: Never insert objects of any kind into slots or other openings in the
product.
Clean the product properly: Unplug the product from the wall outlet before cleaning it. Do not use liquid
cleaners or aerosol cleaners. Use a soft cloth dampened with water for cleaning exterior components, but
NEVER apply water directly to the product or to an LCD screen.
Use recommended mounting accessories: Do not use the product on an unstable table, cart, stand, tripod,
or bracket. Mount the product according to the manufacturer’s instructions, and use a mounting accessory
recommended by the manufacturer.
Use the product with approved equipment: Use your product only with the computers and accessories
identied as suitable for use with your product.
Adjust the volume: Turn down the volume before using headphones or other audio devices.
Revision history
Version 1.0, April 2009

iii
TABLE OF CONTENTS
CHAPTER 1 GETTING STARTED................................................ 1
Unpacking the OT-100 ..................................................................................1
Checking the package contents ....................................................................2
Identifying components .................................................................................4
Charge Cradle................................................................................................8
Setup the OT-100...........................................................................................9
Charging the OT-100 / battery in the cradle.................................................12
Battery Handling Precaution ....................................................................13
Using SD cards ............................................................................................14
Install a SD card...........................................................................................14
Viewing content of a SD card.......................................................................16
CHAPTER 2 LEARNING THE BASICS ...................................... 17
Entering text.................................................................................................17
Shortcut menus............................................................................................17
Performing a reset........................................................................................17
Opening and closing programs ....................................................................18
Program switch ............................................................................................18
Windows CE help.........................................................................................18
Adjusting the volume....................................................................................18
Changing the device name ..........................................................................20
Recalibrating the screen ..............................................................................23
Setting the date and time .............................................................................24
Install and remove programs........................................................................32
Upgrading OS Image or Bootloader.............................................................34
CHAPTER 3 USING THE ACCESSORIES ............................... 37
Using the leather pouch ...............................................................................37
Attaching the stylus cord..............................................................................38
Attaching the hand strap ..............................................................................39
Using the shoulder strap ..............................................................................40
APPENDIX .................................................................................. 41
Troubleshooting ...........................................................................................41
Tips for Troubleshooting...............................................................................41
General Problems .......................................................................................41

iv
Having the OT-100 Serviced .......................................................................42
Guidelines for care and maintenance ..........................................................43
Using the device ......................................................................................43
Cleaning the device .................................................................................43
Carrying or storing the device..................................................................43
Specications...............................................................................................44

1
CHAPTER 1
GETTING STARTED
This chapter describes the procedures from unpacking the OT-100, to powering it on. The following topics are
described.
Unpacking the OT-100 on page• 1
Checking the package contents on page• 2
Identifying components on page• 4
Charge Cradle on page• 8
Setup the OT-100 on page• 9
Charging the OT-100 / battery in the cradle on page 1• 2
Using SD cards on page 1• 4
Install a SD card on page 1• 4
Viewing content of a SD card on page 1• 6
Unpacking the OT-100
The device and accessories are packed in a cardboard carton with foam padding for protection during ship-
ping.
Figure 1.1 Unpacking the OT-100
Carefully unpack the machine and keep the packing materials. If you need to ship it in the future, repack it as
shown in Figure 1.1.
OT-100
Accessories
package
Cradle
Adapter
CD-ROM

2 CHAPTER 1 GETTING STARTED
Checking the package contents
After you unpack the device check that the following items are included.
OT-100 Stylus
Battery
High quality stylus
AC adapter
Cradle
need the
picture

3
If any item is missing or appears damaged, contact your dealer immediately.
Leather pouch Leather pouch cord Stylus cord
2 screws Plastic bit
Hand strap Shoulder strap
CD-ROM Quick start guide
mini-USB to USB cable
need the
picture need the
picture
need the
picture
need the
picture
need the
picture
QSG

4 CHAPTER 1 GETTING STARTED
Identifying components
This section describes the parts and connectors on the OT-100.
Front panel components
1
234
Figure 1.2 Front view
Component Description
1 4.3-inch touch screen
2Power indicator (Green: power on, Red: charging)
3Bluetooch indicator (Light: Bluetooth is functional)
4WiFi indicator (Light: WiFi is functional)

5
Top and bottom panel components
1
Figure 1.3 Top and bottom view
Component Description
1 Top hand strap eyelet
2 3.5mm headphone jack
3 Mini-USB port
4 Cradle connector
5 DC power jack
6 3.5mm microphone jack
3
2
4
6
5

6 CHAPTER 1 GETTING STARTED
Left and right side components
Figure 1.4 Left and right side view
4
1
2
3
Connector Description
1 Reset button
2 Hand strap eyelet
3 Power button
4 Stylus dock

7
Back panel components
4
1
2
3
Connector Description
1 Top hand strap eyelet
2 Speaker
3 Battery cover
4 Bottom hand strap eyelet
Figure 1.5 Back view

8 CHAPTER 1 GETTING STARTED
Charge Cradle
This section interdicts the charge cradle for the OT-100.
The charge cradle can use to charge the OT-100, it has a second slot for charging a spare battery.
Top and front view of the cradle
4
1
2
3
Connector Description
1 DC power connector
2 Second battery slot
3 OT-100 socket
4 LED charging indicator
Figure 1.6 Top view of the cradle
Figure 1.7 Front view of the cradle

9
Setup the OT-100
Refer to the following to setup the OT-100.
Remove the plastic bit.1.
Slide the plastic bit down and away from the battery cover.
Remove the screw if the2.
battery cover is locked.
Remove the battery3.
cover.
Slide the cover down and away from the OT-100.

10 CHAPTER 1 GETTING STARTED
Install the battery.4.
Align the battery connectors on the battery with the pins in the battery
compartment and insert the battery.
Replace the battery5.
cover.
Reinstall the screw.6.

11
Replace the plastic bit.7.
Charge the battery.8.
Open the power jack cover.
Plug the AC adapter power cord into an electrical outlet, then connect the
DC plug of the adapter cable to the OT-100. It takes approximately 2–4
hours to fully charge the battery for the rst time. Subsequent charges
might take longer.
CAUTION
To avoid damaging OT-100 or the AC adapter,
make sure all connectors are properly.
Press the Power button to turn on the OT-100.9.

12 CHAPTER 1 GETTING STARTED
Charging the OT-100 / battery in the cradle
You can charge the battery in the cradle that is more convenient. You can charge a spare battery (optional)
individually or simultaneously as well.
Plug the AC adapter power cord into an electrical outlet, then connect the DC plug of the adapter cable to1.
the power jack at the back of cradle.
Align the cradle connector on the OT-100 with the pins in the OT-100 slot of the cradle, then install the2.
OT-100 in the direction of the arrow.
Align the battery connectors on the battery with the pins in the second battery slot of the cradle, then3.
install the battery in the direction of the arrow.
NOTE
Charge the battery within a temperature range 0˚C to 45˚C.
IMPORTANT
To protect and prolong the life of the battery, do not charge it for 24
hours or longer at a time.
NOTE
The LED indicator on the cradle will light while the OT-100 / battery is
charging. It will off when the charge is complete.
After charging, unplug the cradle and remove the OT-100 / battery from it.4.

13
Battery Handling Precaution
Do not attempt to disassemble or reconstruct the packs.• The battery has safety function and protection
circuit avoid the danger. If they get serious damage. It will cause the generating heat, smoke, rupture, or
ame .
Do not short circuit battery.• Neither short connect the positive terminal and negative terminal with metals
nor catty or store the battery with metal objects .if the battery is short circuited, excessive large current will
ow and then the generating heat , rupture or ame will occur . and also ,it will cause generating heat at
metals. Please cover the plug with waterproof cap when not use the battery.
Do not incinerate or heat the battery.• They will cause the melting of insulator, damage of gas release
vent , lost of safety function ,or ignition on electrolyte. Above mentioned matters will cause the generating
heating , smoke, rupture or ame.
Do not use nearby heated place.• Do not use or leave battery nearby re, stove or heated place (more than
80˚C). In case that separator made of polymer is melted by high temperature, the internal short circuit oc-
curs in individual cells and then it causes the generating heat ,smoke, rupture or ame.
Do not immerse the battery in water or seawater or get it wet.• In case that depredator made of polymer
is melted high temperature , the internal short circuit occurs in individual cells and then it cause the gener-
ating heat ,smoke, rupture or ame.
Donotchargebatterynearbythereorundertheblazingsun.• if the protection circuit does not avoid
the danger works under high temperature or it is broken, the battery will be charged at abnormal current (or
voltage )and abnormal chemical reaction will occur. It causes the generating heat , smoke, rupture or ame.
Do use the special charge and observe charging requirement.• If the battery is charge in unusual condi-
tion ,it will cause lost of safety function or the abnormal chemical reaction and heat, smoke ,rupture or
ame will occur.
Do not try to damage the battery.• Do not drive a nail into the battery strike it by hammer, or tread it. The
impact will cause leakage or generate heat, smoke, rupture or ame.
Do not use the direct soldering on battery.• As the insulator is melted by heat or the gas release vent is
broken , it cause the generating heat, smoke, rupture or ame.
Do not connect battery to the plug socket or car-cigarette-plug.• Added high voltage to the battery ,the
excessive current will ow in it and then it will cause the generating heat, smoke, rupture or ame.
Do not use battery for other equipment.• If the battery is used for other equipment, it will deteriorate
its performance and cycle-life. At worst, abnormal current will ow or battery may generate heat ,smoke,
rupture or ame.
Do not touch a leaked battery directly.• In case the leaked electrolyte gets into eyes, wash them with fresh
water as soon as possible without rubbing eyes. And then, see a doctor immediately.
Donotcontinuetochargeoverspeciedtime.• If the battery is not nished charging over regulated time
,let it stop charging .There is possibility that the battery might generate heat ,smoke ,deformation or ame.
Do not get it into a microwave or high pressure container.• It causes the generating heat ,smoke ,defor-
mation or ame because of a sudden heat or damage of sealing condition of battery
Donotputleakedbatterynearre.• If the liquid leaks from the battery (or the battery give out bad
smell), let the battery leave ammable objects immediately .Otherwise ,the electrolyte leaked from battery
will catch re and other danger.
Do not use an abnormal battery.• In case the battery has bad smell, changes color, deforms , or causes
something wrong in using ,take it out from equipment or charger and do not use it. If an abnormal battery
is used , it will generate heat ,smoke, rupture or ame.

14 CHAPTER 1 GETTING STARTED
Using SD cards
Use optional SD cards for:
Expanding the memory of the OT-100•
Adding functionality•
You can use SD cards for additional data storage. The micro SD and mini SD cards can also be used with an
SD adapter in the OT-100.
NOTE
SD cards must be purchased separately and are not included with the
OT-100.
Install a SD card
Refer to the following to install a SD card.
Press the power button1.
to turn off the OT-100.
Remove the plastic bit.2.
Slide the plastic bit down and away from the battery cover.
Remove the screw if the3.
battery cover is locked.
Other manuals for OT-100
1
Table of contents
Other Partner Tablet manuals