PASCO PS-3218 User manual

Reference Guide
013-15878A
Wireless Blood Pressure Sensor
PS-3218
®
800-772-8700 (US) +1 916 462 8384
www.pasco.com [email protected]
Hardware
Introduction
The Wireless Blood Pressure Sensor is a combination
wireless and USB sensor that connects to a computer or
tablet device through Bluetooth, and can also connect to a
computer with a USB cable (included). The sensor
measures pressure in the range between 0 and 260
millimeters of mercury (mmHg).
The Wireless Blood Pressure Sensor includes a standard
size blood pressure cuff with a bulb and release valve.
Two other cuff sizes are available: PS-3591 Blood Pressure
Cuff, Small, and PS-3593, Blood Pressure Cuff, Large. See
www.pasco.com for more information.
Bluetooth
status
LED
Battery
status
LED
Micro USB
port
ON
button
Micro
USB cable
Power: Rechargeable Battery
OR
USB Cable
Connection:
Device ID
Top
View
End
View Blood Pressure Cuff
(not to scale)
For Educational Use Only! Note: This is not a
medical device. It is designed for educational
use only and should not be used in any
medical process such as life support or patient
diagnosis. It is also not intended for use in
graduate research or industry.
Bulb and Release Valve
Luer Connector
Cuff
Luer
Connector
Included Equipment Quantity
Wireless Blood Pressure Sensor (PS-3218) 1
Micro USB Cable (1 meter) 1
Blood Pressure Cuff*, Standard (PS-3592) 1

®
Wireless Blood Pressure Sensor PS-3218
2013-15878A
Data Collection Software
See the PASCO web site at
www.pasco.com/software
for help in selecting the right PASCO software and to check
for the latest versions.
Software Help
See the SPARKvue Help or PASCO Capstone Help for
information about collecting, displaying, and analyzing
data.
•In SPARKvue, select the HELP button ( ) in any
screen including the Home Screen.
•In PASCO Capstone, select PASCO Capstone Help
from the Help menu, or press F1.
Compatibility
For more information about wireless compatibility, see the
PASCO website at:
www.pasco.com/compatibility
See Appendix B for more information about the PS-3500 Adapter and
Mac OS X models.
Initial Step: Charge the Battery
• Connect the Cable: Use the Micro USB Cable to
connect the micro USB port on the sensor to a USB
port or USB charger such as the PASCO PS-3501
USB Charging Station. Charging begins automatically.
The charger circuit inside the sensor turns itself off
when the unit is fully charged. The battery status LED
will shine yellow as the battery is charging, and will
shine green when the battery is charged. The battery is
partially charged at the factory. Initial charging time
may be three hours or longer depending on the power
source and the condition of the battery.
LED Information
The Bluetooth and the Battery Status LEDs operate as
follows:
For a wireless Bluetooth connection:
For a micro USB cable connection to a USB port:
For a micro USB cable connection to a USB charger:
*Logging: PASCO wireless sensors can either stream live
data to a compatible device or log data (save it to the
sensor’s memory). The data can then be uploaded to the
device for display and analysis at a later time. Logging
capability supports long-term or remote data collection
while not connected to the device.
PASCO Capstone SPARKvue
•Mac OS X •Mac OS X
•Windows •Windows
•iOS
•Android
•Chromebook
Platform Bluetooth SMART Compatibility
iOS iPad 3 and later
iPhone 4S and later
iPod touch 5 and later
SPARK Element All models
Android Android 4.4 and later
Chromebook Chrome OS (requires PS-3500 Adapter*)
Mac OS X Models introduced July 2011 or later*
Windows Windows 7 and later (requires PS-3500 Adapter*)
Bluetooth LED Status Battery LED Status
Red blink Ready to pair Red blink Low power
Green blink Connected
Yellow blink Logging*
Bluetooth LED Status Battery LED Status
OFF -- Yellow ON Charging
OFF -- Green ON Charged
Yellow blink Logging*
Bluetooth LED Status Battery LED Status
Red blink Ready to pair Yellow ON Charging
Green blink Connected Green ON Charged
Yellow blink Logging*
Micro USB
port
Micro USB
cable
USB port

®
Set Up the Software PS-3218
3
013-15878A
Note: The latest versions of SPARKvue and PASCO
Capstone support logging. Check the PASCO Web page
at:
www.pasco.com/software
for the latest software version.
ON/OFF Information
To turn the sensor on, press the ON button. The status
LEDs will blink. To turn the sensor off, press and hold the
ON button for a moment until the status LEDs stop blinking.
The Wireless Blood Pressure Sensor puts itself to sleep
after 1 hour of inactivity if connected, and after several
minutes if not connected.
Set Up the Software
SPARKvue
Connecting the Sensor to a Tablet or a Computer via
Bluetooth
•For SPARKvue, select the Bluetooth icon. In the
Wireless Devices list. The sensors are ordered by
proximity to the device. Select the correct address that
matches the Device ID XXX-XXX number found on the
sensor. Select Done.
Connecting the Sensor to a Computer with the Micro
USB Cable
•Connect the micro end of the included Micro USB
Cable into the micro USB port on the end of the sensor.
Connect the other end of the Micro USB Cable to a
USB port on the computer, or into a powered USB hub
connected to the computer.
•In the SPARKvue Home Screen, select a measurement
from the list under the sensor’s name. A graph of the
measurement versus time opens.
Collecting Data
•Select the Start button to begin collecting data.
PASCO Capstone
Connecting the Sensor to a Tablet or a Computer via
Bluetooth
•For PASCO Capstone, select Hardware Setup in the
Tools palette. In Hardware Setup the sensors are
ordered by proximity to the device. Select the address
that matches the Device ID XXX-XXX number on the
sensor.
Select a display in the main window or from the Display
palette. In the display, use the <Select Measurement>
menu to pick a measurement to be shown.
Connecting the Sensor to a Computer with the Micro
USB Cable
•Connect the micro end of the included Micro USB
Cable into the micro USB port on the end of the sensor.
Connect the other end of the Micro USB Cable to a
USB port on the computer, or into a powered USB hub
connected to the computer.
•In PASCO Capstone, select a display in the main
window or from the Displays palette. In the display,
use the <Select Measurement> menus to pick the
measurement to be shown.
Collecting Data
•Select Record to begin recording data.
Troubleshooting the Wireless Blood Pressure
SensorBlood
•If the Wireless Pressure Sensor loses Bluetooth
connection and will not reconnect, try cycling the ON
button. Press and briefly hold the button until the
status LEDs blink in sequence, and then release the
button. Start the sensor in the usual way.
•If the sensor stops communicating with the computer
software or tablet application, try restarting the
software or application. If the problem remains, press
and hold the ON button for 10 seconds and then
release. Start the sensor in the usual way.
•Turn Bluetooth off and then back on. Retry.
About Blood Pressure
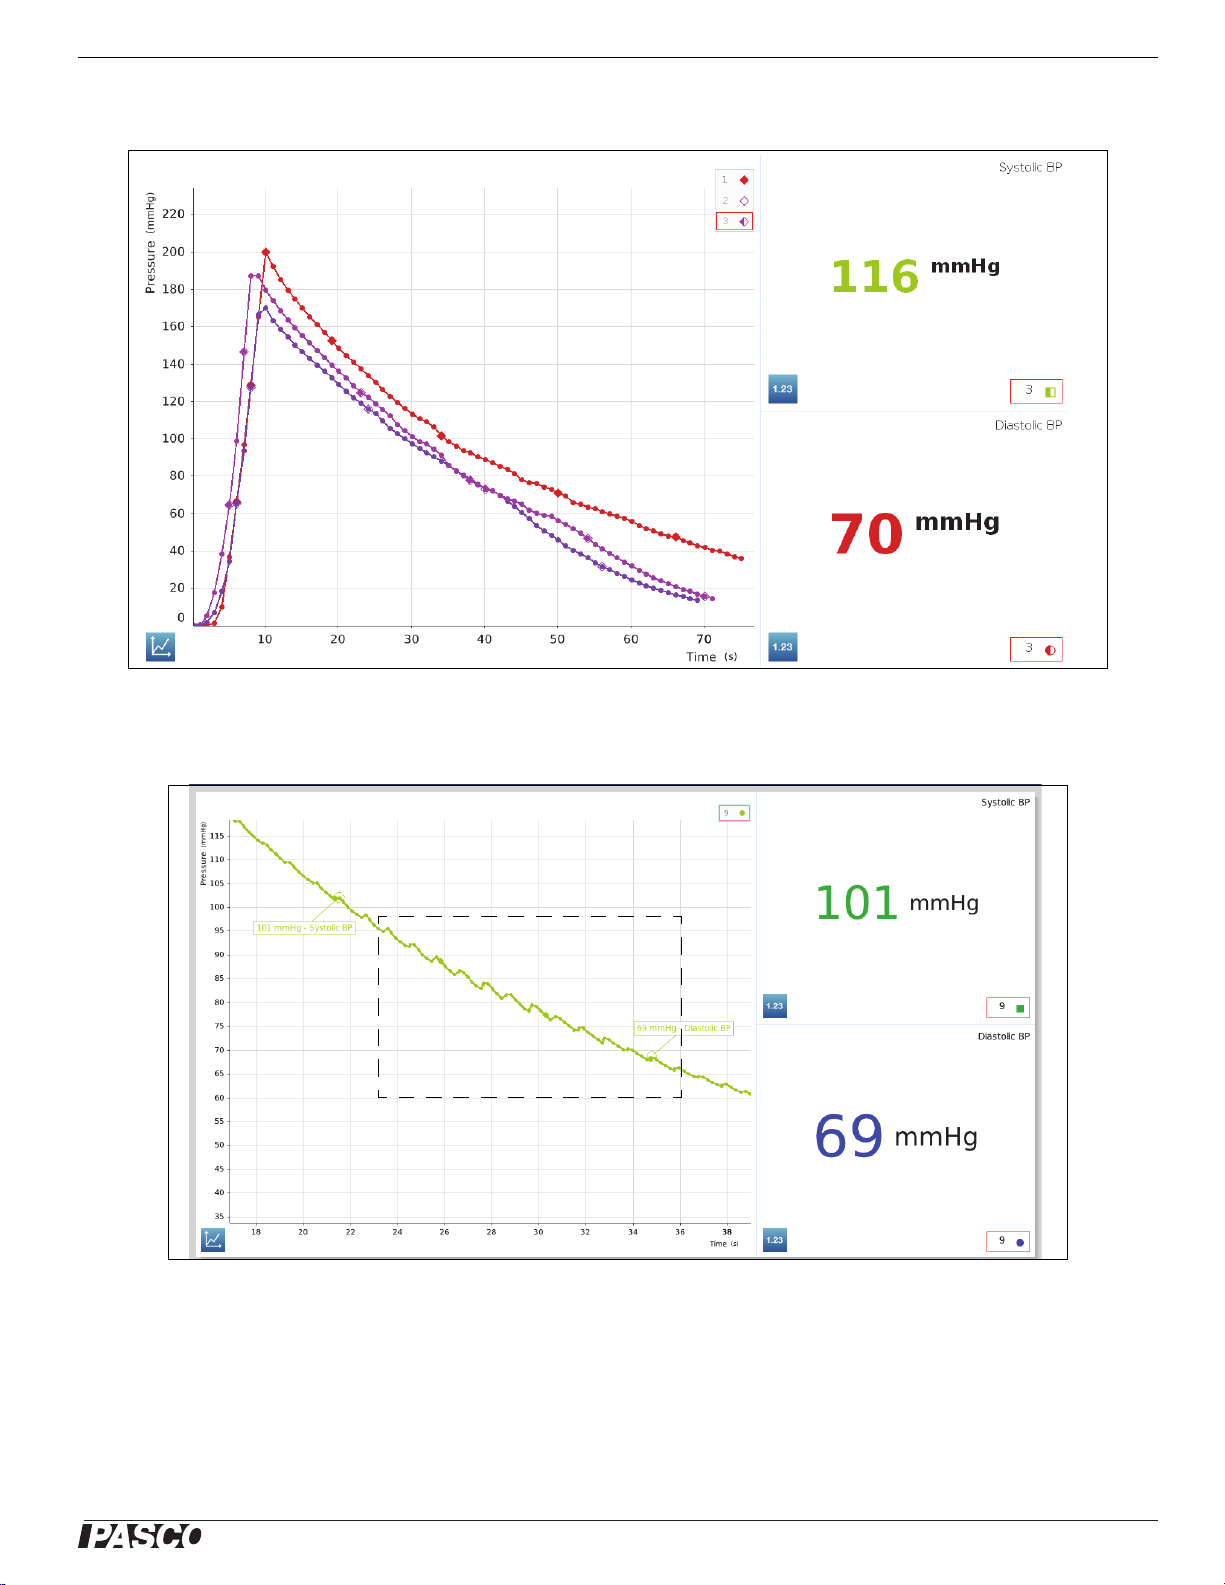
With the Wireless Blood Pressure Sensor, students can
easily measure heart rate (beats per minute) and systolic
and diastolic arterial blood pressure (millimeters of
mercury). Students gain a greater understanding of the
physiology of the circulatory system when they also learn
about the physiology of blood pressure. The systolic and
diastolic pressure provided in the digit display can be used
by the student to verify their own determination of blood
pressure from a graph of pressure versus time.
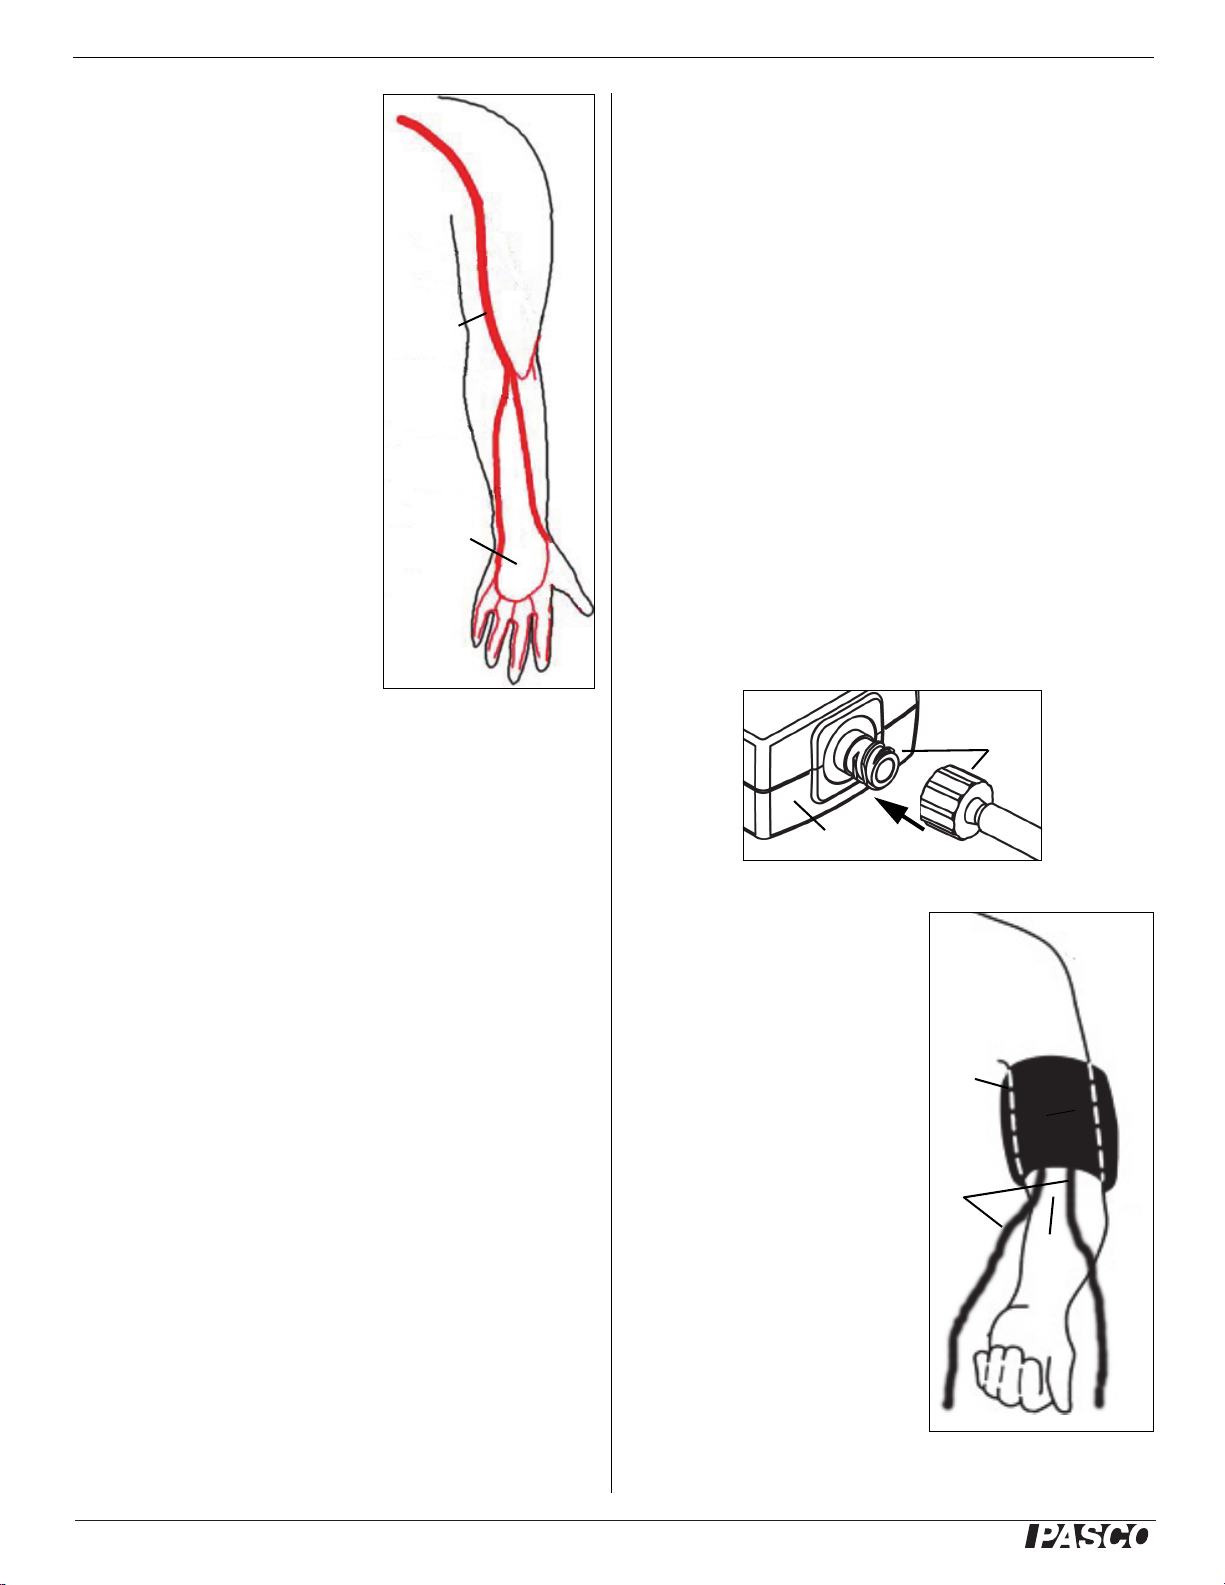
Blood pressure is the force that blood exerts on the walls of
blood vessels. This pressure is caused by the contraction
of the heart and by muscles that surround blood vessels.
Blood pressure is always highest in the two main arteries
that leave the heart. Because the pressure is usually a little
higher in the left artery, blood pressure is usually measured
in the brachial artery supplying the left arm.

®
Wireless Blood Pressure Sensor PS-3218
4013-15878A
Blood pressure consists of two
measurements: systolic and
diastolic pressure. It is
represented as a ratio of systolic
pressure to diastolic pressure, for
example 130/80 (“one-thirty over
eighty”).
In most parts of the world, blood
pressure is reported in
millimeters of mercury (mmHg).
Systolic pressure is the pressure
of the blood on the artery walls
when it leaves the ventricles at
peak ventricular contraction,
when the heart is emptying its
chambers of blood. It is the “top
number” of the blood pressure
ratio. Normal systolic pressure for
a male is approximately 120
mmHg and for a female is
approximately 110 mmHg.
Diastolic pressure is the pressure
of the blood on the artery walls
when the ventricles relax and the heart's chambers fill with
blood. It is the “bottom number” of the blood pressure ratio.
Normal diastolic pressure for a male is approximately 80
mmHg and for females is approximately 70 mmHg.
Systolic and diastolic pressures are affected by various
biological and environmental factors. For example, the salt
in a person's diet can cause the kidneys to change the
amount of fluid in our blood, resulting in changes in blood
pressure. Diet, stress, exercise, body position, drugs,
hormonal changes and genetic factors can affect a
person's blood pressure.
About the Sensor
The Wireless Blood Pressure Sensor consists of a
pressure sensor box and a blood pressure cuff with bulb
and valve. The sensor is a digital sphygmomanometer that
uses an electronic pressure sensor to measure the mean
arterial pressure and then calculates systolic and diastolic
blood pressure and heart rate (in beats per minute).
The blood pressure cuff consists of an inflatable bladder
connected by one hose to a hand pump bulb with a
push-button release valve, and by a second hose with a
connector that attaches to the pressure sensor box.
The Wireless Blood Pressure Sensor uses the oscillometric
technique to estimate blood pressure. When the
oscillations of pressure in a blood pressure cuff are
recorded during gradual deflation, the point of maximal
oscillation corresponds to the mean intra-arterial pressure.
The oscillations begin at approximately systolic pressure
and continue below diastolic, so that systolic and diastolic
pressure can only be estimated indirectly according to an
empirically derived algorithm.
Usage
Experiment ideas:
•Determine the effects of exercise on blood pressure
and heart rate.
•Explore the effects of body position on blood pressure
and heart rate.
•Compare the blood pressure and heart rate of students
in the class.
Set Up the Hardware
Connecting the Sensor to the Cuff
Screw the luer connector on the end of the blood pressure
cuff tube onto the luer connector on the sensor.
Cuff and Arm Placement
First, find a partner. A student
cannot measure his or her own
blood pressure. Partner 1
should be the patient and
partner 2 should conduct the
measurement.
The patient should remove any
constrictive clothing or jewelry
that may interfere with the cuff
placement.
Locate the approximate position
of the main artery (brachial
artery) on the inside of your
upper left arm by pressing with
your fingers near the inside
edge of your biceps muscle
about five or ten centimeters
(cm) above the elbow pit.
Partner 2 should help the
patient wrap the cuff snugly around the upper left arm
Brachial
Artery
Palm
Sensor
Luer
Connector
Elbow
pit
Cuff
Figure 3: Cuff onto upper
Upper Left
Arm
Tubes

®
Procedure PS-3218
5
013-15878A
above the elbow with the two tubes hanging down (one on
each side of the arm).
Use the hook-and-pile material to hold the cuff in place.
Position the cuff's bottom edge at about 2.5 cm (one inch)
above the elbow pit.
Rotate the cuff as needed to position the white index line
(labeled ARTERY) on the cuff over the main artery
(brachial artery) on the inside of your left arm.
Procedure
Partner 1 should sit without crossing your legs. Relax. Rest
your left elbow and forearm on a solid surface with your
palm facing upward. The cuff should be slightly lower than
your heart.
Partner 2 should press and hold the push-button release
valve to make sure that all of the air in the cuff has been
released.
In the data collection software, set up Digits displays of
pressure, diastolic pressure, and systolic pressure. You
may also want to view pressure versus time on a Graph
display.
The patient should stay as still as possible during the blood
pressure measurement. Do not talk or move if possible.
Partner 2 should press “Start” or “Record” to begin data
collection and then use the bulb to pump air into the cuff.
Monitor the pressure in the Digits displays. When the
pressure reaches approximately 170 mmHg, partner 2
should stop pumping and let go of the bulb.
When the cuff is deflated, press “Stop” to end data
collection. After the measurement is finished, release the
remaining air in the cuff by pressing the push-button
release valve on the bulb and holding it for several
seconds. You should be able to hear air coming out of the
cuff.
(See Appendix A: Sample Data.)
Mounting the Sensor
The Wireless Blood Pressure Sensor housing includes a
threaded hole (1/4-20) on one side. Screw a PASCO
Mounting Rod (ME-9483 10 pack) into the threaded hole,
and use clamps and support rods to hold the sensor in
place.
About the Battery
The Wireless Blood Pressure Sensor’s battery is partially
charged at the factory. If the battery status LED blinks red,
use the micro USB cable to connect the sensor to a USB
port or a USB charger.
Battery Usage
Battery life is very important to making the sensor simple
and always ready to use, so all of the PASCO wireless
products are designed for long battery life. For example,
the sensor turns itself off after a few minutes of inactivity.
The battery life between charges for the Blood Pressure
Sensor varies depending on the sampling rate. The battery
life ranges between 11 hours for high sample rates to more
than 70 hours for low sample rates.
In typical classroom/lab use, this would translate to a
battery life between charges ranging from one to four
weeks or more, because full-day continuous sampling
would be unusual. Even in the most extreme case with a
high sample rate, the Blood Pressure Sensor battery would
support a full day of use before needing to recharge.
Maximizing Battery Life
One factor that affects battery life is the storage
temperature and the number of charge cycles. Therefore,
avoid storing the sensor in very cold or very hot
environments.
Related Products
Other physiology sensors include the following:
• Wireless Hand Grip Heart Rate Sensor PS-3206
• Wireless Exercise Heart Rate Sensor PS-3205
• PASPORT EKG Sensor PS-2111
• PASPORT Spirometer PS-2522
Suggested Experiments
See the PASCO Web site at
www.pasco.com/products/lab-manuals
for more information about experiments.
CAUTION: Do not pump above 200 mmHg.
If there is discomfort, push and hold the push-button on
the release valve to deflate the cuff.
NOTE: The pressure in the cuff will decrease
automatically (at about 3 mmHg per second) so the cuff
will slowly deflate by itself in about a minute.

®
Wireless Blood Pressure Sensor PS-3218
6013-15878A
Specifications
Technical Support
For assistance with any PASCO product, contact PASCO
at:
The Reference Guide will be updated periodically. For the
latest revision of this Reference Guide, visit the PASCO
Web site at
www.pasco.com/manuals
and enter the product number, PS-3218, in the text window.
Replacement Parts
For information about possible replacement parts, contact
Technical Support:
Limited Warranty
For a description of the product warranty, see the PASCO catalog. For
more information visit www.pasco.com/legal.
Copyright
This PASCO scientific Reference Guide is copyrighted with all rights
reserved. Permission is granted to non-profit educational institutions for
reproduction of any part of this manual, providing the reproductions are
used only in their laboratories and classrooms, and are not sold for profit.
Reproduction under any other circumstances, without the written consent
of PASCO scientific, is prohibited.
Trademarks
PASCO, PASCO scientific, PASCO Capstone, PASPORT, and SPARKvue
are trademarks or registered trademarks of PASCO scientific, in the
United States and/or in other countries. All other brands, products, or
service names are or may be trademarks or service marks of, and are
used to identify, products or services of their respective owners. For more
information visit www.pasco.com/legal.
FCC Statement
This Class A digital device complies with part 15 of the FCC Rules.
Operation is subject to the following two conditions: (1) This device may
not cause harmful interference, and (2) this device must accept any
interference received, including interference that may cause undesired
operation.
CE Statement
This device has been tested and found to comply with the essential
requirements and other relevant provisions of the applicable EU
Directives.
Product End of Life Disposal Instructions:
This electronic product is subject to disposal and recycling regulations that
vary by country and region. It is your responsibility to recycle your
electronic equipment per your local environmental laws and regulations to
ensure that it will be recycled in a manner that protects human health and
the environment. To find out where you can drop off your waste equipment
for recycling, please contact your local waste recycle/disposal service, or
the place where you purchased the product.
The European Union WEEE (Waste Electronic and
Electrical Equipment) symbol (to the right) and on the
product or its packaging indicates that this product
must not be disposed of in a standard waste
container.
Battery Disposal Instructions:
Batteries contain chemicals that, if released, may affect the environment
and human health. Batteries should be collected separately for recycling,
and recycled at a local hazardous material disposal location adhering to
your country and local government regulations. To find out where you can
drop off your waste battery for recycling, please contact your local waste
disposal service, or the product representative.
The Lithium Polymer (Li-Poly) rechargeable battery used in this product is
marked with the International symbols to indicate the need for the
separate collection and recycling of batteries.
Blood Pressure Value
Unit millimeters of mercury (mmHg)
Range 0 to 260 mmHg
Accuracy ±3 mmHg
Resolution 0.05 mmHg
Address: PASCO scientific
10101 Foothills Blvd.
Roseville, CA 95747-7100
Phone: +1 916 462 8384 (worldwide)
8700-772-8700 (U.S.)
Web: www.pasco.com
Email: [email protected]

®
Appendix A: Sample Data PS-3218
7
013-15878A
Appendix A: Sample Data
How To Find Systolic and Diastolic Blood Pressure Manually
1. Select a single data run. Enlarge an area of the pressure measurement between 120 and 60 mmHg.
2. Identify when your data begins to form ‘blips’ (small bumps). This is your systolic pressure.
3. Next, identify when your data stops forming ‘blips’ (small bumps). This is your diastolic pressure.
4. You may need to change your sample rate in order to see the ‘blips.

®
Troubleshooting PS-3218
8
013-15878A
.
Troubleshooting
Why are the Systolic and/or Diastolic Pressure Not Appearing?
• Perhaps the size of the cuff is incorrect. You may have a cuff that is too small or too large.
• The pressure in the cuff may be falling too quickly, or not fast enough. The pressure release rate should be
between 2 and 5 mmHg per second, and never less than 2 mmHg per second.
Adjusting the Pressure Release Rate for the Blood Pressure Cuff
The default pressure release rate is 3 mmHg per second. To adjust the rate up or down, use a
small screwdriver to turn the adjustment screw in the center of the top of the push-button valve.
Turn the screwdriver counter-clockwise to slow down the release rate and turn the screwdriver
clockwise to speed up the release rate. The pressure release rate is normally slower if the
person’s arm is larger.
Storage
Disconnect the blood pressure cuff from the sensor for storage.
IMPORTANT: The PASCO Blood Pressure Sensor is designed for educational use only. It cannot be used for diagnosis.
Identify when your data begins to
have ‘blips’ (small bumps). This
is your systolic pressure.
Identify when your data stops
forming ‘blips’ (small bumps).
This is your diastolic pressure.
You may need to change your
sample rate to see the ‘blips’.
Adjust the
screw on
the
push-butto
n valve

®
Appendix B: Compatibility PS-3218
9
013-15878A
Appendix B:
Compatibility
Check the PASCO Web page at
www.pasco.com/compatibility
for the latest information on Bluetooth SMART
compatibility.
*The PS-3500 USB Bluetooth 4.0 Adapter,
when connected to a USB port, allows up
to three Bluetooth SMART devices, such
as this PASCO wireless device, to connect
to Windows computers, Chromebooks,
and older Macintosh computers.
Note: The PS-3500 USB Bluetooth 4,0
Adapter is the only adapter we can
currently recommend. Many other Bluetooth 4.0 adapters
are available but this adapter has a specific design that
enables in-app pairing of Bluetooth SMART sensors.
1To check the Mac computer’s Bluetooth compatibility, do
the following:
•Click the (Apple) Menu.
•Select About This Mac
•Click the More Info... button.
•Click the System Report... button.
•Select Bluetooth from the sidebar on the left,
underneath Hardware.
•Scan down the list of information until you find “LMP
Version”.
•If your Mac is equipped with Bluetooth SMART, the
LMP Version will show 0x6. (Anything lower than 0x6
means an older version of Bluetooth. Your device will
need the PS-3500 USB Bluetooth 4.0 Adapter.)
1The Mac Mini and MacBook Air were updated with
Bluetooth SMART support in 2011. The MacBook Pro was
updated in 2012. The Mac Pro that debuted in December
2013 has Bluetooth SMART support.
Exception: Before you upgrade to El Capitan (Mac OS X
10.11.x), if you have a Macintosh with LMP version “0x4”
that requires the PS-3500 USB Bluetooth 4.0 Adapter,
please contact PASCO Technical Support for further
instructions.
What is Bluetooth SMART®?
Bluetooth SMART (also known as Bluetooth Low Energy or
Version 4.0 of the Bluetooth specification) is the latest
protocol of the proprietary open wireless technology
standard created by telecoms vendor Ericsson in 1994. It is
the power- and application-friendly version of Bluetooth
that was built for the Internet of Things (IoT).
Platform Bluetooth SMART Compatibility
iOS iPad 3 and later
iPhone 4S and later
iPod touch 5 and later
SPARK Element All models
Android Android 4.3 and later
Chromebook Chrome OS (requires PS-3500 Adapter*)
Mac OS X1Models introduced July 2011 or later
Windows 7 and 8 Requires PS-3500 Adapter*
Windows 10 Bluetooth SMART compatible
PS-3500 USB
Bluetooth 4.0
Adapter
Other manuals for PS-3218
3
Table of contents
Popular Blood Pressure Monitor manuals by other brands

Life Sourse
Life Sourse UA-767PAC specification

Graham Field
Graham Field Wallmax 222 user manual

Gima
Gima KD-558 user manual

BIOS Diagnostics
BIOS Diagnostics BD270 instruction manual

LABORATOIRE MARQUE VERTE
LABORATOIRE MARQUE VERTE Digitensio Poignet PRO instruction manual

Beurer medical
Beurer medical BC 32 Instructions for use