PASCO PASPORT AirLink SI User manual

®
Instruction Sheet
012-09414E
PASPORT AirLink SI (Sensor Interface)
PS-2005
Introduction
The PASPORT AirLink SI is a sensor interface for
PASPORT sensors that connects to Macintosh,
Windows and Palm handheld computers wire-
lessly through Bluetooth™. The sensor interface
uses a rechargeable nickel-metal-hydride (NiMH) battery
(installed) and comes with an AC charging adapter and inter-
changeable AC input blades for use in different countries.
Your Palm handheld computer must be Bluetooth equipped
from the factory. Your Macintosh must be running Mac OS X
10.2.1 or higher and your PC must be running Windows XP
with Service Pack 2 (SP2) or higher. Consult your computer’s
documentation to determine if it is Bluetooth-capable.
If your computer is not already Bluetooth capable, you may be
able to add Bluetooth capability by purchasing a Bluetooth
module that connects to a USB port (such as the PASCO
PS-2553 Bluetooth USB Adapter). When setting up a Win-
dows computer with Bluetooth, it’s best to try the default driv-
ers included with Windows XP (see the Bluetooth Device
Control Panel). As an alternative, follow the installation
instructions supplied with the module.
Powering the
PASPORT AirLink SI
Use the AC adapter to charge the battery in the PASPORT Air-
Link SI. To use charger, select the correct blades for your
region and snap them into place. To replace the blades, pull
down on the release and remove the blades. (AC adapter spec-
ifications: AC/DC direct plug-in switching power supply;
Input: 100-240 volt AC, 50-60 Hz, 0.6 A. Output: 5 volt DC,
2.6 A.).
Note: Charge for at least four hours prior to first use
To charge the PASPORT AirLink SI:
1. Position the ON/OFF switch to OFF.
2. Connect the AC adapter to the DC Power Input on the
side of the AirLink sensor interface.
3. Plug the AC adapter into a conventional wall socket and
charge for at least four hours before first use. A green
light-emitting diode (LED) inside the AirLink SI will
blink as the unit is charging. The green LED stays on
when the unit is fully charged.
The sensor interface will normally provide 4 to 6 hours of
continuous data collection between charges depending on the
power demand of the connected sensor and the sampling rate.
Included Equipment Part Number
AC Adapter (power supply) 540-070
AC Input Blades 540-071
Antenna 542-002
Example: Bluetooth USB
module and instructions

®
PASPORT AirLink SI (Sensor Interface) Using the PASPORT AirLink SI with a Computer
2
Maximizing Battery Life
The following are suggestions for maximizing battery life:
• Unplug the sensor when not making measurements;
• Turn off the sensor interface when not in use;
• Use slow sample rates for long experiments;
• Quit DataStudio between data collection episodes.
Remember to fully charge the sensor interface before using it
for data collection in the field. As a matter of practice, keep
the interface charging until just before you need to use it. If
constant charging is not possible, always store the interface
fully charged, recharging at least every 3 months.
Status LEDs for the PASPORT AirLink SI
The PASPORT AirLink SI has a pair of light-emitting-diodes
(LEDs) near the antenna. An amber LED shows whether the
interface is on, connected, and collecting data. A bi-color
red-green LED indicates battery status. Please refer to Table 1
below.
The amber and red LEDs flash alternately when the sensor
interface is switched on. When the battery starts to get low, the
red LED blinks once every few seconds (fast). If the battery
gets too low, the interface will cease operation and go into
“sleep” mode and the red LED blinks once every 10 seconds
(slow). If the battery becomes extremely low (red LED on
continuously), the interface may not charge with the switch
ON. Turn the unit OFF and charge fully.
Note: The rechargeable battery cannot be replaced by the
end-user. Please contact PASCO if your battery is not charging
properly.
Using the PASPORT AirLink SI
with a Computer
Because the sensor interface communicates with the computer
wirelessly, it does not physically connect to the computer.
Instead, you set up a wireless connection to the sensor inter-
face in software.
Note: If you have a Palm handheld, see the ImagiProbe®
instruction sheet for directions on establishing a wireless con-
nection to the interface.
You can connect to only one interface at a time. Once you con-
nect to an interface, no one else can access that interface.
Depending on the environment, the sensor interface must
remain within 30 feet (10 meters) of an intended computer.
Actual range may vary.
Setting Up the Computer
• The AirLink SI requires DataStudio version 1.9.7 or
greater.
• Position the AirLink ON/OFF switch to ON. The amber
LED will slowly blink when the sensor interface is on.
Note: Each PASPORT AirLink SI
has an ID# (e.g., IPSI-00136), that is
printed on a label on the bottom of
the interface. Use this ID number to
select the interface when setting up
and connecting.
Macintosh OS X
•Mac OS X 10.4
See your system's documentation (e.g., “Mac Help”) for
setting up a Bluetooth connection.
• In System Preferences, click Bluetooth. In the preference
pane, click ‘Devices’. Select ‘Set Up New Device’ to
open the Bluetooth Setup Assistant.
• Select ‘Any Device’
for the device type.
When the ID# of the
AirLink SI appears in
the list, select it and
click Continue.
• After the computer
gathers information
about the device, click
Continue. Enter 1234
as the passkey. This number will only be used once.
• Click Continue until you reach the Conclusion screen,
and then click Quit.
Color Blinking Solid
Amber Slow (1 Hz): on, not connected
Fast (2-3 Hz): on, connected On,connected,
collecting data
Green Charging Fully charged
Red Fast: low power
Slow: “sleep” mode Very low power
Table 1: Status LEDs

®
Model No. PS-2005 Using the PASPORT AirLink SI with a Computer
3
•Mac OS X 10.3
There are two parts to the setup.
1. Part 1: Bluetooth Setup Assistant
• Run the Bluetooth
Setup Assistant utility
program. In the ‘Select
Device Type’ window,
select ‘Other Device’.
When the ID# of the
AirLink SI appears in
the ‘Bluetooth Device
Set Up’ list, select it
and click Continue.
• Enter 1234 as the passkey. Click Continue until you reach
the Conclusion screen, and then click Quit.
2. Part 2: Bluetooth Serial Utility
• Run the Bluetooth Serial Utility program. Click ‘New’ in
the ‘Bluetooth Serial Ports’ window to create a serial port
and use the following settings:
• Enter ‘IPSI-xxxxx’
for the port name
(where xxxxx is the
ID number on the
back of your
PASPORT AirLink
SI). Click ‘Select
Device’.
• In ‘Select Bluetooth Device’, select the PASPORT Air-
Link SI by its ID number and select ‘Sensor’. Click the
‘Select’ button to return to the previous window.
• Select ‘RS-232’ for the Port type and click OK.
Windows XP (SP2) with Default Win XP Drivers
Open the Bluetooth Devices Control Panel to add the
PASPORT AirLink SI.
• Under the ‘Devices’ tab, click ‘Add’ to open the ‘Add
Bluetooth Device Wizard’. Click the checkbox for ‘My
device is set up and ready to be found’, and then click
‘Next’.
• Select the AirLink SI
from the list of Blue-
toothdevicesand click
‘Next’. When the
Device Wizard asks
for a passkey, enter
1234.
• When the ‘Add
Bluetooth Device
Wizard’ is fin-
ished,make anote
of the Outgoing
COM port num-
ber for the Air-
Link SI. You will
need to enter the
COM port num-
ber in the Data-
Studio ‘Choose Interface’ dialog (see below).
Windows XP (SP2) with the Toshiba Driver
For some PC’s with Windows XP and built-in Bluetooth capa-
bility, a proprietary Toshiba Bluetooth driver (or ‘stack’) can
provide support. The CD with the USB Bluetooth Adapter
available from PASCO includes the Toshiba driver. Follow the
instructions that came with the CD to install the software.
Connect the USB Bluetooth adapter to the computer. Open the
Bluetooth Manager (e.g., double-click its icon in the Task
Tray).
• The ‘Add New Connec-
tion Wizard’ will open.
Choose ‘Express Mode
(Recommended)’ and
click ‘Next’.
• In the ‘Select a device’
window, choose the
AirLink SI that is iden-
tified by its ID# and
click ‘Next’.
• The ‘COM port setting’ window opens. Make a note of
the COM port number. You will need to enter it in Data-
Studio. Click ‘Next’ until you reach the ‘Completing the
Add New Connection Wizard’ window and click ‘Finish’.
• The Bluetooth Settings
window opens. Select
your AirLink SI in the
window. Click the ‘Blue-
tooth’ menu and select
‘Connect’.
• The icon in the Bluetooth
Settings window changes
to show that the AirLink
SI is connected. Exit the
Bluetooth Settings window.

®
PASPORT AirLink SI (Sensor Interface) Specifications
4
Connecting to the PASPORT AirLink SI with
DataStudio
1. Start DataStudio and click the Setup button on the Data-
Studio toolbar. Select Choose Interface. Choose
PASPORT as the interface, and select your PASPORT
AirLink SI from the AirLink SI drop-down list.
• Macintosh
Choose the desired
AirLink SI from the
pop-up menu. .
• Windows
Enter the COM port
number (no spaces)
for the desired Air-
Link in the field to
the right of AirLink
SI..
2. Click OK to return to the
Setup window.
Automatic PASPORT AirLink SI Connection
Each time DataStudio is launched, or a new experiment is cre-
ated, DataStudio will attempt to re-connect to the last selected
PASPORT AirLink SI. If a connection is not established when
expected, choose File->New Experiment to create a new
experiment and re-attempt a connection. When a PASPORT
AirLink SI is connected, its picture will appear in the Experi-
ment Setup window (click the Setup button on the DataStudio
toolbar) along with its ID number (Macintosh) or COM port
number (Windows) and firmware revision (all platforms). If
no PASPORT AirLink SI appears in the Experiment Setup
window, choose File->New Experiment a couple of times
and then check the Experiment Setup window for a connec-
tion. If this does not result in a connection, check the settings
in the Experiment>Choose Interface dialog and then check
the computer's Bluetooth preference pane or control panel.
Changing PASPORT AirLink SI Connections
Do one of the following:
•ClicktheSetup button on the DataStudio toolbar and
select Choose Interface
•FromtheExperiment menu click Change Interface.
Choose a different PASPORT AirLink SI from the popup
menu (Macintosh) or enter a different COM port number
without spaces (Windows).
Disabling PASPORT AirLink SI Connections
In the Choose Interface dialog, either choose a
non-PASPORT interface, or choose ‘None’ from the AirLink
SI menu. To re-enable a connection for future experiments,
follow the instructions under Selecting a PASPORT AirLink
SI for use with DataStudio in this instruction sheet.
Out of Range or Turned Off During Sampling
If the connection is lost during sampling, DataStudio will stop
recording data, and an error dialog will be displayed. Get back
in range, or check if the interface is powered on (see Status
LEDs PASPORT AirLink SI), and try to re-connect. A con-
nection can always be established later by creating a new
experiment, or following the instructions under Selecting a
PASPORT AirLink SI for use with DataStudio in this instruc-
tion sheet.
Connecting PASPORT Sensors
The DataStudio and ImagiProbe programs automatically rec-
ognize a PASPORT sensor when it is plugged into the
PASPORT AirLink SI. Each program will set the calibra-
tion(s) and sampling rate to the sensor’s defaults.
Plugging in a Sensor
Align the alignment bar on the
PASPORT AirLink SI with the
groove on the sensor or sensor
plug. Plug the sensor or sensor
plug into the mini DIN sensor
connector on the end of the sensor
interface.
Specifications
Compatibility Windows, Macintosh, and
Palm-Powered handheld computers
with Bluetooth support
Wireless Range 10 meters
Sampling Rate Up to 1 kHz (varies by software
application and sensor)
Battery 4 hours to fully charge; 4 to 6
continuous hours collection per charge

®
Model No. PS-2005 Troubleshooting
5
Troubleshooting Technical Support
Before you call PASCO technical support, have the apparatus
and this user's guide available. Please note the following:
• DataStudio/ImagiProbe version;
• Product name and model number;
• Approximate age of the product;
• Detailed description of the problem/sequence of events
required to duplicate the problem.
For assistance with any PASCO product, contact PASCO at:
Problem Solution
Sensor interface drops
connection 1. You may be out of range.
Move the computer closer to
the sensor interface and try to
reconnect.
2. Battery may be low.
Recharge.
Software does not see sensor
interface 1. Check interface is powered
on;
2. Confirm interface is within
range;
3. Make sure interface isn't
already connected to another
computer (see Status LEDs
table).
4. (Windows) ensure the COM
port in the DataStudio Setup
window matches the COM port
your computer designated for
the interface.
Software does not see sensor
attached to sensor interface 1. Confirm you are connected
to sensor interface;
2. Make sure sensor is firmly
connected to sensor interface;
3. Turn interface off and back
on. (You will need to
reconnect).
Address: PASCO scientific
10101 Foothills Blvd.
Roseville, CA 95747-7100
Phone: 916-786-3800 (worldwide)
800-772-8700 (U.S)
Fax: (916) 786-7565
Web: www.pasco.com
Email: [email protected]

®
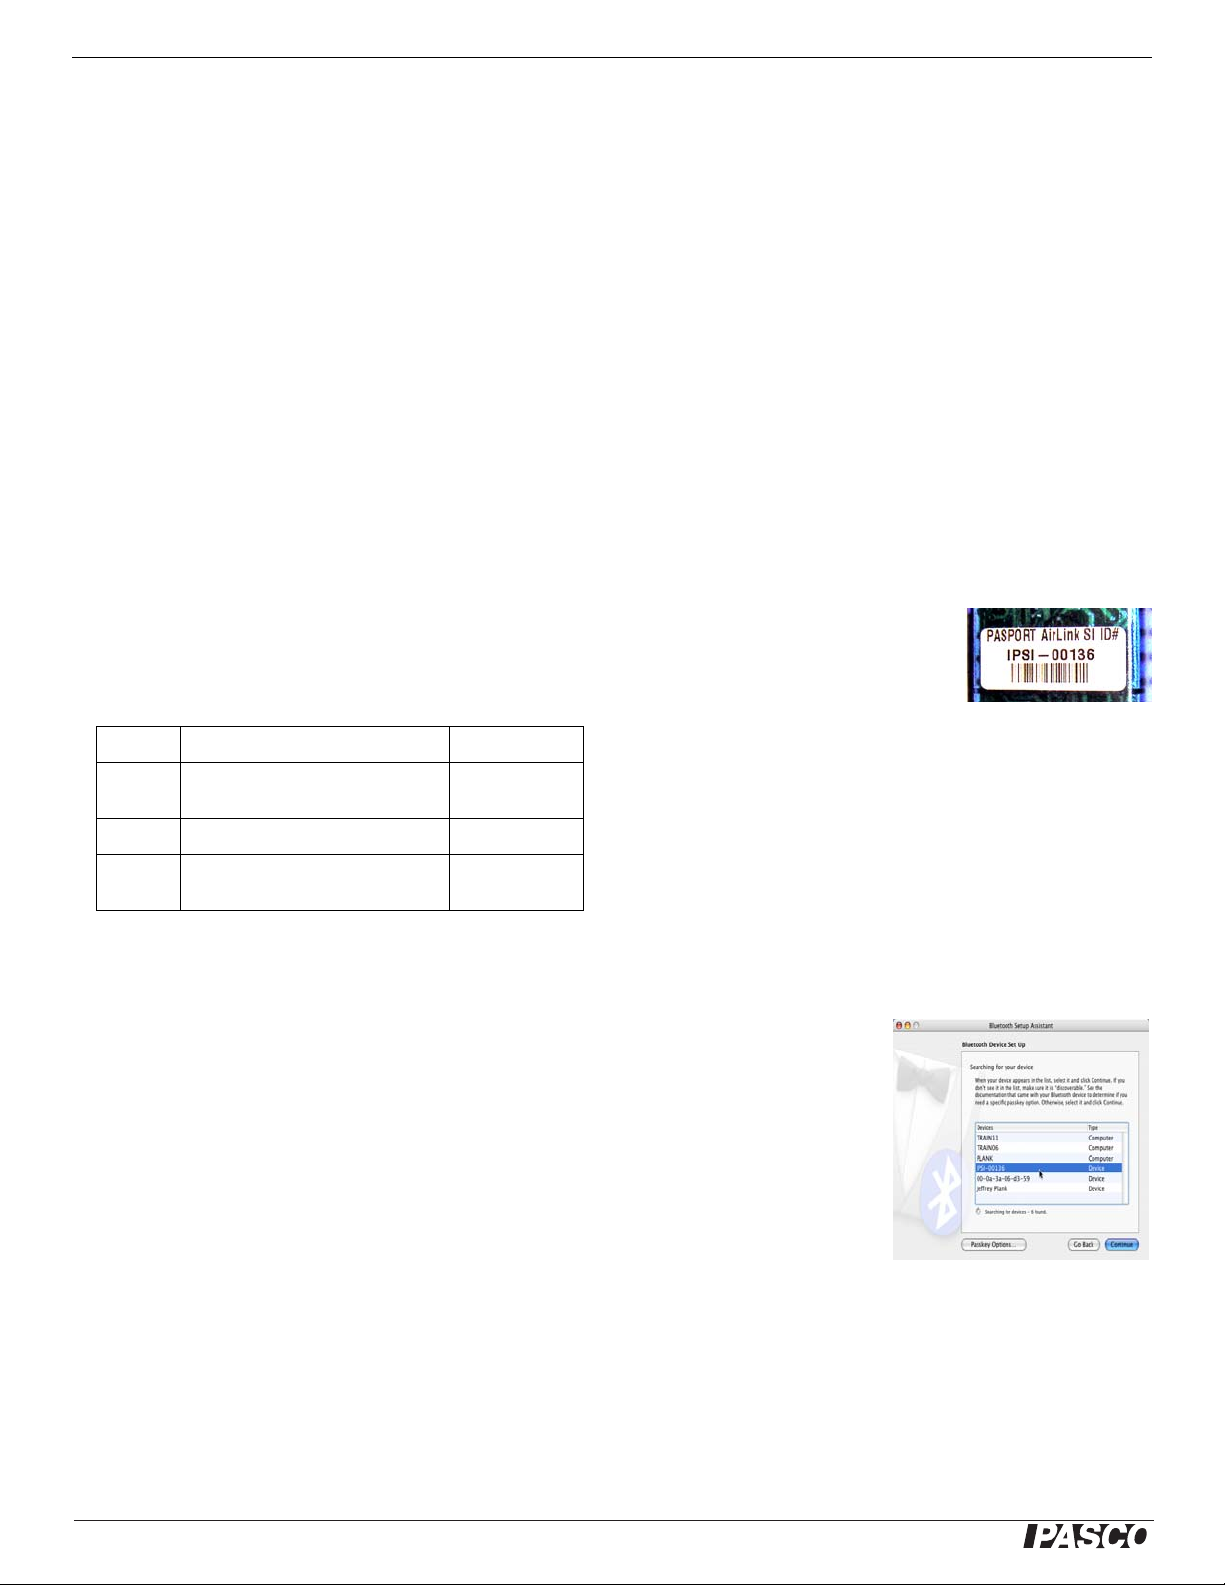
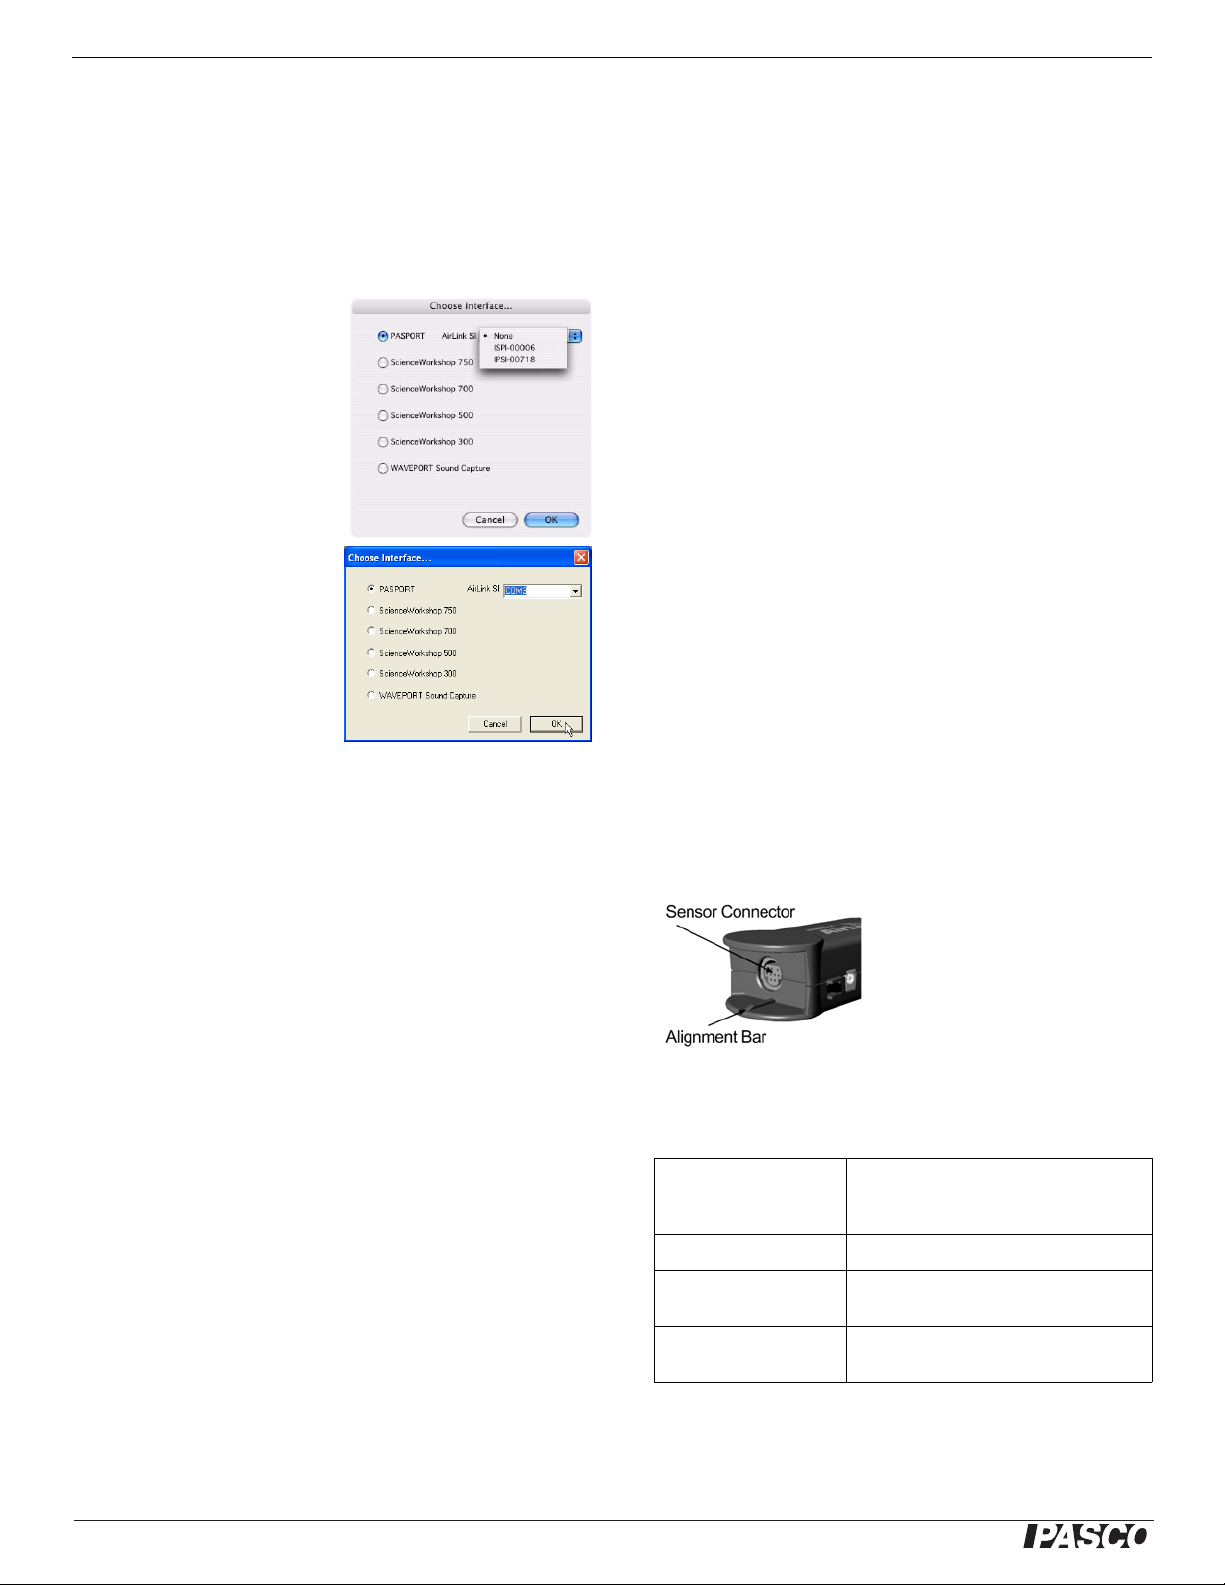
PASPORT AirLink SI (Sensor Interface) Technical Support
6
Communications Regulation Information
The PASPORT AirLink SI (PS-2005) complies with part 15 of the FCC
rules. Operation is subject to the following two conditions: (1) The sensor
interfaces may not cause harmful interference, and (2) the sensor inter-
faces must accept any interference received, including interference that
may cause undesired operation. See instructions below if interference to
radio and television reception is suspected.
IMPORTANT NOTE:
To comply with FCC RF exposure compliance requirements, the antenna
used for this transmitter must not be co-located or operating in conjunction
with any other antenna or transmitter. .
Radio and Television Interference
The equipment described in this manual generates, uses, and can radiate
radio-frequency energy. If it is not installed and used properly-that is, in
strict accordance with instructions from PASCO scientific.-it may cause
interference with radio and television reception.
The sensor interfaces have been tested and found to comply with the lim-
its for a Class B digital device in accordance with the specifications in Part
15 of the FCC rules. These specifications are designed to provide reason-
able protection against such interference in a residential installation. How-
ever, there is no guarantee that interference will not occur in a particular
installation.
You can determine whether the sensor interface is causing interference by
disconnecting it from the computer. If the interference stops, it was proba-
bly caused by the sensor interface.
If the sensor interface does cause interference to radio or television recep-
tion, try to correct the interference by using one or more of the following
remedies:
• Turn the television or radio antenna until the interference stops;
• Move the sensor interface to one side or the other of the televi-
sion or radio;
• Move the sensor interface further from the television or radio.
If these remedies do not correct the problem, consult with an experienced
radio or television technician for additional suggestions.
Important: Changes or modifications to the sensor interface not autho-
rized by PASCO scientific. could void the FCC Certification and negate
your authority to operate the product. Responsible party (FCC matters
only): David Stogner, PASCO scientific, 10101 Foothills Blvd., Roseville,
CA, USA, 95747-7100.
High Risk Activities Warning
Connect only approved sensors to the sensor interface. Connecting unap-
proved devices could void your warranty or result in shock or injury. Be
sure to follow the sensor manufacturer's usage guidelines.
Limited Warranty
PASCO scientific warrants the product to be free from defects in materials
and workmanship for a period of one year from the date of shipment to the
customer. PASCO will repair or replace, at its option, any part of the prod-
uct, which is deemed to be defective in material or workmanship. The war-
ranty does not cover damage to the product caused by abuse or improper
use. Determination of whether a product failure is the result of a manufac-
turing defect or improper use by the customer shall be made solely by
PASCO scientific. Responsibility for the return of equipment for warranty
repair belongs to the customer. Equipment must be properly packed to
prevent damage and shipped postage or freight prepaid. (Damaged
caused by improper packing of the equipment for return shipment will not
be covered by the warranty.) Shipping costs for returning the equipment
after repair will be paid by PASCO scientific.
Copyright
The PASCO scientific 012-09414E PASPORT AirLink SI (Sensor Inter-
face) Instruction Sheet is copyrighted with all rights reserved. Permission
is granted to non-profit educational institutions for reproduction of any part
of this manual, providing the reproductions are used only in their laborato-
ries and classrooms, and are not sold for profit. Reproduction under any
other circumstances, without the written consent of PASCO scientific, is
prohibited.
Trademarks
PASCO, PASCO scientific, DataStudio, ImagiProbe, PASPORT, and Sci-
enceWorkshop are trademarks or registered trademarks of PASCO scien-
tific, in the United States and/or in other countries. All other brands,
products, or service names are or may be trademarks or service marks of,
and are used to identify, products or services of, their respective owners.
For more information visit www.pasco.com/legal.
PASPORT AirLink SI PS-2005
Tested To
Comply With
FCC Standards
FOR HOME OR OFFICE USE
This manual suits for next models
1
Table of contents
Other PASCO Recording Equipment manuals