PATONA PREMIUM Series User manual

PATONA is a registered quality brand from Germany.
2x Mics
1x Receiver
MANUAL
PATONA PRODUCTS ARE MADE WITH
Wireless Microphone Set
for iPhone
PREMIUM SERIES
DE 01
EN 05
FR 09
ES 13
IT 17
NL 21
SV 25
CS 29
PL 33
HR 37
SR 41
TR 99
- 1 -
DE | Wireless Microphone Set for iPhone
Bitte lesen Sie die Anleitung aufmerksam durch und
bewahren Sie diese zum späteren Nachschlagen auf.
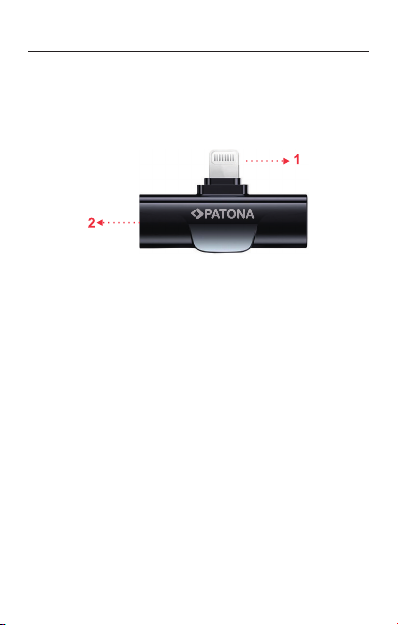
Der Empfänger
1. Anschliessen des Emfpängers
Stecken Sie den Lightning-Stecker in den Lightning-An-
schluss Ihres iPhones.
2. LEDs
ROT/BLAU (blinkend):
Empfänger und Sender gekoppelt.
ROT (durchgehend):
Kopplung ordnungsgemäß aktiv.

- 2 -
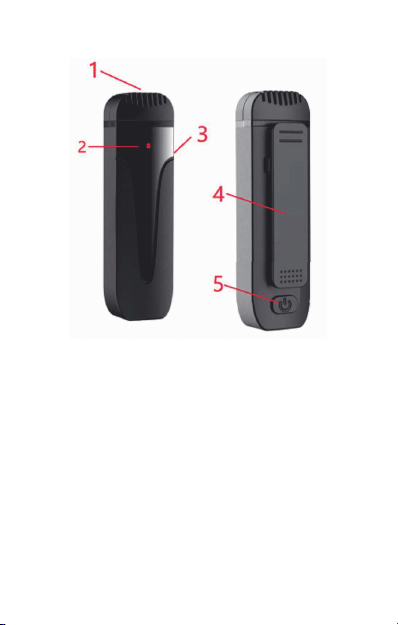
Der Sender
1. Tonabnahme/Mikrofon
Vermeiden Sie, dass Feuchtigkeit in das Mikrofon ein-
dringt.
2. LEDs
ROT/BLAU (blinkend):
Empfänger und Sender werden gekoppelt.
ROT (durchgehend):
Koppelung ordnungsgemäß aktiv.

- 3 -
Beim Laden:
ROT (durchgehend):
Der Akku wird geladen.
AUS:
Der Akku ist voll geladen.
3. USB-C Ladeanschluss
Sie benötigen ein DC 5V/1A Netzteil/Ladegerät (nicht
im Lieferumfang enthalten).
Stromeingang Typ: Lightning
4. Klammer
Dient zur Befestigung z. B. an Kleidung.
5. Power-Taste
1. Zum ein- und ausschalten die Power-Taste ca. 5
Sek. gedrückt halten.
2. Kurz drücken, um das Mikrofon stummzuschal-
ten bzw. die Stummschaltung aufzuheben. Ist die
Stummschaltung aktiv, blinkt die LED blau und rot
abwechselnd.

- 4 -
Technische Daten
Leistung DC 5V/1A
Funkfrequenz 2.4GHz - 2.44GHz
Empfänger Über Lightning Kabel oder iPhone
/ iPad Lightning Anschluss
Arbeitsstrom < 11mA
Standby-Leistungsauf-
nahme
< 55uA
Antwort Frequenz 20Hz-20KHz
Empndlichkeit 35dB
Abtastrate 48K
Signal-Rausch-Verhältnis > 75dB
Akku 50mAh Li-Polymer bis zu 4 Std.
Betrieb.
Laden per USB (Netzteil, nicht im
Lieferumfang enthalten).
Warnungen/Hinweise:
»Öffnen oder zerlegen Sie das Produkt oder dessen
Zubehör nicht.
»Achtung Kleinteile! Nicht für Kinder geeignet.
»Halten Sie das Produkt von Feuchtigkeit und großer
Hitze fern.
»Nutzen Sie nur kompatibles Zubehör.
»Schützen Sie das Produkt vor starken Stößen und
Erschütterungen.
»Unsachgemäße Nutzung führt zum Verlust der Ge-
währleistung.
»Entsorgen Sie das Produkt nach den Richtlinien in
Ihrem Land.

- 5 -
EN | Wireless Microphone Set for iPhone
Please read the instructions carefully and keep them for
future reference.
The Receiver
1. Connecting the receiver
Insert the Lightning connector into the Lightning port of
your iPhone.
2. LEDs
RED/BLUE (blinking):
Receiver and transmitter paired.
RED (solid):
Pairing properly active.

- 6 -
The transmitter
1. Sound pickup/microphone
Prevent moisture from entering the microphone.
2. LEDs
RED/BLUE (ashing):
Receiver and transmitter are paired.
RED (solid):
Pairing properly active.

- 7 -
When charging:
RED (solid):
Battery is charging.
OFF:
The battery is fully charged.
3. USB-C charging port
You will need a DC 5V/1A power adapter/charger (not
included).
Power input type: Lightning
4. Clamp
Used to attach to clothing, for example.
5. Power Button
1. Press and hold the power button for about 5 sec to
turn on/off.
2. Press briey to mute or unmute the microphone.
If muting is active, the LED ashes blue and red
alternately.

- 8 -
Technical data
Power DC 5V/1A
Radio frequency 2.4GHz - 2.44GHz
Receiver Via Lightning cable or iPhone /
iPad Lightning connector
Working current < 11mA
Standby power con-
sumption
< 55uA
Response Frequency 20Hz-20KHz
Sensitivity 35dB
Sampling rate 48K
Signal to noise ratio > 75dB
Battery 50mAh Li-polymer up to 4 hrs
operation. Charging via USB (AC
adapter, not included).
Warnings/Notices:
»Do not open or disassemble the product or its ac-
cessories.
»Attention small parts! Not suitable for children.
»Keep the product away from moisture and high heat.
»Use only compatible accessories.
»Protect the product from strong impacts and shocks.
»Improper use will void the warranty.
»Dispose of the product according to the guidelines
in your country.

- 9 -
FR | Wireless Microphone Set for iPhone
Veuillez lire attentivement les instructions et les conser-
ver pour pouvoir vous y référer ultérieurement.
Le récepteur
1. Connecter le récepteur
Branchez le connecteur Lightning dans le port Lightning
de votre iPhone.
2. LEDs
ROUGE/BLEU (clignotant) :
Récepteur et émetteur couplés.
ROUGE (continu) :
Couplage correctement activé.

- 10 -
L‘émetteur
1. Prise de son/microphone
Éviter que l‘humidité ne pénètre dans le microphone.
2. LEDs
ROUGE/BLEU (clignotant) :
Le récepteur et l‘émetteur sont couplés.
ROUGE (continu) :
Couplage correctement activé.

- 11 -
Pendant le chargement :
ROUGE (continu) :
La batterie est en cours de chargement.
ÉTEINT :
La batterie est entièrement chargée.
3. Port de charge USB-C
Vous avez besoin d‘un adaptateur/chargeur DC 5V/1A
(non compris dans la livraison).
Type d‘entrée d‘alimentation : Lightning
4. Agrafe
Sert à la xation, par exemple sur les vêtements.
5. Bouton d‘alimentation
1. Maintenir la touche Power enfoncée pendant envi-
ron 5 secondes pour allumer ou éteindre le micro-
phone.
2. Appuyer brièvement sur cette touche pour couper
ou rétablir le son du microphone. Si la coupure du
son est active, la LED bleue et rouge clignote en
alternance.

- 12 -
Caractéristiques techniques
Puissance DC 5V/1A
Fréquence radio 2.4GHz - 2.44GHz
Récepteur Via câble Lightning ou connecteur
Lightning iPhone / iPad
Courant de travail < 11mA
Puissance absorbée
en veille
< 55uA
Fréquence de réponse 20Hz-20KHz
Sensibilité 35dB
Taux d'échantillonnage 48K
Rapport signal/bruit > 75dB
Batterie 50mAh Li-Polymer jusqu'à 4 heu-
res de fonctionnement. Recharge
via USB (adaptateur secteur, non
fourni).
Warnings/Notices:
»Do not open or disassemble the product or its ac-
cessories.
»Attention small parts! Not suitable for children.
»Keep the product away from moisture and high heat.
»Use only compatible accessories.
»Protect the product from strong impacts and shocks.
»Improper use will void the warranty.
»Dispose of the product according to the guidelines
in your country.

- 13 -
ES | Wireless Microphone Set for iPhone
Lea atentamente las instrucciones y consérvelas para
futuras consultas.
El receptor
1. Conexión del receptor
Enchufe el conector Lightning en el puerto Lightning de
su iPhone.
2. LEDs
ROJO/AMARILLO (intermitente):
Receptor y transmisor emparejados.
ROJO (jo):
Emparejamiento correctamente activo.

- 14 -
El transmisor
1. Captador de sonido/micrófono
Evite que entre humedad en el micrófono.
2. LEDs
ROJO/ AZUL (intermitente):
El receptor y el transmisor están emparejados.
ROJO (jo):
Emparejamiento correctamente activo.

- 15 -
Durante la carga:
ROJO (jo):
La batería se está cargando.
APAGADO:
La batería está completamente cargada.
3. Puerto de carga USB-C
Necesitas un adaptador/cargador de corriente DC
5V/1A (no incluido).
Tipo de entrada de alimentación: Lightning
4. Clip
Sirve para sujetarlo a la ropa, por ejemplo.
5. Botón de encendido
1. Mantén pulsado el botón de encendido durante
unos 5 segundos para encenderlo y apagarlo.
2. Pulse brevemente para silenciar o activar el micró-
fono. Si el modo silencio está activado, el LED par-
padea en azul y rojo alternativamente.

- 16 -
Datos técnicos
Alimentación DC 5V/1A
Frecuencia de radio 2,4GHz - 2,44GHz
Receptor Mediante cable Lightning o co-
nector Lightning de iPhone / iPad
Corriente de funciona-
miento
< 11 mA
Consumo en espera < 55uA
Frecuencia de respuesta 20Hz-20KHz
Sensibilidad 35dB
Frecuencia de muestreo 48K
Relación señal/ruido > 75dB
Batería 50mAh Li-Polímero hasta 4
horas de funcionamiento. Carga
mediante USB (adaptador de
corriente, no incluido).
Advertencias/avisos::
»No abra ni desmonte el producto ni sus accesorios.
»Atención a las piezas pequeñas. No apto para niños.
»Mantenga el producto alejado de la humedad y del
calor intenso.
»Utilice únicamente accesorios compatibles.
»Proteja el producto de golpes e impactos fuertes.
»El uso inadecuado invalidará la garantía.
»Elimine el producto de acuerdo con las directrices
de su país.

- 17 -
IT | Wireless Microphone Set for iPhone
Leggere attentamente le istruzioni e conservarle per
riferimenti futuri.
Il ricevitore
1. Collegamento del ricevitore
Inserire il connettore Lightning nella porta Lightning
dell‘iPhone.
2. LEDs
ROSSO/BLU (lampeggiante):
Ricevitore e trasmettitore sono accoppiati.
ROSSO (sso):
Accoppiamento correttamente attivo.
- 18 -
Il trasmettitore
1. Pick-up del suono/microfono
Evitare che l‘umidità penetri nel microfono.
2. LEDs
ROSSO/BLU (lampeggiante):
Il ricevitore e il trasmettitore sono accoppiati.
ROSSO (sso):
Accoppiamento correttamente attivo.

- 19 -
Durante la ricarica:
ROSSO (sso):
La batteria è in carica.
SPENTO:
La batteria è completamente carica.
3. Porta di ricarica USB-C
È necessario un adattatore/caricabatterie da 5V/1A DC
(non incluso).
Tipo di ingresso di alimentazione: Lightning
4. Clip
Utilizzata per agganciarla, ad esempio, agli indumenti.
5. Tasto di accensione
1. Tenere premuto il pulsante di accensione per circa
5 secondi per accendere e spegnere il dispositivo.
2. Premere brevemente per silenziare o disattivare il
microfono. Se il silenziamento è attivo, il LED lam-
peggia alternativamente in blu e rosso.
Other manuals for PREMIUM Series
10
This manual suits for next models
1
Table of contents
Languages:
Other PATONA Microphone manuals


