Patrol Group 420I User manual

420 + 420 +
MANUAL / instrukcja obsługi
MANUAL / instrukcja obsługi
Multi Composter
Brief guide / krótki poradnik
Composter location / ustawienie kompostownika
Suitable material for your composter / Co nadaje się na kompost?
Ready-made compost / Gotowy kompost
How to properly prepare compost / Jak poprawnie przygotować kompost?
How to use ready-made compost / Jak wykorzystać gotowy kompost?
www.patrolgroup.com
420L Multi Composter
650L Multi Composter
880L
www.patrolgroup.com
MANUAL /instrukcja obsługi
MANUAL / instrukcja obsługi
EN
PL
EN
EN
EN
PL
PL
PL
EN
PL
In order to ensure optimal conditions for the composting
process, properly assembled composter should be placed
in a shady place with good air circulation. It is important,
that composter should be placed directly on the soil (if
necessary we recommend using only a garden grid as a
base). The proper position of the composter allows for
drainage of excess moisture and earthworms and microbes
access to the compost.
W celu zapewnienia optymalnych warunków dla procesu
kompostowania właściwie złożony kompostownik należy
umieścić w zacienionym miejscu z dobrym obiegiem
powietrza. Ważne, aby kompostownik był umiejscowiony
bezpośrednio na glebie (zalecamy zastosowanie jedynie
kratki ogrodowej jako podłoża). Takie ustawienie kompos-
townika pozwoli na odprowadzanie nadmiaru wilgoci oraz
na dostęp dżdżownic i drobnoustrojów do kompostu.
Organic waste from your garden and/or kitchen (e.g.: green
parts of plants, garden cuttings, scobs, leaves, needles,
cork, rotten fruit and owers, weeds without seeds, organic
kitchen waste, cold ash). Cut grass should be mixed with
other waste. Otherwise the excess of cut grass can provoke
rotting of the composter content.
Depending on the composting conditions (temperature,
humidity, composition), the compost should be ready
within eight weeks up to one year. Ready-made compost
should have a compact and absorbable texture, resembling
soil/peat.
W zależności od warunków kompostowania (temperatura,
wilgotność, skład) kompost jest gotowy w przedziale czasu
od 8 tygodni do 1 roku. Gotowy kompost powinien mieć
zwartą i nasiąkliwą konsystencję, przypominającą
ziemię/torf.
Compost is a natural fertilizer that can be used in many
places in your garden to improve plant growth. The thin
compost layer may be spread over the lawn. Ready-made
humus may also be used around trees and shrubs.
Kompost to naturalny nawóz, który można wykorzystać w
wielu miejscach w ogrodzie dla poprawy wzrostu roślin.
Kompost w postaci cienkiej warstwy można rozprowadzić
po trawniku. Kolejne zastosowanie to wymieszanie
kompostu z ziemią na grządkach. Gotowy humus można
również rozsypać wokół drzew i krzewów, co pozytywnie
wpłynie na ich rozwój.
Patrol Group spółka z ograniczoną odpowiedzialnością S.K.A.
30-694 Kraków, ul. Koszutki 2, Poland
e-mail: biuro@patrolgroup.com
www.patrolgroup.com
Odpadki organiczne z ogrodu i kuchni (m.in.: zielone części
roślin, rozdrobnione gałęzie, trociny, liście, igliwie, kora,
opadłe owoce, kwiaty, chwasty bez nasion, organiczne
odpadki kuchenne, zimny popiół). W przypadku ściętej
trawy trzeba zawsze zadbać o jej właściwe wymieszanie z
innymi odpadkami, w przeciwnym razie nadmiar trawy
może spowodować gnicie kompostu.
We recommend that the bottom layer of the composter
should be covered with small cut branches, which allow
drainage of the excess moisture from the upper layers of
compost. Material for composter should be diverse,
dispersed and well mixed. Do not tamp the content of the
composter, because it slows down the composting process.
Every few weeks, we recommend you to mix the upper
layers of the material in the composter. An important
aspect of the composting process is to maintain an
adequate level of moisture. Depending on the situation,
compost should be watered, or in the case of long period of
heavy rain composter should be covered.
Zalecamy, aby dno kompostownika zostało wyścielone
warstwą drobnych gałązek, które umożliwią odpro-
wadzenie nadmiaru wilgoci z górnych warstw kompostu
do gleby. Materiał wrzucany do kompostownika powinien
być różnorodny, rozdrobniony i dobrze wymieszany. Nie
należy nadmiernie ubijać zawartości kompostownika,
ponieważ spowolni to proces kompostowania. Co kilka
tygodni zalecamy przemieszanie górnej warstwy materiału
znajdującego się w kompostowniku. Ważnym aspektem w
procesie kompostowania jest utrzymanie odpowiedniego
poziomu wilgoci. W zależności od sytuacji, kompost
powinien być nawadniany, a w przypadku długich i inten-
sywnych opadów deszczu można osłonić obudowę
kompostownika.
A
B
C
D
E
B
CDE
A
B
CE
AB
C
E
Set includes / zestaw zawiera
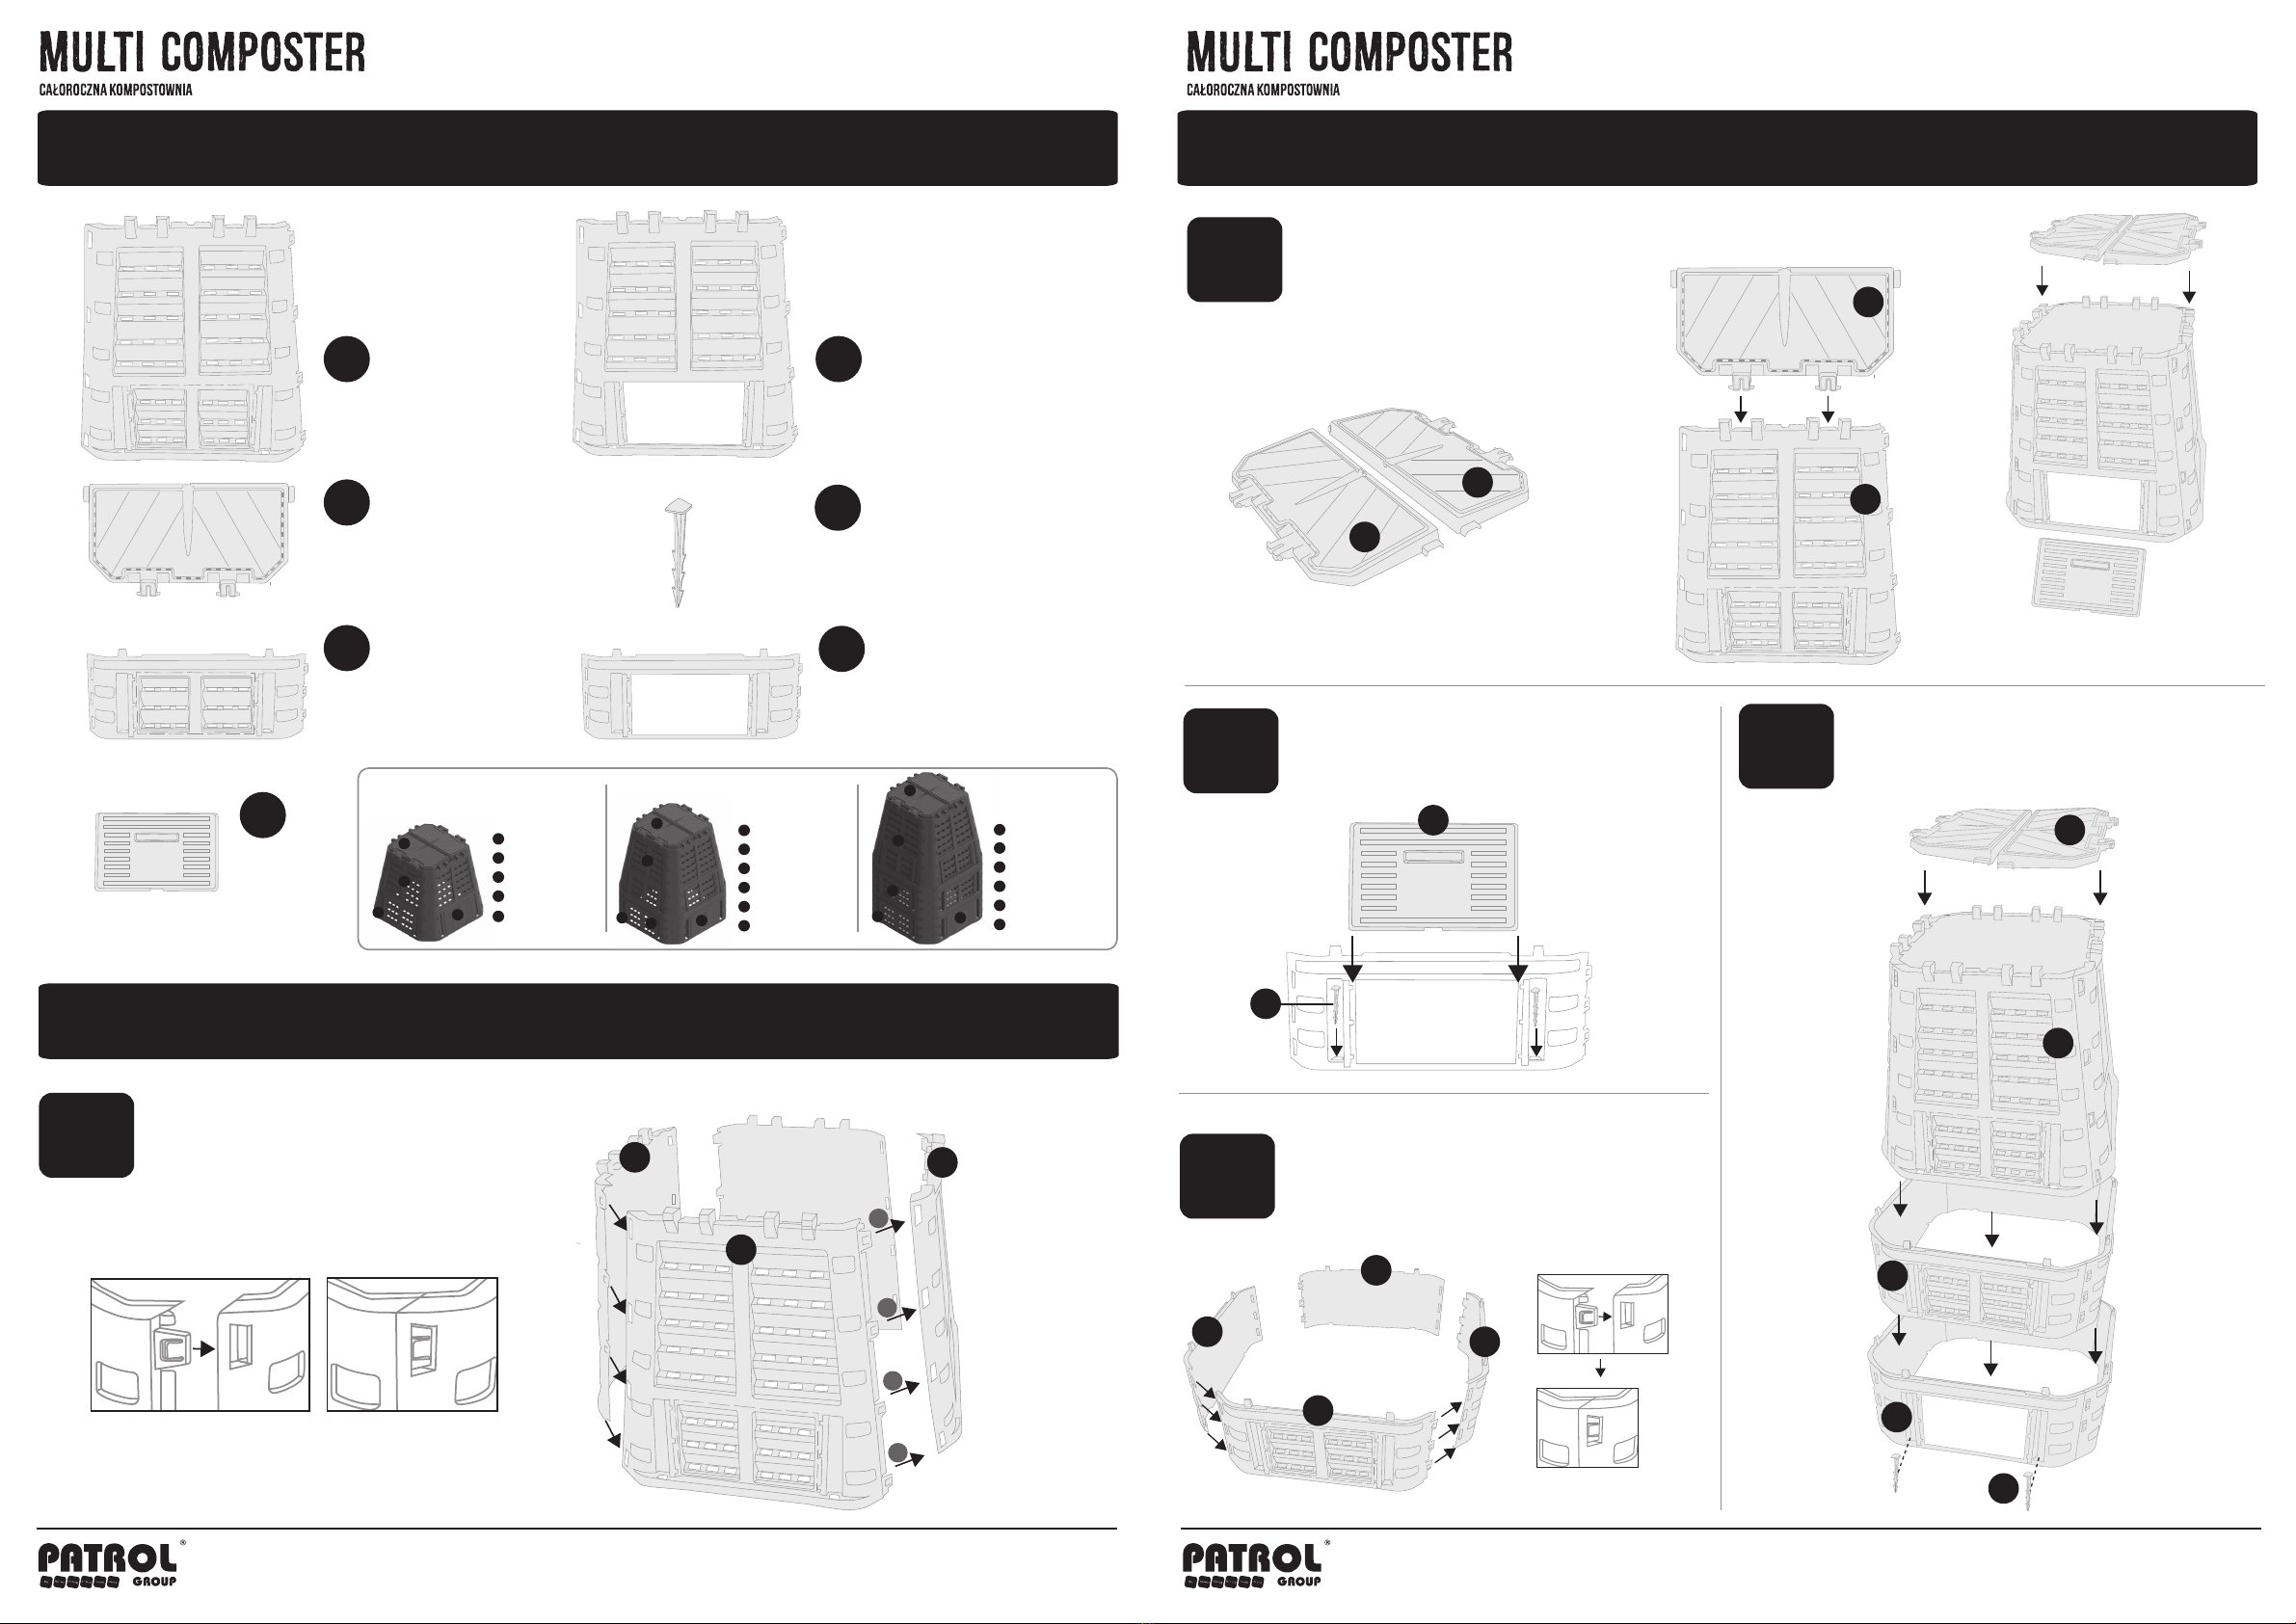
Assembly / montaż
step 1
/ krok 1
step 2
/ krok 2
Assemply / montaż
www.patrolgroup.com www.patrolgroup.com
Side module
/ Ściana boczna
Hatch wing
/ Skrzydło klapy
Enlarging module 230L
/ Moduł powiększający 230L
Combining the side modules
/ Łączenie ścian bocznyh
Mounting the hatch wings
/ Mocowanie klapy
step 3
/ krok 3
Positioning the slide gate
and anchors
/ Umiejscowienie zasuwy i kotew
step 4
/ krok 4
Combining the enlarging module
/ Montaż modułu powiększającego
step 5
/ krok 5
Final combining of all composter elements
/ Finalne łączenie wszystkich elementów kompostownika
click system
Slide gate
/ Zasuwa
A
Side module
/ Ściana boczna
A1
B
E
D
Ground anchors
/ Kotwy mocujące
MultiComposter
420L
2x side module
2x side module
2x hatch wing
2x slide gate
8x ground anchors
MultiComposter
650L MultiComposter
880L
C
Enlarging module 230L
/ Moduł powiększający 230L
D1
click system
A
A
A
B
B
C
C
E
D
D
D
D
B
A
A
A1
D1
D
B
C
E
4x side module
2x hatch wing
2x slide gate
2x enlarging mogule
2x enlarging module
8x ground anchors
A
D1
D
B
C
E
4x side module
2x hatch wing
2x slide gate
6x enlarging mogule
2x enlarging module
8x ground anchors
A
Sequence of assembly 1-4
/ kolejność montażu 1-4
1
2
3
4
D
D1
*Optimal position of the slide gate relative to the hatch
/ Optymalne umiejscowienie zasuwy względem pokrywy
B
A
This manual suits for next models
2


