Patterson Medical 09 107 8393 User manual
Merton & Swedish Bath Rails
FINISH NEW CODE OLD CODE
Swedish Bath Rail Chrome 09 107 8393 AA1910
Swedish Bath Rail Epoxy 09 107 8419 AA1911
Metron Bath Rail Chrome 09 107 8427 AA1914
Metron Bath Rail Epoxy 09 107 8435 AA1915
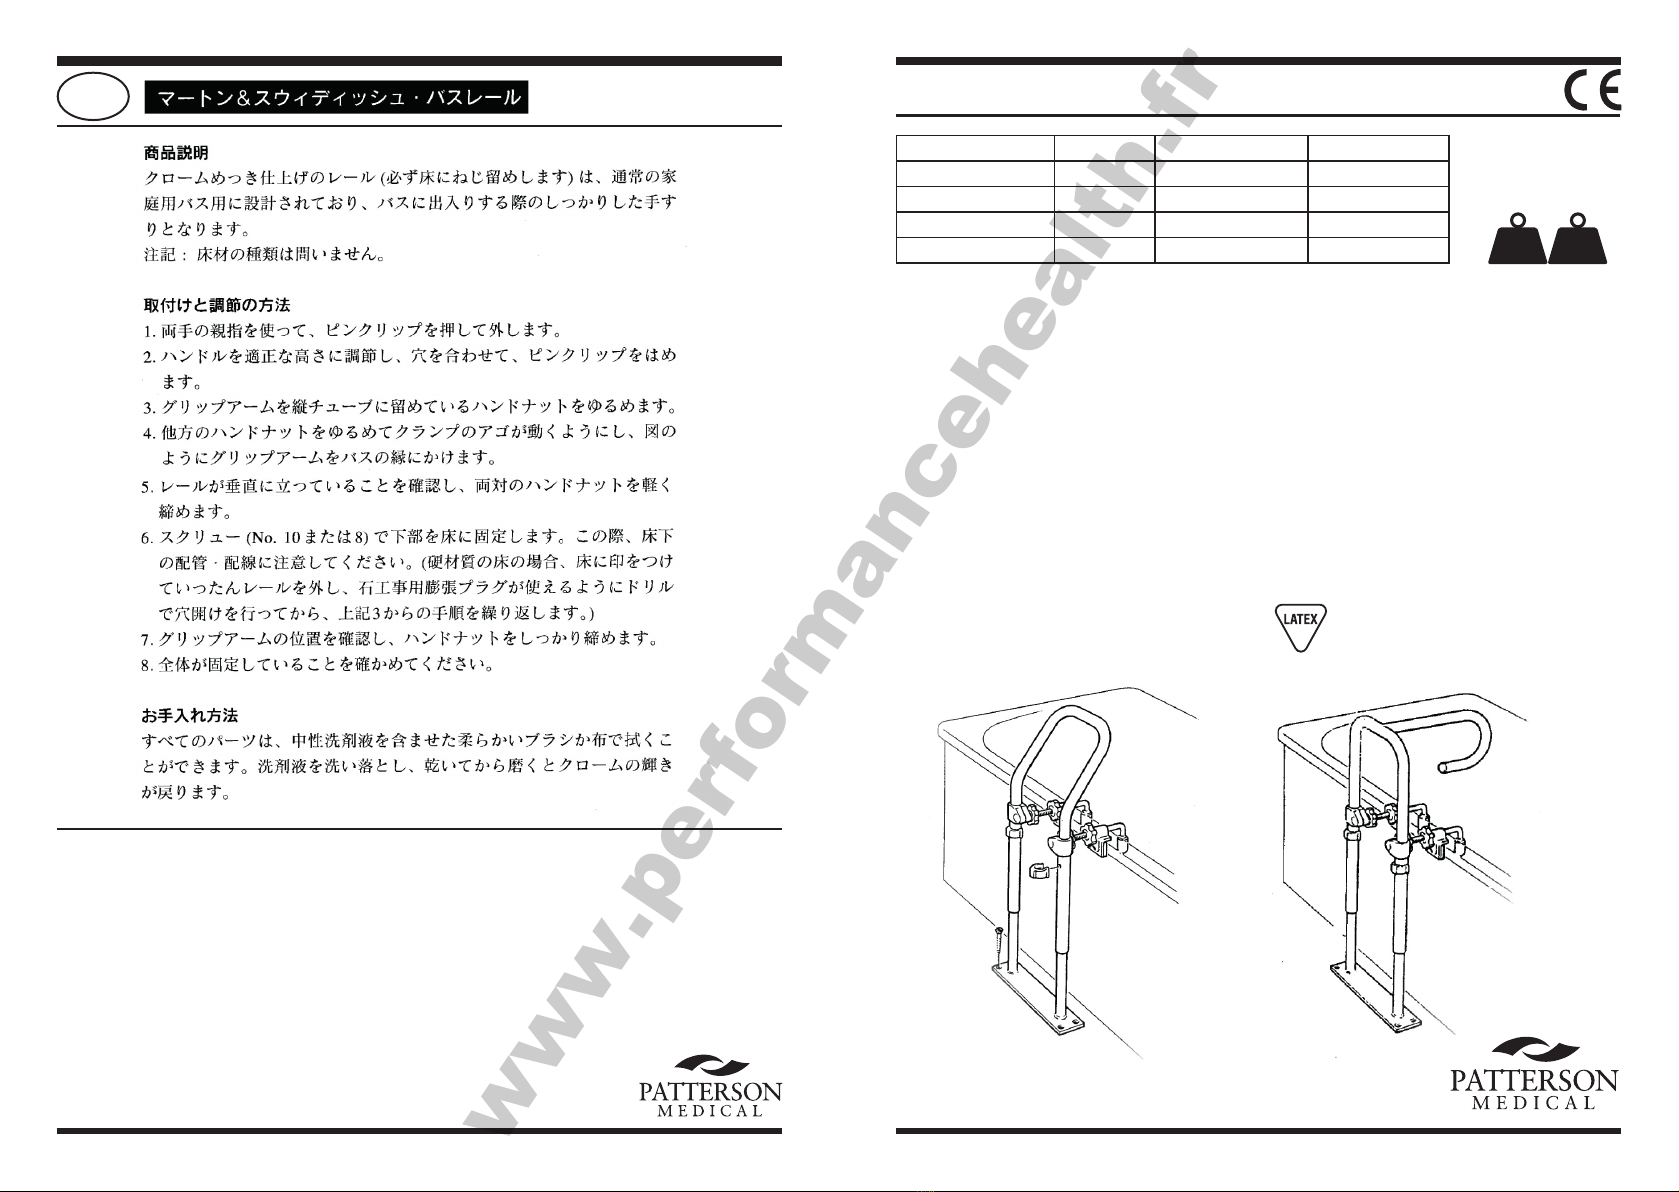
Description
These bath rails, (which must be
screwed down to the floor), are for use
beside ordinary domestic baths, to give a
secure grab handle at the optimum
position to assist entry and exit.
Note: No special type of flooring is needed.
Installation and Adjustment
1. Push-o the pin-clips using both thumbs.
2. Set handle to desired height, align holes
and snap pin-clips into position.
3. Slacken the hand-nuts which clamp the
grip-arms to the vertical tubes.
4. Turn the other hand-nuts to allow the
clamp jaws to be retracted, and place the
grip-arms over the bath edge as shown.
5. Ensuring that the rail is standing vertically,
lightly tighten both pairs of hand-nuts.
6. Screw to the floor using No. 10 or 8
screws, being careful of underfloor
pipes and wires. (For solid floors, mark
floor, remove rail, drill to take expanding
masonry plugs, then repeat from3 above).
7. Check position of grip-arms and firmly
tighten hand-nuts.
8. Check installation is secure.
Cleaning and Care
All parts may be cleaned using a brush or
cloth and a solution of mild detergent.
AA1910/1
AA1914/5
Maximum
user weight
150
kg 23 ½
st
70035 Is4 © Patterson Medical Ltd. 2013
Manufactured for Patterson Medical Ltd.
Nunn Brook Road, Huthwaite,
Sutton-in-Ashfield, Nottinghamshire,
NG17 2HU, UK.
UK: Tel: 08444 124 330 Fax: 08448 730 100
www.pattersonmedical.co.uk
International: Tel: +44 1623 448 706
Fax: +44 1623 448 784
Patterson Medical Products, Inc.
28100 Torch Parkway Suite 700,
Warrenville, IL 60555-3938
Tel: 1-800-323-5547 Telefax: 1-800-547-4333
Patterson Medical Australia
PO Box 1006, North Ryde, NSW Australia 2113.
Tel: 1300 473 422 Fax: 1300 766 473
Patterson Medical France
Zone Industrielle de Montjoly,
11 Avenue de I’Industrie - CS 40712
08013 Charleville-Mézières Cedex, France.
Tel: 03 24 52 61 15 Fax: 03 24 52 90 34
Please retain these instructions for future reference.
J
Note: The ttings on
this rail contain latex
www.performancehealth.fr

Description
Ces barres (qui doivent être vissées
au sol) s’installent sur le flanc d’une baignoire
domestique ordinaire et fournissent une bonne
préhension pour rentrer dans la baignoire et en
sortir.
Remarque : Elles ne nécessitent pas de types
de sol spécifiques.
Installation et réglage
1. Enlevez les clips à l’aide des deux pouces.
2. Fixez la poignée à la hauteur désirée, alignez les
trous et engagez les clips dans la position voulue.
3. Desserrez les écrous à oreilles qui serrent les bras
de fixation aux tubes verticaux.
4. Desserrez les autres écrous à oreilles pour
rétracter les griffes de serrage, et placez les bras
de fixation sur l’intérieur du flanc de la baignoire
selon l’illustration.
5. Vérifiez que la barre est bien verticale et serrez
légèrement les deux paires d’écrous.
6. Vissez la barre au sol à l’aide de vis No 10 ou
8. en veillant à ne pas faire de trou dans des fils
ou conduits sous le sol. En ce qui concerne les
sols bétonnés, marquez le sol, enlevez la barre,
percez des trous convenant à des chevilles
de maçonnerie expansives, puis répétez les
instructions à partir du paragraphe 3 ci-dessus.
7. Vérifiez la position des bras de fixation et serrez
bien les écrous.
8. Vérifiez que l’installation est sûre.
Nettoyage et entretien
Lavez toutes les pièces des barres avec une
brosse ou un torchon et une solution de
détergent doux.
Beschreibung
Diese Geländer (auf dem Fußboden zu
verschraubenden) sind für eine Anbringung neben
normalen Badewannen vorgesehen und bieten den
Benutzer einen für ihn an der günstigsten Stelle
angebrachten, sicheren Haltegriff, der das Einsteigen
in die und Aussteigen aus der Wanne erleichtert.
Anmerkung: Zur Anbringung ist kein spezieller
Fußboden erforderlich.
Anbringung und Einstellung:
1. Entfernen Sie die Stiftklemmen durch Schieben mit
beiden Daumen.
2. Stellen Sie den Griff auf die gewünschte Höhe ein,
richten Sie de Befestigungslöcher aufeinander aus
und lassen Sie dieStiftklemmen einschnappen.
3. Lockern Sie die Handmuttern, mit denen die
Befestigungsvorrichtung an den vertikalen Rohren
angebracht ist.
4. Drehen Sie die gegenüberliegenden Handmuttern,
so daß sich die Greifbacken zurückziehen lassen,
und schieben Sie die Befestigungsvorrichtung wie
abgebildet über den Wannenrand.
5. Vergewissern Sie sich, daß das Geländer
geradesteht, und ziehen Sie beide Handmuttern-
Paare leicht an.
6. Befestigen Sie das Geländer mit Schrauben
No. 10 oder 8 am Fußboden, wobei eventuelle
unter dem Fußboden verlaufenden Rohre oder
Leitungen sorgfältig vermieden werden müssen.
(Wenn es sich um einen festvergossenen oder
gefliesten Fußboden handelt, markieren Sie
die Schraublöcher, entfernen Sie das Geländer,
bohren Sie zur Aufnahme von Mauerwerkdübeln
geeignete Löcher, und wiederholen Sie die ab 3.
angegebenen Schritte).
7. Überprüfen Sie die Einstellung der Befestigung
vorrichtung und ziehen Sie die Handmuttern gut
fest.
8. Vergewissern Sie sich, daß das installierte
Geländer fest steht und eine sichere Anwendung
gewährleistet.
Reinigung und Pflege
Alle Teile können mit einer Bürste oder einem Lappen
und milder Reinigungsmittellösung gereinigt werden.
Descripción
Estas barras (que deben ir atornilladas al suelo),
están concebidas para su uso al lado de las bañeras
domésticas corrientes y dar un agarre firme del
asidero en la posición óptima para permitir la entrada
y la salida.
Nota: No se necesita ninguna clase de suelo
especial.
Instalación y Ajuste
1. Saque las clavijas de pinza con los dos dedos
pulgares.
2. Ponga el asidero a la altura deseada, alinee los
agujeros y con un empujón suave fije las clavijas
de pinza en su sitio.
3. Afloje las tuercas de mano que sujetan los brazos
asideros a los tubos verticales.
4. Gire las otras tuercas para permitir que se
retraigan las garras de pinza y coloque los brazos
de sujeción sobre el borde de la bañera tal como
se muestra.
5. Asegurándose de que la barra esté en posición
vertical, apriete ligeramente los dos pares de
tuercas con la mano.
6. Atorníllelo al suelo con 10 u 8 tornillos, teniendo
cuidado de las posibles tuberías o alambres por
debajo del piso. (Para los pisos de hormigón,
marque el piso, retire la barra, haga taladros que
puedan tomar anclajes de expansión y luego
repita a partir del punto 3 anterior).
7. Compruebe la posición de los brazos de sujeción
y apriete bien las tuercas con la mano.
8. Verifique que la instalación es segura.
Limpieza y Cuidado
Se puede limpiar por todas partes con un
cepillo o un paño y la mezcla de un detergente
suave.
Descrizione
Queste sbarre (da avvitare al suolo) sono realizzate
per un uso a fianco di vasche domestiche e offrono
un’impugnatura salda in una posizione ottimale per
entrare e uscire dalla vasca con maggiore facilità.
Nota: non è richiesto un tipo particolare di
pavimento.
Installazione e regolazione
1. Estrarre i perni-fermaglio utilizzando entrambe i
pollici.
2. Regolare l’impugnatura all’altezza desiderata,
allineare i fori e inserire i perni-fermaglio.
3. Allentare i dadi ad alette che collegano i braccioli
ai tubi verticali.
4. Girare gli altri dadi ad alette per ritrarre le ganasce
di bloccaggio e collocare i braccioli sul bordo della
vasca come mostrato.
5. Assicurandosi che la sbarra sia in posizione
verticale, stringere leggermente entrambe le
coppie di dadi ad alette.
6. Avvitare al suolo utilizzando viti n. 10 o 8,
prestando attenzione alle tubature e ai cavi sotto il
pavimento. Nel caso di pavimenti solidi, tracciare
segni indicativi, togliere la sbarra, trapanare per
poter inserire tappi ad espansione di muratura,
quindi ripetere dal punto 3.
7. Controllare la posizione dei braccioli e avvitare
saldamente i dadi ad alette.
8. Verificare che l’installazione sia stabile.
Pulizia e manutenzione
È possibile pulire tutte le parti utilizzando una
spazzola o un panno e una soluzione di detersivo
delicato.
Barres de maintien Merton & Swedish
FWannengeländer ‘Merton’ und ‘Schwedisch’
D
Barras de Baño ‘Merton & Swedish’
ESbarre per vasca Merton e Swedish
I
www.performancehealth.fr
This manual suits for next models
7
Other Patterson Medical Bathroom Aid manuals

Popular Bathroom Aid manuals by other brands

Drive Medical
Drive Medical Swivel Shower Chair BEN operating instructions

Invacare
Invacare Rio H605 user manual

MOBB Health Care
MOBB Health Care MHFTSF instructions

Korpinen
Korpinen 21273113-00 installation guide

Elcoma
Elcoma Life LL-TK Series Installation guidelines

Hewi
Hewi M8010.05 Installation and operating instructions

R82
R82 Orca user guide

Homecraft
Homecraft 09 107 5647 manual

Rehab and Mobility Products
Rehab and Mobility Products RM400 Assembly instructions

Kohler
Kohler K-11870 Installation and care guide

The Splash Lab
The Splash Lab TSL.GR45.18 Installation & maintenance

Drive Medical
Drive Medical 12455 quick start guide


