pba 4CS.442.001U Series User manual
DESIGN FOR ALL 4CS
.XX FINISH .44 .43
STAINLESS STEEL AISI 316
.44 SATIN
.43 BRIGHT The illustrations and descriptions herein are applicable to production as of the date of Document.
The manufacturer reserves the right to make changes and improvements in designs and dimensions.
©2020 by PBA S.p.A.
ADA
ITEM A
4CS.442.001U . xx 24 3/4”
4CS.442.002U . xx 36 3/4”
4CS.442.003U . xx 42 3/4”
B
36 3/4”
54 3/4”
54 3/4”
4CS.442.004U . xx 51 3/4” 45 3/4”
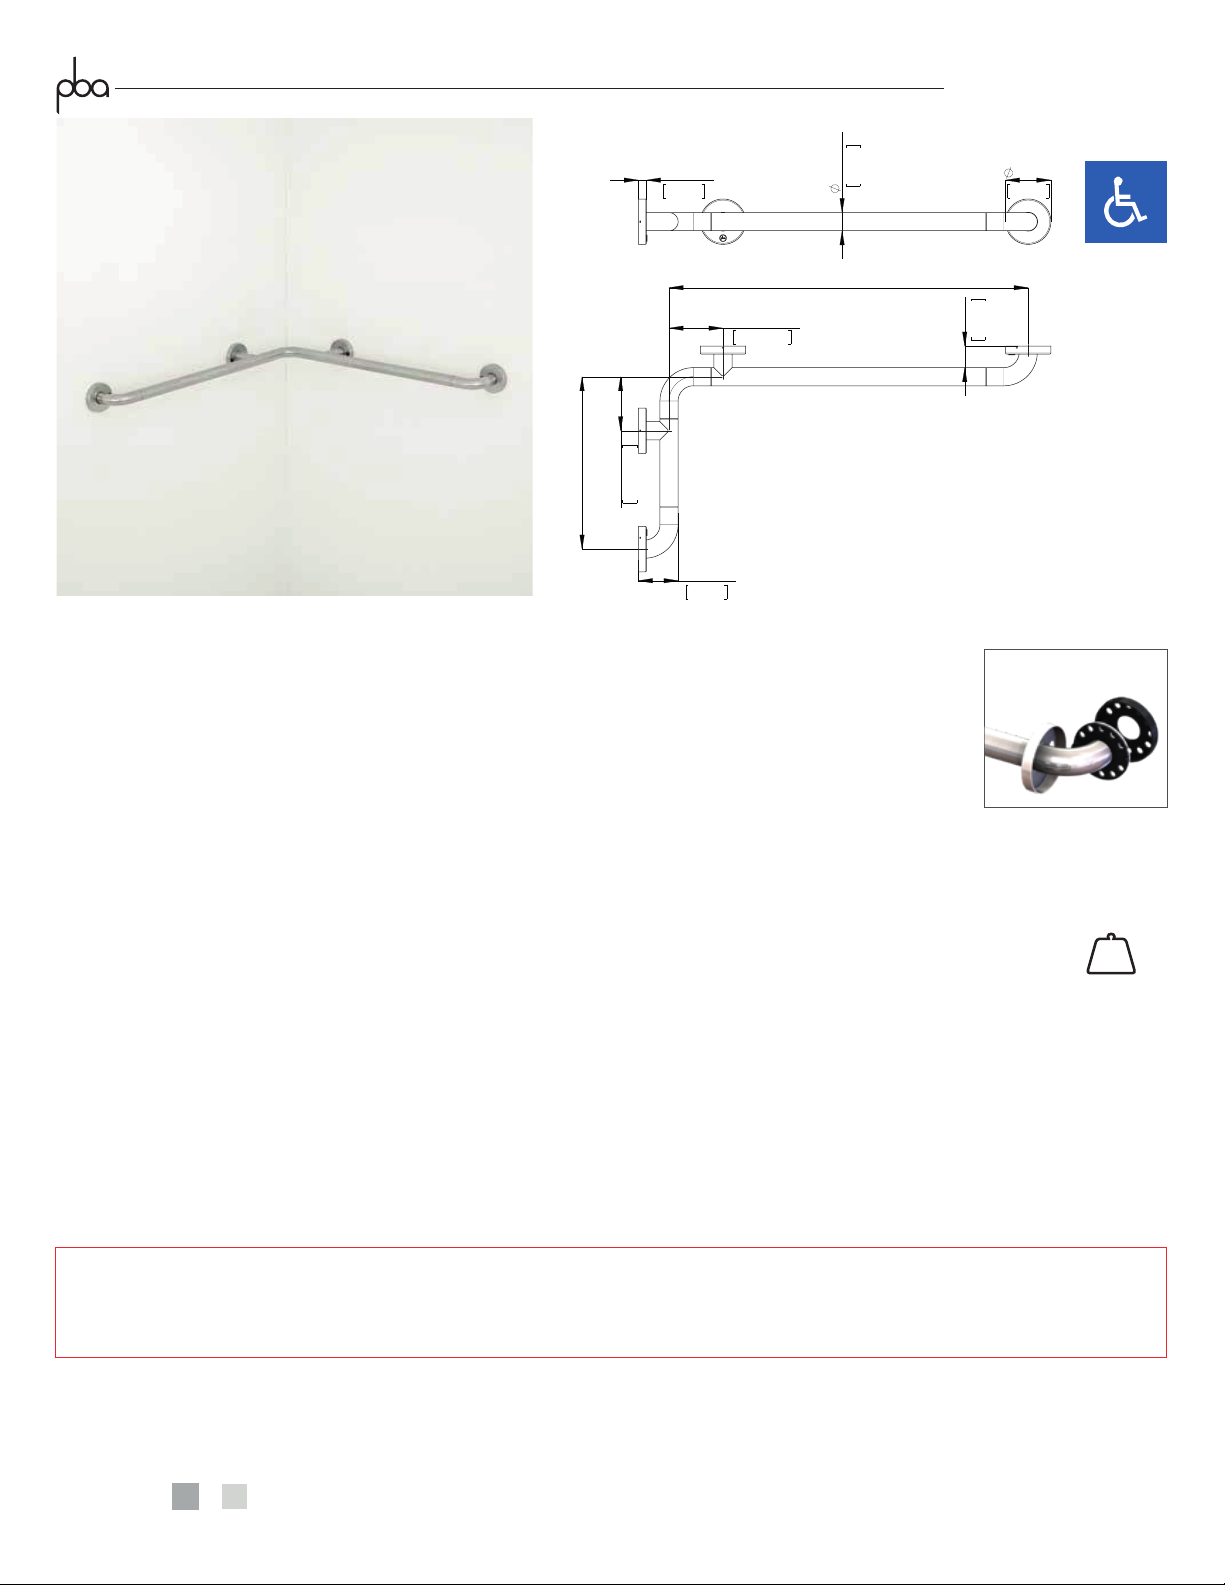
TWO-WALL GRAB BAR
Rail 1/16" (1,5 mm) thick, in type 316L stainless steel tubing with 1-17/64" (32 mm) outer diameter. Stainless steel bends
connected with 3-3/16" (Ø 80 mm) flanges.
Cover in type 316L stainless steel. Mounting flanges with steel core 1/8" (3 mm) thickness, stainless steel covers and fully
recyclable polyamide-6 wall protection. Each cover snaps over mounting flange to conceal mounting screws.
Clearance between the grab bar and wall is 1-1/2" (38 mm).
MOUNTING KITS not included.
Optional mounting kit for concrete, natural stone, solid brick and hollow brick: KIT 4CN.0VM.0004.00.
Optional mounting kit for sheetrock wall and wooden plate: KIT 4CN.0VM.0010.00.
Optional mounting kit for toilet partition: KIT 4CN.0VM.0040.00.
One Mounting kit is required for each flange.
661lb
300 kg
Strength. PBA 4CS Two-wall grab bars can support loads up to 661 pounds (300 kg) if properly installed.
SAFETY WARNING
Grab bars must be firmly secured to the anchors and the wall in order for them to support the weight they are designed for.
Grab bars alone are not stronger than anchors and walls. In case the grab bar is not securely anchored to the wall, the building
owner or maintenance personnel must remove it from service to avoid any accident or injury.
flange in stainless steel
Concealed mounting
REV 01/2020
SUSTAINABILITY
This product contributes to LEED credit
®
B
95,25mm
3-3/4"
95,25mm
3-3/4"
38mm
1-1/2"
70mm
2-3/4"
14mm
35/64"
32mm
1-17/64"
80mm
3-5/32"
A

DESIGN FOR ALL 4CS
The illustrations and descriptions herein are applicable to production as of the date of Document.
The manufacturer reserves the right to make changes and improvements in designs and dimensions.
©2020 by PBA S.p.A.
[2-19/64"]
Ø58,3 mm
POLYAMIDE-6
BACK FLANGE
STAINLESS STEEL
FLANGE
CONCEALED MOUNTING FLANGE DETAIL
SNAP ON
COVER
[21/64"]
Ø8,5 mm
GRAB BAR INSTALLATION
Provide concealed anchor device or backing as specified or required in accordance
with local building codes before wall is finished.
Fasten concealed mounting flanges to anchor device or backing with three screws
in each flange.
Concealed anchor devices and mounting screws are not included with
PBA grab bars and must be specified as optional mounting kit.
AVAILABLE MOUNTING KITS:
4CN.0VM.0004.00
3 x plugs
3 x screws
CONCRETE
SOLID BRICK
HOLLOW BRICK
4CN.0VM.0010.00
3 x screws
SHEETROCK
WOODEN PLATE
4CN.0VM.0040.00
TOILET PARTITION
1 x stainless steel backing
3 x 16mm screws
3 x 25mm screws
3 x 30mm screws
3 x stainless steel nuts
thickness from 1/2” to 1”
for 1/2” panel
for 1” panel
for 3/4” panel
INSTALLATION ON WALL WITH PBA KIT 4CN.0VM.0004.00
Place grab bar in desired mounting location. Use mounting flanges as a template to mark location of mounting screws. Mark screw location
for each mounting flange and remove grab bar from wall. Drill Ø5/16” (8 mm) and insert plugs. Place grab bar and drive mounting
screws into plugs and secure tightly. Press all snap-flange covers into place to conceal mounting flanges.
2
T25
1
2
4
Ø
3
2
1
5
/
16”
5
/
32”
3
1
3
INSTALLATION ON WALL WITH PBA KIT 4CN.0VM.0010.00
Place grab bar in desired mounting location. Drive mounting screws in each flange and secure tightly. Press all snap-flange covers into
place to conceal mounting flanges.
INSTALLATION ON TOILET PARTITION WITH PBA 4CN.0VM.0040.00
Using grab bar as a template and stainless steel backing to find holes position, mark toilet partition panel . Drill Ø5/16” (8 mm) holes for
connectors. Insert connectors through backplate and into holes in panel. Secure grab bar to connectors using screws furnished by
manufacturer. Press all snap-flange covers into place to conceal mounting flanges.
Hidrocloric Hydrofluoric
Muriatic
acid
Chlorine water /
Bleaching solution
Neutral
HCl HCl HF NaClO
OK
acid
SOAP
PH
acid
1 3 4
SOAP
2
CLEANING AND MAINTENANCE
DO NOT USE abrasive liquid detergents
REV 01/2020
This manual suits for next models
3
Popular Bathroom Fixture manuals by other brands


BellaVista
BellaVista SF-F-SLD-11-12 installation guide

Dreamline
Dreamline PYRAMID installation instructions

Delta
Delta WINDEMERE 35996LF-OB-ECO manual

Delta
Delta TRINSIC Series installation instructions

Devon & Devon
Devon & Devon Savoy Y Assembly instructions

Dreamline
Dreamline AQUALUX SHDR-3348588 Series installation instructions


