PDE AXC User manual

2
ASSEMBLY INSTRUCTIONS
TABLE OF CONTENTS
Page 3–4 ................................................................................................................................................... Packaging Checklist
Page 5 ................................................................................................................... Right Hand S-Clamp Assembly Illustration
Page 6 ...................................................................................Applying Anti-Seize to Pre-Assembled Rear S-Clamp Assembly
Page 7 ..............................................................................................................................Pre-setting The Rear S-Clamp Hook
Page 8 ............................................................................................................................. Rear S-Clamp Assembly Installation
Page 9 ................................................................................................................................... S-Clamp Rear Clamp Installation
Page 10 ....................................................................................................................... S-Clamp Handle Assembly Installation
Page 11 ...............................................................................................................................................S-Clamp Final Assembly
Page 12–13 ......................................................................................................................... S-Clamp Lock Clamp Installation
Page 14–15 ................................................................................................................... Front S-Clamp Assembly Installation
Page 16–17 ............................................................................................................Final Assembly-Connecting Bar Assembly
Page 17 ..............................................................................................................................................................................Notes
NOTE: Assemblies and parts shown in this
manual are representative. Some items
may appear differently than actual parts,
assemblies, or components received.
4
1
3
2
5
PRIME DESIGN EUROPE▪Bietenweg22▪3300TIENEN(Belgium)▪Tel: + 32 16226099▪Fax: + 32 16226099▪www.pde-group.com
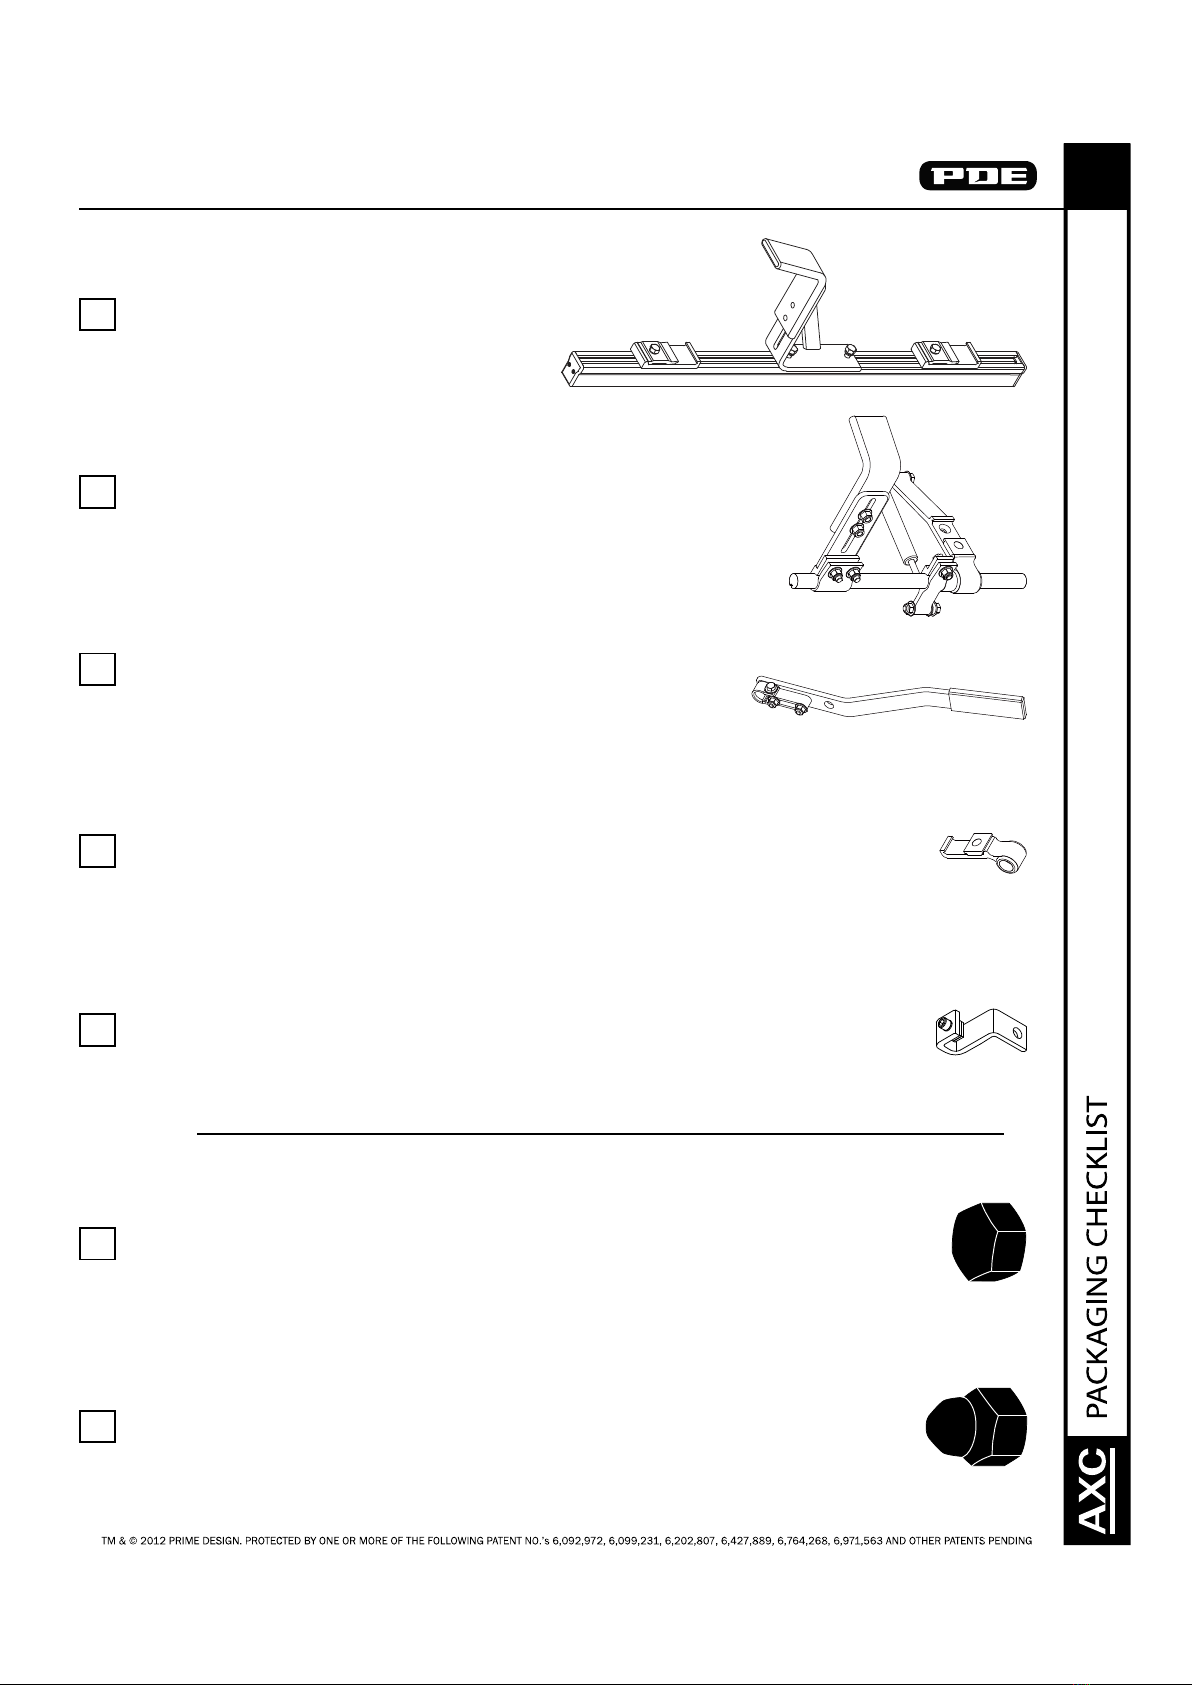
3
ASSEMBLY INSTRUCTIONS
6.1—5/16” Hex Head Bolt Caps ........................... (Qty7)
6.2—5/16” Hex Head Nut Caps ........................... (Qty7)
5.—Side Mounting Lock Bracket, AluRack ........... (Qty1)
4.—Rear Clamp Assy, AluRack ............................... (Qty1)
1.—S-Clamp Adjustable Front Hook Assy .............(Qty1)
3.—S-Clamp Handle Assy, RH ............................... (Qty1)
2.—S-Clamp, 152mm, RH ..................................... (Qty1)
HKT-201 (Qty 1)
PRIME DESIGN EUROPE▪Bietenweg22▪3300TIENEN(Belgium)▪Tel: + 32 16226099▪Fax: + 32 16226099▪www.pde-group.com

4
ASSEMBLY INSTRUCTIONS
6.3—Anti-Seize Compound ................................... (Qty1)
HKT-201 Cont. (Qty 1)
Packed By: Date: / /
Inspected By: Date: / /
PRIME DESIGN EUROPE▪Bietenweg22▪3300TIENEN(Belgium)▪Tel: + 32 16226099▪Fax: + 32 16226099▪www.pde-group.com
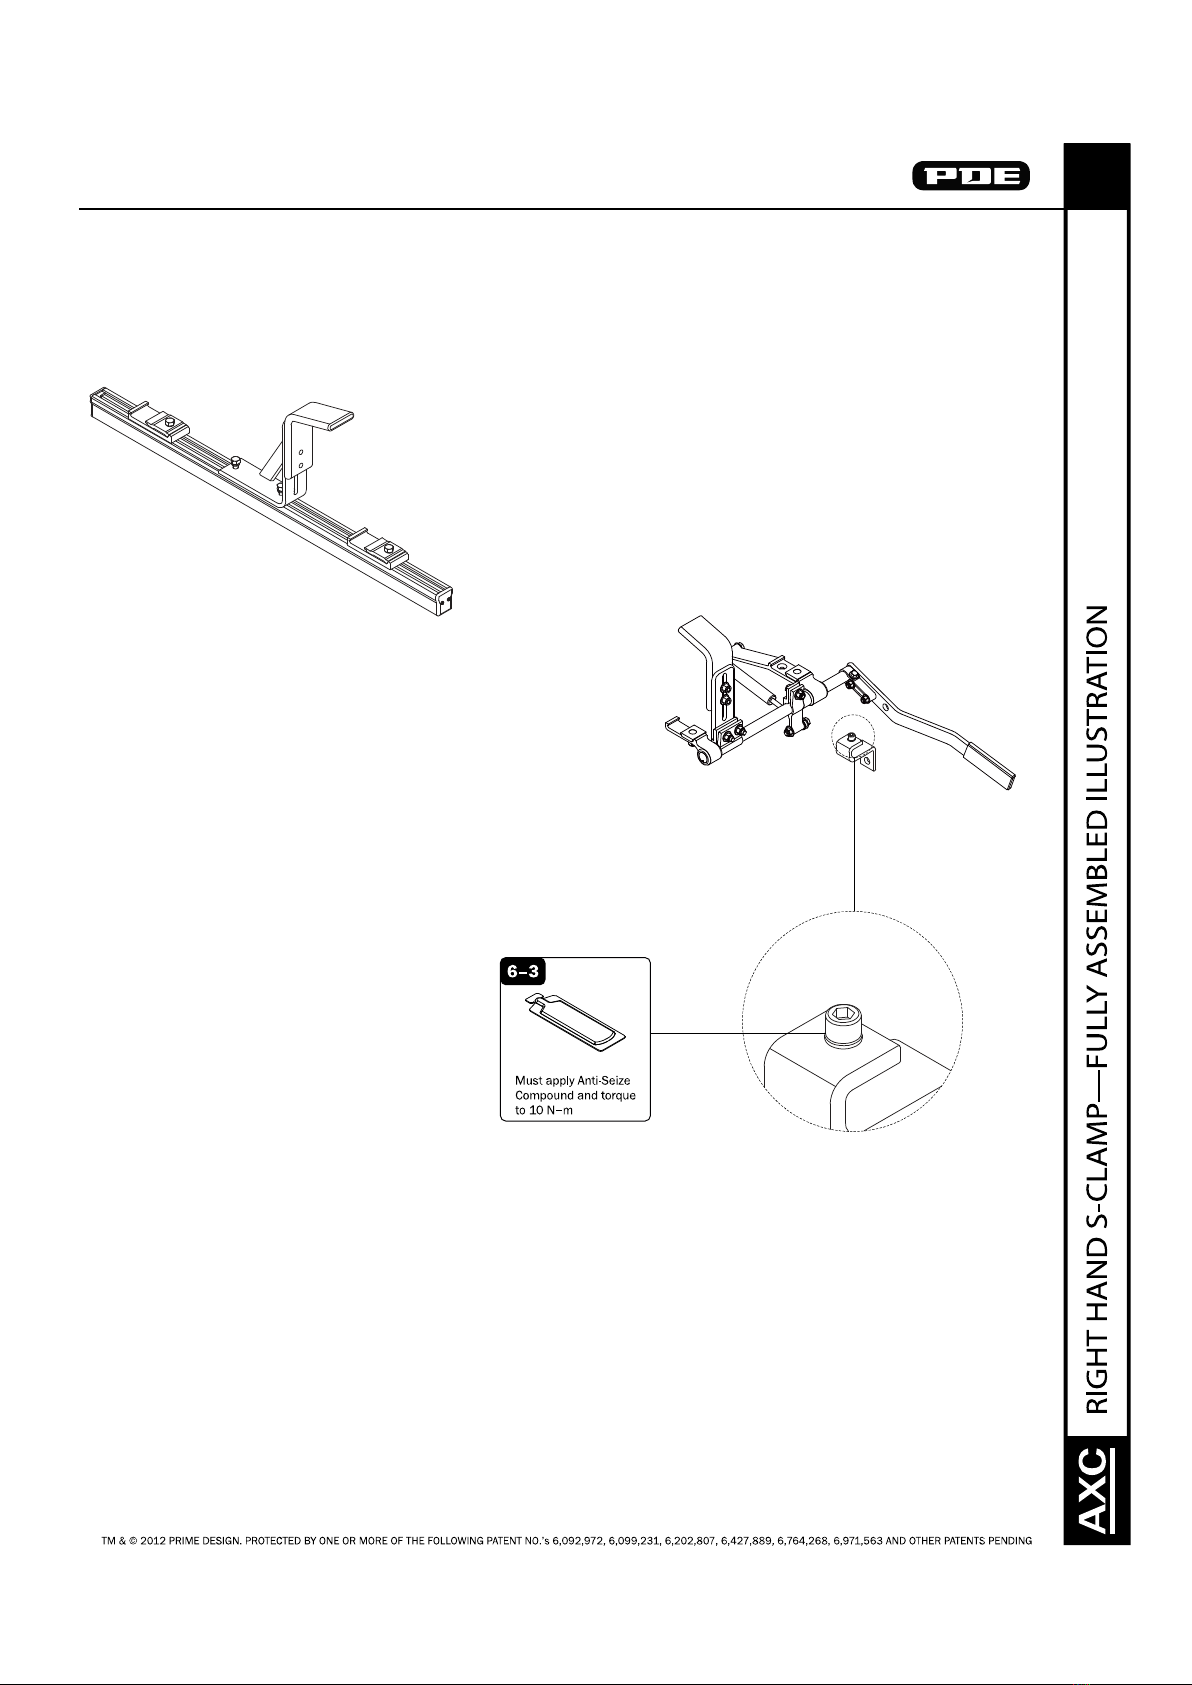
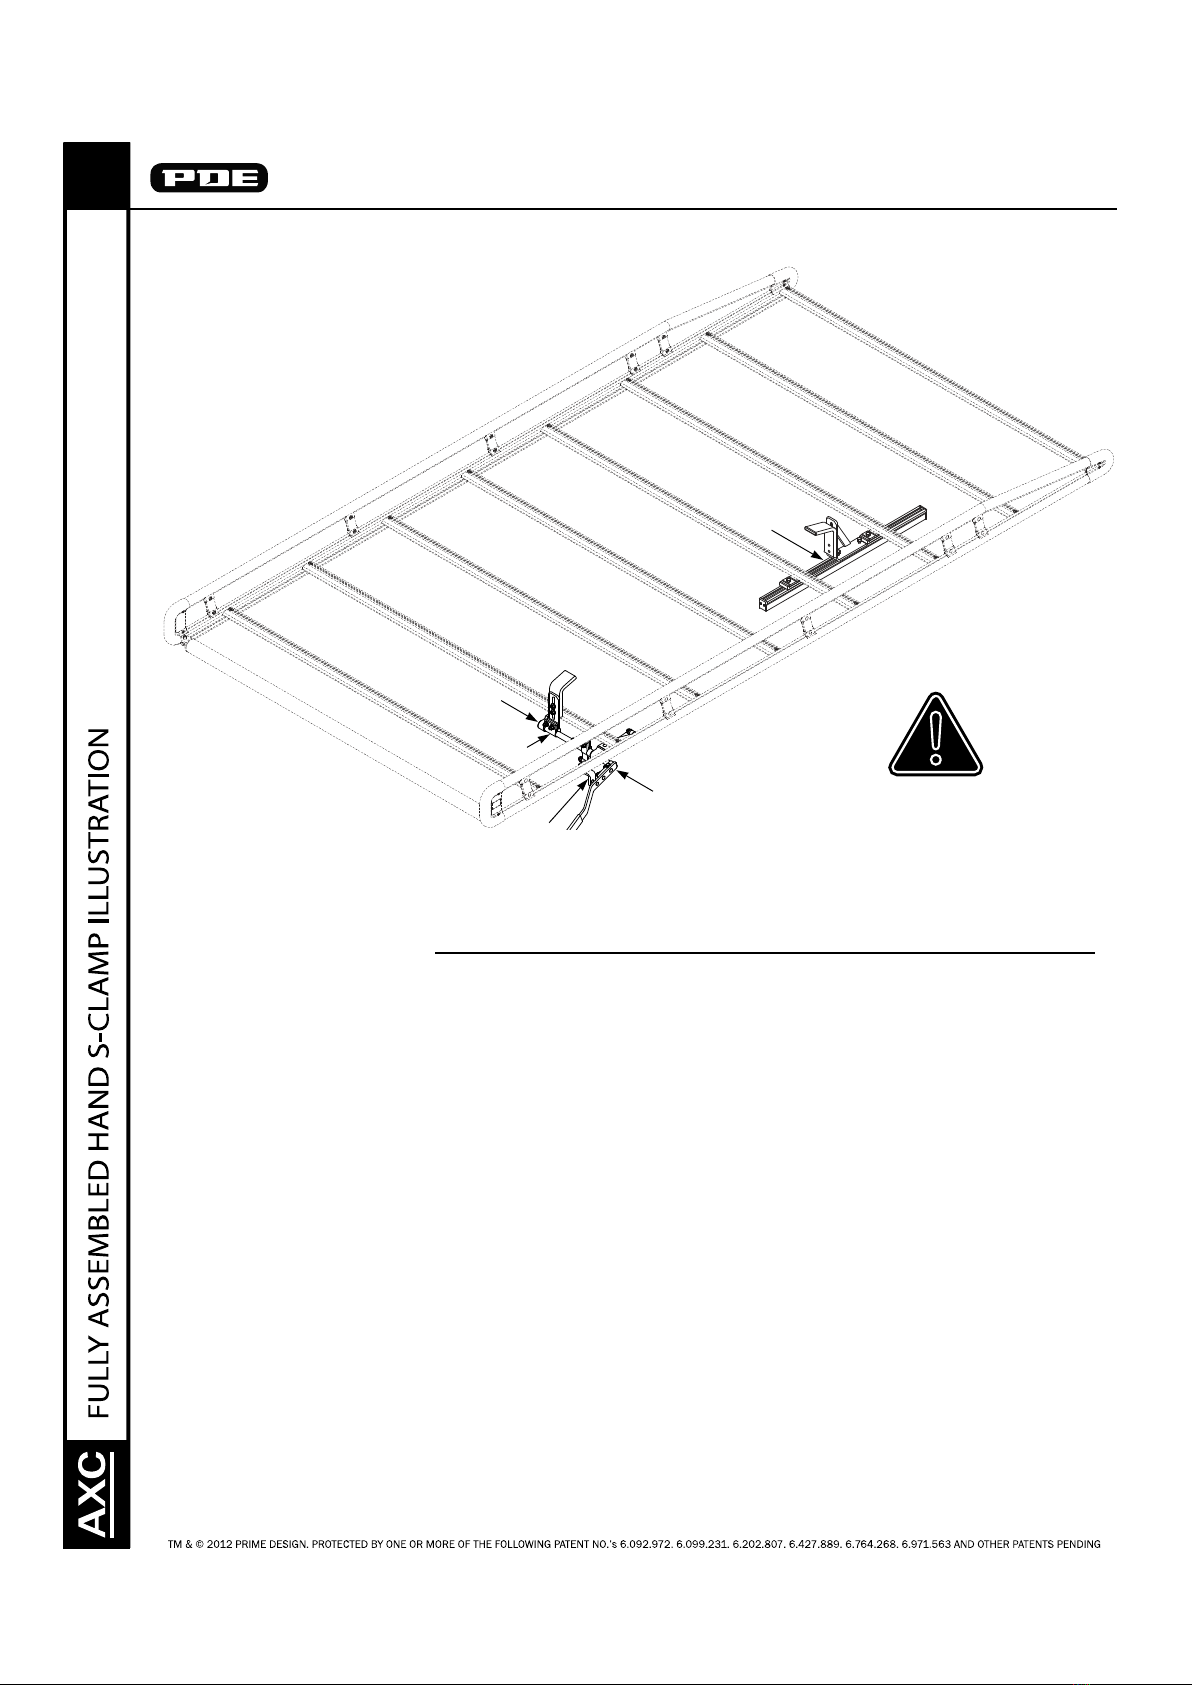
5
ASSEMBLY INSTRUCTIONS
RIGHT HAND S-CLAMP OVERVIEW
PRIME DESIGN EUROPE▪Bietenweg22▪3300TIENEN(Belgium)▪Tel: + 32 16226099▪Fax: + 32 16226099▪www.pde-group.com
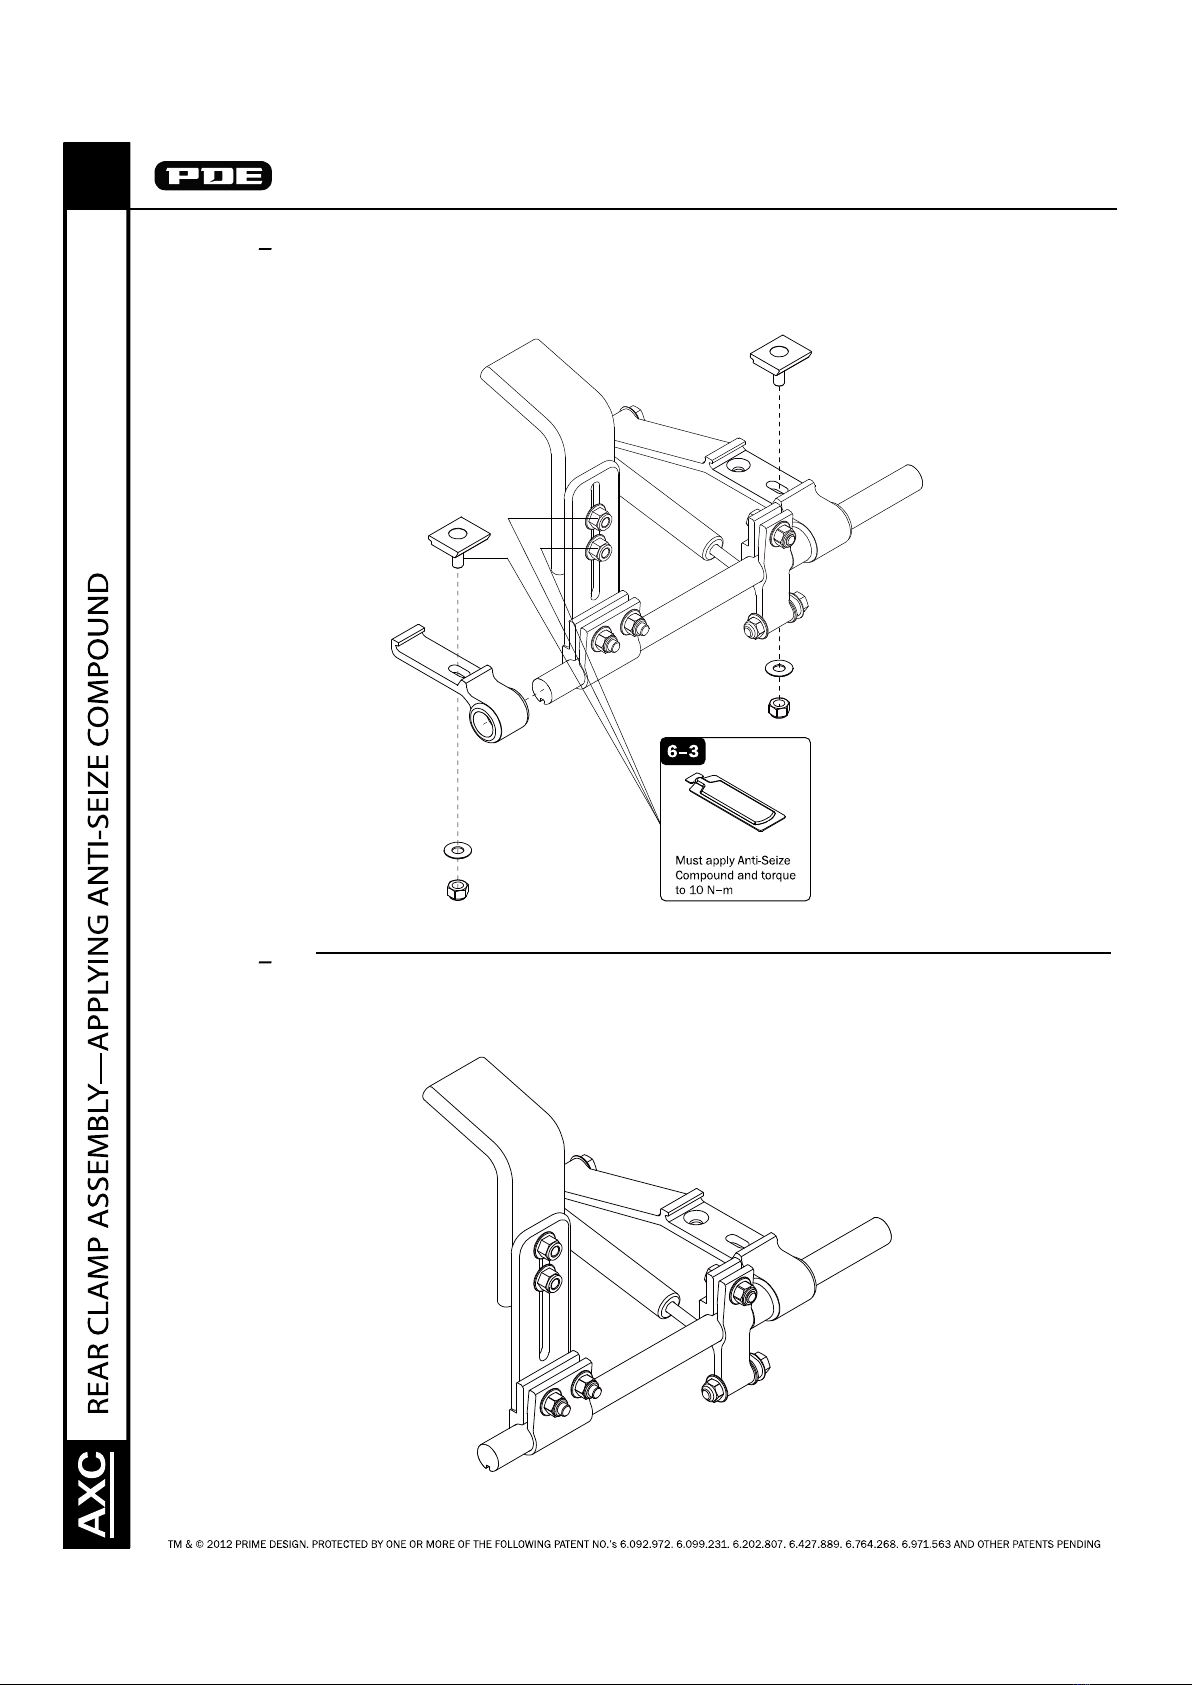
6
ASSEMBLY INSTRUCTIONS
STEPS 1 2:
ANTI-SEIZE COMPOUND APPLICATION
RESULTS
STEPS 1 2:
APPLYING ANTI-SEIZE COMPOUND TO
PREASSEMBLED REAR CLAMP ASSEMBLY
PRIME DESIGN EUROPE▪Bietenweg22▪3300TIENEN(Belgium)▪Tel: + 32 16226099▪Fax: + 32 16226099▪www.pde-group.com

7
ASSEMBLY INSTRUCTIONS
STEPS 3 4:
PRESETTING THE S-CLAMP 105°
ADJUSTABLE REAR CLAMP HOOK.
STEPS 3 4:
BUSHING INSERTION RESULTS
Step 3: Slide S-Clamp Hook all the way to the top. The
purpose is to clear the crossbar during installation.
Step 4:
the S-Clamp Hook in place for Rear S-Clamp
PRIME DESIGN EUROPE▪Bietenweg22▪3300TIENEN(Belgium)▪Tel: + 32 16226099▪Fax: + 32 16226099▪www.pde-group.com
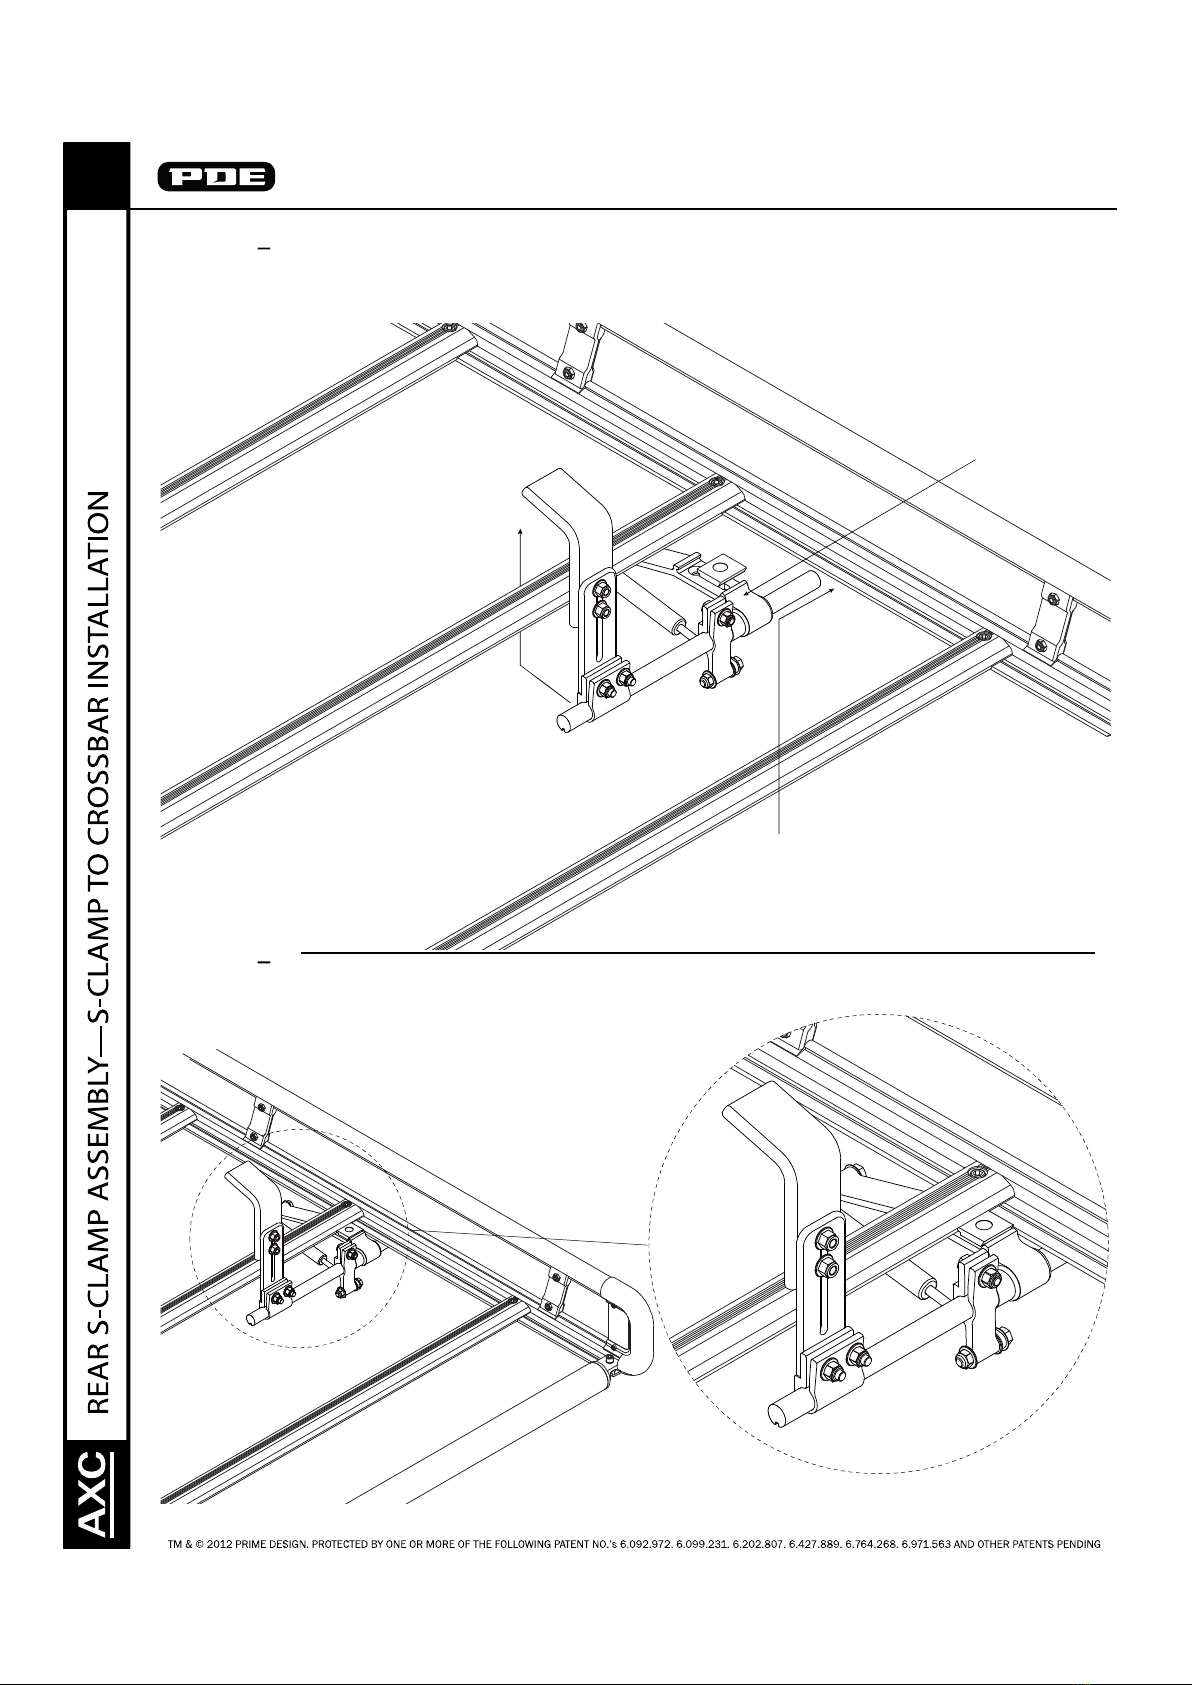
8
ASSEMBLY INSTRUCTIONS
STEPS 5 6:
ATTACHING THE REAR S-CLAMP
ASSEMBLY TO THE CROSSBAR
STEPS 5 6:
REAR S-CLAMP ASSEMBLY ATTACHMENT
RESULTS
Step 5: Place the S-Clamp assembly
underneath and behind Crossbar as shown.
Step 6: Slide S-Clamp Assembly all the way
toward the right hand Roof Rack Rail. Finger-
tighten Gas Spring Assy Clamp.
PRIME DESIGN EUROPE▪Bietenweg22▪3300TIENEN(Belgium)▪Tel: + 32 16226099▪Fax: + 32 16226099▪www.pde-group.com

9
ASSEMBLY INSTRUCTIONS
STEPS 7 8:
INSTALLING THE REAR CLAMP ASSEMBLY
STEPS 7 8:
REAR CLAMP ASSEMBLY RESULTS
Step 7: Slide the Rear Clamp Assembly onto
the S-Clamp Rear Clamp Rod as shown.
Step 8: Finger-tighten Rear Clamp.
PRIME DESIGN EUROPE▪Bietenweg22▪3300TIENEN(Belgium)▪Tel: + 32 16226099▪Fax: + 32 16226099▪www.pde-group.com
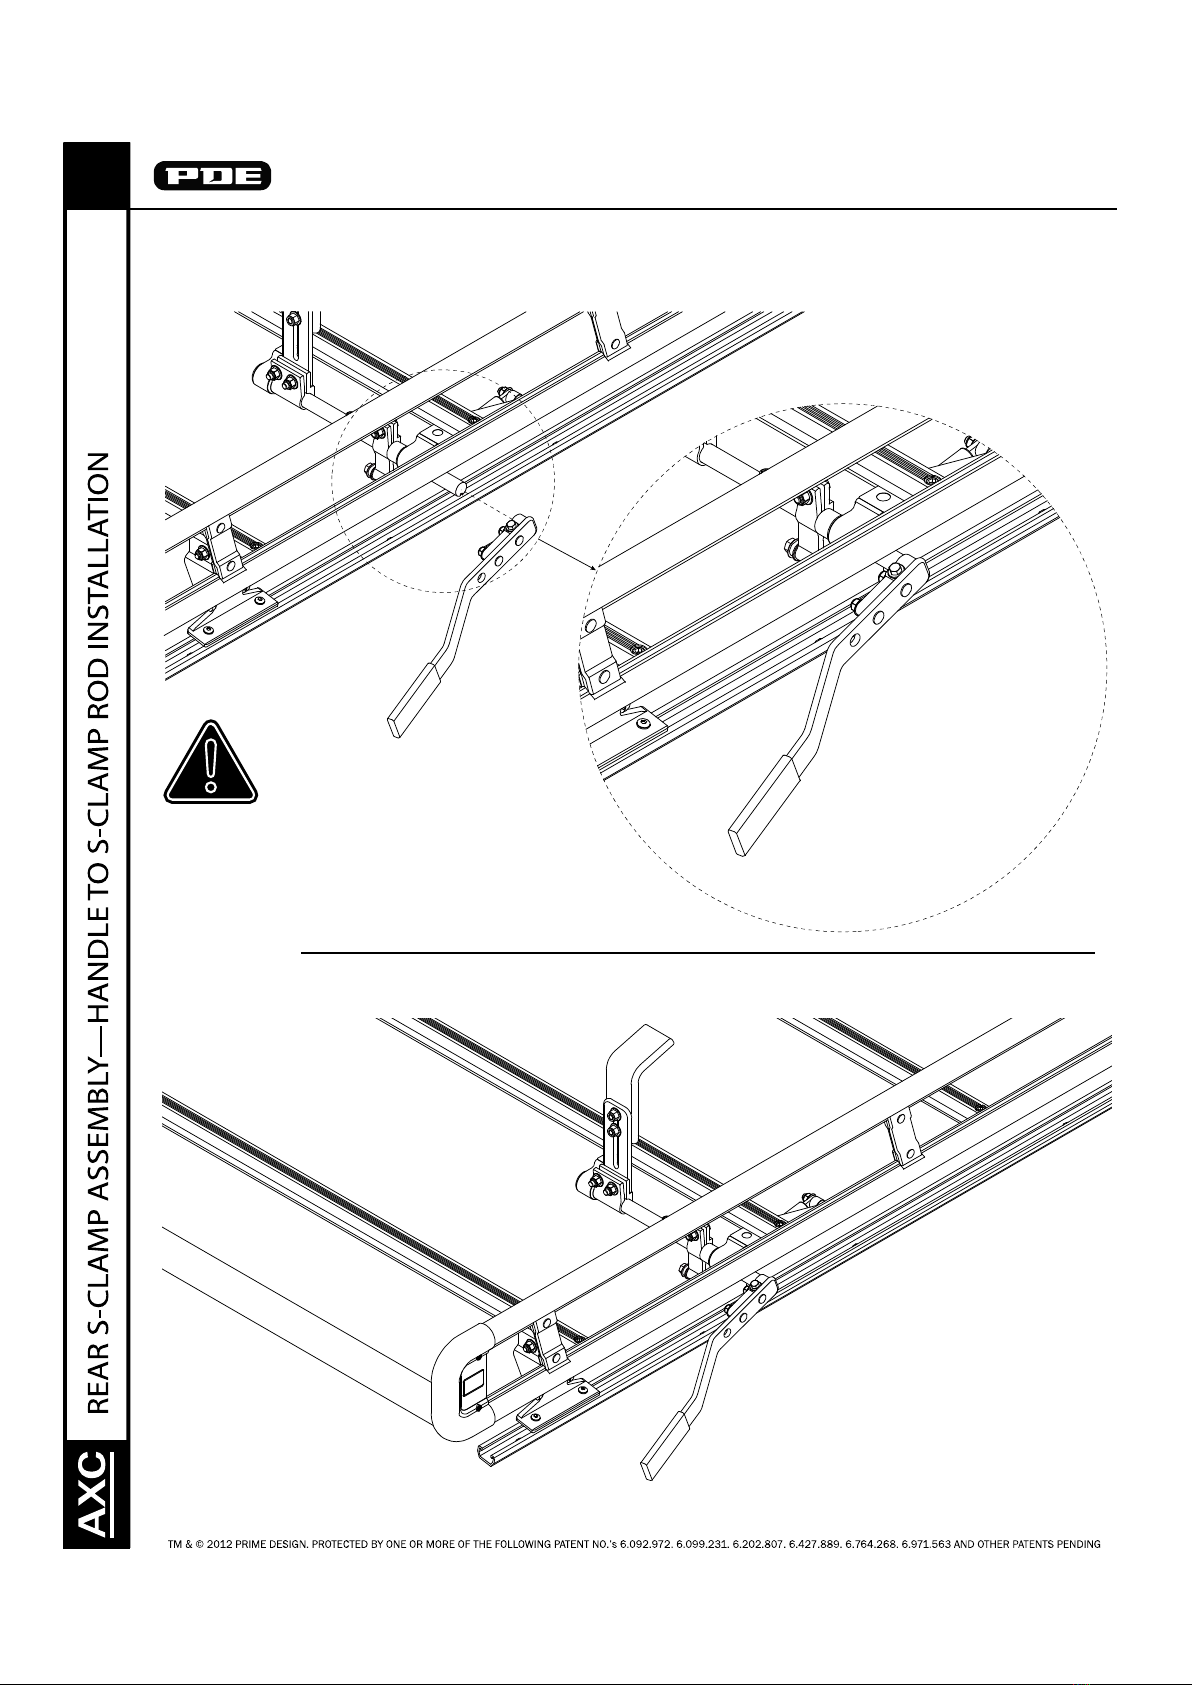
10
ASSEMBLY INSTRUCTIONS
STEP 9:
S-CLAMP HANDLE ASSEMBLY
STEP 9:
S-CLAMP HANDLE RESULTS
Step 9: Torque to 8 N-m
Attention Installer!
The S-Clamp Handle has a relief area within
the bore. The S-Clamp Rod must seat fully
prior to tightening the handle to the rod.
PRIME DESIGN EUROPE▪Bietenweg22▪3300TIENEN(Belgium)▪Tel: + 32 16226099▪Fax: + 32 16226099▪www.pde-group.com

11
ASSEMBLY INSTRUCTIONS
STEP 10:
FINAL REAR S-CLAMP ASSEMBLY TORQUE
SPECIFICATIONS
STEP 10:
FINAL REAR S-CLAMP ASSEMBLY RESULTS
Step 10: Torque Clamp
Nuts to 13 N-m
210mm
82.5mm
Attention Installer!
Verify the S-Clamp dimensions are set approximately as
PRIME DESIGN EUROPE▪Bietenweg22▪3300TIENEN(Belgium)▪Tel: + 32 16226099▪Fax: + 32 16226099▪www.pde-group.com
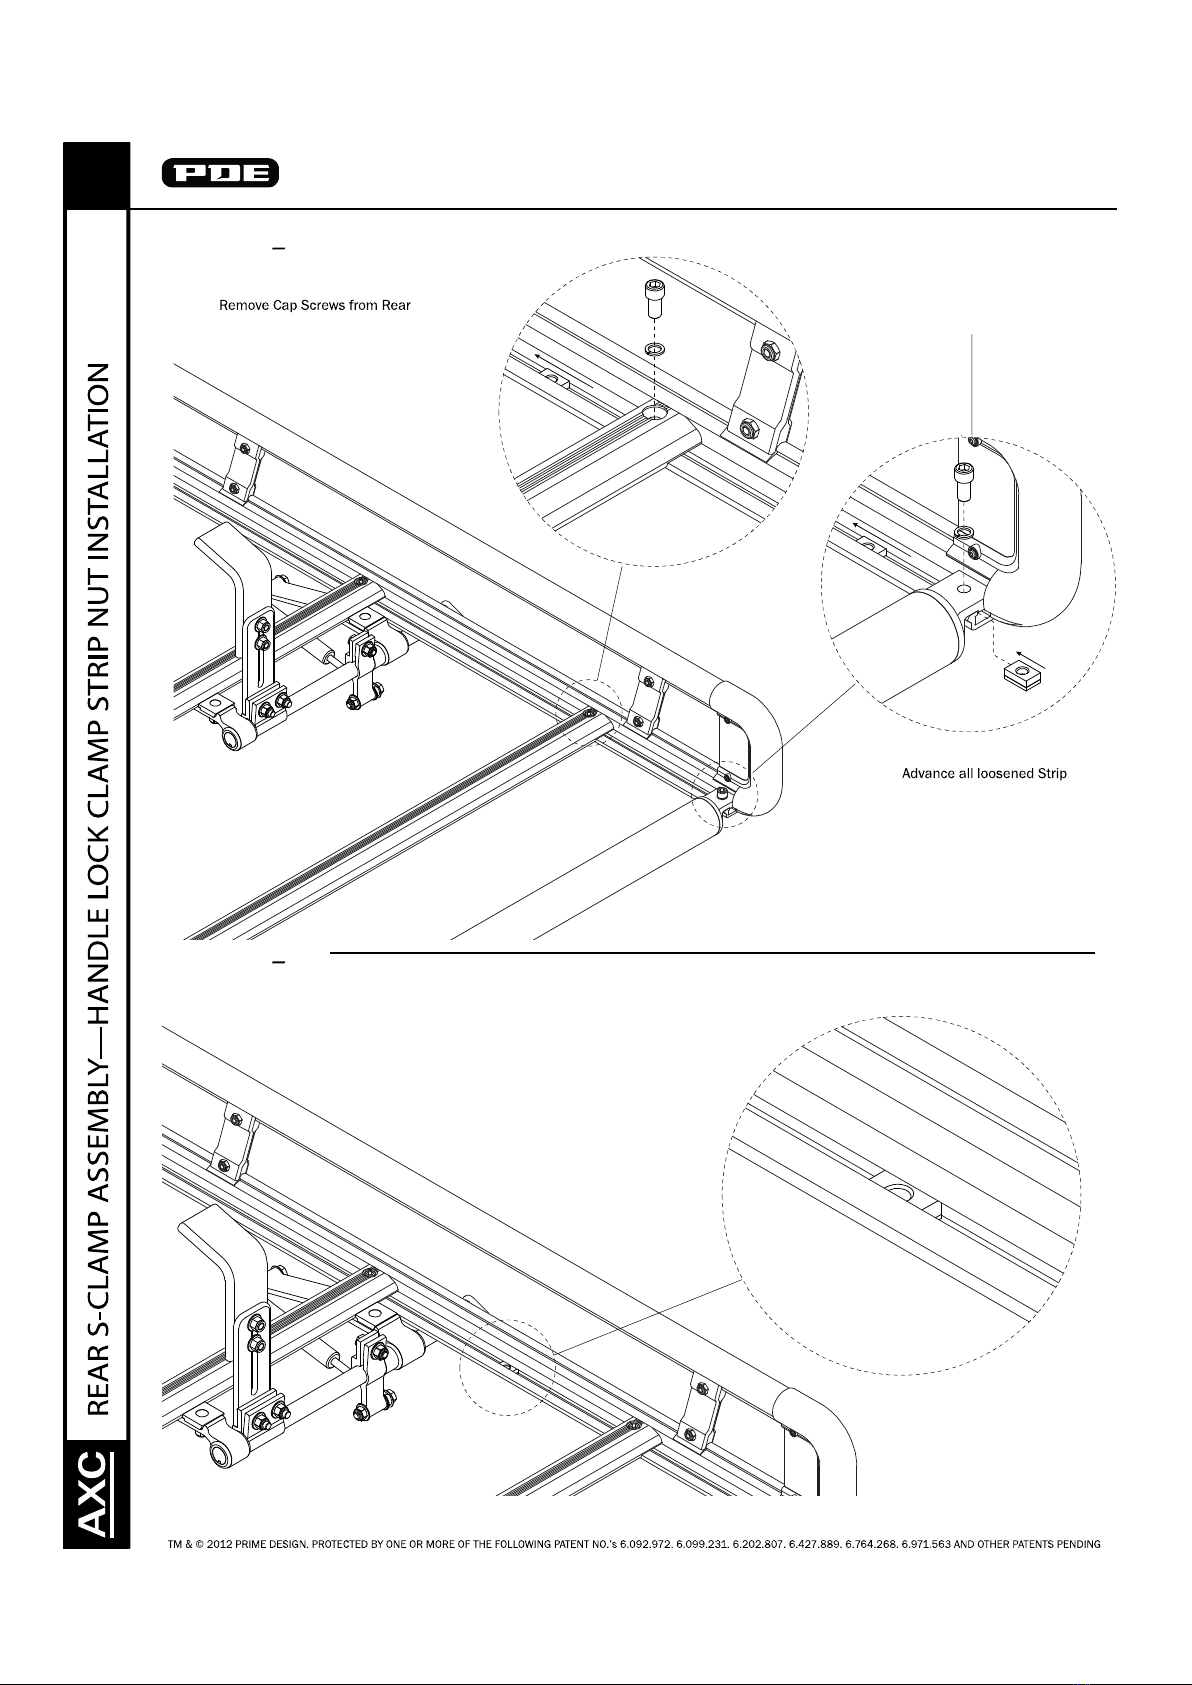
12
ASSEMBLY INSTRUCTIONS
STEPS 11 13:
INSERTING THE LOCK CLAMP STRIP NUT
STEPS 11 13:
LOCK CLAMP STRIP NUT RESULTS
Step 11:
Roller and applicable Crossbar(s).
Step 13:
Nuts one forward toward the front of the
Channel. There will need to be one Strip
Nut remaining between the Crossbar
immediately behind the mounted
S-Clamp Assembly and the Crossbar
containing the S-Clamp Assembly.
Step 12: Slide the new Strip Nut into the
Channel and under the Roller Assembly.
PRIME DESIGN EUROPE▪Bietenweg22▪3300TIENEN(Belgium)▪Tel: + 32 16226099▪Fax: + 32 16226099▪www.pde-group.com

13
ASSEMBLY INSTRUCTIONS
STEPS 14 16
INSTALLING THE S-CLAMP HANDLE LOCK CLAMP
STEPS 14 16:
S-CLAMP HANDLE LOCK CLAMP RESULTS
5–7mm
Step 14
Step 16: Torque to 10 N-m
Step 15: Set distances.
Visually align holesBottom View
PRIME DESIGN EUROPE▪Bietenweg22▪3300TIENEN(Belgium)▪Tel: + 32 16226099▪Fax: + 32 16226099▪www.pde-group.com

14
ASSEMBLY INSTRUCTIONS
STEP 17:
PREPARING THE FRONT CLAMP ASSEMBLY
STEP 17:
FRONT CLAMP ASSEMBLY RESULTS
Step 17: Loosen the Crossbar Clamp
Bolts as shown.
PRIME DESIGN EUROPE▪Bietenweg22▪3300TIENEN(Belgium)▪Tel: + 32 16226099▪Fax: + 32 16226099▪www.pde-group.com
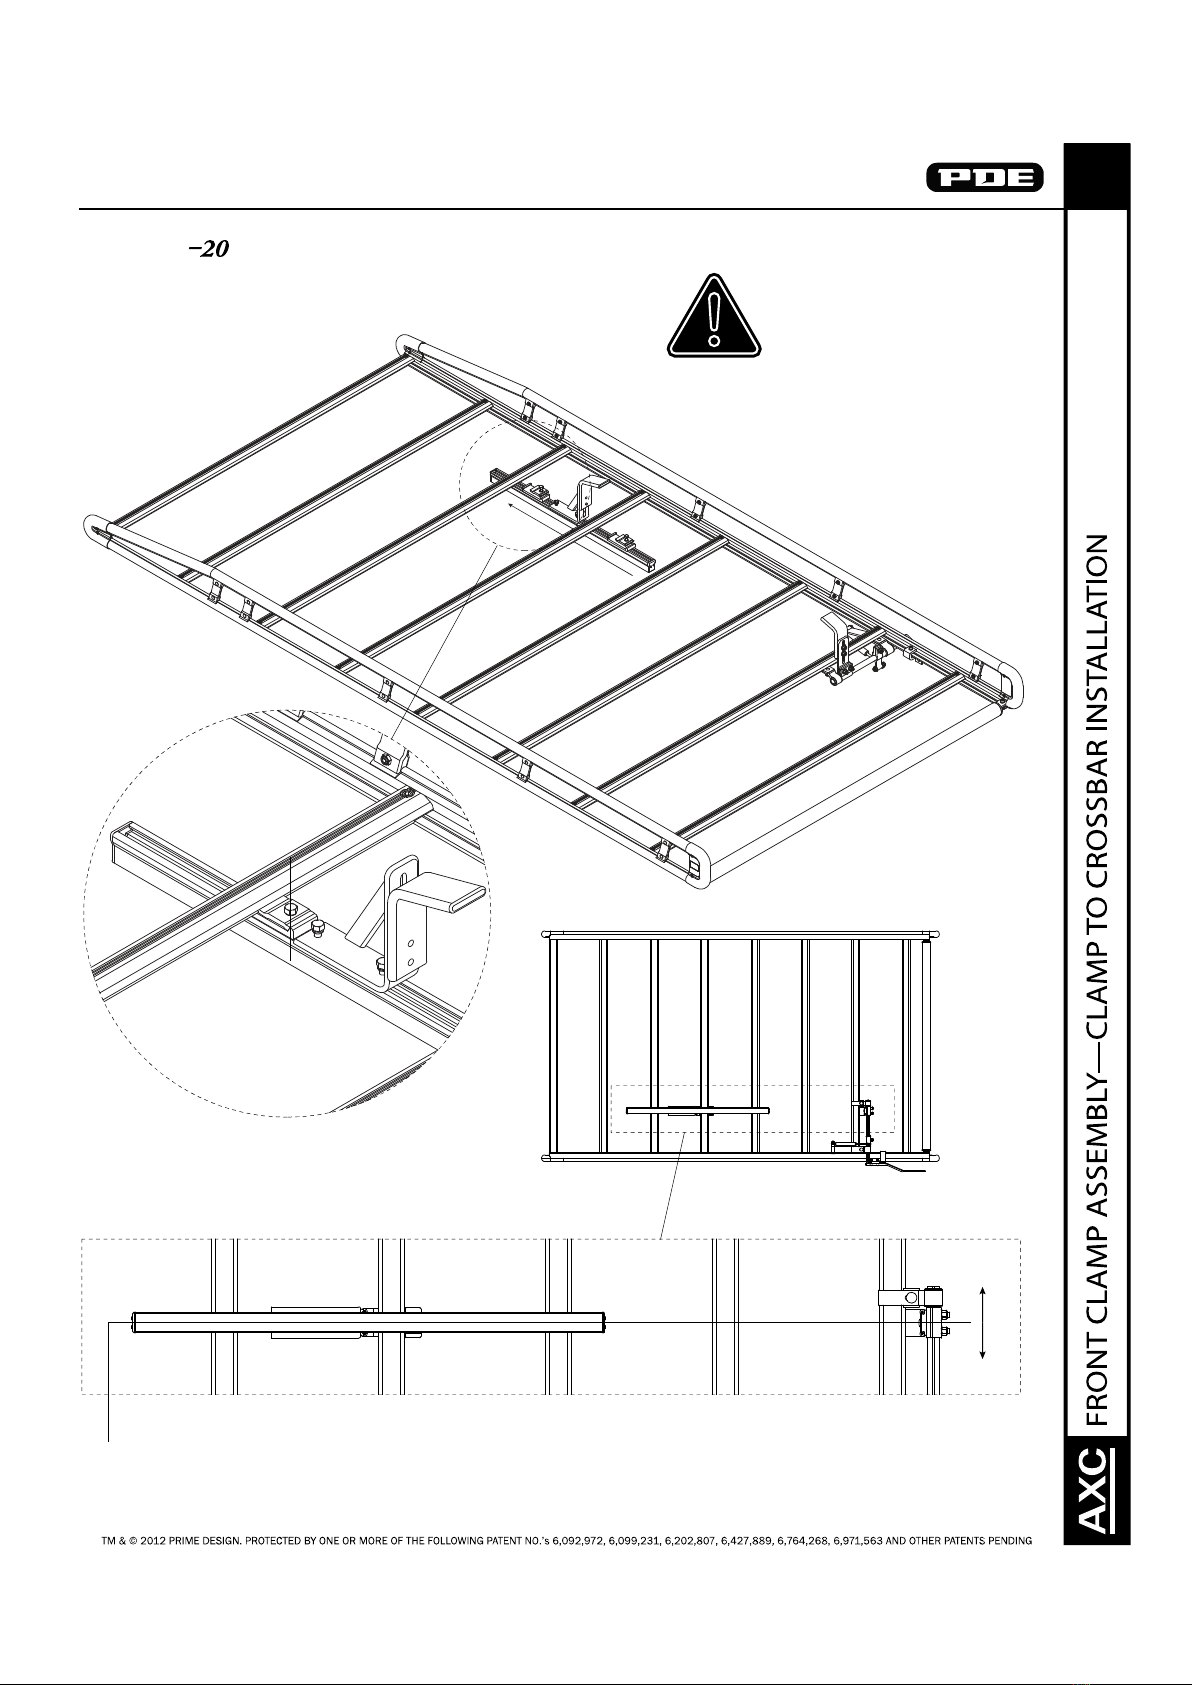
15
ASSEMBLY INSTRUCTIONS
STEPS 18 :
INSTALLING THE FRONT CLAMP ASSEMBLY
Step 18: Slide Front Clamp Assembly
forward until Crossbar Clamp is seated.
Step 19: Finger-tighten Clamp Bolts.
Step 20: Align center of Front Hook Assembly to Rear Hook.
Torque Front Hook Assembly Crossbar Clamps to 13 N-m.
Bottom View
Placement of Front Hook Assembly is
wholly dependent upon Ladder length
and desired clamping location.
PRIME DESIGN EUROPE▪Bietenweg22▪3300TIENEN(Belgium)▪Tel: + 32 16226099▪Fax: + 32 16226099▪www.pde-group.com

16
ASSEMBLY INSTRUCTIONS
STEPS 21 23:
ADJUSTING THE FRONT HOOK CLAMP
Step 21: Push Ladder against
the Front Hook as shown.
Attention End User!
time, it will require adjustments to the
Front and Rear Ladder Hooks for correctly
securing the ladder to the AluRack.
Step 22: Push Front Hook
downward against Ladder
Rung until snug as shown.
Step 23: Torque Front Ladder Hook to 13 N-m.
PRIME DESIGN EUROPE▪Bietenweg22▪3300TIENEN(Belgium)▪Tel: + 32 16226099▪Fax: + 32 16226099▪www.pde-group.com

17
ASSEMBLY INSTRUCTIONS
STEPS 24 25:
ADJUSTING THE REAR HOOK CLAMP
Step 24: Push Rear Hook
downward against Ladder
Rung until snug as shown.
Step 25: Torque Rear Ladder Hook to 13 N-m.
Padlock holes line up between Handle and Bracket. If
Padlock holes are not aligning, check that the Handle
the S-Clamp Handle Lock Clamp is properly set
according to Steps 14-16 of this Assembly Manual.
PRIME DESIGN EUROPE▪Bietenweg22▪3300TIENEN(Belgium)▪Tel: + 32 16226099▪Fax: + 32 16226099▪www.pde-group.com
Popular Automobile Accessories manuals by other brands


BURY
BURY POWERMOUNT Series operating manual

Dometic
Dometic FJX4233EEH quick start guide

ASA Electronics
ASA Electronics Voyager VCCS150 quick start guide

Klenn Air Horns
Klenn Air Horns RAMHD-230KIT installation manual

Metra Electronics
Metra Electronics 99-3308G installation instructions

SUSPENZ
SUSPENZ 44-0174 manual

Kuda-Phonebase
Kuda-Phonebase 045100 Installation instruction

PE Racing
PE Racing Pedalbox Assembly Manual & Installation Instructions

Camoplast
Camoplast ATV T4S Installation guidelines

DiniTech
DiniTech NRGkick Series instruction manual

SuperATV
SuperATV PR-P-RAN-09 installation instructions

v.link
v.link VL2-DVD800 manual