DiniTech NRGkick Series User manual

EN
ES
PT
TR
FI
SE
charge. fast. anywhere.
Instruction Manual
Manual de instrucciones
Manual de Instruções
Kullanım kılavuzu
Käyttöohje
Bruksanvisning


Ver.: 1810-11 1
EN
Instruction Manual

2Ver.: 1810-11
EN
1. General
Read the instruction manual carefully before operating the unit.
The instruction manual will help you to
•use the product correctly
•detect damage early, and prevent or repair damage
•avoid failure and repair costs
•extend the product service life and increase reliability
•avoid environmental hazards
The instruction manual forms an essential part of the product and must be retained for later use.
DiniTech GmbH will not be liable for damages resulting from not following the instructions in this manual.
2. Copyright
© Copyright DiniTech GmbH. No part of this document, either extracts or in full, may be distributed to
any other party without the written consent of DiniTech GmbH. Breach of the foregoing will render those
concerned liable to prosecution.
Subject to change without notice.
Ver.: 1810-11
Ver.: 1810-11 3
EN
3. Safety Instructions
Warning!
Not following the safety instructions could result in a risk to life or of injury, as well as damage to the unit.
DiniTech GmbH disclaims all liability for claims resulting from not following the safety instructions.
Electrical Hazard! Fire Hazard!
Never use worn, damaged or dirty charge connectors, grid connectors or adapter plugs!
The electrical system to which the charging unit is connected and on which it runs must be inspected by a
qualified electrician. The current circuit of the socket that will be used for charging must have its own
residual current protective unit and a circuit breaker. Only use properly installed, undamaged sockets and
an electrical system that is in perfect working order for charging.
On unknown sockets the vehicle charging current must be set to the lowest current value!
The owner (end customer) must make sure the charging unit is always in immaculate condition when in
operation!
The charging unit must be regularly inspected for damage to the housing, the charging connector and the
grid connector (visual check)!
If the charging unit is damaged, it must be disconnected from the grid immediately. The damaged unit
must not be connected to the power grid again and must be replaced!
Repairs may not be carried out on the charging unit. Repairs may only be carried out by the manufacturer
(replacement of the charging unit)!
Do not make any unauthorized modifications to the charging unit!
Contacts must not be oiled, greased or treated with contact spray!
Do not remove labels such as the rating plate, warning notices, current limit marks or display symbols!
Never disconnect the power grid connector while charging is in progress! Before stopping the charging
process, first unplug the charging connector from the vehicle and then unplug the grid connector.
Always follow the correct sequence when connecting plugs!
Additional extension cables may not be used for connection to the power grid as well as to the vehicle!
The charging unit and all included accessories must only be used to charge the drive battery of electric or
plug-in-hybrid vehicles. The unit may not be used with different types of loads (improper use)!
Read the information and instructions for your vehicle carefully before you charge the vehicle using the
charging unit!
Before charging the vehicle, make sure that it is sufficiently secured against rolling away!
Do not run the charging unit in a thermally insulated or encapsulated vessel or container
due to the risk of overheating.

4Ver.: 1810-11
EN
The charging unit should be hanging from the power grid socket when charging is in progress to allow
water to run off the charging unit. Protect the unit from water intrusion!
If an adapter plug is used, never set a higher charging current than
1) the maximum current the adapter is Approved for.
2) the maximum current the upstream installation and socket are Approved for.
If the power supply socket feels hot when charging is in progress, replace this socket immediately!
Never use force to pull on the cable ends of the charging unit!
Never connect or disconnect plug connections between grid connector, plug adapter or vehicle inlet while
the NRGkick is in charging mode!
Their use as a rope for lifting or pulling mechanical loads or for wrapping or tying up objects is strictly
prohibited!
The charging unit may only be operated in accordance with its intended use!
When removing the cable from the socket pull on the connector, never the cable!
Protect the charging unit and the charging cable from mechanical damage (running over, pinching or
kinking) and the electrical contact area from heat sources, dirt and water!
Only use adapters and accessories supplied by DiniTech GmbH with the charging unit or those that are
approved by DiniTech GmbH!
The plug adapters contain a Neodymium magnet which may not be brought into direct body contact with
heart pacemakers out of safety reasons.
The NRGkick contains a Bluetooth Low Energy module which may not be brought into direct body contact
with heart pacemakers out of safety reasons.
In the following countries the charging current may not be set higher than 8A if a Schuko adapter plug is
used:
Denmark, Finland, France and Switzerland
If a Schuko adapter plug is used, the weight of the charging unit must not put strain on the socket. Relieve
the strain on the cable (e.g. by placing the unit on something or hanging the cable over a hook).
During a single phase charging operation within a 3-phase-grid, the requirements of the grid operator for
asymmetric grid loads needs to be considered. The charging power may not be set to a higher value than
the maximum single phase power drain permitted by the grid operator.
4. Intended Use
The charging and all included accessories unit may only be used to charge the drive battery of an electric
or plug-in-hybrid vehicle. Section 5 ”Product Description” describes operation of the charging unit.
Any other use will be considered as improper use. DiniTech GmbH does not assume liability for any damage
that results from such improper use!
Intended use includes following the instructions in this manual as well as observance of all labeling such as
type plates, warning notices, current limit marks, display symbols and ambient conditions.

Ver.: 1810-11 5
EN
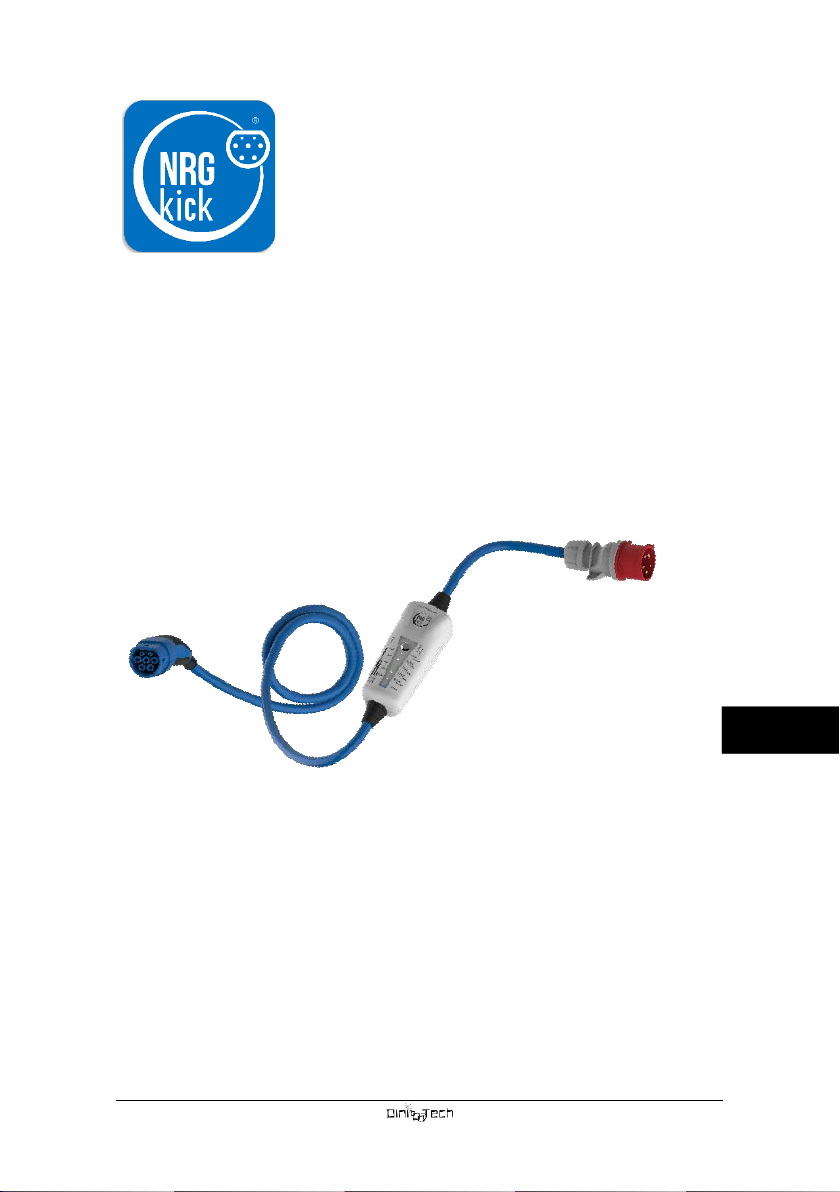
5. Product Description
The NRGkick charging unit consists of the charging cable with the vehicle connector, the electronics in a
plastic housing (charging unit) including the residual current protection mechanism, optional energy meter
with Bluetooth interface and the power grid cable with connector.
The charging unit is available in a number of different models:
•Total cable length: 5m or 7.5m
•Vehicle connector acc. to IEC62196 (Type 2) or SAE J1772 (Type 1)
•1-phase or 3-phase charging mode
•Maximum charging current 16A or 32A
•Energy meter and Bluetooth LE interface
The integrated residual current protection mechanism means NRGkick charges your vehicle in accordance
with the highest safety standards. The mechanism breaks the current reliably if AC or DC residual currents
occur. The charging unit is designed such that it is easy to adjust the charging current via a selection button.
The LED indicator shows you the selected charging current and power at all times. If you have purchased
the “energy meter with Bluetooth LE” product option you can also change the charging current without
interrupting the charging process. In combination with the NRGkick smartphone App, the energy meter
provides additional functions with full transparency and visibility into every charging event.
5.1 Charging Unit –NRGkick
1) Selection button
2) Display: Selectable charging power
3) Display: Selectable maximum charging
current
4) LED indicator:
Selected current or power
5) LED status indicator
6) Information on the maximum possible
charging current that can be set
depending on the requirements of the
different power grid connectors.
The text may vary depending on the specific model!

6Ver.: 1810-11
EN
5.2 Charging your Electric Vehicle
First connect the grid connector to the power supply socket. The charging electronics will then initialize
which is shown by an oscillating flashing signal. At the same time an automatic self check which tests all
essential functions is carried out. Furthermore, this self check will be carried out at every charging request.
In case the self check fails, possible errors are indicated via the LEDs. After a successful self check only the
LED for the current that was set the last time is illuminated.
Now select the charging current you want using the selection button.
CAUTION! When choosing the charging current take all the following points into account:
a) Maximum current according to the supply cable of the electric system
b) Maximum current according to the grid connector used
c) If an adapter is used: Maximum charging current is automatically limited to the maximum current the adapter is
approved for. Before charging check the charging current which may have been limited by the adapter.
Points a) and b) also apply if an adapter is used.
Connect the vehicle connector to the vehicle.
Once the connected vehicle has been detected by the charging unit, all LED lights will illuminate briefly.
From this point onwards it will no longer be possible to change the charging current using the selection
button on the unit.
Remark: If the correct connection sequence is not applied and the vehicle is already connected, you have
around 10 seconds to set the charging power after connecting the charging unit to the power supply. After
adjusting the setting, you then have at least 4 seconds after releasing the selection button to make another
adjustment. All LEDs should illuminate briefly to indicate that your vehicle has been detected. From this
point onwards it will no longer be possible to change the charging current using the selection button on
the unit.
The charging unit is now in “vehicle charging” mode and, depending on the vehicle type, the charging
process will start after a few seconds.
The set values for the charging current/charging power take the form of upper limits. Depending, for
example, on the battery charging status or the outside temperature, the vehicle may, over the course of
the charging process, set the actual charging current to a lower value than the current set in the App or
directly on the NRGkick.
Remark: NRGkick may remain connected to the power socket when the vehicle is disconnected.
5.3 Interrupting the Charging Process on the Unit
If the selection button is pressed for 4 seconds, the charging process will be interrupted and the charging
unit will re-initialize. You will then be able to change the charging power again.
This function is only available in the first 2 minutes subsequent to start the charging procedure.
Remark: After initialization, you have 25 seconds to change the setting. The charging unit will then switch
back to “vehicle charging” mode.
5.4 Interrupting the Charging Process
The charging process should normally be stopped on the vehicle. Follow the instruction manual for your
vehicle. The vehicle connector will then be unlocked and can be unplugged. Finally, disconnect the grid
connector on the charging unit.
Ver.: 1810-11 7
EN
5.5 Connection Sequence
Start the charging process
Stop the charging process
1. Connect the power grid connector to the grid.
1. Unlock the vehicle connector on the vehicle and
unplug it.
2. Connect the vehicle connector to the vehicle.
2. Disconnect the grid connector.
The NRGkick can, however, also remain connected
to the power grid socket permanently.
5.6 Theft-Protected and Tamper-Proof
Electric vehicles with type 2 charging socket lock the vehicle connector after it is plugged in. This means
your NRGkick is protected against theft during and after charging. The socket can only be unlocked via the
vehicle.
NRGkick has a protection system to prevent the charging current settings being tampered with by
passersby:
•The charging current can only be adjusted using the selection button after connection to the power
supply. If the vehicle connector is already plugged in, you have max. 10 seconds left to adjust the
settings (see 5.2).
•The charging current can only be re-set by interrupting the charging process within 2 minutes of
starting the charging process (see 5.3).
•After this, it will no longer be possible to modify the charging current –even if the power supply is
disconnected and reconnected, which causes the NRGkick to re-initialize.
It will then only be possible to change the charging current again after the type 2 charging socket
is unlocked via the vehicle.
Additionally, it is only possible to reset the Access Code for connecting to a smartphone (see 7.2) if the
vehicle connector is unlocked and unplugged.
5.7 Error Mode
Errors are shown with the following sequences of flashing LEDs on the NRGkick:
•5x flashing of all LEDs + short break (repeating)
Indicates a potential error of the residual current protection mechanism or that it has been triggered, the
NRGkick is in “Error”-Mode. Note: With the “Energy meter and Bluetooth”product option, you can read
out the error with the NRGkick App on a smartphone.
The “Error”mode can only be reset by disconnecting the power supply. In case of an error, check for a
vehicle-related fault or a fault in the plug connections.
•Flashing of the Status LED and the LED of the selected charging current (repeating)
Indicates an irregularity of the PE conductor test. Make sure that the electrical installation and the
protective conductor are connected correctly.
This error can be acknowledged by pressing the selection button for at least two seconds.
Note: In some countries, e. g. Norway, ground-free power grids are prevalent. Charging in these grids is
possible via acknowledgement of the error as described before. After acknowledgement this is shown
permanently during the charging process with the flashing green Status LED.

8Ver.: 1810-11
EN
•LED 24A (NRGkick 32A, 32A light) or LED 13A (NRGkick 16A, 16A light) are permanently illuminated,
all other LEDs are flashing
Indicates an irregularity on the check of the internal switching contact. Disconnect the NRGkick from the
vehicle and the grid. Then reconnect the NRGkick to the grid. If the error persists please contact your
dealer.
•LED 32A (NRGkick 32A, 32A light) or LED 16A (NRGkick 16A, 16A light) are permanently illuminated,
all other LEDs are flashing
Indicates an irregularity of the residual current protection mechanism. A too high residual current created
by the electric vehicle has triggered the residual current protection mechanism of the NRGkick. This is
caused by an error of the vehicle or by a defect of the cable from the electric vehicle leading to the NRGkick.
Disconnect the NRGkick from the vehicle and the grid and check, possibly with the involvement of a skilled
electrician or a workshop, if one of the causes described above has occurred. Then reconnect the NRGkick
to the grid. If the error persists please contact your dealer.
•No LED is illuminated
Make sure that the electrical installation is connected correctly. The NRGkick needs a connection to phase
1 and the neutral conductor in order to power the internal electronics.
5.8 Integrated Functions
•Charging electronics in conformity with EN 62752 (control pilot circuit according to IEC/TS 62763)
•Residual current protection for direct as well as for alternating residual current (continual
surveillance in the “vehicle charging” mode).
•Energy meter for voltage, current, power and energy measurement*
•Bluetooth Low Energy (BLE) for the data exchange with smartphones*
*not included in the “light” product option
6. Adapter Plugs
Only use adapters and accessories supplied with the charging unit or those approved by DiniTech GmbH.
Take note of the maximum current that can be set for the specific adapters! The maximum current is
indicated on the label on the adapter. In addition, there are current limit marks printed on the left of the
NRGkick housing that inform you of the maximum charging current that can be set for the requirements
of the different grid connectors.

Ver.: 1810-11 9
EN
7. Smartphone App
The “NRGkick”App can be downloaded from Google Play and the Apple App Store. This
provides enhanced options for controlling the charging unit and monitoring the charging
process.
The App is fairly self-explanatory. When establishing a Bluetooth connection between your smartphone
and NRGkick take account of the following:
7.1 How to connect your NRGkick charging unit to the NRGkick App
•Connect the charging unit to the power supply
•Open the NRGkick App on your Smartphone while being close to the charging unit. The charging
unit is displayed in the NRGkick App.
•Tap the icon to connect to the charging unit
Note: Upon opening the NRGkick App the first time you are prompted to change the access code for
security reasons. The factory-set value for both charging unit and NRGkick App is „1234“. You can also
change the access code anytime later via the settings menu.
If different access codes have been assigned to charging unit and NRGkick App (e.g. when using a new
Smartphone) you can still connect to the charging unit but cannot change parameters (e.g. changing the
charging current).
In this case, you are prompted to enter your access code which is already set in the NRGkick. If you have
forgotten it, you can reset the access code of the charging unit to the factory-set value of “1234” by
proceeding as described in point 7.2. Afterwards also assign the same access code “1234” to the NRGkick
App via the settings menu.
7.2 Hints for Use
A short oscillating flashing light usually signals that a parameter has been sent from the smartphone to the
charging unit. If the Access Codes for the smartphone and charging unit do not match, all LEDs will briefly
flash simultaneously.
If the user has enabled a limiting function via the smartphone (e.g. energy limit or stop command), the
green LED will flash.
It is possible to connect several charging units to the same smartphone (not at the same time). The
different Access Codes for the individual charging units will be saved on the smartphone and assigned
separately.
The Access Code for the charging unit can be reset as follows:
1) Press the selection button and keep it held down.
2) Connect the charging unit to the power grid (button stays pressed).
3) As soon as the LEDs illuminate, release the button.
4) The reset takes approximately 1 minute and is signaled by various flashing sequences.
5) Finally, the default code ´1234´ will be assigned to the charging unit again.
Remark: The Access Code can only be reset if the vehicle connector is unlocked and unplugged to
prevent the unit being tampered with by unauthorized persons.
10 Ver.: 1810-11
EN
8. Maintenance
The charging unit is maintenance-free. Regularly check the housing of the charging unit, the charging cables
and the connectors by a visual check for external damage. If damage is found, the charging unit may under
no circumstances be used.
9. Cleaning
If required, clean the charging unit with a damp cloth. Avoid cleaning agents with solvents.
10. Technical Data
Product name NRGkick
Nominal voltage 230V/400V 50Hz
Nominal current 16A, 32A (depending on model)
Maximum charging power 11kW, 22kW (depending on model)
Residual current protection (AC) 30mA
Residual current protection (DC) 6mA
IP protection class IP66
Charge mode Mode 2 acc. to EN 62752
Ambient conditions** -30°C … +50°C (Standard: +45 °C)
5% - 95% humidity
max. 2000m altitude
Weight: 16A model approx. 2.9kg; 32A model approx. 4kg
Housing dimensions (L, W, H): 215mm x 90mm x 84mm
Bluetooth connection*: Bluetooth Low Energy (BLE)
*not included in the ”light” model
** CEE plug connection: -25 °C to +40 °C
11. Disposal
The packaging and the unit must be disposed of according to applicable local and regional regulations in
the place where the unit is operated.
Run-down or faulty batteries must be disposed of separately in accordance with national and local
regulations on environmental protection and recycling.
This product may not be treated as ordinary waste and must be returned to a collection
point for the recycling of electronic equipment. For more information, contact your local
authority, a local waste disposal service or the company from which you purchased the
product.
Ver.: 1810-11 11
EN
12. Declaration of Conformity
NRGkick
(Charging unit for electric vehicles)
DiniTech GmbH
Lugitsch 63
A-8091 Jagerberg
AUSTRIA
The item described complies with the following relevant directives and standards:
Directive 2014/35/EU electrical equipment (Low voltage directive)
Directive 2014/30/EU electromagnetic compatibility (EMC)
Directive 2014/53/EU radio equipment (RED)
Directive 2011/65/EU hazardous substances in electrical and electronic equipment (ROHS)
IEC/EN 62752 In-cable control and protection device for mode 2 charging of electric road
vehicles
IEC/EN 62196-1 Plugs, socket-outlets, vehicle connectors and vehicle inlets - Conductive
charging of electric vehicles
IEC/EN 60309-2 Plugs, socket-outlets and couplers for industrial purposes
ETSI EN 301 489-1 V2.1.1 Electromagnetic Compatibility (EMC) standard for radio equipment and
services; Part 1: Common technical requirements; (2017-02)
ETSI EN 301 489-17 V3.1.1 Electromagnetic Compatibility (EMC) standard for radio equipment and
services; Part 17: Specific conditions for Broadband Data Transmission
Systems; (2017-02)
EN 55014-1 Electromagnetic compatibility - Requirements for household Appliances,
electric tools and similar Apparatus (April 2017) - Part 1: Emission (CISPR
14-1:2016 + COR1:2016)
EN 55014-2 Electromagnetic compatibility - Requirements for household Appliances,
electric tools and similar Apparatus (April 2015) - Part 2: Immunity -
Product family standard (CISPR 14-2:2015)
EN 61000-3-2 Electromagnetic compatibility (EMC) - Part 3-2: Limits - Limits for harmonic
current emission (IEC 61000-3-2:08/2014)
EN 61000-3-3 Electromagnetic compatibility (EMC) –Part 3-3: Limits –Limitation of
voltage changes, voltage fluctuations and flicker in public low-voltage
supply systems. (IEC 61000-3-3:08/2013)
EN 61000-6-2 Electromagnetic compatibility (EMC) –Part 6-2: Generic standards –
Immunity for industrial environments (IEC 61000-6-2:08/2005)

12 Ver.: 1810-11
EN
Content
1. General..............................................................................................................................................2
2. Copyright ...........................................................................................................................................2
3. Safety Instructions .............................................................................................................................3
4. Intended Use .....................................................................................................................................4
5. Product Description ...........................................................................................................................5
5.1 Charging Unit –NRGkick ....................................................................................................................5
5.2 Charging your Electric Vehicle............................................................................................................6
5.3 Interrupting the Charging Process on the Unit ...................................................................................6
5.4 Interrupting the Charging Process......................................................................................................6
5.5 Connection Sequence ........................................................................................................................7
5.6 Theft-Protected and Tamper-Proof....................................................................................................7
5.7 Error Mode ........................................................................................................................................7
5.8 Integrated Functions..........................................................................................................................8
6. Adapter Plugs.....................................................................................................................................8
7. Smartphone App................................................................................................................................9
7.1 How to connect your NRGkick charging unit to the NRGkick App .......................................................9
7.2 Hints for Use......................................................................................................................................9
8. Maintenance....................................................................................................................................10
9. Cleaning...........................................................................................................................................10
10. Technical Data .................................................................................................................................10
11. Disposal ...........................................................................................................................................10
12. Declaration of Conformity................................................................................................................11
Ver.: 1810-11 1
ES
Manual de instrucciones

2 Ver.: 1810-11
ES
1. General
Lea el manual de instrucciones cuidadosamente antes de operar la unidad.
El manual de instrucciones le ayudará a
•usar el producto correctamente
•detectar y prevenir o reparar daños
•evitar fallas y costos de reparación
•extender la vida útil del producto y aumentar la fiabilidad
•prevenir algún peligro para el medio ambiente
El manual de instrucciones constituye una parte esencial del producto y debe conservarse para su uso
posterior.
DiniTech GmbH no será responsable por los daños que se produzcan por no seguir las instrucciones de este
manual.
2. Derechos de autor
© Copyright DiniTech GmbH. Ninguna parte de este documento, ya sea parcial o totalmente, puede
distribuirse a terceros sin el consentimiento por escrito de DiniTech GmbH. El incumplimiento de lo
anterior hará a las partes responsables pasibles de acciones legales!
Sujeto a cambios sin previo aviso.
Ver.: 1810-11
Ver.: 1810-11 3
ES
3. Instrucciones de Seguridad
¡Advertencia!
El no seguir las instrucciones de seguridad puede resultar en riesgos para la vida, riesgos de lesiones, como
así también en daños a la unidad. DiniTech GmbH se exime de toda responsabilidad por reclamaciones que
resulten de no seguir las instrucciones de seguridad.
¡Peligro de electrocución! ¡Peligro de incendio!
¡Nunca utilice conectores de carga, conectores de rejilla o enchufes adaptadores desgastados, dañados o
sucios!
El sistema eléctrico al que está conectada y en el que opera la unidad de carga debe ser inspeccionado por
un electricista calificado. El circuito del tomacorriente al que conectará la unidad de carga debe tener su
propia unidad de protección de corriente residual y un disyuntor. Cargue sólo en tomacorrientes no
dañados, instalados correctamente y en instalaciones eléctricas sin fallas.
¡En tomacorrientes desconocidos, la corriente de carga del vehículo debe ajustarse al valor de corriente
más bajo!
El propietario (cliente final) debe asegurarse de que la unidad de carga ¡siempre opere en perfectas
condiciones!
La unidad de carga debe ser inspeccionada regularmente por daños en la carcasa, en el enchufe de carga
y en la fuente de alimentación (control visual)!
Si la unidad de carga está dañada, debe desconectarse de la red inmediatamente. ¡Una unidad de carga
dañada no debe volver a conectarse a la red eléctrica y debe ser reemplazada inmediatamente!
Los trabajos de reparación en la unidad de carga no están permitidos y sólo pueden ser realizados por el
fabricante (sustitución de la unidad de carga).
¡No realice ninguna modificación no autorizada en la unidad de carga!
¡Los contactos no se deben aceitarse, engrasarse ni tratar con spray de contacto!
¡No retire etiquetas como la placa de identificación, advertencias, marcas de rendimiento o símbolos de
pantalla!
¡Nunca desenchufe el cable de alimentación cuando la carga está en progreso! Para detener el proceso de
carga primero desenchufe el conector de carga del vehículo y luego desenchufe el conector de red.
¡Siga siempre la secuencia de conexión correctamente!
¡No se pueden usar cables de extensión adicionales para la conexión a la red eléctrica ni al vehículo!
La unidad de carga y todos los accesorios con ella suministrados deben ser utilizados exclusivamente para
la carga de la batería de tracción de vehículos eléctricos o híbridos-eléctricos enchufables. La unidad no se
debe utilizar para otro tipo de cargas (uso indebido).
¡Lea la información y siga las instrucciones de su vehículo cuidadosamente antes de cargar el automóvil
con la unidad de carga!
Antes de comenzar la carga, asegúrese de que el vehículo que va a cargar esté suficientemente asegurado
para que no se desplace durante la carga.
No haga funcionar la unidad de carga en un recipiente o contenedor encapsulado o aislado térmicamente,
existe riesgo de sobrecalentamiento.

4 Ver.: 1810-11
ES
La unidad de carga debe estar colgando del tomacorriente de la red eléctrica cuando la carga está en curso
para permitir que el agua drene fuera de la unidad de carga. ¡Proteja la unidad contra el ingreso de agua!
Cuando utilice enchufes adaptadores, nunca configure una corriente de carga más alta que
1) la corriente para la cual se aprobó el adaptador.
2) la potencia para la cual están aprobados la instalación del suministro de corriente y el tomacorrientes.
Si el tomacorrientes de la fuente de alimentación se calienta cuando la carga está en progreso ¡reemplácelo
inmediatamente!
¡Nunca aplique fuerza para tirar de los extremos del cable de la unidad de carga!
¡Nunca conecte o desconecte las conexiones entre el tomacorrientes de la red, el adaptador de enchufe o
la entrada del vehículo mientras el NRGkick está en modo de carga!
¡El uso del producto a modo de cuerda para levantar o tirar cargas mecánicas o envolver o atar objetos
está estrictamente prohibido!
¡La unidad de carga solo debe ser utilizada para su finalidad prevista!
Al retirar el cable del tomacorrientes, tire del conector, ¡nunca del cable!
¡Proteja la unidad de carga y el cable de daños mecánicos (atropellos, atascos o retorcimiento) y las áreas
de contacto de fuentes de calor, suciedad y agua!
Utilice para su unidad de carga sólo adaptadores y accesorios suministrados o aprobados por DiniTech
GmbH!
Los adaptadores de enchufe contienen un imán de neodimio que no debe ponerse en contacto físico
directo con marcapasos cardíacos por razones de seguridad.
En el NRGkick hay un módulo Bluetooth de baja energía que no debe ponerse en contacto físico directo
con marcapasos por razones de seguridad.
En los siguientes países la corriente de carga no debe ajustarse a más de 8A si se utiliza un adaptador
Schuko: Dinamarca, Finlandia, Francia y Suiza.
Si se utiliza un enchufe adaptador Schuko, el peso de la unidad de carga no debe poner en tensión el
tomacorriente. Es necesario aliviar la tensión en el cable (por ejemplo, colocando la unidad sobre algo o
colgando el cable sobre un gancho).
Para la operación de carga monofásica en una red trifásica se deben observar las especificaciones del
operador de la red con respecto a la carga de red asimétrica. La potencia de carga no debe establecerse a
un valor más alto que el máximo consumo de energía monofásico permitido por el operador de la red.
4. Uso previsto
La unidad de carga y todos los accesorios suministrados con ella se deben utilizar exclusivamente para
cargar la batería de tracción de vehículos híbridos eléctricos y enchufables. El capítulo 5 "Descripción del
producto" explica cómo utilizar la unidad de carga.
Cualquier otro uso será considerado como uso indebido. ¡DiniTech GmbH no asume ninguna
responsabilidad por cualquier daño que resulte de dicho uso indebido!
El uso adecuado incluye el cumplimiento de todas las instrucciones de este manual, como así también el
cumplimiento de todas las etiquetas como la placa de características, advertencias, marcas de rendimiento,
símbolos de la pantalla y condiciones ambientales.

Ver.: 1810-11 5
ES
5. Descripción del producto
La unidad de carga NRGkick consiste en: el cable de carga con el conector al vehículo, la unidad electrónica
dentro de la carcasa de plástico (unidad de carga) incluído el mecanismo de protección de corriente
residual, el medidor de energía con interfaz Bluetooth (opcional), y el cable de alimentación con el enchufe
para el tomacorriente.
La unidad de carga está disponible en diferentes variantes:
•Largo total del cable: 5m y 7.5m
•Conector de vehículo según IEC62196 (tipo 2) o SAE J1772 (tipo 1)
•Monofásica o trifásica
•Corriente máxima de carga 16A o 32A
•Medidor de energía y conexión Bluetooth LE
El mecanismo de protección de corriente residual integrado significa que NRGkick carga su vehículo de
acuerdo con los más altos estándares de seguridad. El mecanismo interrumpe la corriente de manera
confiable si se producen corrientes residuales de CA o CC.
La unidad de carga está diseñada de tal manera que es fácil ajustar la corriente de carga a través de un
botón de selección. El indicador LED le muestra la corriente de carga seleccionada y la potencia en todo
momento.
Si ha comprado la opción del "medidor de energía con Bluetooth LE", puede también cambiar la corriente
de carga sin interrumpir el proceso de carga. En combinación con la aplicación para teléfonos inteligentes
NRGkick, el medidor de energía proporciona funciones adicionales con total transparencia y visibilidad en
cada estadio de la carga.
5.1 Unidad de carga NRGkick
1) Botón de selección
2) Pantalla: Potencia de carga seleccionable
3) Pantalla: Corriente de carga máxima seleccionable
4) Indicador LED: Corriente o potencia seleccionada
5) Indicador de estado LED
6) Información sobre la corriente de carga máxima posible
que se puede configurar según los requisitos de los
diferentes conectores de la red eléctrica.
¡El texto puede variar dependiendo del modelo específico!

6 Ver.: 1810-11
ES
5.2 Cargando su vehículo eléctrico
Primero conecte el enchufe de red al tomacorriente. La electrónica de carga se iniciará y se mostrará
mediante una señal parpadeante oscilante. Al mismo tiempo, se lleva a cabo una autocomprobación
automática que prueba todas las funciones esenciales. De igual manera ésta autocomprobación se llevará
a cabo en cada solicitud de carga. En caso de que falle la autocomprobación, los posibles errores se indican
a través de los LED. Después de una autocomprobación exitosa se encenderá sólo el LED de la corriente
que se configuró la última vez.
Ahora seleccione la corriente de carga que desea con el botón de selección.
¡PRECAUCIÓN! Al elegir la corriente de carga tenga en cuenta todos los siguientes puntos:
a) La corriente máxima acorde al cable de la red de alimentación
b) La corriente máxima acorde el conector de red utilizado
c) Si se utiliza un adaptador: la corriente máxima de carga se limita automáticamente a la corriente máxima aprobada para
el adaptador. Antes de cargar compruebe que la corriente de carga puede haber sido limitada por el adaptador.
Los puntos a) y b) también se aplican si se usa un adaptador.
Conecte el enchufe de vehículo al automóvil.
Una vez que el vehículo conectado ha sido detectado por la unidad de carga, todas las luces LED se
iluminarán brevemente. A partir de este punto, ya no será posible cambiar la corriente de carga con el
botón de selección de la unidad.
Observación: si no se aplica la secuencia de conexión correcta y el vehículo ya está conectado, tiene
aproximadamente 10 segundos para configurar la carga de corriente después de conectar la unidad de
carga a la fuente de alimentación. Luego de realizar la configuración, tendrá al menos 4 segundos después
de soltar el botón de selección para realizar otro ajuste. Todos los LED deben iluminarse brevemente para
indicar que su vehículo ha sido detectado. A partir de este punto, ya no será posible cambiar la corriente
de carga con el botón de selección de la unidad.
La unidad de carga está ahora en modo "carga de vehículo" y, según el tipo de automóvil, el proceso de
carga comenzará después de unos segundos.
Los valores establecidos para la corriente / potencia de carga toman la forma de límites superiores.
Dependiendo, por ejemplo, del estado de carga de la batería o de la temperatura exterior durante el
transcurso del proceso de carga, el vehículo puede configurar la corriente de carga real a un valor inferior
al establecido en la aplicación o en el NRGkick directamente.
Observación: NRGkick puede permanecer conectado al tomacorriente cuando el vehículo está
desconectado.
5.3 Interrupción del proceso de carga desde la unidad
Si se presiona el botón de selección durante 4 segundos, el proceso de carga se interrumpirá y la unidad
de carga se reiniciará. A continuación, podrá volver a cambiar la potencia de carga. Esta función solo está
disponible en los primeros 2 minutos posteriores al inicio del proceso de carga.
Observación: después de la iniciación, tiene 25 segundos para cambiar la configuración. La unidad de
carga volverá luego al modo "carga de vehículo".
5.4 Interrupción del proceso de carga
El proceso de carga normalmente se debe detener desde el vehículo. Siga el manual de instrucciones de su
automóvil. El conector del vehículo se desbloqueará y se podrá desenchufar. Finalmente, desenchufe el
conector de la unidad de carga del tomacorriente.
This manual suits for next models
4
Table of contents
Languages:
Other DiniTech Automobile Accessories manuals


Popular Automobile Accessories manuals by other brands


Hauler Racks
Hauler Racks C-7R Series Assembly instructions

WeatherTech
WeatherTech No-Drill MudFlap installation instructions

Ranger design
Ranger design 1506-PHX Cargo Plus installation guide

HOLDFAST
HOLDFAST 220501 instructions

Prorack
Prorack K748 Fitting instructions

Streetwize
Streetwize SWOBD3 INFORMATION FOR USE