pdlux PD-MV1009 User manual

SPECIFICATIONS
Power source:100-240V/AC
Power frequency: 50/60Hz
Rated load:1200W Max,tungsten(cosφ=1)
300W Max,fluorescent(cosφ=0.5)
HF system: 5.8GHz CW radar,ISM band
Transmission power: <0.2mW
Detection range: 2-10m(radii.) (adjustable)
Time setting: 8sec-12min (adjustable)
Detection angle: 360°(Ceiling installation)
180°(Wall installation)
Light-control: 10-1000Lux (adjustable)
Installation sit: Ceiling mounting / Wall mounting
Standby power: Approx0.9W
SENSOR INFORMATION
H
L
L
1
2
3
4
5
6
7
8
9
10
11
12
0 11 22 33 44 55 66 77 88 99 1010 1111 1212 1313 1414
Detection rang: 6M max (Height of installation2M) Detection rang: 7-8M max (Height of installation4M)
Detection rang: 6-8M max (Height of installation8M)
Detection rang: 6-7M max (Height of installation6M)
Detection rang: 6-7M max (Height of installation10M)
Ground
Microwave Sensor
PD-MV1009 instruction
www.pdlux.com Tel: 86-574-83008608
Ceiling installation
1.5-2.5m
Correct moving orientation Detection angle
25m Max. 180°
Height of installation1.5-2.5m
Wall installation
360º
Sensing angle adjustment range
SPECIAL FUNCTION
OPERATING PRINCIPLE OF THE SENSOR
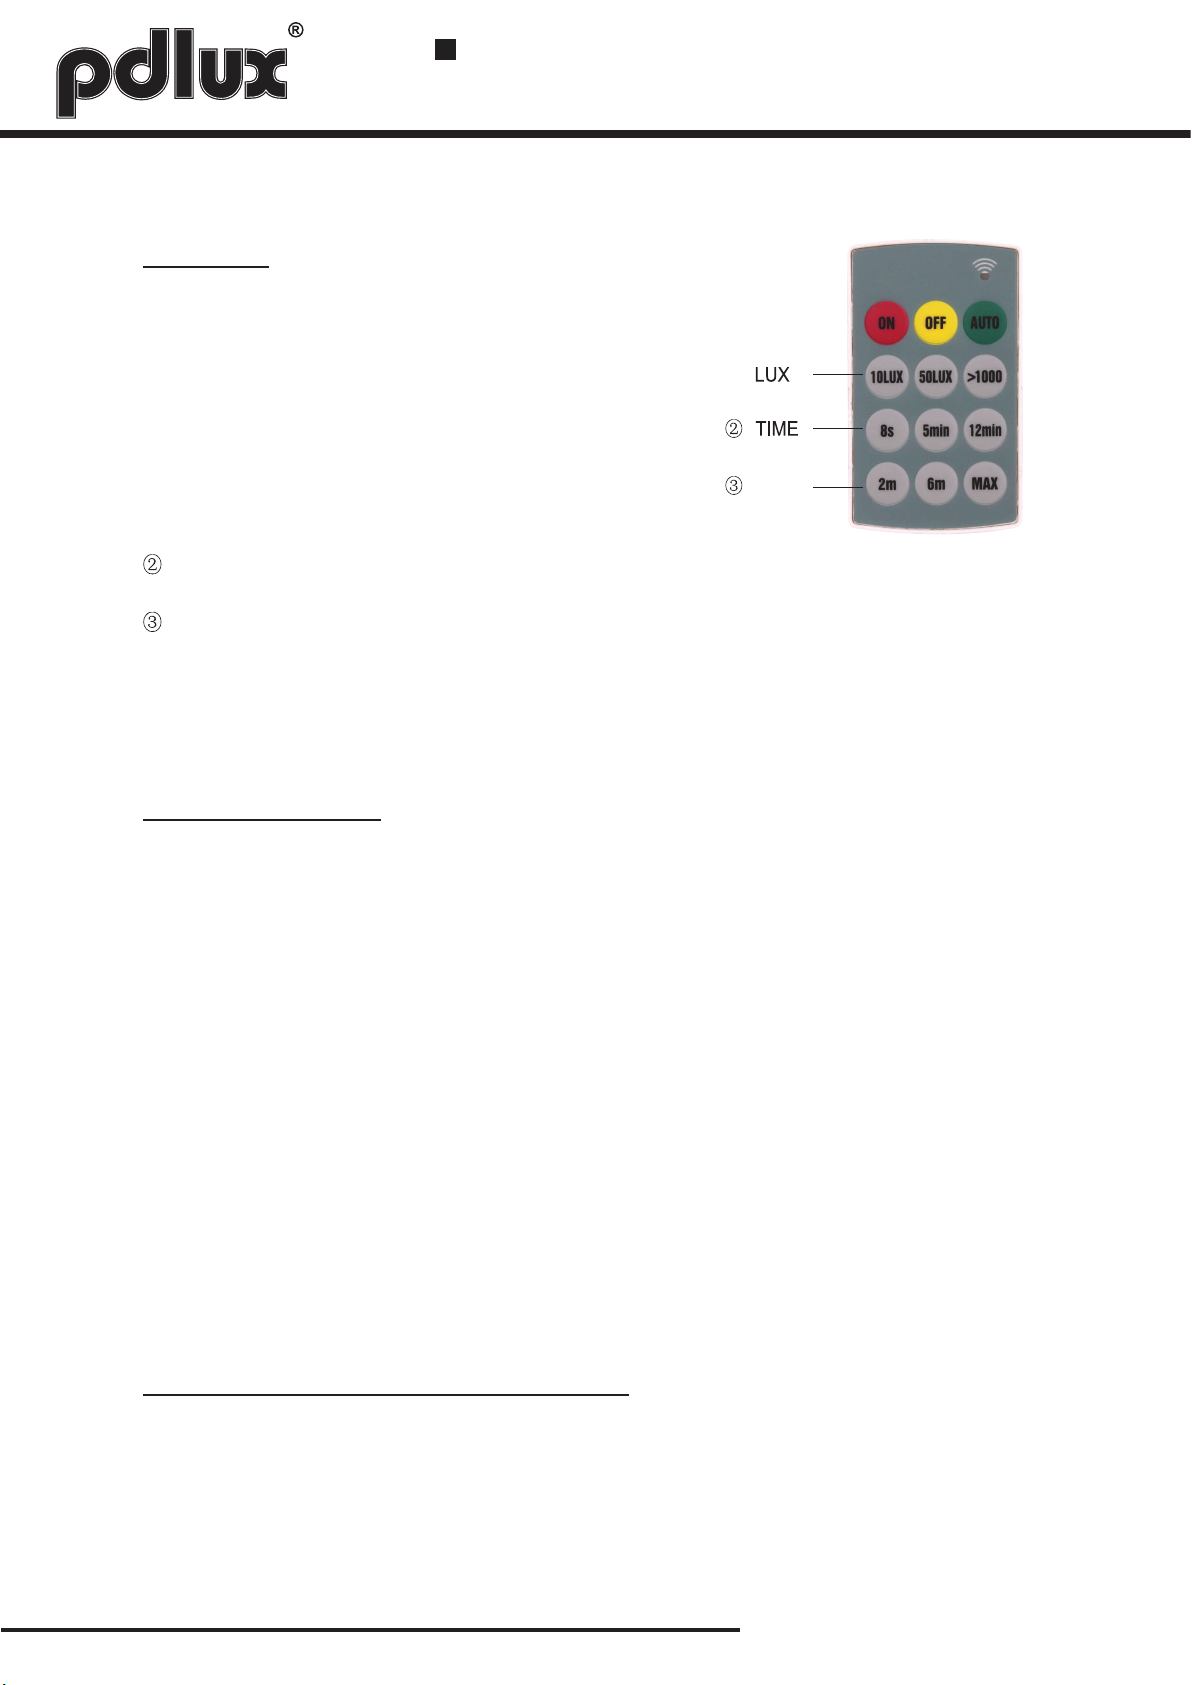
SENS: Detection distance: two meters; it is an approximate value which will change according to detection
object’s size.Detection distance: six meters; it is an approximate value which will change according to
detection object’s size.Detection distance: maximum; it is an approximate value which will change according
to detection object’s size.
1. LUX value adjusting, press the 50 LUX button, the sensor will flicker twice, press again, and it will flicker twice
again. Press the third time; it indicates that the unit enters the rundle adjusting mode, then “10LUX” is used as
the DOWN key, “50LUX” the median key, “>1000”the UP key; There are seven gears below, press
the“10LUX”button, the indicator will flicker one time ( power off one time), when reaching the minimum value,
the indicator doesn’t flicker, remaining on all the time. If you don’t set the unit at this moment, it will enter the
detection state three seconds later ( set the valid time being ten seconds after the last time); This is also applied
to the “>1000”and “10LUX”buttons. If you are not satisfactory with the set value or for other reasons, you can
press the “50LUX”reverting to the median value, after the indicator flickers three times, you can reset it; the
rundle adjusting function can withdraw automatically, the set time is ten seconds after the last time you input the
button
2. Time setting adjusting, the same as the adjustment above, the difference is that pressing the “5MIN”button
enters time setting, “8S”is used as DOWN key, “5M” as the median key, “12M”as Up key. When the time rundle
adjusting is used, the minimum time is eight seconds, the maximum time is 12 minutes, one gear equates to 30
seconds.
3. Distance adjusting, the same as the way listed 1, press the “6M”there times entering the distance adjusting
state, “2M”button is used for DOWN key, “6M”as reverting to median value button, “MAX”used as UP key, the
minimum value is two meters( approximate value).
After the sensor is powered on, the indicator will keep on for five seconds (the period may alter), entering the
detection state 10 seconds later, you can set its sensitivity, delay time, luminance via the three knobs on the
sensor. The indicator will flicker (no matter whether it is turn on or not), the lock time is four seconds after the
sensor is power on. During this period whatever you operate the sensor, it won’t activate, but the indicator will
flicker according to detection.
When the above button is input, the indication light will flicker twice.
The remote controller has the rundle adjusting function.
Microwave Sensor
PD-MV1009 instruction
www.pdlux.com Tel: 86-574-83008608
TIME: Adjust time-delay of load work.The time delay is about 8s when turn in to 8s.The time delay is about
12min when turn in to 12min.
FUNCTION
①LUX:When luminance is less than 10 LUX, enable the
light to power on, for the use at night. When luminance
is less than 50 LUX, enable the light to power on, for the
use when ambient luminance is not enough. When
luminance is more than 1000 LUX, enable the light to
power on, for the use when it is in the daytime.
AUTO=“AUTO”mode, enable the sensor to detect
ON= Always on, about six hours later turn to “AUTO”mode
OFF= Always off, about six hours later turn to “AUTO”mode ①
SENS
Time setting
The light can be set to stay ON for any period of time
between approx.8sec(turn fully anticlockwise) and a
maximum of 12min(turn fully clockwise). Any movement
detected before this time elapse will re-start the timer. It
is recommended to select the shortest time for adjusting
the detection zone and for performing the walk test.
NOTE: after the light switches OFF, it takes approx. 1sec
before it is able to start detecting movement again.The
light will only switch on in response to movement once
this period has elapsed.
Light-control setting
The chosen light response threshold can be infinitely
from approx. 10-1000lux. Turn it fully anti-clockwise to
select dusk- to-dawn operation at about 10 lux. Turn it
fully clockwise to select daylight operation at about
1000lux. The knob must be turned fully clockwise when
adjusting the detection zone and performing the walk test
in daylight.
Note: please don’t adjust the three functional buttons to excess. That is because the three functional buttons were
connected to the components directly, there is a small stopper in each of the three
components, when you adjust the buttons from start to end, the excessive turn will damage the stopper,and lead to the
360°non-stop turn around. Theadjust range limit is 270°, please do pay attention to this.
TIME
LUX
Microwave Sensor
PD-MV1009 instruction
www.pdlux.com Tel: 86-574-83008608
ATTENTION: When use this product, please adjust the sensitivity to an appropriate
position you need, please do not adjust the sensitivity to maximum, to avoid the product
does not work normally caused by wrong motion.Because the sensitivity is too high easily
detect the wrong motion by wind blowing leaves & curtains, small animals, and the wrong
motion by interference of power grid & electrical equipment. All those lead the product does
not work normally !
When the product does not work normally, please try to lower the sensitivity appropriately,
and then test it.
Detection range setting (sensitivity)
Detection range is the term used to describe the radii
of the more or less circular detection zone produced
on the ground after mounting the sensor light at a
height of 2.5m, turn the reach control fully
anticlockwise to select minimum reach (approx.2m
radii), and fully clockwise to select maximum reach
(approx. 10m radii).
NOTE: the above detection distance is gained in the
case of a person who is between 1.6m~1.7m tall with
middle figure and moves at a speed of 1.0~1.5m/sec.
if person’s stature, figure and moving speed change,
the detection distance will also change.
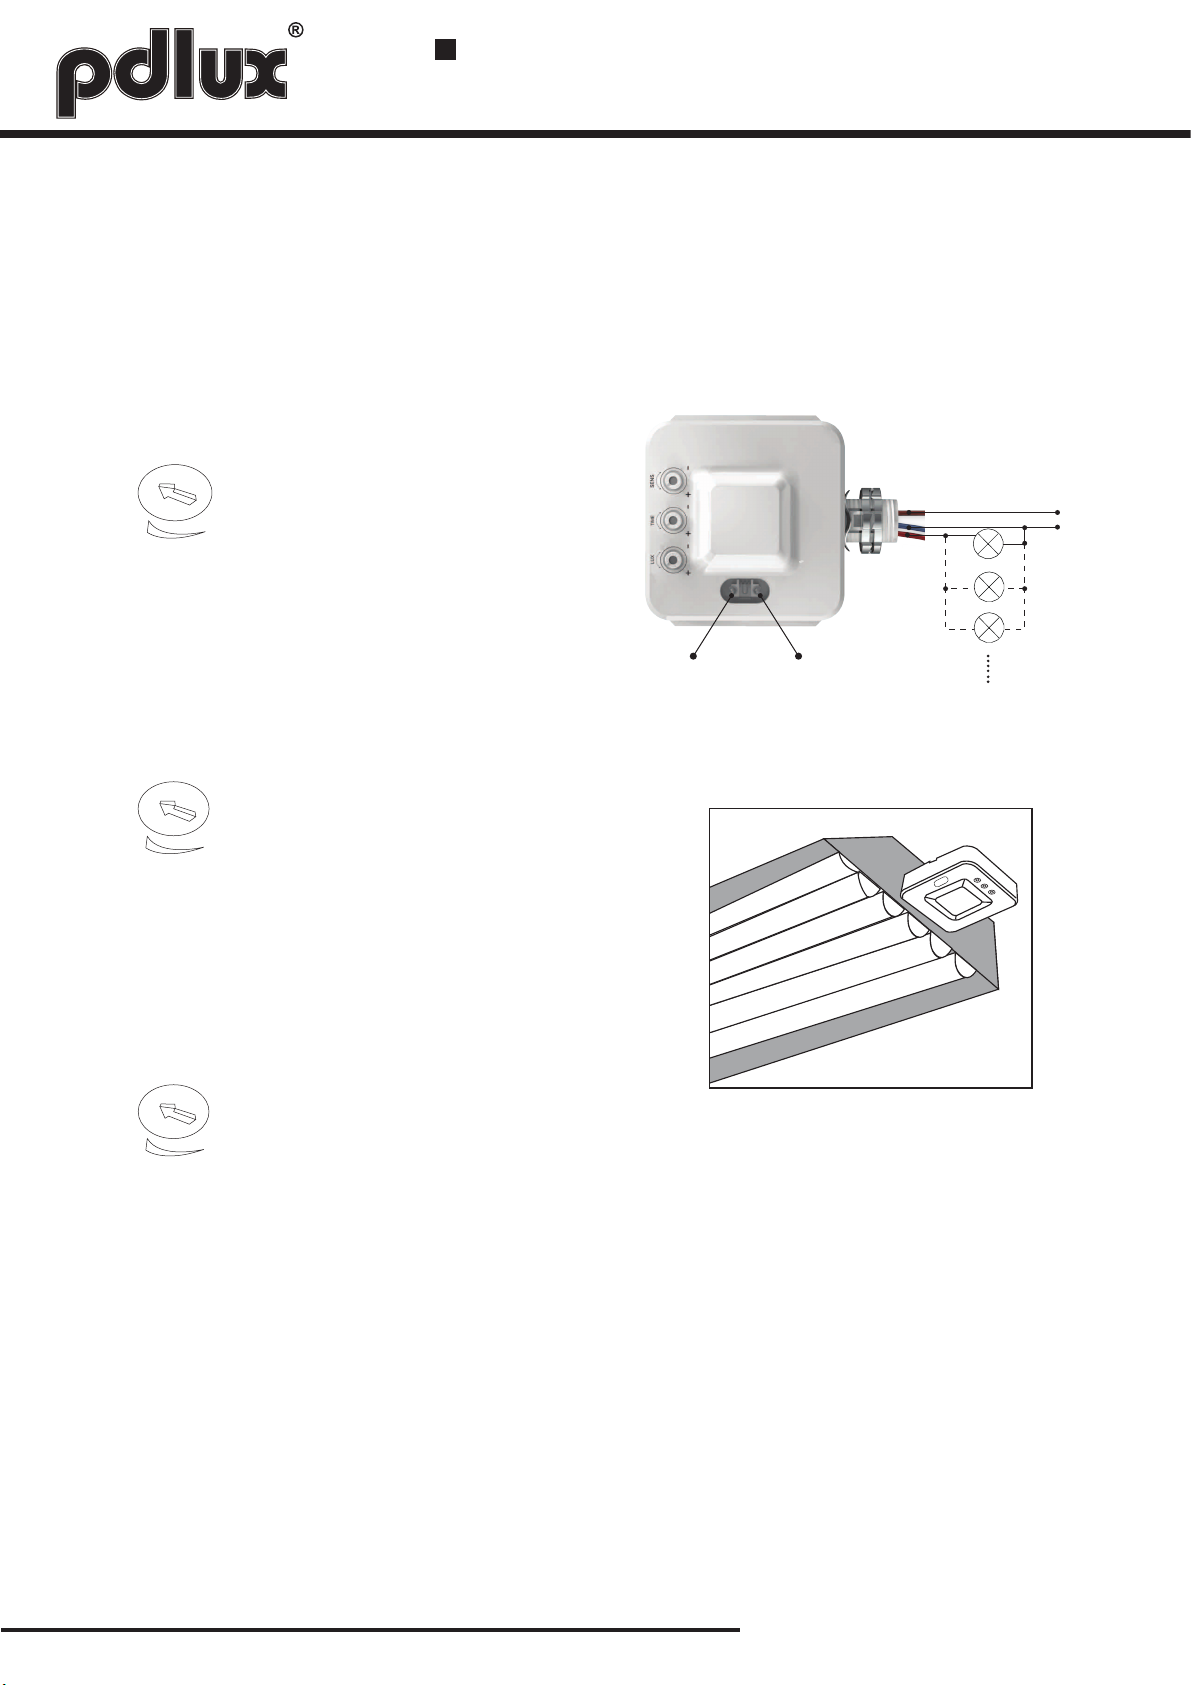
SENS
Daylighting devices Working indicator light
AC in
load
load
load
The total power of incandescent lamp can not exceed 1200W
The total power of CFL can not exceed300W
When the remote controller is input “ON” or“OFF”, the sensor enters always on/off mode, output power
on/power off signal, the indicator will power on for one second every four seconds. It won’t withdraw this mode
until six hours later.
Remote controller and the local setting priority are subject to the last setting. If the last setting is remote
controller, then all the settings are subject to the remote controller setting. Otherwise, all the settings are
according to local setting.

Microwave Sensor
PD-MV1009 instruction
www.pdlux.com Tel: 86-574-83008608
warehouseLiving room Office Meeting Room
The Control Switching Devices,installed in the nonmetallic objects.
Can be widely used in home\market\office building\factory\hotel\institution etc.
This product can be installed at the height up to 12M, suitable to be installed in the large warehouse.
FOR OCCASIONS
Add: 17F,Commerce Building of NingBo,
No 588, South Tiantong Rode,Yinzhou District,Ningbo,China
Tel: 86-574-83008608(20 lines) Fax: 86-574-83008609
INSTALLATION INSTRUCTION
(1)Before installing switch off power.
(2)Take off the bottom-stand.
(3)The bottom-stand is fixed on the selected
position with inflated screw.
(4)Connect the power and the load into the
connection-wire column of the sensor
according to connection-wire diagram.
(5)The sensor aimed at the lock of the
bottom-stand and push.
Ceiling
Ceiling
Ceiling
Push
Push
Wall Installtion
(Installation method
is similar to ceiling
installation)
Other pdlux Accessories manuals


