Peace Powersports MP-08 User manual

Thank you for buying a Peace Sports MP-08 scooter! Enjoy it!
This manual contains all the information needed to ride maintain and generally get the most from
your new scooter. PLEASE READ ALL OF THIS MANUAL BEFORE YOU RIDE YOUR
SCOOTER. This is very important because it will familiarize you with your scooter and its proper
care and handling. Proper maintenance and service will maximize both the safety and life of the bike.
Should you need tech support or after sale service please contact your dealer.
The Information contained in this manual is the most up to date at the time publishing however we
reserve the absolute right to amend this document. These changes can/will be made with/without
notice. Please note the Name on the name plate the VIN and the engine code as this information can
be helpful in the future.
IMPORTANT NOTICE:
This scooter is designed to carry only one passenger please do exceed the recommended weight limit.
This motor cycle is designed for use on level roads only and is not intended for off road use.
The maximum load for this bike is : 330lbs
READ THIS OWNERS MANUAL CAREFULLY
pay special attention to the following warnings:
WARNING: this statement indicates that there is a strong possibility or SEVERE INJURY or
DEATH i the instructions are not ollowed.
CAUTION: this statement indicates that there is a possibility o personal injury or equipment
damage i the instructions are not ollowed.
NOTE: gives helpful information.
This manual should be considered a permanent feature of the scooter and should always be
transferred to the new owner just like the keys or the title.
This document is copyright 2010 Peace Powersports Inc. This manual and pictures contained within
are property of Peace Powersports Inc. and to be used by Peace Powersports and it's affiliates only.
Any unauthorized distribution or plagiarism is a violation of federal law.
Contents:
Section 1 – Sa e riding
1-3 Safe Riding Rules
1-3 Protective Clothes
1-3 Retrofitting
1-3 Loading and accessories
Section 2 – Description
2-5 Parts Location
2-6 VIN Record
2-7 Instruments and Indicators
2-7 Ignition Switch
2-8 Steering Lock
2-8 Seat Cushion Lock and Luggage Box
2-9 Left and Right Handlebar controls
2-10 Fuel and Fuel Tank
2-10 Petcock
2-10 Engine Oil
2-11 Tires
Section 3 – Operation Guide
3-12 Pre-ride Inspection
3-12 Starting the Scooter
3-12 Initial Break In
3-13 Riding
3-13 Parking
Section 4 – Maintenance
4-13 Maintenance Schedule
4-15 Engine Oil Check and Change
4-16 Gear Oil change
4-17 Spark Plug
4-17 Valve Check and Adjustment
4-19 Air Cleaner
4-20 Idle Speed adjustment
4-20 Hydraulic Disc Front Brake Check
4-21 Rear Brake Adjustment
4-21 Muffler
4-22 Battery Maintenance
4-22 Fuse
4-22 Troubleshooting
4-22 Cleaning
4-22 Storage
4-23 Storage Removal
4-23 SPECS
Section 5 – Initial Setup
5-24 Post delivery inspection
5-24 Warranty information
2

Section 1: Sa e Riding
1-3 Sa e Riding Rules:
1. Always do a pre-ride check before starting the scooter. This will aid in preventing
accidents and equipment damage.
2. Many accidents involve inexperienced/untrained riders. Many areas require you to have a
special license or certification. Make sure that you have the proper qualifications before
riding. NEVER let anyone who is not qualified operate your scooter.
3. Many accidents between scooters and cars occur because the driver of the car did not see
the scooter rider. Because of this it is important to make your self as visible as possible
by doing the following: Wearing bright and/or reflective clothing and avoiding the blind
spots that are present in other vehicles.
4. Obey all local laws and regulations regarding the operation of your scooter. Also
operating the scooter at speeds in excess of posted limits is the cause of many accidents.
Therefore NEVER exceed the posted speed limits. This is the ONLY safe and legal way
to operate your scooter. Never ride faster than the conditions permit. If it is raining
snowing icy etc. slow down. Always use your turn signals as this is usually the only
warning that other drivers have before you make a turn.
5. Don't let yourself be surprised by other motorists. You can do this by using extra caution
at intersections at the entrances and exits to parking lots and parking garages and of
course always ride with both hands and keep both feet on the foot rests or in the foot well
area.
1-3 Protective Clothes
1. Most motorcycle accident fatalities are due to head injuries. ALWAYS wear a helmet. You
should also wear a face shield and long pants and long sleeves to prevent other injuries in
case of an accident.
2. The Exhaust system gets very hot during the course of a ride and it will stay hot after the
scooter has been shut off for quite a while. DO NOT TOUCH the exhaust system while it
is hot.
3. Do not wear clothing that is loose as this could catch on control levers the kick starter or
other surfaces which could cause dangerous handling and instability.
1-3 Retro itting
** WARNING** : Retrofitting the scooter with aftermarket parts, or removing the factory parts
can be very dangerous or i ega , and may void your factory warranty. Obey a oca aws and
regu ations regarding the scooter and it's equipment.
1-3 Loading and Accessories
** WARNING** : To prevent accidents, take extreme care when se ecting, and adding accessories
and cargo to your scooter. Improper oading or improper accessories can great y reduce the
stabi ity, and ride qua ity of the scooter. When se ecting accessories, p ease factor tire, road, and
weather conditions. Fo owing this advice wi he p you decide which accessories to use and how
to oad your scooter as safe y as possib e.
*Loading:
Maximum Load: The front cargo area can hold up to 1.5 kg (3.30 lbs) the under-seat storage can hold
10 kg (21 lbs) and the rear cargo box can hold 5 kg (11.02 lbs) and 150 kg (330.69 lbs)
3
Keep the weight of any cargo as low and close to the center of gravity as possible and load weight
equally on both sides to reduce instability. A load that is high and away from the center of gravity is
dangerous and unstable.
The scooter can be made unstable by the shifting of a loose load. Make sure to check loads often and
verify that everything is tied down and that the mountings are secure for any added cargo accessories.
Do not attach large or heavy items (such as a sleeping bag or tent) to the handlebars or front fender as
this may cause unstable and/or slow steering.
*Accessories:
Genuine accessories designed by the manufacturer for your scooter have been designed and tested for
your scooter. Because the factory cannot test every accessory you the end user are responsible for
proper selection installation and use of accessories not produced by the company. Always follow
guidelines set forth in the loading section as well as the guidelines set forth below:
1. Carefully inspect the accessories that you install to make sure they do not: Block lights
reduce ground clearance and/or turning angle or limit the travel of suspension steering or
controls operation.
2. Large fork mounted fairings or windshields or poorly designed/improperly mounted
fairings can produce aerodynamic forces that cause unstable handling. Also do not install
any accessories that block airflow to the engine or intake.
3. Make sure that your accessories do not inhibit your control of the bike or inhibit your
ability to move freely. This could lower your reaction time in an emergency and cause a
serious accident.
4. Do not add electrical equipment that will exceed the scooter's electrical system capacity. A
Blown fuse could cause a dangerous loss of lighting or engine power.
5. This scooter was not designed to pull a side car or trailer. Operating the scooter while
pulling a side car or trailer may seriously impair the handling of the unit.
4

Section 2 : Description
2-5 Parts Location
1. Rear rack
2. Seat/Under-seat storage
3. Floorboard/Battery and fuse
4. Front brake lever
5. Exhaust
6. Dipstick/Oil filler neck
7. Passenger Footrest
8. Rear brake lever
9. Front luggage box (glove box)
10. Helmet hook
11. Gas cap (under the seat)
12. Rear luggage box (optional trunk)
13. Kickstand
14. Center stand
15. Kick starter
16. Trunk release lock
5
Handlebars
1. Headlight switch
2. Speedometer
3. Tachometer
4. Left turn signal indicator
5. High beam indicator
6. Right turn signal indicator
7. Gas gauge
8. Turn signal switch
9. Horn button
10. Hazard switch
11. Front luggage box lock
12. Ignition switch
13. Starter switch
14. Kill switch
2-6 VIN Record
Please record your VIN and engine code in a safe secure and private location and keep it. This will
help when ordering parts and also in recovering the scooter in the event of theft. The VIN is
recorded in various locations throughout the scooter. The first location is below the front luggage box
(the glove box). There is a small plastic cover about 4 inches long and about 1.5 inches wide. It is
behind this. The second location for the VIN is the vehicle nameplate which is on the left engine
hanger near the back of the bike. It is a black aluminum plate riveted to the frame. The Engine code
is stamped on the bottom left of the engine crankcase. This information is specific to your scooter.
6
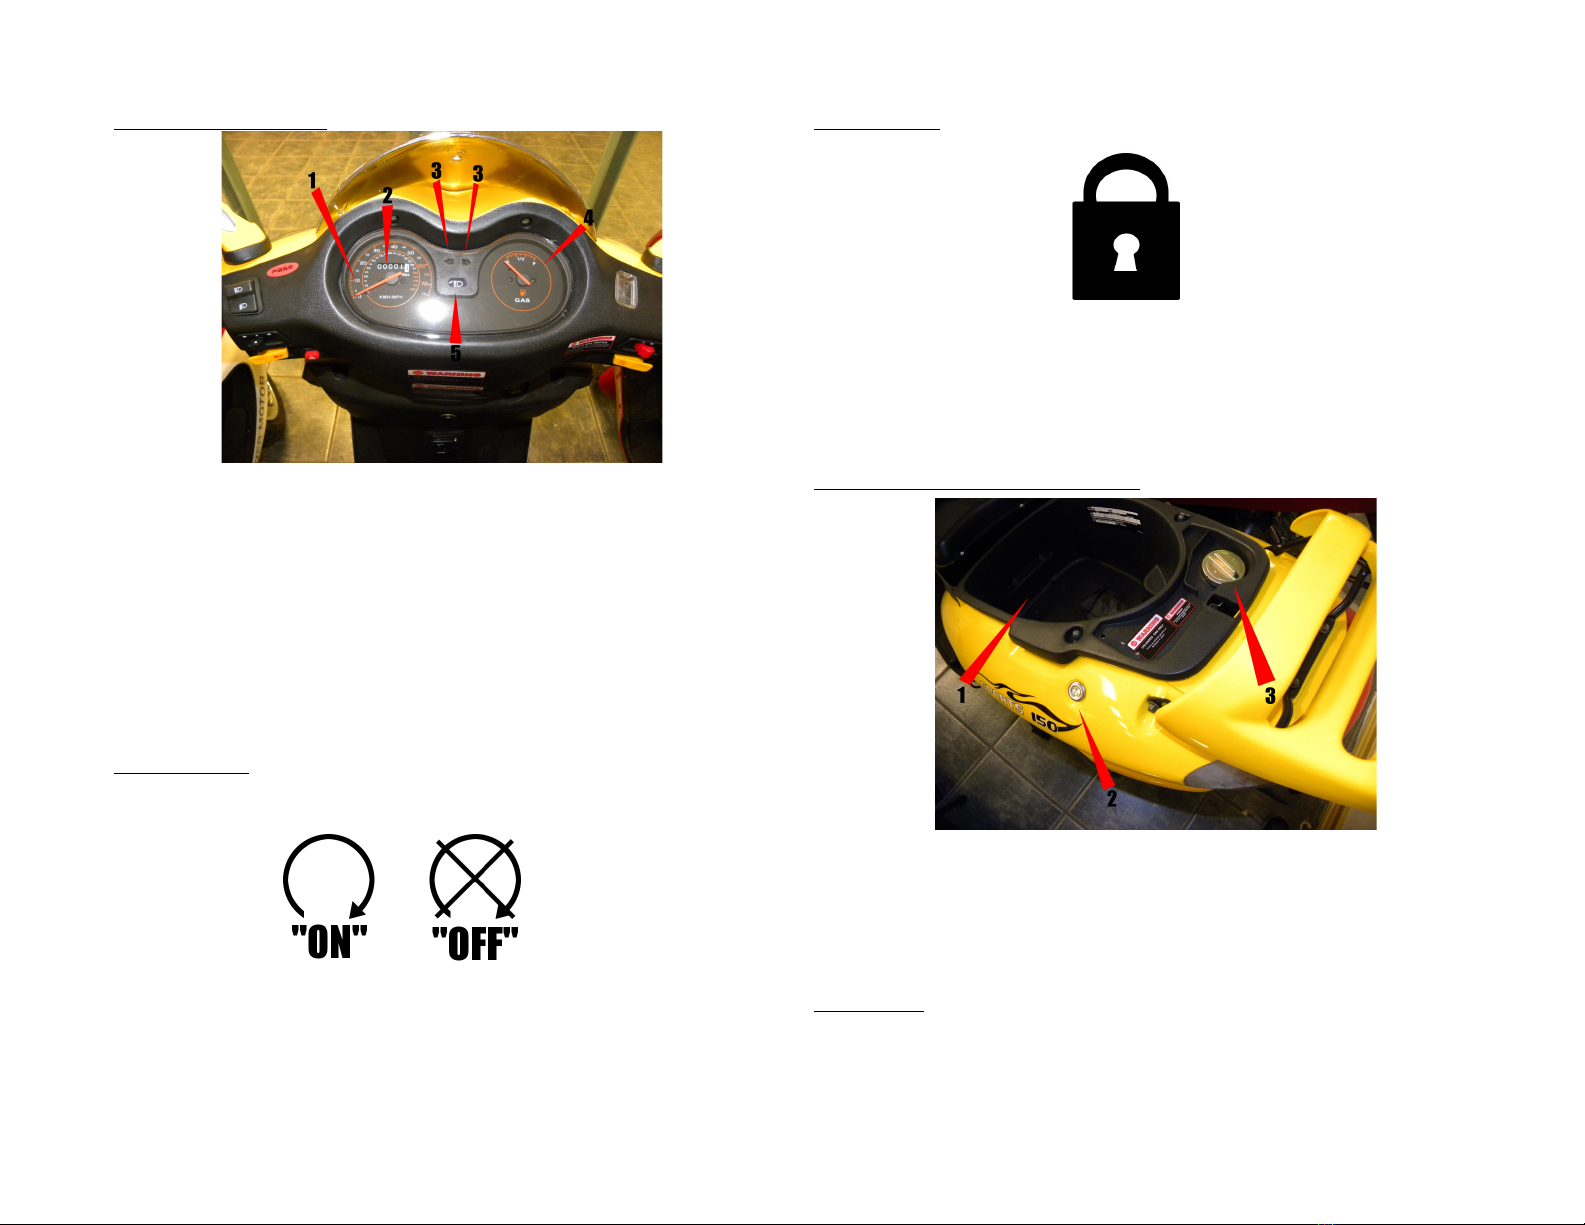
2-7 Instruments and Indicators
1. Speedometer – Shows the scooter's speed
2. Odometer – Shows the total number of miles that the scooter has traveled
3. Turn signal indicators – These flash when the turn signal is operated indicating the
direction of an upcoming turn
4. Gas gauge – Shows the amount of fuel left in the tank.
5. High beam indicator – This will illuminate when the high beams are used.
Some special notes on the Gas gauge:
The gas gauge shows the amount of fuel left in the fuel tank. When the pointer is on the “F” (full) it's
indicating that the amount of fuel left in the tank with reserve is 6.8l (1.79 gallons ). When the
pointer gets to ¾ empty it is indicating that you should stop for fuel as soon as possible. At this point
there is roughly 1.2l (0.3 gallons) of fuel left. If you do not stop for fuel at this time you WILL run
out very soon.
2-7 Ignition Switch:
These key position “ON” which is illustrated above means that the Lights and engine can be
operated and the key cannot be removed. The “OFF” position also illustrated above indicates that
the lights and engine CANNOT be operated and the key CAN be removed.
7
2-8 Steering Lock:
When the ignition switch is at the lock position (as pictured above) the steering mechanism is locked
and therefore cannot be turned from side to side. This makes the bike harder to steal. To use this
safety feature turn the handlebars all the way to the left and with the key in the ignition turn the key
to the off position then push the key inward and turn the key counterclockwise (<==) until it
engages. This may take moving the handlebars around a bit. To deactivate the steering lock simply
turn the key clockwise (==>) until it releases.
2-8 Seat Cushion Lock and Under Seat Storage:
1. Under-seat storage area
2. Seat lock
3. Gas cap
The seat lock is located on the left side of the scooter below the seat cushion. To open the under-seat
storage area insert the key into the lock and turn it clockwise until the seat is released. To lock the
seat back again simply lower the seat back down and press until an audible “CLICK” is heard.
**CAUTION!**
•Before locking the seat cushion make sure the key is NOT in the under-seat area.
•Since the Under-seat area is directly above the engine it will become hot inside during use
please do not put food flammables or pets in the under-seat area.
8
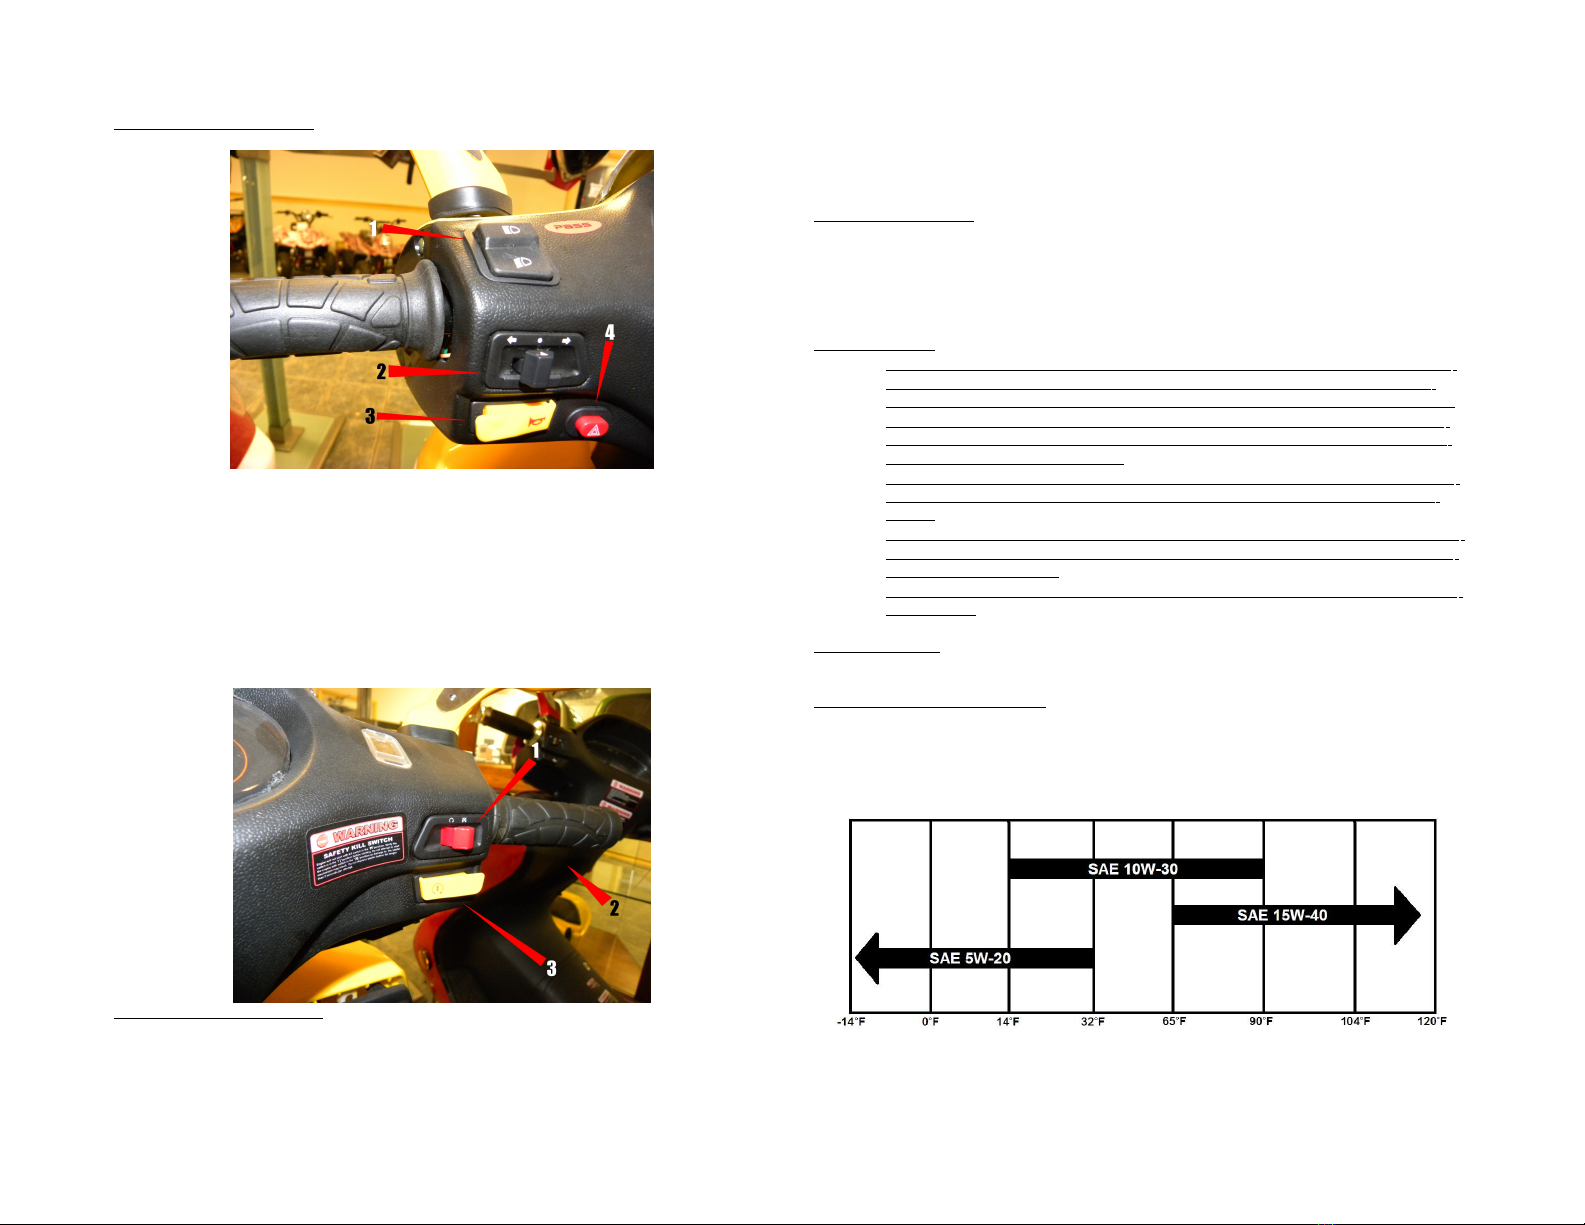
2-9 Le t Handlebar Controls:
1. Headlight control switch
2. Turn signal switch
3. Horn button
4. Emergency flashers
A special note on the turn signal switch:
Move the switch to the left position for a left signal “ <= ” and move the switch to the right position
for a right signal “ => ”. you will then find that the signal does not cancel like it would in a car. In
order to cancel the signal you must then push inward on the switch.
2-9 Right Handlebar Controls:
1. Kill switch
2. Throttle
3. Starter
9
Special note on the lights:
Your headlights may not come on when the key is turned on. Most scooters have lights that are only
active when the engine is running in order to conserve battery power.
2-10 Fuel and gas tank:
When selecting your fuel it is important to remember that your scooter takes 90 octane or higher
(PREMIUM ONLY). DO NOT use “dirty” gas old gas or gas of low or questionable quality. The
jets inside the carb are very small and will clog causing your scooter to run poorly or not at all.
** WARNING! **
•Gaso ine is extreme y f ammab e and wi exp ode under certain conditions. ALWAYS
refue in a we venti ated area, with the engine NOT running. DO NOT smoke, or
a ow f ames or sparks in the area where gaso ine is stored or where you are refue ing.
•Before refue ing, be sure that your gas is free of debris. Though there is a fue fi ter,
using “dirty” gas wi shorten the ife of the fi ter, and require frequent carb c eaning
and may damage other components.
•DO NOT over fi the tank. There shou d be no fue in the fi er neck. After refue ing,
make sure that the gas cap is on tight y. Fai ure to do so can cause a fire/exp osion
hazard.
•Do not spi fue when refi ing the tank. Spi ed fue or fue vapor can ignite, sudden y
and without warning. If any fue IS spi ed, make sure and et the area dry comp ete y
before starting the engine.
•Avoid pro onged skin contact or breathing the vapors and KEEP OUT OF REACH OF
CHILDREN!
2-10 Fuel Petcock:
This scooter has an automatic vacuum petcock and needs no user input to function.
2-10 Engine Oil and Oil Selection:
It's important to select a quality oil for use in your scooter. This plays a very critical role in extending
engine life and performance. We have a guide below to help you select the best oil for your
conditions. Other oils such as machine oil gear oil or vegetable oil are NOT for use in your scooter
engine.
10

Conventional oil is recommended for at least the first 1500 miles you may use synthetic after that
point
SAE 10W30 is the factory recommended oil for temperatures ranging from 14º to 90ºF. Extreme
temperature use from 90º and up requires the use of 15W40 oil The responsibility of selecting oils
outside of this temperature range is on the end user. The key is to use only high quality oil designed
for use in motor vehicles and not substitute lesser quality oils or extreme weights. When changing
the oil make sure to let the old oil drain out completely first.
** CAUTION **
DO NOT run the engine with low oil this will cause severe engine damage!
2-11 Tires:
Proper inflation of tires will give the best ride handling and safety characteristics and it increases tire
life. Check tire pressure frequently and adjust if necessary. When selecting tires select tires that are
the same size as the factory equipped tires: 130/60-13 (front) and 130/60-13 (rear)
The tire pressure should be set COLD at: ~32 PSI (225 kPa)
Special note on tires:
Tire pressure should be checked before you ride while the tires are cold. Check the tires for cuts
embedded nails or other sharp objects. Check the rims for dents or deformations. See your dealer if
you should encounter these items/conditions.
** WARNING! **
•DO NOT attempt to patch a damaged scooter tire, This wi damage the tire's abi ity to
stay inf ated, and set the whee off ba ance.
•ALWAYS keep the tires proper y inf ated. Improper tire inf ation causes abnorma tread
wear, and creates a safety hazard. Under inf ation can resu t in the tire s ipping off the
rim and cause a sudden oss of tire pressure, which cou d ead to a serious accident!
•Riding on excessive y worn tires is dangerous and adverse y affects hand ing and
traction.
•Use of incorrect tire sizes is dangerous and cou d cause an accident.
When the tread depth on the tires reaches 1.5mm REPLACE THEM. DO NOT RIDE YOUR
SCOOTER WITH LESS THAN 1.5MM OF TREAD ON THE TIRES. YOU COULD HAVE AN
ACCIDENT, CAUSING DAMAGE, INJURY AND EVEN DEATH!
11
Section 3 : Operation Guide:
3-12 Pre-Ride Inspection
** WARNING! **
Fai ure to do a pre-ride inspection can cause severe persona injury or death, and/or vehic e
damage!
Inspect your scooter EVERYTIME before you ride it. The items listed below will only take a
moment to inspect and in the long run will save time money possibly your life.
1. Check the engine oil and check for leaks add oil as needed
2. Check the fuel level and check for leaks add Gas as needed
3. Check the front and rear brakes for proper function and adjust out any free play
4. Check tire condition and pressure
5. Check the throttle operation and make sure it is smooth and closes completely all the way
through the handlebar's turning radius
6. Check all lights and the horn for proper function
7. Check all screws and fasteners and be sure they are tight
8. Make sure that the steering is smooth with no free play and adjust as needed. If you
cannot correct any free play please contact your dealer for assistance
3-12 Starting the scooter:
** WARNING! **
NEVER run the engine in an enc osed area. The exhaust contains poisonous carbon monoxide
gas (CO), which wi cause a oss of consciousness and DEATH!
Starting the bike using the starter button:
1. Place the scooter on the center stand. This is not the single footed kick stand but the stand
with 2 feet which raises the rear wheel off of the ground. Placing the scooter on the center
stand for starting reduces your chances of accidental take off injury and damage to your
scooter.
2. Insert the key into the ignition and turn clockwise to the “ON” position.
3. Engage both brakes and press the starter button
4. You may need to open the throttle just a small amount when starting a cold engine
5. Let engine idle for 1-2 minutes before driving
6. DO NOT LEAVE RUNNING VEHICLE UNATTENDED.
**WARNING!**
Do not remove the scooter from the center stand unti the bike is warmed up, and you are
stradd ing the scooter with your feet on the ground, with a safety gear on. Then simp y ho d the
front brake ight y, then rock the scooter forward.
Starting the bike using the kick starter
1. Place scooter on center stand
2. Insert the key into the ignition and turn clockwise to the “ON” position
3. Rotate the throttle a small amount and kick the lever down repeatedly until engine starts
4. Let engine idle for 1-2 minutes before driving
3-12 Initial break in
To ensure your scooter's future reliability and performance pay extra attention to how you ride for the
first 500 miles. You want to take it slow and easy on your new machine. Avoid full throttle riding
large hills that will abnormally strain the engine. And last but not least do not exceed 60% throttle
for long periods of time.
Be sure to conduct maintainance according to the maintainance schedule. Failure to do so will void
your warranty and damage your scooter.
12

3-13 Riding
**WARNING**
READ THIS ENTIRE SECTION BEFORE RIDING!!
1. After the engine has been warmed up it is ready to ride now its your turn to get ready to
ride
2. Double check all of your safety and personal protection equipment is in good working
order (you know Helmet leathers gloves etc.)
3. Before removing from the center stand make sure the throttle is closed
4. Stand on the left side of the scooter and grip the handlebars firmly while applying the left
hand brake. Push the scooter forward. It will stop moving when the rear wheel touches the
ground
5. Mount the scooter from the left with your left foot on the ground to keep balance. Shift
weight to the right foot if you feel more comfortable that way.
6. Release the rear brake check your mirrors and nearby traffic for potential hazards.
7. If all clear use signals and gradually open the throttle to move forward.
8. To slow down release the trottle and apply BOTH front and rear brakes at the same time.
It will take a little practice to coordinate the two.
9. When approaching a corner turning or driving down an incline slow down and use
caution.
**WARNING!**
•Independent or uncoordinated use o only the ront OR rear brake reduces braking
per ormance
•Hard braking may cause wheel to lock, possibly resulting in loss o control o your
scooter.
•Reduce speed or brake BEFORE entering into a turn, closing the throttle or braking
mid turn may cause wheel slip possibly resulting in loss o control o scooter, damage,
injury, or DEATH
•When riding in wet or rainy conditions, or on loose sur aces, the ability to maneuver
and stop will be severely reduced. Use smooth, controlled actions under these
conditions as rapid accelleration, braking, or turning may cause a loss o traction,
loss o control etc.
•EXERCISE CAUTION IN WET/LOOSE CONDITIONS. IT COULD SAVE YOUR
LIFE.
3-13 Parking
To stop the scooter close the throttle and brake to a stop. Turn the key off . Place the scooter on the
side or center stand. Turn the handlebars to the left and turn the key to the left. To the “LOCK”
positon. This locks the steering to help deter theft..
PARK ON FIRM LEVEL SURFACE TO PREVENT SCOOTER FROM FALLING OVER
Section 4 : Maintainance
**WARNING** FAILURE TO PERFOM MAINTAINANCE WILL VOID YOUR WARRANTY
4-13 maintainance Schedule
Required maintainance schedule specifies how often your scooter needs to be serviced and to detail
what things need attention. It is essential that your scooter be serviced on time to retain it's highest
level of safety dependability and emission control performance.
These instructions are based on the assumption that the scooter will be used exclusively for its
designed purpose only. Sustained high speed operation or in extreme wet/dusty conditions more
maintainance will be required. Consult your dealer for recommendations applicable to your individual
needs and use
13
I=Inspect for wear and damage C=Clean R=Replace A=Adjust
ITEM NO
TE
0
MI
500
MI
1K 1.5K 2K 3K 4K 5K 6K 7K 8K 9K 10
K
*FUEL LINES * I I I I I I I I I I I I I
FUEL FILTER * I I I I R I R I R I R I R
THROTTLE CABLE AND
GRIP
* I I L I L I L I L I L I L
AIR FILTER * I I C C C C C C C C C C
PCV (CRANK CASE VENT C C C C C C C C C C
SPARK PLUG R R R R R R R R R R
VALVE CLEARANCE
ADJUSTMENT
** A A A A A A A A A A
ENGINE OIL *# \R R R R R R R R R R R R R
ENGINE OIL FILTER
SCREEN
* C C C C C C C C C C C C C
DRIVE BELT * I R I R I R I R I R
IDLE SPEED
ADJUSTMENT
A A A A A A A A A A A A A A
GEAR OIL CHANGE * R R R R R R R R R R R
MUFFLER AND
MUFFLER BOLTS
* I I I I I I I I I I I
BRAKE FLUID R I I I I R I I R I I R I
BRAKE PADS/SHOES * I I I I R I I R I I R I
BRAKE HOSES I I I I I I I I I I I I I
LIGHTS AND HORN * I I I I I I I I I I I I I
CLUTCH PAD WEAR * I I I R I I I R I I
SUSPENSION/SHOCKS * I I I I L I L I L I L I L
NUTS BOLTS AND
FASTENERS
* I I I I I I I I I I I I I
STEERING BEARINGS * I I I I I I
WHEELS AND TIRES ** I I I I I I I I I I I
* Perform more often if scooter is frequently used in dusty dry hot or wet conditions.
** For safety or complication of task we recommend you have these services performed by your
dealer
# After 1500 miles synthetic oil may be used in engine
14
4-15 Engine oil check and change
Check engine oil level each time before riding the scooter. The level must be between the Upper and
Lower Level marks on dipstick
1. Start the engine and let it idle for a few minutes.
2. Stop the engine and put the scooter on the center stand on level ground
3. After a few minutes remove the cap/dipstick wipe it clean and reinsert the dipstick as far
as possible WITHOUT screwing it in.
4. Remove dipstick. The level should be between the upper and lower level marks.
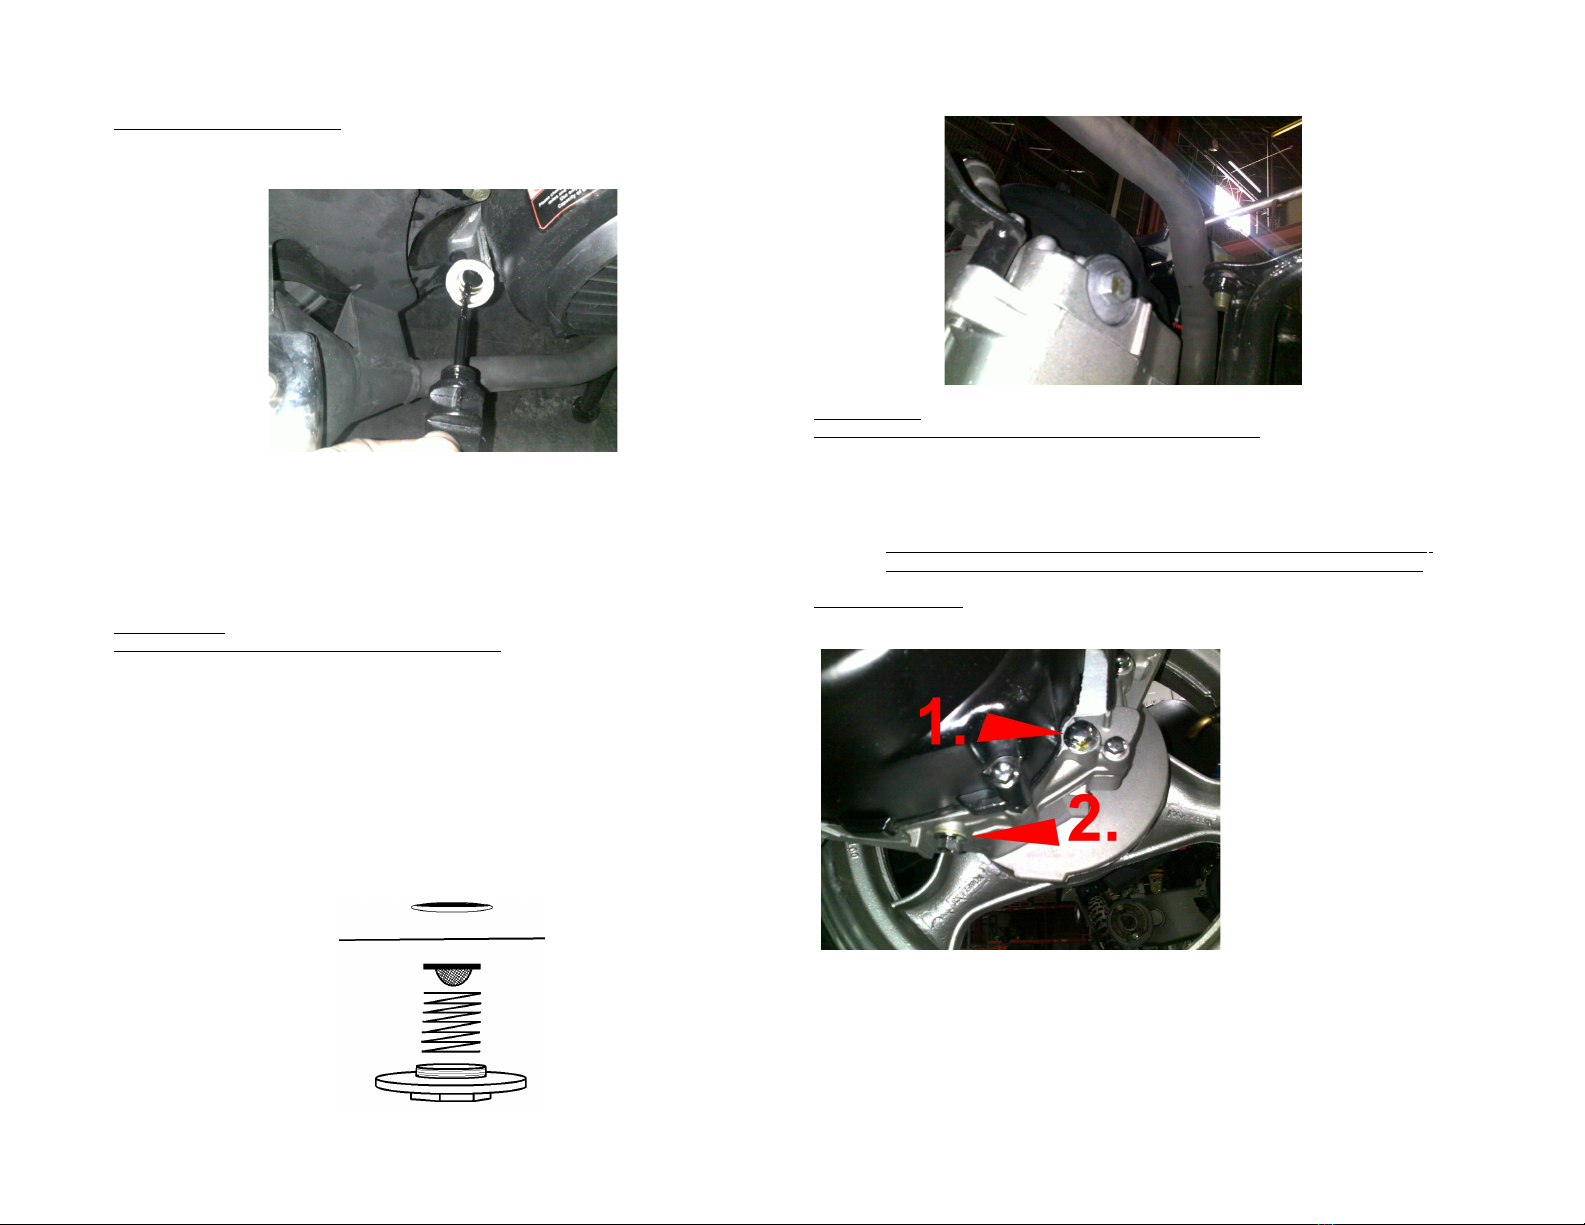
Engine Oil change
Change engine oil with quality oil at the recommended service intervals for long engine life.
**WARNING**
Engine oi may be hot! Use caution to avoid being burned!
How to change your oil
1. Place scooter on center stand.
2. Warm up engine for 2 minutes if cold outside for faster and more complete draining.
3. Place empty drain pan/tray under engine drain plug
4. Remove drain plug
5. A spring and oil spring may fall out with drain plug
6. After all oil has drained clean and replace screen spring and drain plug as shown below
7. Tighten drain plug well and wipe clean with a paper towel.
8. Add 750ml of oil (¾ of a quart) through the dipstick/fill hole. Replace dipstick
9. Start engine and let idle for 30-45 seconds. Stop engine
10. Check engine oil level on center stand level ground. Add oil if necessary to reach upper
level mark on dipstick and recheck. Check drain plug area for oil leaks.
OIL DRAIN FROM BELOW
**WARNING**
Running engine whi e ow on oi can cause serious engine damage!
–WHEN USING YOUR SCOOTER IN VERY DUSTY OR HOT CONDIONS YOUR OIL
SHOULD BE CHANGED MORE FREQUENTLY.
–PLEASE DISPOSE OF USED ENGINE OIL RESPONSIBLY. TAKE IT IN A SEALED
CONTAINER TO YOUR LOCAL RECYCLING CENTER OR SERVICE STATION FOR
RECLAMATION.
–DO NOT THROW IT IN THE TRASH, POUR ON THE GROUND, OR DOWN A
DRAIN. THE EPA CAN HEAVILY FINE YOU FOR IMPROPER DISPOSAL!!!
4-16 Gear Oil Change
Gear Oil should be changed upon initial set up and then according to the maintenance schedule
thereafter.
Gear oil change procedure
1. Place scooter on center stand.
2. Place drain pan under Drain bolt (#2) and remove the bolt -Do not misplace washer seal
3. Allow gear oil to drain slowly rotate wheel to help get leftover oil out
4. Replace drain bolt WITH aluminum washer. Remove Fill bolt (#1)
5. Add 80W-90 gear oil (GL3 GL4 GL5) until it spills back out of the fill hole (approx 6OZ)
6. Replace Fill bolt and wipe down area. Check for leaks after a few miles of riding
16

4-17 Spark Plug
**WARNING**
Do the spark p ug check with the engine off and coo . If hot, the engine cou d burn you!
Spark Plug is located behind the access door in front of the seat.
1. Remove the one retaining screw then gently pry the door off by gripping the vent holes.
2. Pull the spark plug boot off the plug (#1)
3. Use a 5/8” spark plug socket to remove the spark plug from the head
4. Inspect the spark plug electrodes for deposits erosion and carbon fouling.
5. Use a wire brush to clean a dirty plug before reinstalling.
6. If electrodes are eroded or fouled replace plug.
7. Check spark plug gap. It should be between 0.6-0.8mm
8. Thread plug in BY HAND to avoid cross threading. Tighten with socket. Under tightening
can cause thread damage/engine damage.
9. Only use NGK spark plug Part#CR7-HSA to replace your plug.
4-17 Valve clearance check and adjustment
**WARNING**
Checking and adjusting va ve c earance is a crucia part of the maintainance of your scooter. Too
much c earance can cause poor performance and ticking noise from engine. Too itt e c earance
can cause popping, backfiring, and poor performance and can eventua y ead to va ve damage
and/or engine fai ure. Adjust va ve c earance with engine COLD (4 hours since ran) for accuracy.
Valve clearance should be .019 on the intake, .023 on the exhaust (Use that # eeler gauge)
Valve clearance check procedure
1. Remove the four bolts that hold in the under seat storage box. Lift out the box
2. Remove the rear body panel screws and gently pop the panels off.
3. Remove the seat bolts. Set the seat aside
4. Remove the front body cowling around the valve cover
17
5. Remove the engine fan cover
6. Rotate the engine so that the timing tab lines up with the “T” on the magneto
7. Remove valve cover and gasket.
8. Cam timing chain sprocket should look like the picture below
18
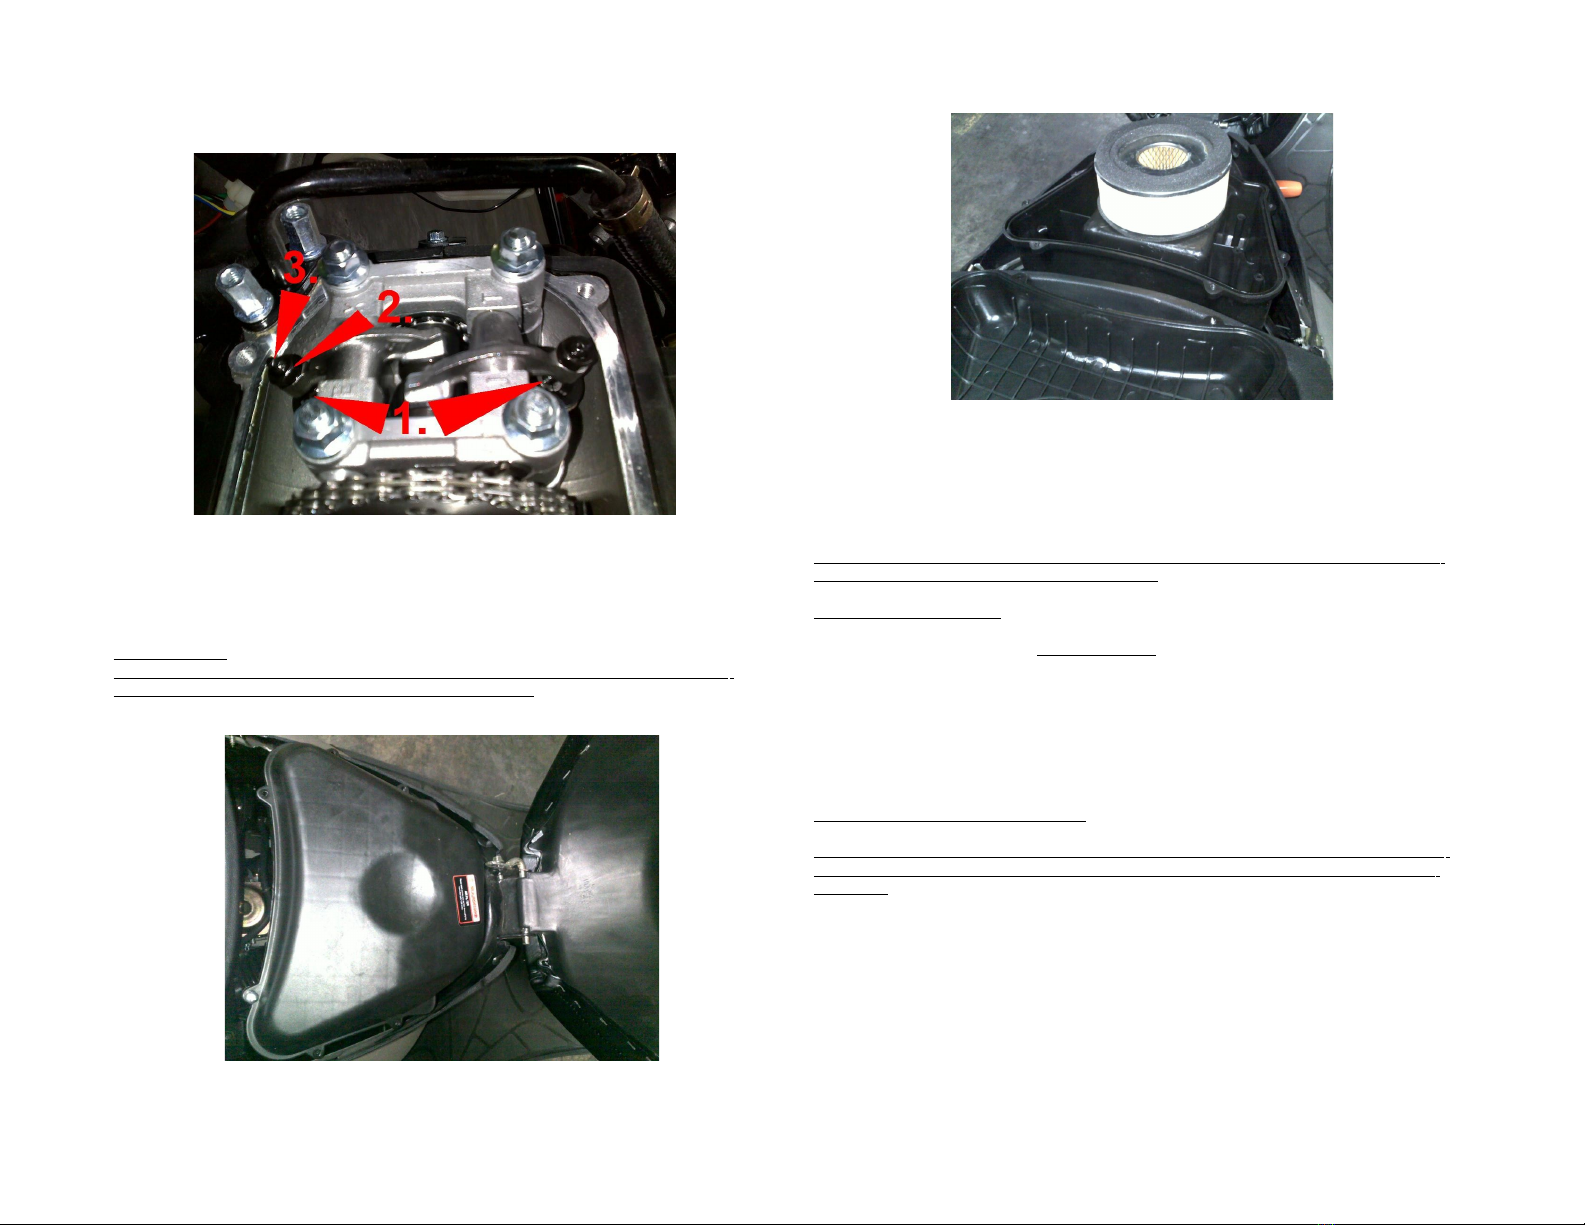
9. Use a feeler gauge to check the clearance between the valve adjuster and the lifter (#1).
There should be a light drag on the feeler gauge if clearance is correct.
10. If clearance is out of specification loosen lock nut (#2) and turn adjuster screw (#3) until
specification is reached. Hold adjuster screw with pliers or crescent wrench and tighten
lock nut.
11. Recheck valve clearance after all tools are removed from adjuster screw and lock nut. If
necessary readjust. Keeping tools on adjuster can give a false reading on the feeler gauge
12. Replace valve cover and EGR tube if applicable.
4-19 Air Cleaner
Air c eaner must be checked, and if needed rep aced according to the maintainance schedu e.
Fai ure to proper y service air c eaner can damage your engine.
1. Open the under seat storage area in order to gain access to the air cleaner assembly
2. Remove the screws around the air box and lift off the lid
19
3. Lift air cleaner element straight up to remove.
4. Inspect the air cleaner element for dirt and debris. If large debris is on the element lightly
tap air filter against a wall or object (away from bike) to dislodge large particles.
5. If there is dirt discoloration or water damage to filter contact your dealer for a
replacement filter immediately.
6. Check the intake tract for debris or dirt
7. Place filter back and replace cover and screws
Never use compressed air or water to c ean out air fi ter, these can cause tiny ho es in the fi ter,
which et dirt into your engine and cause damage!!!
4-20 Idle speed adjustment
1. Place the scooter on its CENTER STAND and start the engine. If it will not idle move on
to steps 2 and 3
2. To adjust idle speed locate the idle adjustment screw on the carburetor
3. Turn the screw clockwise (tighten) to increase idle speed.
4. Turn the screw counter-clockwise (loosen) to decrease idle speed.
5. The Ideal idle setting is slightly lower that what spins the rear wheel while on the center
stand. You do not want the clutch dragging at idle so therefore you do not want the rear
wheel to free spin while on the center stand.
4-20 Hydraulic Disc Front Brake Check
Your front and rear brakes must be inspected to ensure optimum stopping power and most of a
RIDER SAFETY. A owing the front brake to wear beyond the imits can cause you to have an
accident!!!
You may check your disk brake pads and rotor by visually inspecting them. Replace your pads if the
friction material is less than 1mm thick. The rotor must be replaced if it is less than 4mm thick.
The front disk is self adjusting. No adjustments are necessary.
View the sight glass on the front master cylinder and if the brake fluid level is below half remove the
two Phillips head screws to the master cylinder cover and add fluid until the level is ¾ full according
to the sight glass.
20
4-21 Rear Drum Brake Check and Adjustment
1. Place scooter on center stand and chock front wheel to prevent accidental disengagement
of the center stand.
2. Remove the muffler assembly
3. Remove the rear wheel (The rear drum may be applied to assist in removing wheel nut)
4. Inspect the shoes if the friction material is thinner than 2mm replace the rear shoes.
5. Replace wheel and muffler
To adjust the rear drum brake
1. Place scooter on center stand
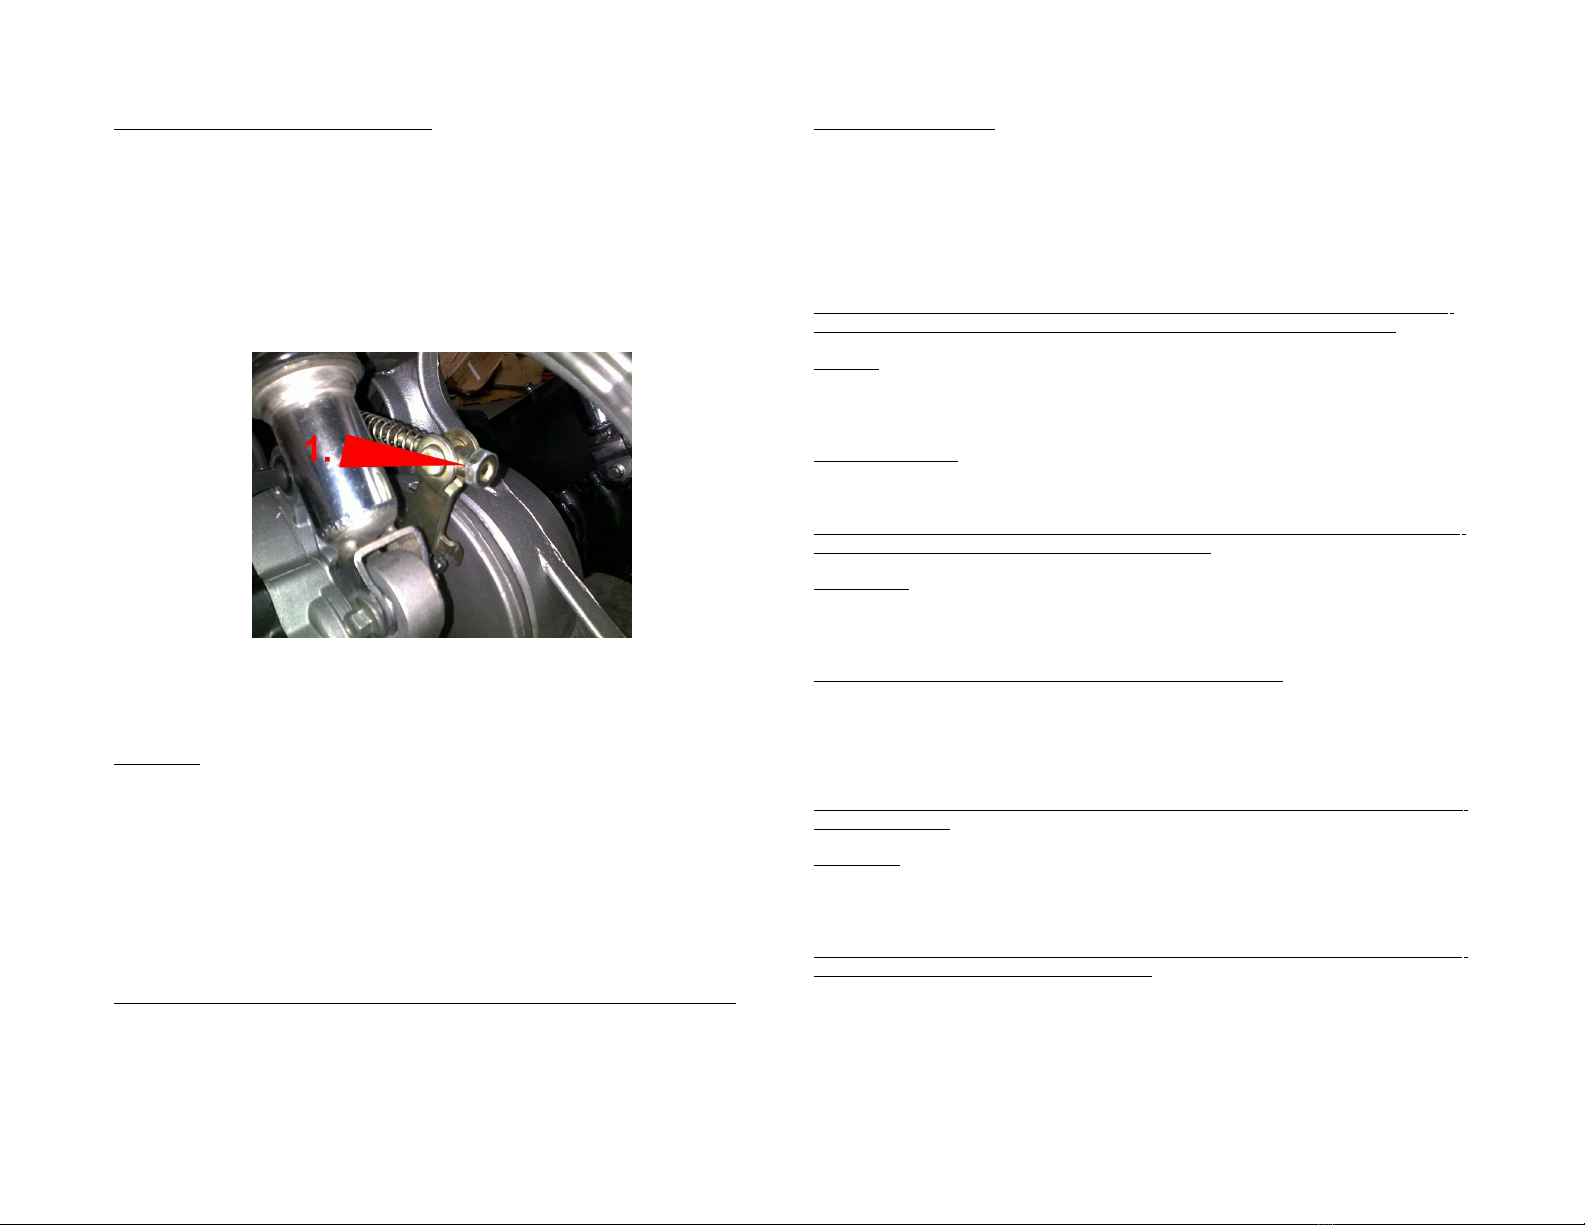
2. Locate the cable tension adjustment nut near the rear wheel (#1)
3. Spin the wheel. Turn the adjustment nut clockwise (tighten) until a slight amount of drag
is felt in the wheel while spinning.
4. Back the nut off one-half turn.
5. Test brakes handle should be firm and have approximately ½” of free play.
6. Remove bike from center stand.
4-12 Mu ler
The exhaust system must be periodically inspected for cracks loose bolts and rust damage.
1. Check muffler for crack at all joints and bends If any cracks are found have them repaired
at your local muffler shop or replace muffler
2. Check muffler bolts to head and to frame. These can vibrate loose over time and cause
your muffler to FALL OFF if not checked.
3. Check your muffler for rust if small amounts are found lightly sand with sandpaper or
scotch-brite and paint over with BBQ or Exhaust High temperature paint.
4. Deep rust pitting in muffler may cause an exhaust leak. The muffler must be replaced if
this is found.
Damage to your muff er, or exhaust eaks can cause exhaust va ve damage and engine fai ure.
21
4-22 Battery maintainance
1. The battery that comes with your scooter is maintainance free and does not require you to
add water.
2. The terminals must be cleaned periodically to prevent corrosion build up and terminal
damage.
3. After cleaning the terminals with a brush and a baking soda/water solution allow the
terminals to dry then apply a light coat of bearing grease over the them to prevent future
corrosion build up.
**WARNING** Never a ow a too or other METAL object to contact both termina s. This cou d
cause the meta to heat up and burn you, and cause permanent damage to your battery!!
4-22 Fuse
The fuse does not require any maintainance. If none of the scooter's electrical features are functioning
check the fuse first. It is located in the battery tray.
4-22 Troubleshooting
If the scooter has issues seek help from your dealer or local scooter shop
**WARNING** If you don't know what you are doing, do not dismant e or maintain your scooter.
You cou d void your warranty, be injured, or even ki ed!!!!!
4-22 Cleaning
Clean your scooter regularly to protect the finish and inspect for damage cracks wear and fluid
leaks.
**WARNING** High pressure water (or air) can damage your scooter.
Hand wash with mild detergent and water avoiding the intake of engine electrical components
instruments switches and muffler outlets.
Rinse well and hand dry.
**WARNING** Braking power may be owered temporari y after washing. Anticipate onger stops
to avoid an accident.
4-22 Storage
Some measures need to be taken for long term storage of scooter.
1. Wash your scooter and dry it. Allow it to completely dry!
2. Empty the fuel tank and carburetor
**WARNING** Gaso ine is extreme y f ammab e. Do not drain gaso ine whi e smoking or around
open f ames or sparks. The gaso ine cou d ignite!!!
3. Remove the spark plug and add ½oz of oil to the cylinder.
4. Kick the kick start lever a few times to coat the cylinder walls with oil.
5. Replace the spark plug
6. Remove the Negative cable from the battery.
7. Seal the muffler outlet with plastic to prevent moisture from collecting.
8. Cover the scooter with a cloth and store in a cool dry place AWAY from direct sunlight.
22

4-23 Removal rom storage
1. Take off the cover from the bike
2. Charge the battery then replace the negative terminal
3. Add fresh gasoline
4. Perform all pre-ride inspection checks. Try the scooter at low speeds in a safe riding area
away from traffic.
4-23 Speci ications
Dimensions
Overall length 198cm/78in
Overall width 68cm/27in
Overall height 113cm/44½in
Wheel base 135cm/53in
Ground Clearance 14cm/5½in
Top Speed 85kph/53mph +- 4%
Fuel economy 2.8L/100km/84MPG
Weight
Dry weight 112kg/247lbs
Capacities
Passenger capacity One Operator One passenger
Max weight capacity 150kg/330lbs
Fuel tank capacity 6L/1.6Gallons
Engine
Model 157QMJ
Type Horizontal 4-stroke single cylinder forced air cooled
Bore and stroke 57.4 X 57.8mm
Compression Ratio 9.2:1
Displacement 147.5CC
Max power output 6.5kw/8.7hp @7200rpm
Max Torque 8.0nm/5.9lb/ft @4250rpm
Start Mode Electric with kick backup
Spark Plug NGK CR7-HSA
Spark Plug gap 0.8mm/.030in
Carburetor VE45/23MM CVK
Chassis and suspension
Tire size 130/60-13 32psi
Front brake type Hydrolic disk
Rear brake type Cable operated drum
Transmission
Transmission type Step-less variable belt drive
Clutch type Dry shoe auto centrifugal
Electrical
Battery DC 12V-7AH YTX7A-BS
Lights
Headlight 12V-25W/25W (x2)
Tail/Stop 12V-5W/18W
Turn Signal 12V-10W (x4)
Running (Front) 12V-3.4W (x2)
Turn signal Indicator (cluster) 12V-3.4W (x2)
High beam indicator (cluster) 12V-3.4W (x1)
Cluster Lights 12V-1.7W (x3)
23
Section 5 : Initial Set-up
5-24 Post delivery inspection
Please contact your dealer if you did not receive a PDI document. Document should be
PEACEPDI.PDF.
Follow all instructions in PDI document
5-24 Warranty In ormation
See your dealer for warranty information.
24
Table of contents
Popular Scooter manuals by other brands


Roma Medical
Roma Medical Vegas 2 R100 user manual

Baja motorsports
Baja motorsports RT50-R Retro Setup instructions

Escooterclub
Escooterclub e-Scooter Series user manual

Lambretta
Lambretta 125 d instruction manual

Ninebot
Ninebot eKickScooter ZING E8 user manual

HYOSUNG
HYOSUNG Exceed 150 2002 owner's manual