Peaceful Breeze 681 User manual

5 Stage HEPA Air Purifier
MODEL 681
Please read and save these instructions.
Distributed by: Asthma Freedom, Inc., 3845 Tonawanda Creek Road, E. Amherst, NY 14051
Phone: 716•688•5922 • Fax: 716•688•5922
Thank you for choosing Peaceful Breeze™.
www.peacefulbreeze.com

◆ Important Safety Instructions
This product has been designed and manufactured in consideration of life safety.
WARNING
Before installing this product, carefully read all installation and operation instructions. Failure to follow the
important safety instructions listed below may result in personal injury or property damage. Do not operate this
product with a damaged cord or plug. If this product malfunctions, is dropped or appears damaged in any way,
return the complete product to the place of purchase for inspection, repair and/or replacement.
1. ALWAYS operate the unit from a power source using the same voltage, frequency and rating as indicated
on the product identification plate.
2. This product is not a toy. Close supervision is necessary when the unit is used near children or disabled
individuals.
3. DO NOT operate this product with a damaged cord or plug. If the purifier malfunctions, is dropped or
appears damaged in any way, return the complete unit to the place of purchase for inspection, repair
and/or replacement.
4. To reduce the risk of electrical shock, DO NOT expose the unit or power cord to water.
5. When product is not in use, being assembled, disassembled or cleaned, switch off power and unplug cord
from outlet.
6. DO NOT place objects on the product. Never allow objects to obstruct the inlet or outlet openings. DO
NOT operate unit near walls or curtains.
7. Use only accessories or attachments designed specifically for this unit. Use of attachments or accessories not
recommended for this product may result in personal injury or property damage and may void warranty.
8. This product is intended for residential use only.
9. DO NOT attempt to disassemble the unit other than to replace filters or fragrance cartridge.
10. DO NOT place the unit on a metal surface.
11. DO NOT use the unit in artificially hot or humid conditions. Never allow it to be used in any hazardous
environment.
12. Keep unit out of reach of children.
13. DO NOT clean the machine with organic solvents.
14. For optimal performance, place the unit 3 feet (90 cm) above floor level. In carpeted areas, the unit should
NEVER be used at floor level.
15. For rapid air purification, set unit on “High”, then turn to lower speed after 30 minutes. When the unit is
being used at night, set the speed at “Low” to keep the air fresh and clean.
16. NEVER wash the HEPA Filter. The filter is not washable and doing so will cause damage.
— 1 —

Please read and save these instructions.
◆ Main Features
1. Purification Function:
This purifier is equipped with a filter system, which consists of a washable pre-filter and a HEPA
filter using activated carbon. The HEPA filter captures 99.97% of airborne particles as small as .3
microns. The filter system can eliminate smoke, harmful gases (formaldehyde, carbon monoxide,
etc.) and odors, as well as eliminate harmful bacteria in the air, thus reducing air pollution and
improving air quality in the home.
2. Negative Ion Function:
Negative ions (≥3.5x10⁶ ions/cm3) are discharged to combine with dust, bacteria and mildew in
the air, eliminating them.
3. Sterilization Function: (available upon request)
The herbal sterilization filter is made from herbs by distilling their natural components, which have
broad-spectrum antibacterial effects and can restrict the growth and reproduction of gram-positive
bacteria and gram-negative bacteria.
4. Fragrance Emission Function: (optional)
Unit is fitted with an optional fragrance emission function. Either a canned fragrance system or
essential oil additive system is available. The unit can also be operated without fragrance.
5. Other Functions:
•Negative Ion Indication: The ION pattern indicator illuminates in the screen while the purifier
generating ions.
•The HEPA Replacement Indicator Light will illuminate after approximately 8000 hours of use.
After replacing the HEPA filter, insert a needle into the reset unit on upper right of the fixing
frame, the HEPA replacement indicator light will turn off.
•Air Pollution Detection: After 24 hours, the air pollution detector is at its optimum state. When
air pollution is severe, the API (Air Pollution Indicator) will illuminate and the unit will
automatically increase its setting (e.g. L->M or M->H) speed to purify the air.
•Remote Control: Remote control distance ≤16’ (5m).
•3 Speed Settings: H, M, L
•Timer: 2h, 4h, 8h
— 2 —

◆ Technical Specifications:
VOLTAGE:
Input Voltage: 120V AC ~ 60Hz
Consumed Power: 39W
WORKING ENVIRONMENT:
Temperature: 14˚F - 131˚F (-10˚C - 55˚C)
Relative Humidity: ≤95% RH
EFFICIENCY AND EFFECTIVENESS:
Negative Ion Generated: ≥3.5x10⁶ ions/cm3
Air Flow: H: 3.5±0.5 m/s
M: 2.0±0.5 m/s
L: 1.0±0.5 m/s
HEPA Efficiency: 99.97%
Area of Effectiveness: 315 - 405 sq. ft. (35 - 45 sq. m.) (approx. 20' x 20')
Noise: ≤26dB (excluding environmental noise)
Remote Control Distance: ≤16' (≤5m)
UNIT SIZE/WEIGHT:
Dimensions: 17-7/8" x 8-1/2" x 12-5/8"
(453 mm x 215 mm x 320 mm)
Weight: N.W. 9.7 lbs (4.4 kg)
G.W. 13.35 lbs (6.06 kg)
— 3 —
◆ Remote Control
All functions can be performed using the remote control supplied with this unit (batteries not included).
a) Remove battery cover and install two “AAA” batteries as indicated. (Please observe correct battery polarity.)
b) Point the remote towards the unit and press the appropriate button. The remote control will operate up to
16 feet (5 meters) from the unit.
WARNING
Be sure to replace the batteries with new batteries of the same type.

◆ Product Illustration
Front
Cover
4
Multi-Layer
HEPA Filter
7
Herbal Sterilization Filter
Optional (located behind HEPA Filter)
8
Pre-filter (located behind front cover)
5
Carry Handle
(located in back of unit)
Negative
Ion Outlet
1
2
Filtered Air
Outlet
3
Fixing
Frame 6
Air Pollution
Sensor (API)
9
Fragrance
Cover
10
Power
On/Off
Button
13
Function
Selection
Button
14
Function
Setting
Button
15
16
HEPA Indicator
Fragrance
Cartridge
11
Fragrance
Cover
10
1. Carry Handle
2. Negative Ion Outlet
3. Filtered Air Outlet
4. Front Cover
5. Pre-Filter
6. Fixing Frame
7. HEPA Filter
8. Herbal Sterilization Filter
9. Air Pollution Indicator (API)
10. Fragrance Cover
11. Fragrance Cartridge (Optional)
12. HEPA Resetting Button Hole
13. Power ON/OFF Button
14. Function Selection Button
15. Function Setting Button
16. HEPA Indicator
HEPA Resetting
Button Hole
12
— 4 —

◆ Installation Instructions
1. Before replacing filters, turn off power to purifier and unplug power cord.
2. To remove front cover, press on the upper right and left corners of the
cover door.
3. After removing the front cover door, take off the pre-filter.
4. Remove multi-layer filter (HEPA + Activated Carbon Filter).
5. If desired, place the herbal sterilization filter in the inner part of the fixing frame as
shown, followed by the Multi-layer HEPA filter and the pre-filter.
6. Replace the front cover door as shown in the diagram at left. Press on the upper right
and left corners of the door to snap into place.
FRAGRANCE CARTRIDGE INSTALLATION (OPTIONAL)
Press the fragrance cover on the right side of the top cover to remove. Install the fragrance
cartridge into the unit. Press the cover lightly to lock into place.
ESSENTIAL OIL FILLING (OPTIONAL)
Switch off the power and unplug power cord to unit. Press and remove the fragrance cover. The Essential Oil
Holder will appear. Add one drop of essential oil and a little water into the holder, and then push the button to
ON. Replace the fragrance cover. Plug in the unit and turn on the power to enjoy the aromatic air.
CAUTION: To avoid unpleasant smell, do not use the fragrance holder when essential oil is in use.
◆ Operation Guide
NOTE: For best results, we recommend you operate your air cleaner 24 hours a day. Smoking, outside air or
other pollutants will contaminate the air quickly. While the air cleaner will not process all the air in a room; the
more air circulated through the filter, the more filtered air returns to the room. Portable air cleaners will be much
more effective in rooms where all the windows and doors are closed. For best performance, the air outlet slot
should be kept clear, at least 3 feet (90 cm) in all directions.
1. Carefully remove unit from the box (please save the box for storage).
2. Ensure filter is installed before operation. (Refer to Installation Instructions Section).
3. Plug cord into electrical outlet.
4. Press ON/OFF button (13) on the machine or remote control. The
default speed setting will be L(LOW).
5. Press the function-selecting button (14) to choose the function.
ION ➡ SPEED ➡ TIMER ➡ MODE will illuminate the screen.
6. Press the function-selecting button (15) to set the operation after
the mode has been selected:
A. Press button to select ON/OFF in ION function state.
B. Press button to select airflow: L(LOW) ➡ M(MEDIUM) ➡ H(HIGH) in SPEED function state.
C. Press button to select desired timer setting 2H, 4H or 8H.
D. Press button to select AUTO or MANUAL in the MODE function.
— 5 —
Power On/Off
Button
13
Function
Selection
Button
14
Function
Setting Button
15

7. If AUTO mode is selected, the unit will work at H(HIGH) speed automatically when API indicates severe air
pollution.
8. Press ON/OFF button to turn off.
9. For optimal performance:
•Place the machine on a flat surface. Never allow objects to obstruct the inlet or outlet windows. Keep the
negative ion outlet clear with at least 3' (90 cm) clear area around it. For most efficient operation and to
avoid electrostatic shock, keep unit away from metal materials.
•The herbal filter will create a soft fragrance in the air. After two or three days of use, the fragrance will
weaken. This does not affect the unit’s performance. The unit may be used with or without the herbal filter.
•To increase the fragrance from the unit, change the fragrance cartridge or add essential oil/water to the
essential oil holder.
10. Before disassembling or assembling parts, press ON/OFF button to turn off power and unplug.
◆ Maintenance:
WARNING
Disconnect from power supply before servicing.
1. Switch off and unplug the unit before cleaning. Clean the unit with a soft cotton cloth and mild detergent.
Do not use organic solvents. Exercise caution to ensure that no water gets into the machine.
2. Every 1-2 months, the pre-filter should be washed in soap and water. Allow the pre-filter to dry completely
before reinserting it into the machine.
3. Change the herbal sterilization filter monthly. To lengthen the life of the filter when not in use for long
periods of time, switch off and unplug the unit. Remove the filter and place in a sealed bag.
4. If the HEPA light illuminates or if the white surface of the filter turns black, replace the filter.
5. The multi-layer HEPA and herbal sterilization filters are not washable. If these filters should get wet, allow to
air dry completely in the sun before replacing or changing them.
NOTE: Placing the HEPA filter in a sunny location will “recharge” the photocatalyst in the filter, thus extending
the life of the filter.
7. Do not use unit in heavy smoke or dust conditions. This will damage the filters.
◆ Troubleshooting:
WARNING
DO NOT attempt to disassemble the unit other than to replace filters or fragrance cartridges. Contact Peaceful
Breeze™ at www.peacefulbreeze.com to have it replaced or repaired by a professional electric appliance
repair center. Failure to follow these important safety instructions may result in personal injury or property
damage and may void the product warranty.
— 6 —

Two-Year Limited Warranty:
Two-Year Limited Warranty: Asthma Freedom, Inc., the distributor of Peaceful Breeze™Products, warrants
each new product distributed or sold by it to be free from defects in material and workmanship under normal
use, its obligation under this warranty being limited to repair or replacement of the purchased product for a
period of two years from date of purchase. This warranty applies only to the original purchaser of this product.
This warranty does not apply to any product which has been subject to misuse, commercial use, or other use
not in accordance with its manual, or resulting from unauthorized attempts to repair the product. This warranty
does not apply to product failure resulting from normal wear and tear. Asthma Freedom, Inc. reserves to itself
the determination of whether the purchased product has been misused or otherwise used to void this warranty.
THIS WARRANTY IS GIVEN IN LIEU OF ALL OTHER WARRANTIES, EXPRESS OR IMPLIED, INCLUDING
WARRANTIES OF MERCHANTABILITY AND OF FITNESS FOR A PARTICULAR PURPOSE. ASTHMA FREEDOM, INC.
IS NOT LIABLE FOR CONSEQUENTIAL OR INCIDENTAL DAMAGES OF ANY NATURE, PURCHASER’S EXCLUSIVE
REMEDY BEING RIGHTS UNDER THIS WARRANTY. SOME STATES DO NOT ALLOW THE EXCLUSION OR
LIMITATION OF CONSEQUENTIAL OR INCIDENTAL DAMAGES OR ALLOW LIMITATIONS ON THE EXISTENCE OF OR
THE TIME PERIOD OF AN IMPLIED WARRANTY, SO THE ABOVE EXCLUSIONS AND LIMITATIONS MAY NOT APPLY
TO YOU. THIS WARRANTY GIVES YOU SPECIFIC LEGAL RIGHTS, AND YOU MAY HAVE OTHER RIGHTS, WHICH
VARY BY STATE.
To exercise this warranty you must do the following, within the two-year warranty period: Return product and
copy of sales receipt, per the return policy on www.peacefulbreeze.com, to Asthma Freedom, Inc., 3845
Tonawanda Creek Rd., E. Amherst, NY 14051, postage prepaid and insured.
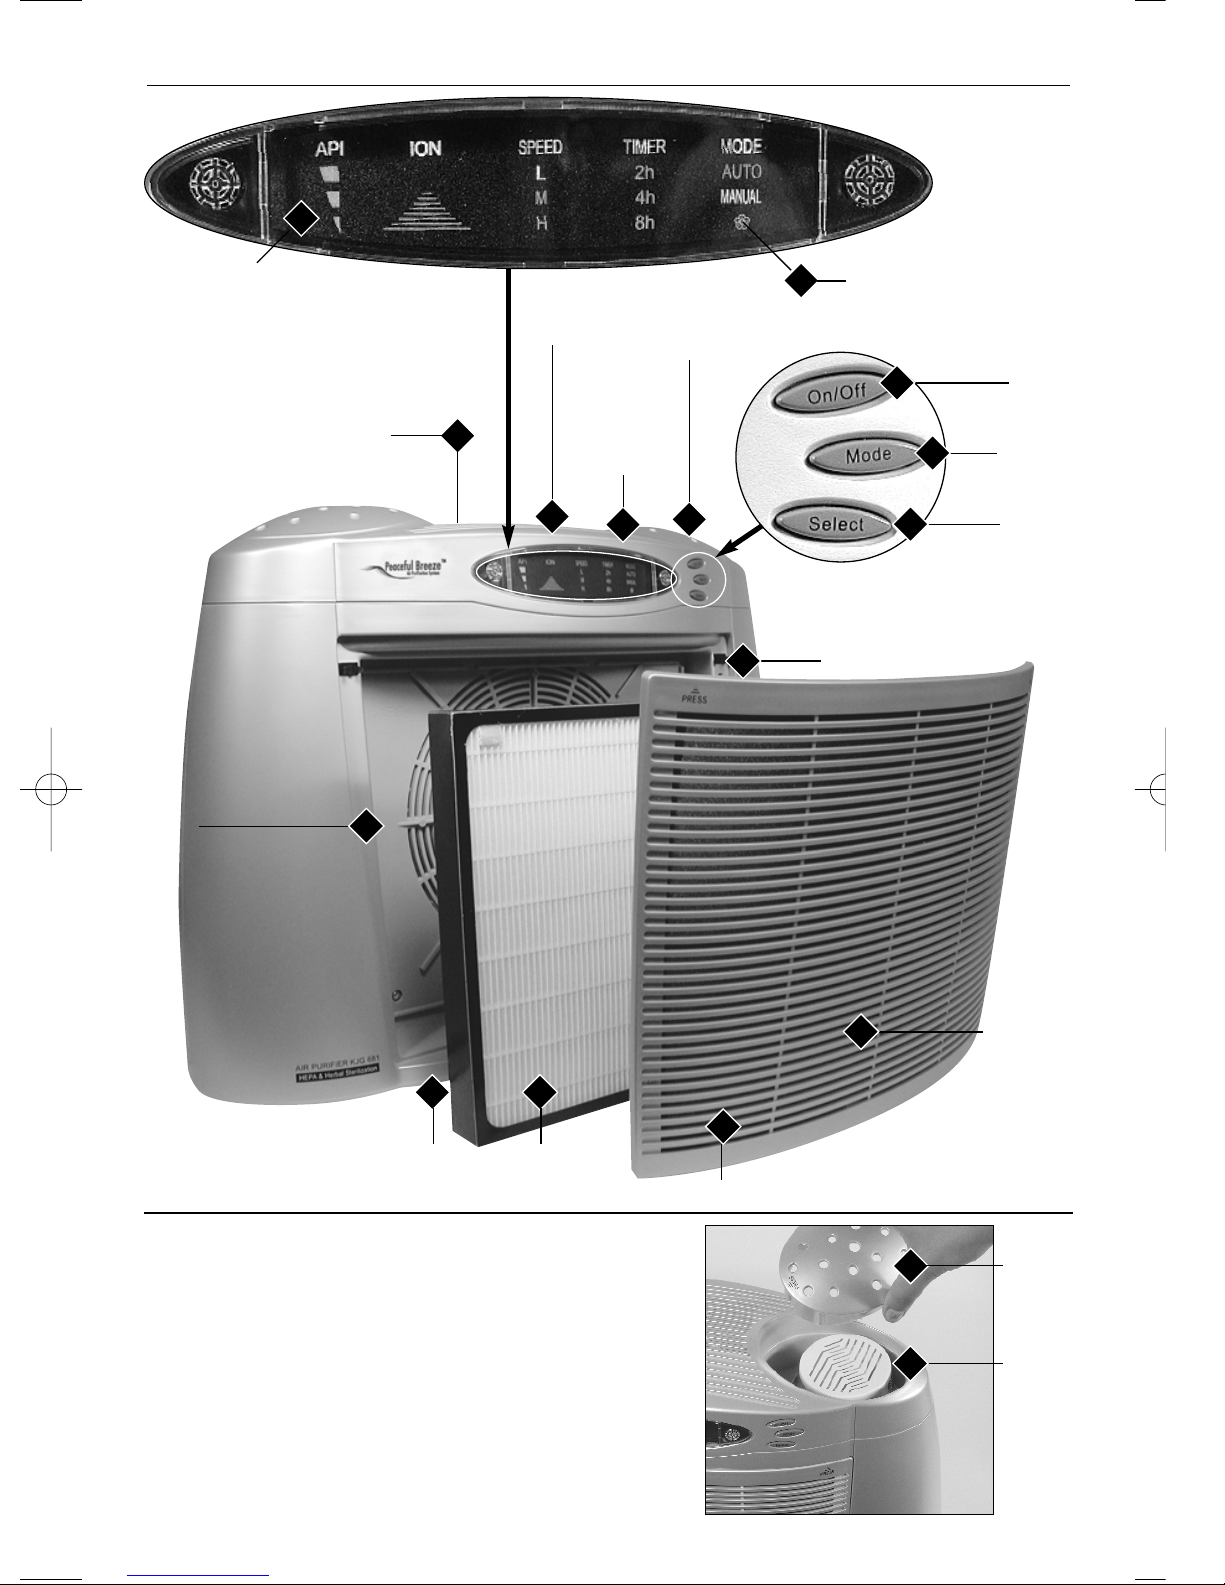
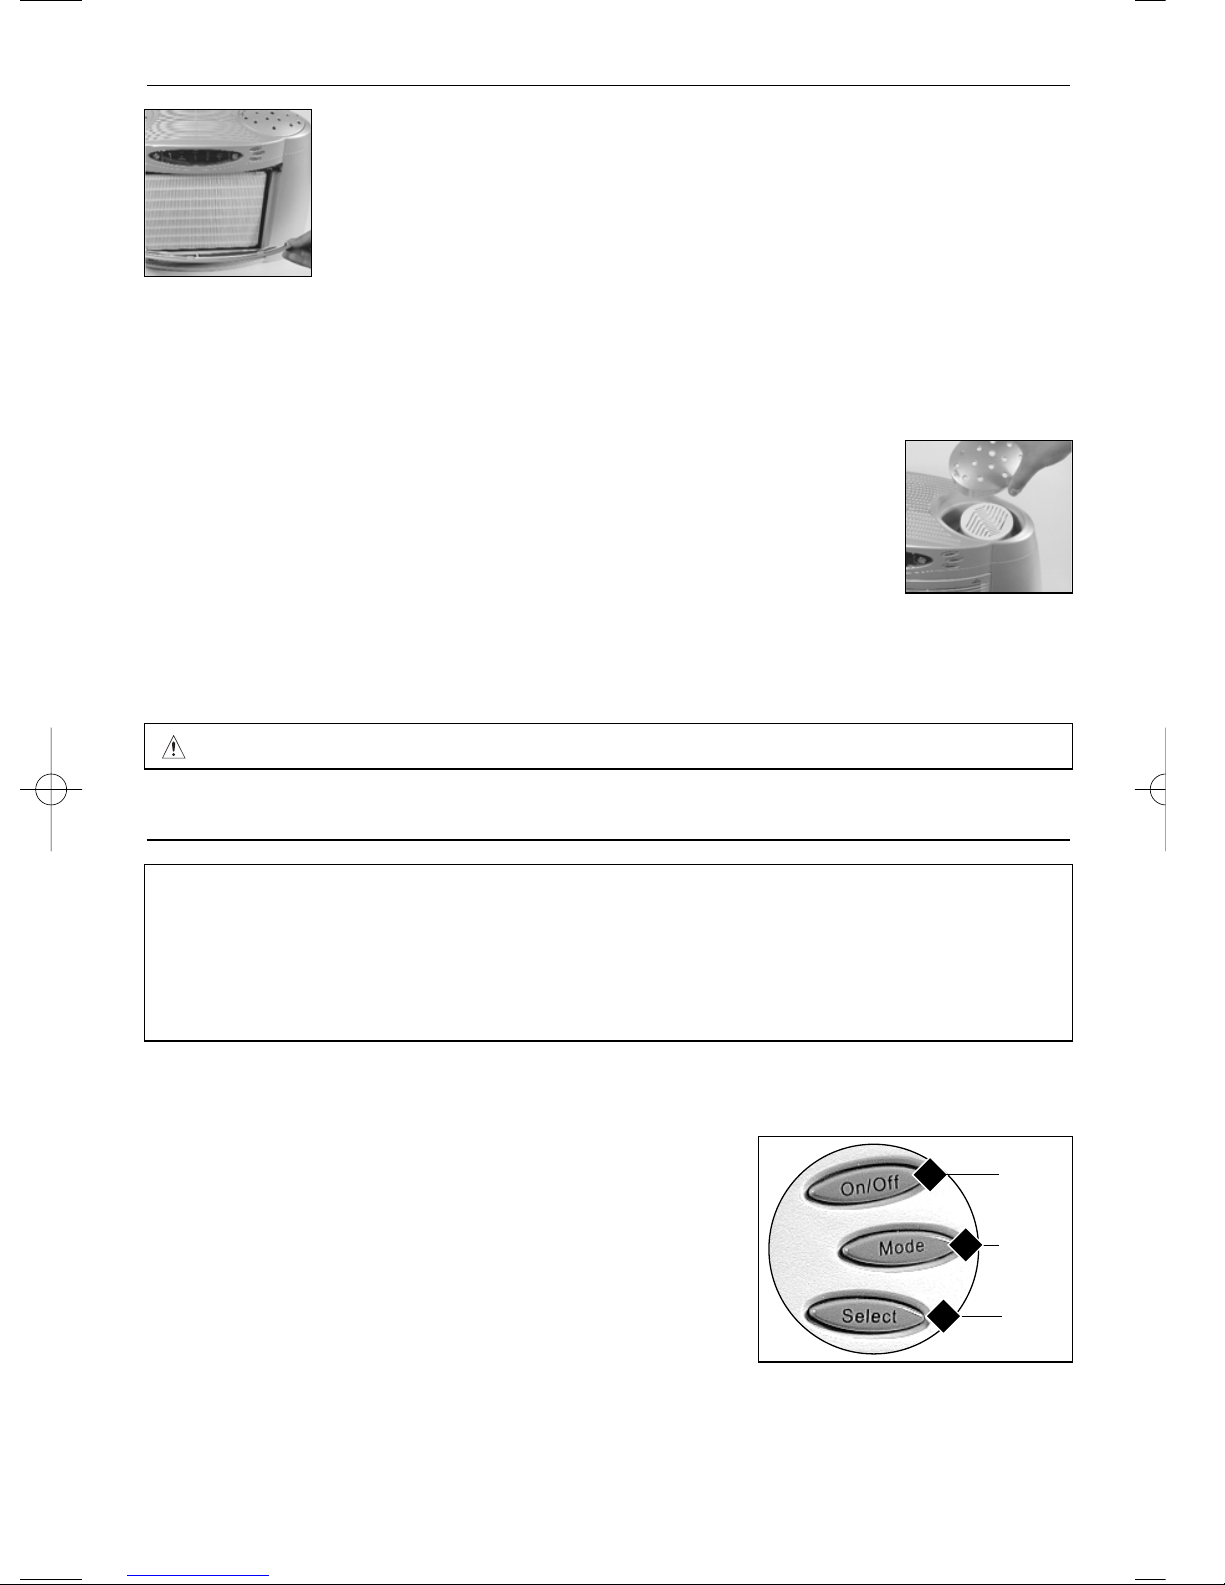
Please note that due to minor changes in design or otherwise, the product purchased may sometimes slightly
differ from the illustration on the product box or instructions.
— 7 —
Peaceful Breeze™ is a registered trademark of Asthma Freedom, Inc., E. Amherst, NY 14051
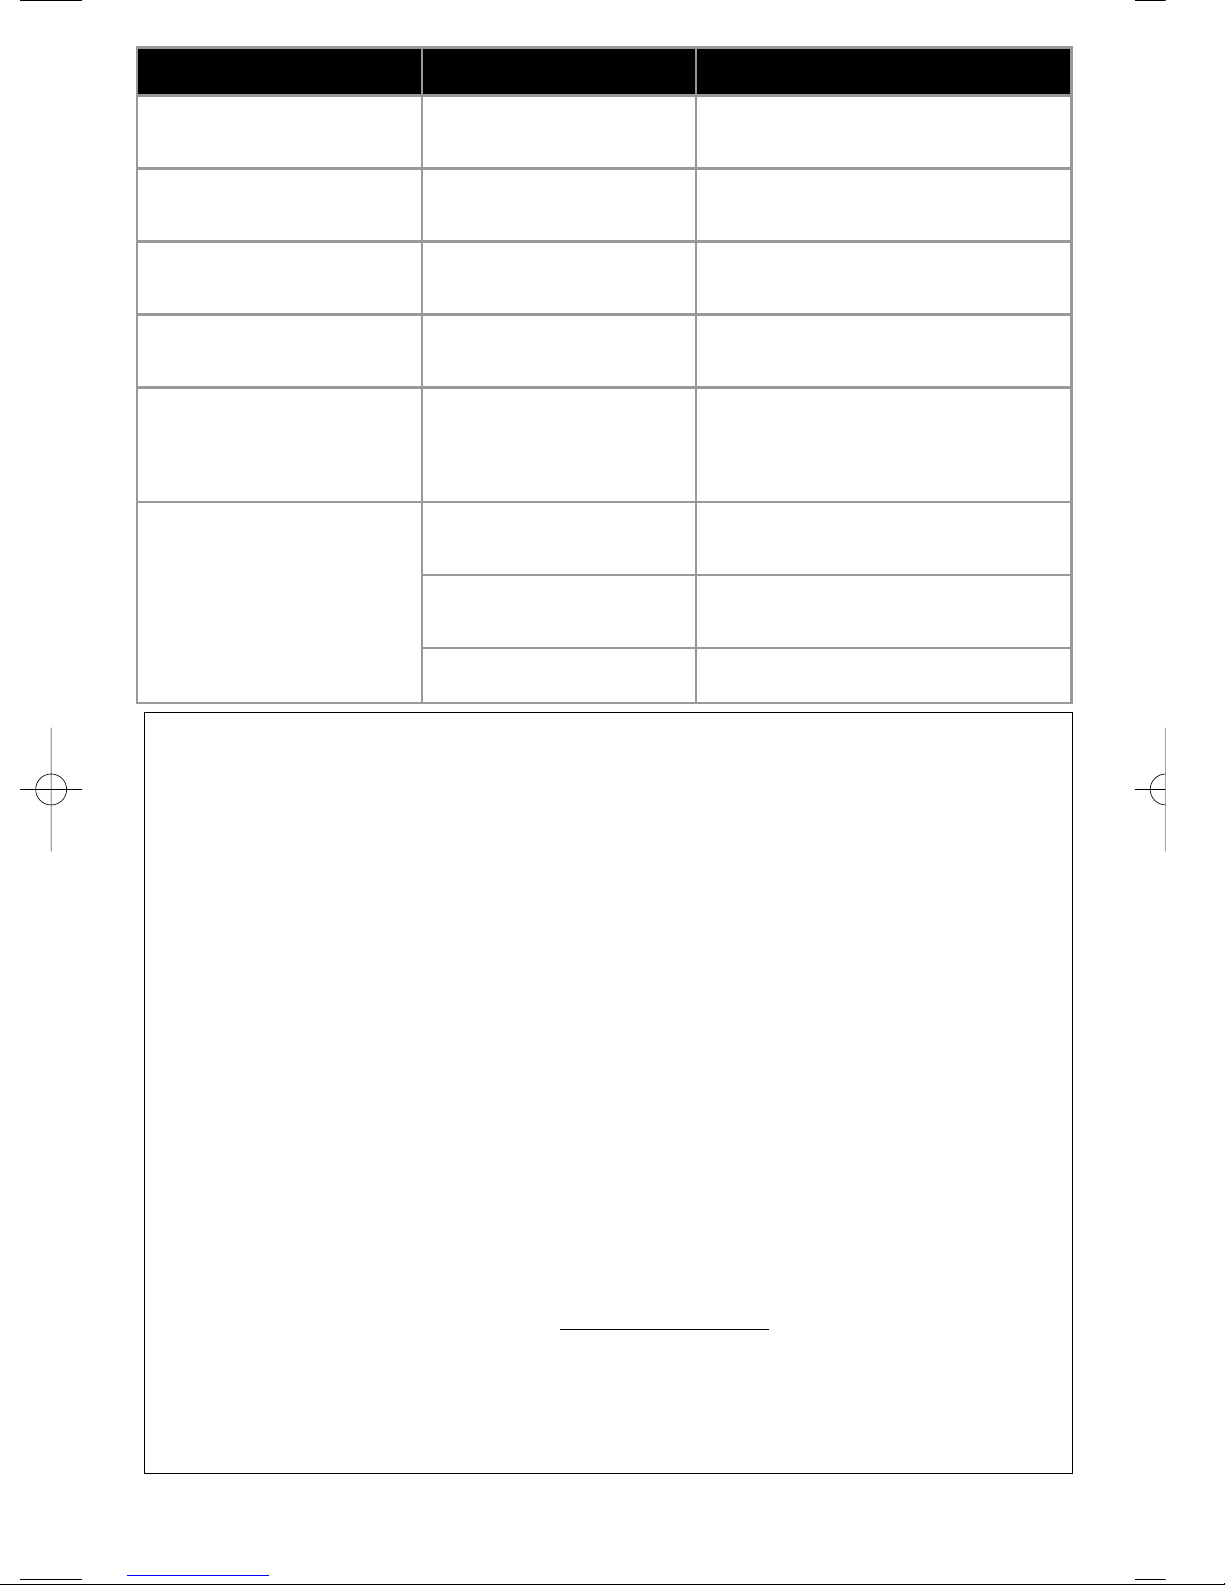
PROBLEM POSSIBLE CAUSE TRY THIS
No Power Fault in power source Switch on when the power
source is regular.
Not Working Plug not connected. Fault in
electrical circuit. Reinsert the plug into outlet or
plug into different outlet.
Weak air output The filter is sealed in packaging
material. Remove packaging material
and reinsert filter.
Remote control not
working Low battery Change battery
API (Air Pollution
Indicator) is not working Function is not set to
AUTO mode.
Press function selecting button to select
AUTO, then press the function setting
button to set.
Inefficient
deodorization The filter is incorrectly installed. Reinstall the filter according to the
installation instructions in this manual.
The pre-filter is dirty. Clean the pre-filter with water. Allow to air
dry thoroughly before reinserting.
The HEPA filter is dusty. Replace the filter.
Table of contents