Warranty
PEARL® Faucet Limited Lifetime Warranty covers replacement parts which include: a) leaking or
malfunction of the faucet head, b) faucet handle if proven to be a manufacturing defect, c) faucet
cartridge, d) other faucet components if proven to be a manufacturing defect. Further faucet
problems that extend beyond the above mentioned may be covered by the PEARL® Faucet Limited
Lifetime Warranty at the discretion of PEARL®. Only replacement parts covered in the Pearl® Faucet
Limited Lifetime Warranty are free of charge. PEARL® is not responsible for any shipping and handling
costs.
PEARL® Faucet Limited Lifetime Warranty does not cover nish reduction, scratches, staining,
acid/alkaline etching, damage from chemicals such as alcohol and solvents, damage from cleaning
practices, damage from abrasive cleaners, damage from atmospheric conditions, hose fatigue due to
natural wear and tear, fatigue to the faucet due to excessive force, or reduced ow due to blockages
from external debris. The liability of PEARL® only covers the PEARL® faucet and shall not exceed the
purchase price of the faucet. PEARL® will not be responsible for any incidental or consequential costs
associated with removal or installation of the faucet or its accessories. This includes any damage and
or costs from repair, replacement, or labour. Any subsequent damage or incidents associated with the
faucet will not be the responsibility of PEARL®. This includes ooring damage, water stains, cabinet
damage, appliance damage, or accidents resulting in physical harm. The responsibility of PEARL® only
extends to the physical component of the faucet, any damages and harm resulting outside of the
physical faucet are the responsibilities of the homeowner and installer. The PEARL® Faucet Limited
Lifetime Warranty extends only to the expected lifetime service of the faucet. The expected lifetime
service of the faucet is 10 years. Pearl® Faucet Limited Lifetime Warranty extends up to 10 years of the
original purchase date or date of occupancy in the original homeowners home. Installations that do
not follow the PEARL® instructions manual are not the responsibility of PEARL®. PEARL® strongly
recommends all installations to be installed by licensed professionals. All installations are required a
waterline pressure test to ensure no debris slips into the hose. PEARL® is not responsible for any
clogged hoses or reduced water ow as a result of dirty waterlines. PEARL® faucets are only
warrantable for home use only, any commercial usage voids warranty.
To be eligible, the homeowner must be the original purchaser of the faucet. If the home where the
faucet resides has changed owners, the warranty will be voided. Warranty is voided if the PEARL®
product was relocated from its initial place of installation, which includes installation to a dierent sink
within the building, relocation of faucet to a new home, installation of faucet after the rebuilding of
the original home, installation on commercial property, subjected to commercial use. Warranty will be
voided if the faucet has been subjected to faulty maintenance, faulty installation, or misuse of the
product.
To qualify for PEARL® Faucet Limited Lifetime Warranty, the homeowner must provide proof of
authenticity of the faucet and proof of purchase. Documents acceptable for proof of purchase
includes: original receipt from dealer, packing slip from the dealer, or invoice from the dealer. To prove
the product in question is a PEARL® faucet, homeowner must provide pictures of the whole faucet
and a picture of the PEARL® logo. The picture of the whole faucet must be clear and identiable as a
PEARL® faucet. A picture of a disassembled faucet does not meet the requirements of a clear
identiable picture. The picture of the PEARL® logo must clearly show the logo, pictures distorted or
modied by software voids warranty.
Exclusive Remedy: In the event of any defect in the Product that breaches the foregoing warranties,
PEARL®, at its option, will repair or replace the defective part of the Product. PEARL® is to be notied
with a description of the problem to claim the defective product. In order to notify PEARL® and
receive assistance or service under this warranty, the original purchaser may: (1) call 1-604-242-1601
for a consumer service representative who can assist you, or (2) write the consumer service
department c/o PEARL® Inc., 120-1231 Burdette Street, Richmond BC, V6V 2Z2, and include a
description of the problem, model number, location of purchase, your name, address, phone number
and approximate date of purchase, or (3) email PEARL® customer service department by going to
www.lifewithpearl.com, or (4) notifying the location or distributor from which the Product was
purchased. You may be required to return the Product to PEARL® for inspection and proof of purchase
may be required.
Limitations and Exclusions: PEARL® WILL NOT BE LIABLE FOR ANY OTHER DAMAGES OR LOSSES,
INCLUDING, BUT NOT LIMITED TO, INCIDENTAL AND/OR CONSEQUENTIAL DAMAGES, REGARDLESS OF
THE LEGAL THEORY ASSERTED, INCLUDING ANY CLAIM OR BREACH OF WARRANTY HEREUNDER OR
ANY OTHER CAUSE, AND WHETHER ARISING IN CONTRACT OR IN TORT (including negligence and
strict liability).
All of the above warranties do not cover damages resulting from improper maintenance, repair,
cleaning or installation, misuse, abuse, alterations, accidents, natural deposits, natural oxidation,
erosion, or force majeure. Damage to the product caused by accident, misuse or abuse is not covered
by this warranty. Failure to comply with cleaning instructions may void this PEARL® warranty. PEARL®
reserves the right to discontinue or modify any product at any time. All sinks and faucets should be
installed by qualied plumbing professionals. PEARL® is not responsible for any issues that arise due to
inadequate plumbing. To claim PEARL® Faucet Limited Lifetime Warranty, the homeowner should
email
[email protected] with
the
above
requir
ed
documents
or
call
1-604-242-1601
for
a
Customer
Service Representative between 9AM-5PM PDT Monday-Friday. *Labour, shipping and handling not
included
Testing
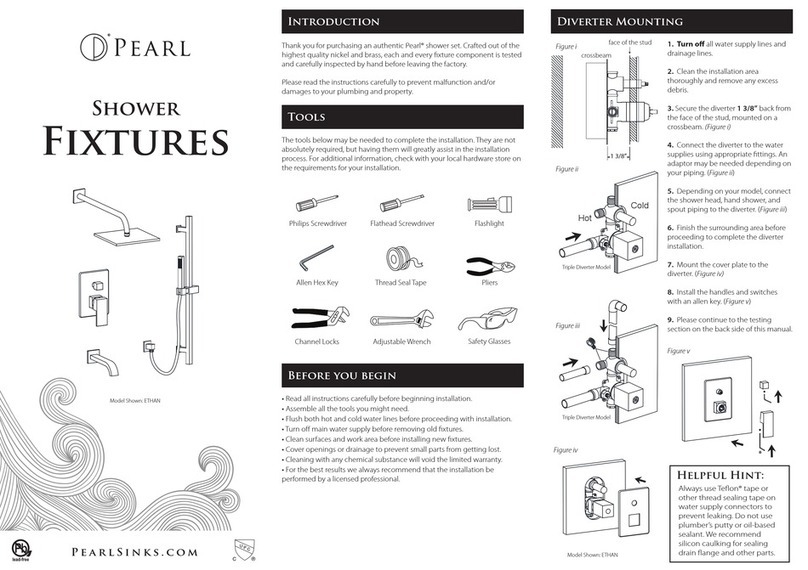
1. Turn on water supplies and
check all connections for leaks. If
there are leaks, turn o water
supplies and check to see if proper
washers were used along with
proper thread sealing tape.
2. Turn handles up and down or
left and right (where applicable) and
test both cold and hot water
connections.
Maintenance
Simply rinse the surface of the faucet with clear warm water regularly.
For tougher grime rinse with a mild liquid detergent if necessary.
Dry the faucet with clean soft cotton cloth.
All PEARL™ faucets are tted with ceramic cartridges that can withstand
more than 500,000 actuations. In the event that the cartridge malfunctions,
follow these steps to replace it.
Do NOT use any acidic cleaning solutions, abrasive cleaners, or
harsh cleaners, as it may damage the natural polish or satin
nish of your faucet.
13. Attach the gasket then nut and
secure the spout.
14. Tighten as needed
15-16. Attach the water mixer to the bottom
of the spout thread. Use sealant tape as
needed.
17. Using the 2 supplied short connector
hoses, attach each hose to the water mixer
and tighten. Use sealant tape as needed.
18. Connect the other end of the hose to
each handle and tighten. Use sealant tape
as needed.
19. Connect the supply line hoses to the
bottom of each handle base and tighten.
Use sealant tape as needed.
20. Connect the other end of the supply
line to the water supply outlets. Use sealant
tape as needed.
