Pelgrim KV 7144 User manual
Handleiding
Manual
Notice d’utilisation
Anleitung
12
34
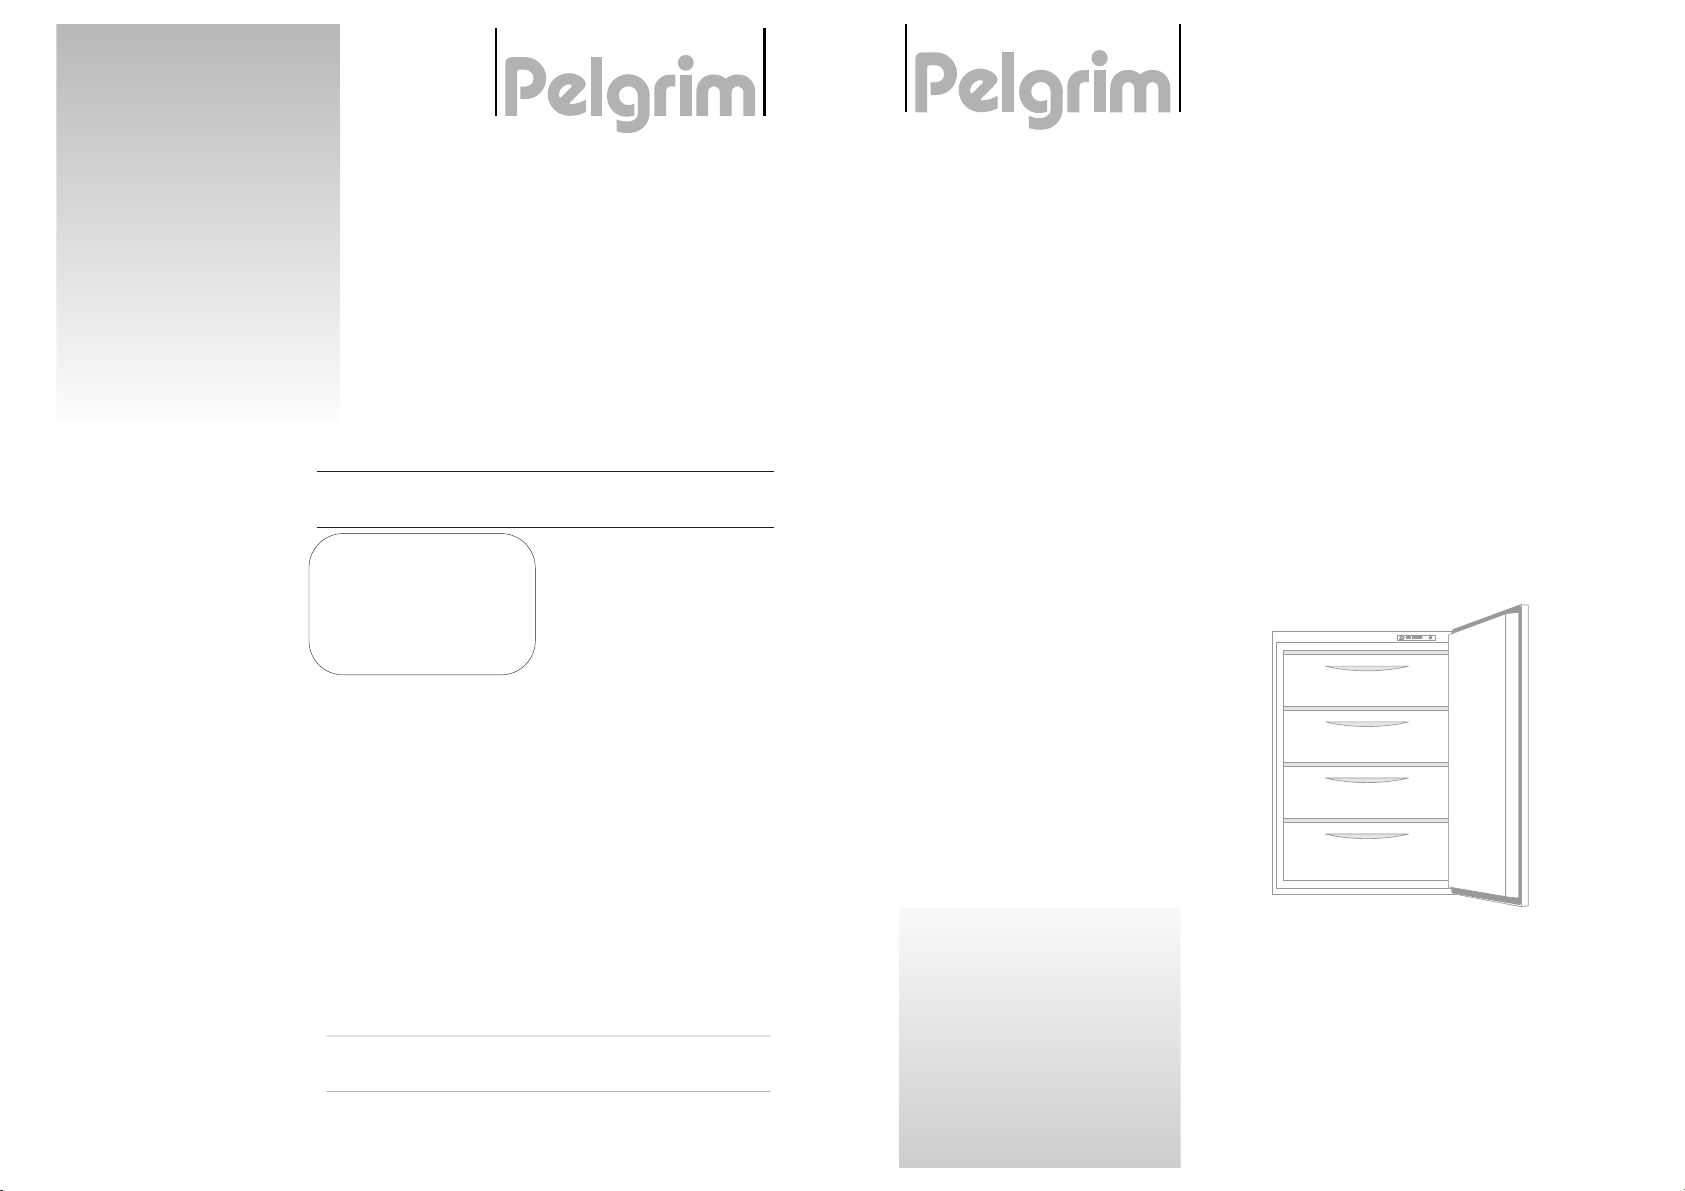
Geïntegreerde diepvrieskast
Integrated upright freezer
Congélateur armoire intégrable
Integrierter Gefrierschrank
KV 7144
Pelgrim confère 5 années de garantie sur l'appareil à condition que celui-ci a été raccordé
selon les règles de l'art par un installateur agréé conformément aux prescriptions d'installation.
Pelgrim s'engage à remplacer gratuitement pendant 5 années à dater de l'achat les pièces.
Pendant l'année suivant la date de l'achat il ne sera pas porté en compte de frais de
déplacement ni de main-d'oeuvre.
Tombent sous la garantie tous les vices et dysfonctionnements résultant de fautes de
construction ou de pièces défectueuses.
Les fautes d'installation et d'utilisation ne sont pas couvertes par la garantie.
Nom et adresse de l'installateur:
Date d'achat:
Collez ici l’autocollant avec le numéro de type de votre appareil
Kleben Sie hier den Aufkleber met der Typennummer Ihres Geruates auf.
Pelgrim gibt 5 Jahre Garantie auf dieses Gerät, falls es fachkundig durch einen anerkannten
Installateur und in Übereinstimmung mit den Installationsvorschriften angeschlossen wurde.
Pelgrim verpflichtet sich, 5 Jahre ab dem Kaufdatum, kostenlos Ersatzteile auszuwechseln.
Innerhalb eines Jahres nach dem Kauf werden keine Fahrtkosten und kein Arbeitslohn
berechnet.
Unter die Garantie fallen alle Reparaturen, die durch Konstruktionsfehler oder fehlerhafte
Ersatzteile auftreten.
Beim Kundendienst-Einsatz müssen Kaufbeleg und Garantiezertifikat vorgezeigt werden.
Schäden, die durch unsachgemäßen Gebrauch-/Installation entstanden sind, fallen nicht unter
die Garantie.
Name und Adresse Installateur:
Kaufdatum:
CERTIFICAT DE GARANTIE
GARANTIEZERTIFIKAT

Klap, voordat u de handleiding leest, eerst de uitvouwpagina uit.
Please, fold out the cover first.
S.v.p. déplier la page déplainte.
Bitte klappen Sie die Ausklappseite vollständig aus.
Nederlands . . . . . . . . . . . . . . . . . . . . . . . . . . . . . . . . . . . . . . . . . . . . . . . . . . . . . . . . . . . . . 1 - 11
English . . . . . . . . . . . . . . . . . . . . . . . . . . . . . . . . . . . . . . . . . . . . . . . . . . . . . . . . . . . . . . . . .12 - 23
Français . . . . . . . . . . . . . . . . . . . . . . . . . . . . . . . . . . . . . . . . . . . . . . . . . . . . . . . . . . . . . . . .24 - 35
Deutsch . . . . . . . . . . . . . . . . . . . . . . . . . . . . . . . . . . . . . . . . . . . . . . . . . . . . . . . . . . . . . . . .36 - 47
Doelmatig en Stijlvol
12
34
1
2

1
3930 6550 9840
toestelbeschrijving
1bedieningspaneel
2uittrekbare lade
woord vooraf
In deze handleiding vindt u informatie over de
installatie, veiligheid, bediening en onderhoud
van uw toestel.
Als u de informatie doorleest, bent u snel op
de hoogte van alle mogelijkheden van het
toestel.
Bewaar dit boekje. Een eventueel volgende
gebruiker van dit toestel kan daar zijn
voordeel mee doen.
inleiding
Uw nieuwe vrieskast is bestemd voor
huishoudelijke doeleinden. Het toestel is
geschikt voor het bewaren van
levensmiddelen.
De bewaartijden zijn sterk afhankelijk van de
kwaliteit van de levensmiddelen.
Het “Voorlichtingsbureau voor de voeding” in
Den Haag kan u informatie verschaffen over
het bewaren van levensmiddelen.
inhoud
Inleiding . . . . . . . . . . . . . . . . . . . . . . . . . . . . . . 1
Veiligheid . . . . . . . . . . . . . . . . . . . . . . . . . . . . . 2
Voor uw veiligheid . . . . . . . . . . . . . . . . . . . . . . 2
Ingebruikname . . . . . . . . . . . . . . . . . . . . . . . . . 3
Voor u het toestel kunt gebruiken . . . . . . . . . 3
Tips . . . . . . . . . . . . . . . . . . . . . . . . . . . . . . . . . . 4
Bewaartips . . . . . . . . . . . . . . . . . . . . . . . . . . . . 4
Energietips . . . . . . . . . . . . . . . . . . . . . . . . . . . . 4
Storingen . . . . . . . . . . . . . . . . . . . . . . . . . . . . . 5
Storingen zelf verhelpen . . . . . . . . . . . . . . . . . 5
Onderhoud . . . . . . . . . . . . . . . . . . . . . . . . . . . . 6
Ontdooien . . . . . . . . . . . . . . . . . . . . . . . . . . . . . 6
Reinigen . . . . . . . . . . . . . . . . . . . . . . . . . . . . . . 6
Installatie . . . . . . . . . . . . . . . . . . . . . . . . . 7 – 10
Inbouwen . . . . . . . . . . . . . . . . . . . . . . . . . . . . . 8
Technische gegevens . . . . . . . . . . . . . . . . . . 11
Inbouwmaten en beluchting . . . . . . . . . . . . . 11
Afvoeren verpakking en toestel . . . . . . . . . . 11
INLEIDING

3
voor u het toestel kunt gebruiken
reinigen
Maak eerst het interieur schoon en droog.
Gebruik voor het schoonmaken een sopje van
een neutraal schoonmaakmiddel (allesreiniger
of afwasmiddel). Het interieur na het
schoonmaken afnemen met schoon water en
droogwrijven.
Laat het toestel 1 à 2 uur drogen.
Stel de thermostaat in op de middelste stand.
Steek de stekker in het stopcontact. Het
toestel koelt nu continu tot de ingestelde
temperatuur is bereikt.
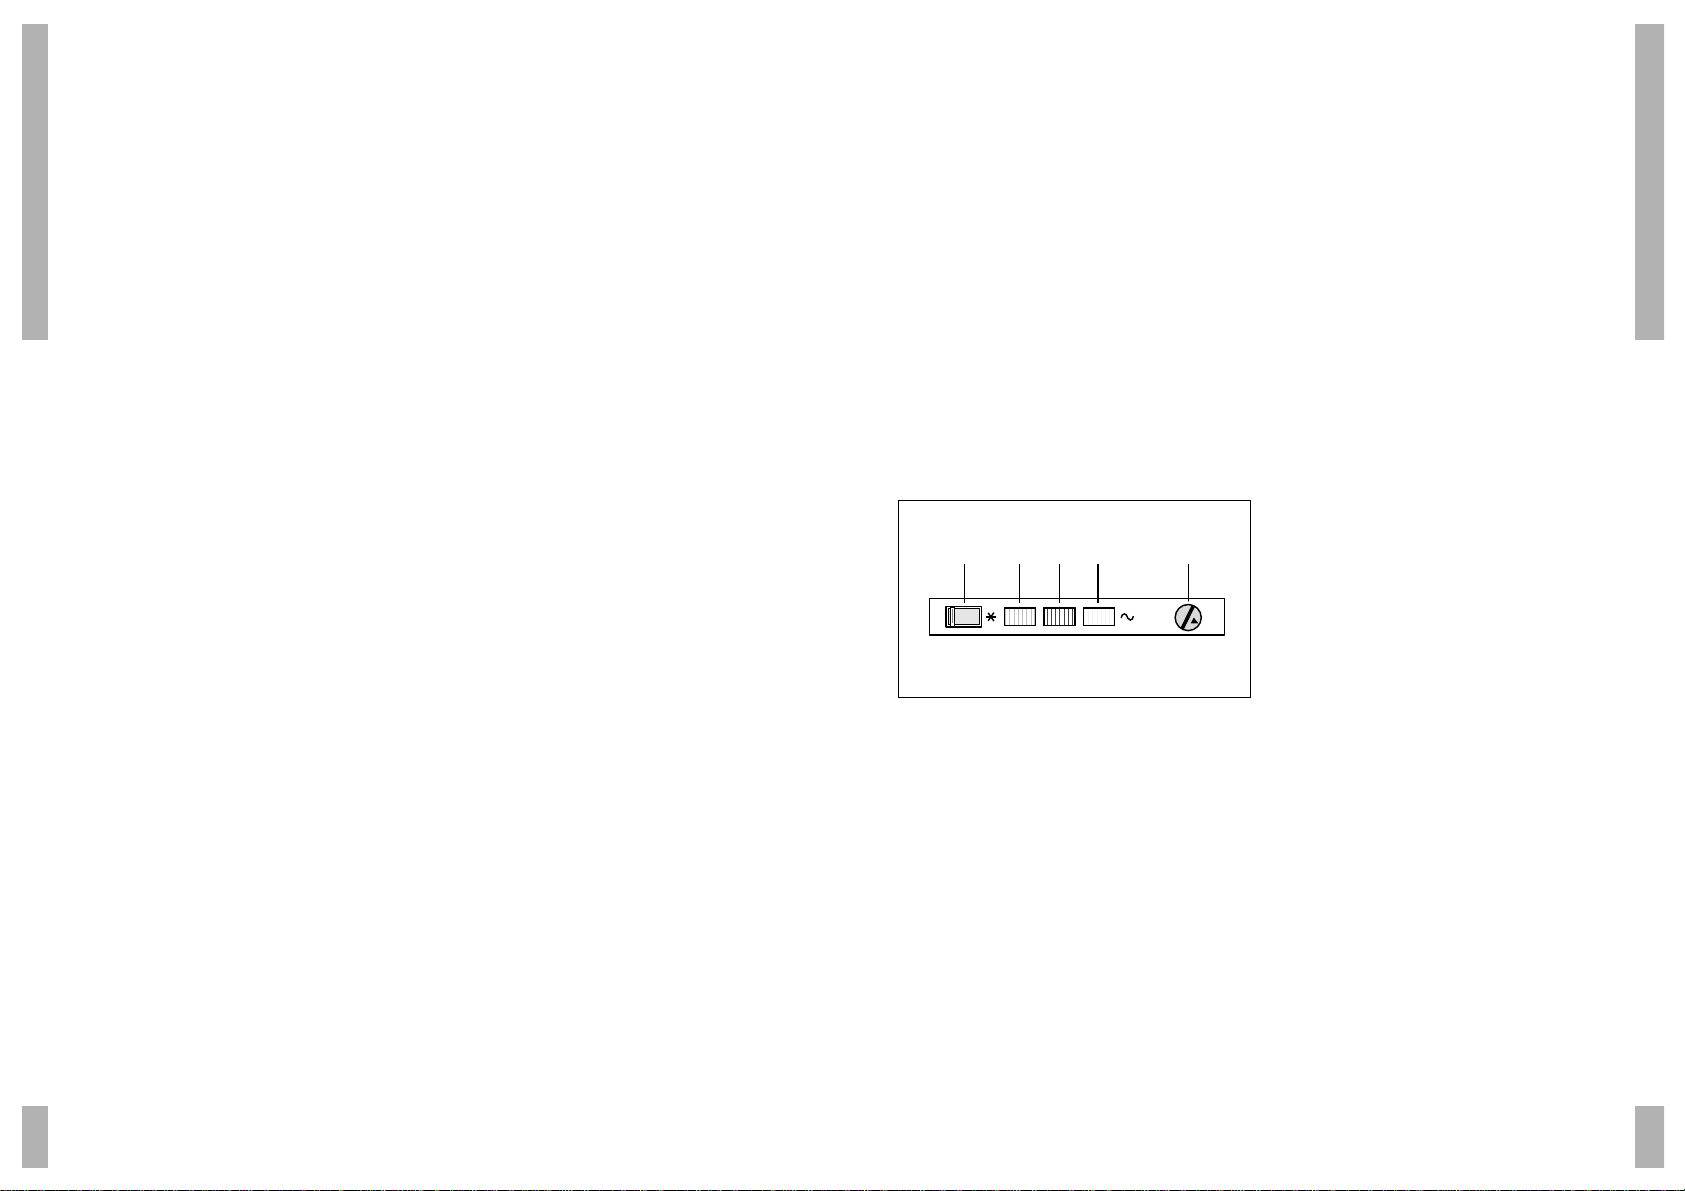
fig. 1
instellen van de temperatuur
Snelvriesknop geel (A) voor het invriezen van
verse producten.
Alarmlampje rood (B) licht op als de
temperatuur in de vriezer te hoog is. Dit kan
gebeuren:
– als de vrieskast aangesloten wordt;
– tijdens het invriezen van verse producten;
– als de deur te lang open staat of als de kast
defect is.
Bedrijfslampje groen (C) licht op als de
vrieskast aangesloten en in bedrijf is.
Snelvrieslamp geel (D) licht op als de
vrieskast aangesloten en in bedrijf is in de
stand snelvriezen
Thermostaat (E). De knopaanduiding is
voorzien van een punt (dit is de uit-positie) en
van de cijfers 1 (minst koud) tot en met 4
(koudst).
INGEBRUIKNAME
2
voor uw veiligheid
■De huisinstallatie waarop u het toestel
aansluit moet voldoen aan de nationale en
lokale voorschriften.
■Sluit het toestel aan op een volgens de
geldende voorschriften geïnstalleerde
wandcontactdoos.
■Houd voldoende afstand tussen de vriezer
en een hittebron. De mantel mag niet
warmer dan 75 °C worden.
■Koelleidingen nooit verbuigen.
■Om beschadigingen aan het koelsysteem te
voorkomen het toestel nooit reinigen met
scherpe voorwerpen. Bij beschadigingen
aan het koelsysteem, waarbij koelvloeistof
vrijkomt, de ruimte ventileren. Waarschuw
onmiddellijk de Servicedienst!
■Gebruik de plint, laden en schappen nooit
als opstapje.
■Laat kinderen nooit met het toestel spelen.
■Reparaties mogen alleen door een bevoegd
servicemonteur worden uitgevoerd.
■Neem contact op met uw leverancier als u
beschadigingen aantreft.
■Laat het toestel aansluiten/repareren door
een erkend installateur.
■Gebruik geen verlengsnoer voor het
aansluiten van de vriezer.
■Trek de stekker nooit aan het snoer uit het
stopcontact. Pak altijd de stekker zelf vast
en trek deze recht uit het stopcontact.
■Bewaar geen explosieve en licht
ontvlambare stoffen in de vriezer.
Alcohol en vloeistoffen met een hoog
alcoholpercentage alleen afgesloten en
staand bewaren.
■Geen flessen met vloeistof die bevriest in
de vriezer bewaren, ze kunnen kapot
vriezen.
■Heeft u uw oude diepvrieskast nog in huis
en gebruikt u deze niet meer, verwijder dan
de deur(en). Dit om te voorkomen dat
kinderen zichzelf kunnen opsluiten en in
levensgevaar komen.
VEILIGHEID
12
34
A D B C E

Remedie
Steek de stekker in het
stopcontact.
Vervang de zekering(en).
Stel de thermostaat goed in.
Plaats de levensmiddelen op
de juiste wijze in de vriezer.
Verplaats het voorwerp.
Oorzaak
Stekker niet in het
stopcontact.
Zekering in meterkast defect.
Thermostaat foutief ingesteld.
Onjuiste opstelling
levensmiddelen in de vriezer.
Er ligt een voorwerp tegen
het toestel.
Storing
Toestel doet niets.
Temperatuur in vriezer te
hoog of te laag.
Toestel maakt lawaai.
5
storingen zelf verhelpen
STORINGEN
4
bewaartips
Koop uitsluitend levensmiddelen in een
onbeschadigde verpakking.
Leg diepvrieslevensmiddelen zo snel mogelijk
na de aankoop in de vriezer. Zorg ervoor dat
ze tijdens het transport niet ontdooien.
energietips
opstelling
Hoge omgevingstemperaturen beïnvloeden
het energieverbruik nadelig. Ook direct
zonlicht of andere warmtebronnen in de buurt
van de vriezer hebben een ongunstige invloed
op het energieverbruik.
Ventilatie-openingen vrijhouden. Afgedekte
(vervuilde) openingen geven een hoger
energieverbruik.
gebruik
Te lage koeltemperaturen geven een onnodig
hoog energieverbruik.
Laat gerechten eerst afkoelen voordat u ze in
de vriezer plaatst.
Open de deur(en) zo min en zo kort mogelijk.
Schakel de vriezer uit als u deze voor een
langere periode niet gebruikt. Bijv. tijdens
vakanties.
TIPS

7
installatie
algemeen
Volg voor de elektrische aansluiting altijd de
nationaal en lokaal geldende voorschriften op.
Deze bepalen o.a. dat het toestel geaard dient
te zijn.
transport
Indien de kast "liggend" werd vervoerd, dan
mag de kast pas na een halve dag in gebruik
genomen worden. Dit moet, omdat de
koelvloeistof weer terug moet vloeien naar de
compressor.
plakband verwijderen
De deur is meestal met plakband geborgd.
Resten kunt u verwijderen met een sopje of
met wasbenzine.
plaatsing
Niet direct naast een verwarmingsbron (oven)
of in de zon. Het toestel functioneert het beste
bij een omgevingstemperatuur van
16-32 graden Celsius.
ventilatie
Het koelaggregaat behoeft geen onderhoud,
wel is een goede ventilatie vereist! In een
hoge keukenkast moet in de sokkel en bij het
plafond een opening aanwezig zijn. De
afmetingen van deze openingen zijn vermeld
bij de desbetreffende tekeningen.
INSTALLATIE
6
ontdooien
Ontdooi de vriezer wanneer de ijslaag een
dikte van 5 mm bereikt heeft.
Verwijder het vriesgoed.
Schakel de vriezer uit.
Ontdooi de vriezer.
Maak de vriezer schoon en droog.
Schakel de vriezer weer in.
Plaats het vriesgoed weer in de vriezer als de
vriezer op temperatuur is.
U kunt het ontdooien versnellen door een
schaal met heet water in de vriezer te
plaatsen.
Bewaar het vriesgoed op een koele plaats
ingepakt in dekens of kranten.
waarschuwing
Verwijder ijsaanslag nooit met scherpe
voorwerpen, ontdooisprays, een föhn, een
straalkacheltje of iets dergelijks. Dit kan tot
onveilige situaties leiden en onherstelbare
schade aan het toestel veroorzaken.
reinigen
waarschuwing
Trek voor het schoonmaken de stekker uit het
stopcontact. De stekker nooit aan het snoer
uit het stopcontact trekken!
Maak het interieur eens per maand schoon.
Gebruik voor het schoonmaken een sopje van
een neutraal schoonmaakmiddel (allesreiniger
of afwasmiddel). Het toestel na het
schoonmaken afnemen met schoon water en
droogwrijven. Laat het toestel 1 à 2 uur
drogen.
De mantel kunt u eventueel behandelen met
een onderhoudsmiddel voor lakken.
waarschuwing
Gebruik nooit een stoomreiniger voor het
reinigen van de vriezer. Dit is gevaarlijk.
Gebruik niet te veel vocht.
Vermijd het binnendringen van vocht in
elektrische componenten.
ONDERHOUD

9
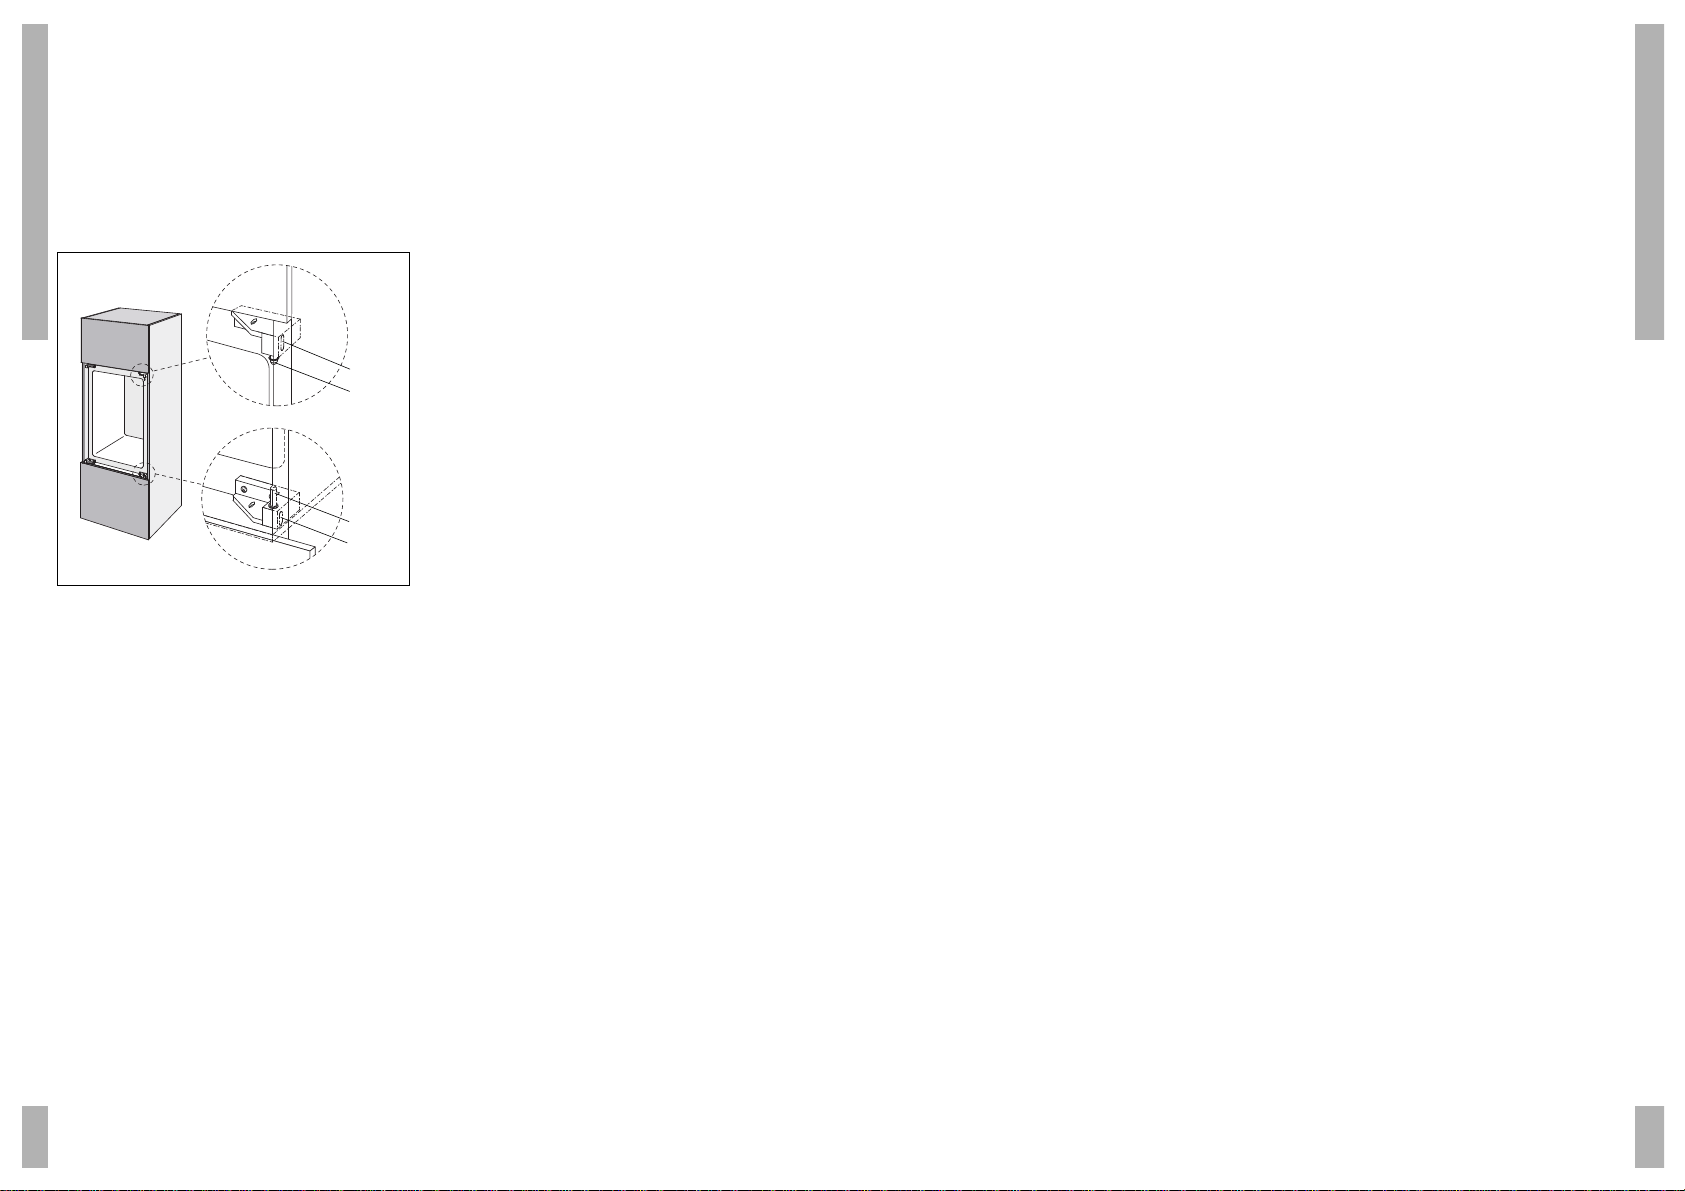
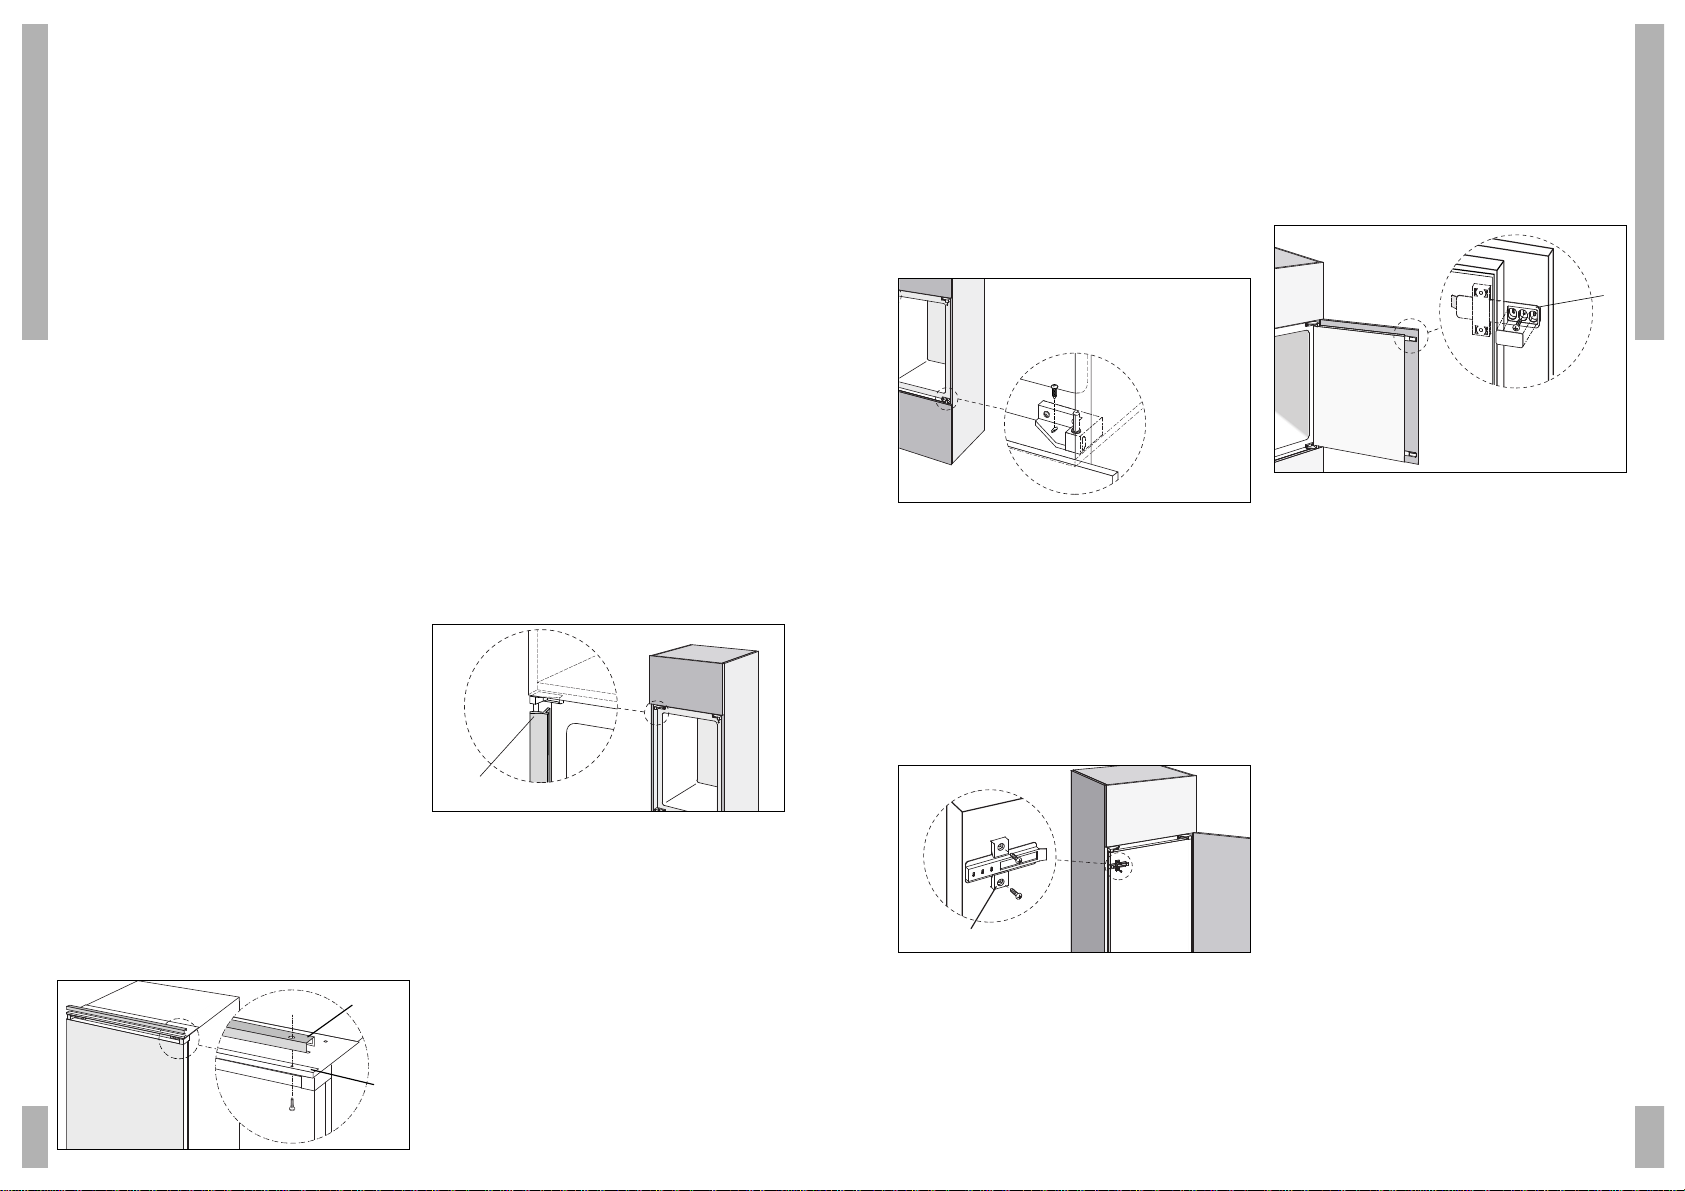
Bevestig het toestel aan de bodem van de nis
door twee schroeven door de gaten in de
onderste scharnierhouders (fig. 3b) te draaien.
Bevestig het toestel aan het plafond van de
nis door twee schroeven door de sierlijst te
draaien.
fig, 3b
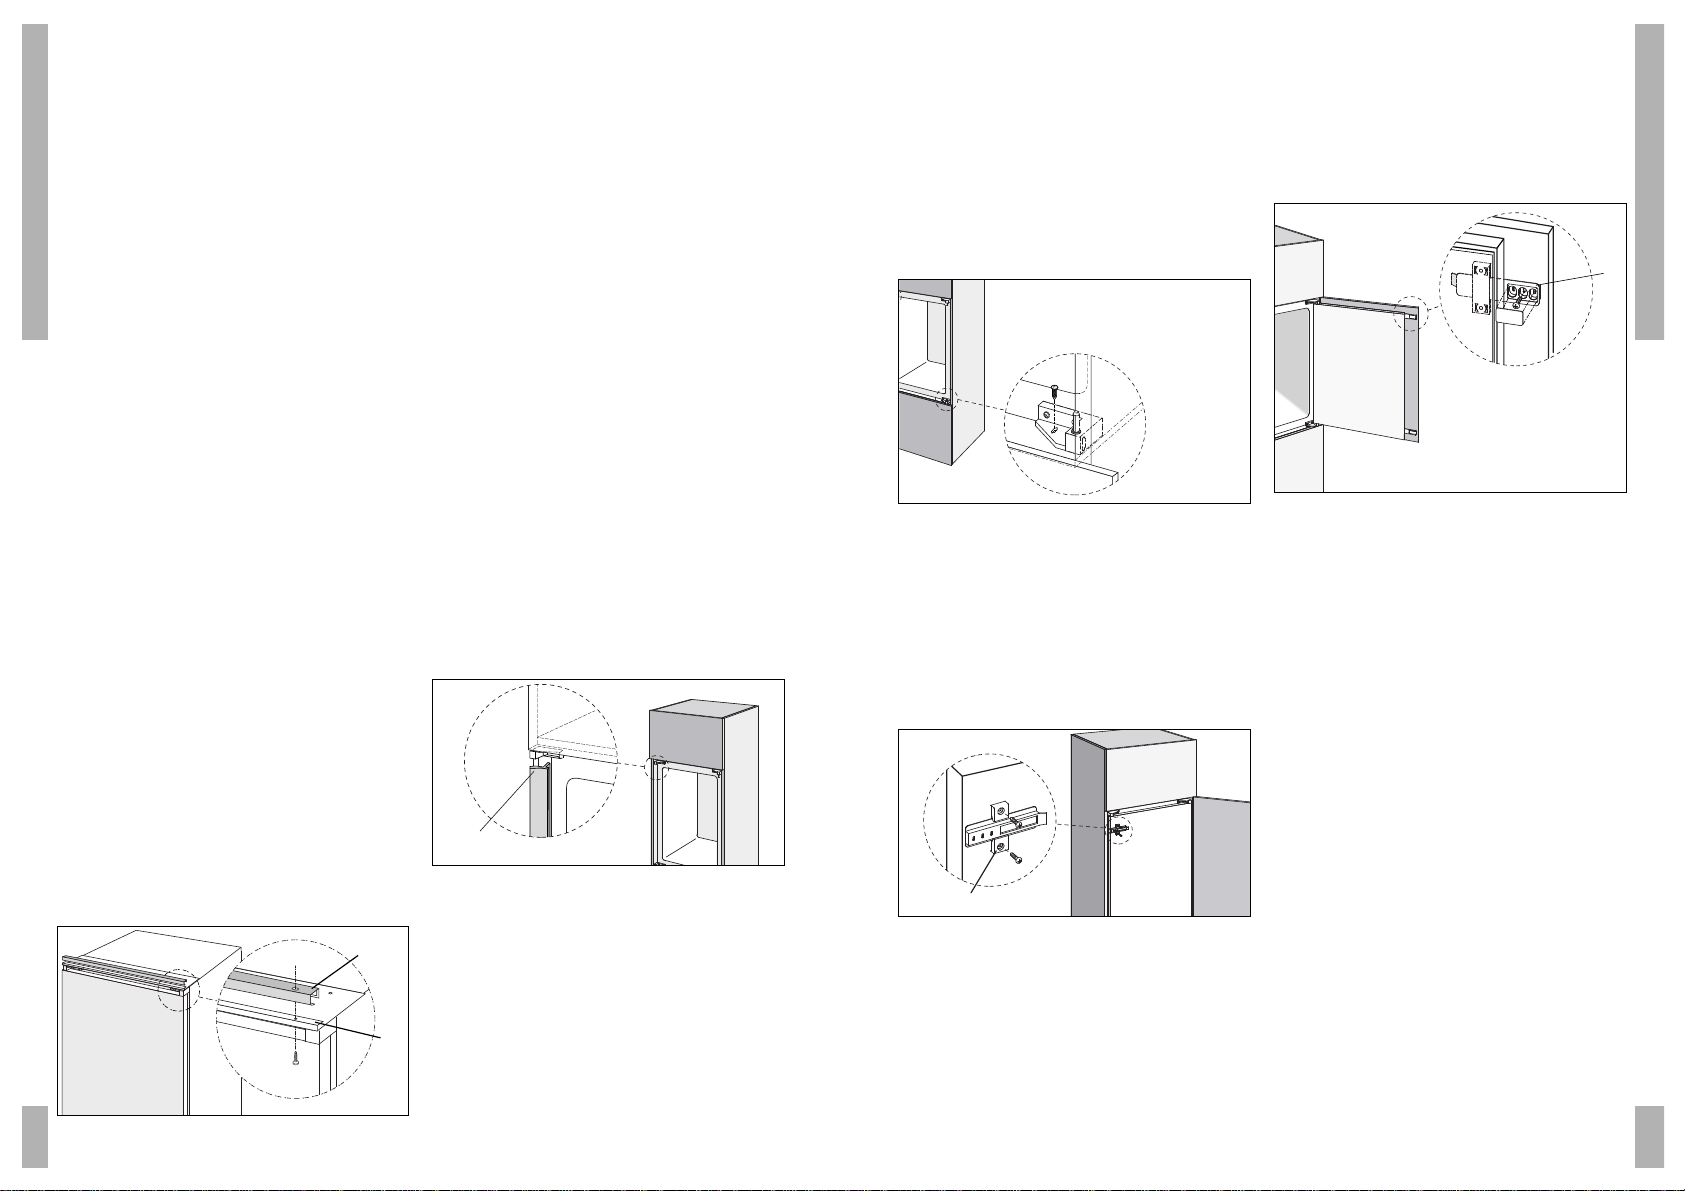
monteren deuren
Open de deuren van de keukenkast en de
vrieskast.
Monteer eerst de beugels (fig. 4-E) op de
vrieskastdeur met de platte kant tegen de
deur.
fig. 4
Open de deuren van de keukenkast en de
vrieskast zo ver mogelijk.
Schuif de deurgeleiders (fig. 5-F) in de beugels
E met de drie schroefgaten naar de buitenkant
van de vrieskastdeur.
fig. 5
Bepaal de positie van de bevestigingsgaten
voor deurgeleiders F. De deurgeleiders
moeten op 25 mm vanaf de rand van de
keukenkastdeur worden gemonteerd.
Bevestig de deurgeleiders F op de
keukenkastdeur.
Schroef de deurgeleiders vast met de
houtschroeven en plak de afdekplaatjes op de
deurgeleiders.
veranderen draairichting vrieskastdeur
Verwijder voorzichtig, met een mes of een
ander scherp voorwerp, het afdekdopje uit de
vrieskastdeur linksboven. Verwijder
vervolgens het dopje uit de vrieskastdeur
linksonder. Sluit de deur van de vrieskast.
INSTALLATIE
8
inbouwen
voordat u begint
Bepaal de gewenste draairichting van de
vrieskastdeur. Verander zonodig de
draairichting van de deur.
De keukenkast moet in alle richtingen haaks
en waterpas staan, om ervoor te zorgen dat de
deur van het toestel perfect sluit.
Leid de stekker en het netsnoer door de
achterkant van de keukenkast.
let op:
Stopcontact en stekker moeten te allen tijde
bereikbaar blijven.
Het bevestigingsmateriaal bevindt zich in de
onderste lade van de vrieskast.
plaatsen
Controleer de nishoogte.
Een smalle kier tussen de bovenzijde van het
toestel en het plafond van de nis wordt
weggewerkt met de sierlijst. Een bredere kier
wordt weggewerkt met het meegeleverde
afdichtprofiel.
Schuif, indien noodzakelijk, het afdichtprofiel
B op de sierlijst C (zie fig. 2).
fig. 2
Plaats het toestel in de nis.
let op:
De voorkant van de sierlijst moet gelijk liggen
met de voorkant van het bovenpaneel van de
nis.
De verticale kier tussen toestel en
keukenkast, aan de sluitkant van de
vrieskastdeur, wordt weggewerkt met de
meegeleverde kunststof plakstrip.
Meet de nishoogte en knip de plakstrip op de
juiste lengte.
Trek het toestel iets naar voren uit de nis.
Bevestig de strip aan het toestel
(zie fig. 3a-D).
fig. 3a
Schuif het toestel vervolgens voorzichtig terug
in de nis, met de sluitkant van de deur strak
tegen de kastwand.
INSTALLATIE
B
C
D
E
F
11
inbouwmaten en beluchting
technische gegevens
Typenummer KV 7144
Voeding 220/240 V 50 HZ
Inhoud 75 L
Hoogte 875 mm
Breedte 540 mm
Diepte 540 mm
afvoeren verpakking en toestel
Afgedankte apparaten direct onbruikbaar
maken. Dat wil zeggen stekker uit het
stopcontact trekken en de aansluitkabel
doorknippen. Een eventueel slot op de
koelkast onklaar maken of de deuren
verwijderen.
Het is belangrijk dat een oude koelkast op
verantwoorde wijze en conform de
overheidsbepalingen wordt afgevoerd.
Bij de productie van koel- en vriesapparaten
werden in het verleden CFK’s en HFK’s
gebruikt in het koelcircuit en het
isolatieschuim. Als deze stoffen vrijkomen
kunnen ze de ozonlaag in de atmosfeer
aantasten.
Uw nieuwe koelkast is volledig CFK- en
HFK-vrij.
Ook de verpakking van uw nieuwe koelkast
dient op verantwoorde wijze afgevoerd te
worden.
De overheid kan u ook informatie verschaffen
over het op verantwoorde wijze afvoeren van
afgedankte apparaten.
TECHNISCHE GEGEVENS
10
let op:
Houd nu de vrieskastdeur goed vast.
Draai aan de zijkant van de vrieskast, aan de
scharnierende kant van de deur eerst de
bovenste borgschroef S (fig. 6) los.
fig. 6
Schuif met behulp van de schroevendraaier
de bovenste borgschroef omhoog. Draai de
schroef vervolgens weer vast.
De scharnierpen T bevindt zich nu geheel in
de scharnierhouder. Leg het kunststof
ringetje, dat zich op de bovenste scharnierpen
bevond, apart.
Draai, terwijl u de deur nog steeds stevig
vasthoudt, de onderste borgschroef S los.
Druk de schroef met behulp van de
schroevendraaier naar beneden en draai de
borgschroef weer vast.
Til de deur van de vrieskast.
Leg het kunststof ringetje, dat zich op de
onderste scharierpen bevond, apart.
Leg de deur op een krasvrije ondergrond.
Verplaats de kunststof geleidingen voor de
scharnierpen naar de linkerzijde van de deur.
Stop de afdekdopjes in de vrijgekomen gaten
rechts.
Draai de borgschroef S aan de linkerkant los
en til de scharnierpen linksonder iets omhoog.
Zet de borgschroef weer vast en plaats het
kunststof ringetje op de scharnierpen.
Til de vrieskastdeur op en zet hem op de juiste
positie op de linker scharnierpen. Draai de
borgschroef weer los en schuif de onderste
scharnierpen met de schroevendraaier verder
omhoog en draai de borgschroef weer vast.
Draai de borgschroef linksboven los en druk
de bovenste scharnierpen iets naar beneden.
Schuif het kunststof ringetje op de pen.
Druk de scharnierpen nu geheel naar beneden
en draai de borgschroef weer vast.
INSTALLATIE
S
S
T
T

13
introduction
Your new freezer is intended for household
use. The appliance is suitable for keeping
food.
The length of time you can keep food depends
very much on the quality of the food.
table of contents
Introduction . . . . . . . . . . . . . . . . . . . . . . . . . . 13
Safety . . . . . . . . . . . . . . . . . . . . . . . . . . . . . . . 14
For your safety . . . . . . . . . . . . . . . . . . . . . . . . 14
Preparing for use . . . . . . . . . . . . . . . . . . . . . . 15
Before you can use the appliance . . . . . . . . 15
Tips . . . . . . . . . . . . . . . . . . . . . . . . . . . . . . . . . 16
Tips on keeping food . . . . . . . . . . . . . . . . . . . 16
Energy tips . . . . . . . . . . . . . . . . . . . . . . . . . . . 16
Faults . . . . . . . . . . . . . . . . . . . . . . . . . . . . . . . . 17
Trouble shooting . . . . . . . . . . . . . . . . . . . . . . 17
Maintenance . . . . . . . . . . . . . . . . . . . . . . . . . 18
Thawing . . . . . . . . . . . . . . . . . . . . . . . . . . . . . . 18
Cleaning . . . . . . . . . . . . . . . . . . . . . . . . . . . . . 18
Installation . . . . . . . . . . . . . . . . . . . . . . . 19 – 22
Building in . . . . . . . . . . . . . . . . . . . . . . . . . . . . 20
Technical data . . . . . . . . . . . . . . . . . . . . . . . . 23
Building-in dimensions and ventilation . . . . 23
Disposal of packaging and appliances . . . . 23
INTRODUCTION
12
appliance description
1control panel
2removable drawers
preface
These instructions for use contain information
about the installation, safety, control and
maintenance of your appliance.
The installation instructions are intended for
the installer, who can install the appliance
safely for you.
By reading the other information, you will
quickly become familiar with all the
appliance's features.
Please keep this book safely for future use.
APPLIANCE DESCRIPTION
15
before you can use the appliance
cleaning
First, ensure that the interior is clean and dry.
For cleaning, use the suds of a neutral
cleansing agent (a general detergent or
washing-up liquid). After cleaning, rinse the
interior with clean water and rub dry.
Leave the appliance to dry for 1 or 2 hours.
Set the thermostat in the middle position.
Insert the plug into the socket. The appliance
now cools continuously until the set
temperature has been reached.
fig. 1
setting the temperature
Yellow fast-freeze button (A) for freezing fresh
products.
Red alarm light (B) lights up if the temperature
in the freezer is too high.
This can happen:
– when the freezer is being connected up;
– when fresh products are being frozen;
– if the door has been open too long or if the
appliance is defective.
Green operational light (C) lights on when the
freezer is switched on and operational.
Yellow operational light (D) lights up when the
fast freeze button is switched on.
Thermostat (E). The knob is marked with a
point (this is the off position) and with the
figures 1 (least cold) to 4 (coldest).
PREPARING FOR USE
14
for your safety
■The house mains to which you should
connect the appliance should comply with
national and local regulations.
■Connect the appliance to a wall socket
which has been fitted in accordance with
the current regulations.
■Ensure there is a sufficient distance
between the freezer combination and a
heat source. The temperature of the mantle
must not exceed 75 °C.
■Never bend refrigerant pipes.
■To avoid damaging the cooling system,
never clean the appliance with sharp
objects. In the event of damage to the
cooling system resulting in leakage of
refrigerant, ventilate the area. Warn the
Service department immediately.
■Never use the plinth, drawers and shelves
as a step.
■Never let children play with the appliance.
■Repairs should only be carried out by a
recognised service engineer.
■Contact your supplier if you discover any
damages.
■Have the appliance connected/ repaired by
a qualified fitter.
■Do not use an extension lead to connect up
the refrigerator.
■Never pull the plug out of the socket by the
cable. Always grasp the plug firmly and
remove it straight from the socket.
■Do not store any explosive or highly
inflammable substances in the freezer.
Alcohol and liquids with a high percentage
of alcohol should only be stored in closed,
upright containers.
■Do not keep in the freezer any bottles
containing fluids which will freeze. The
freezing may cause the bottles to break.
■If you still have your old freezer at home
and no longer use it, remove the door(s).
This will prevent children shutting
themselves inside and endangering their
lives.
SAFETY
12
34
A D B C E

Remedy
Put the plug in the socket.
Change the fuse(s).
Set the thermostat correctly.
Place the food correctly in
the freezer.
Move the object.
Cause
The plug is not in the socket.
Defective fuse in the fuse-
box.
Thermostat has been set
incorrectly.
Food has been placed
incorrectly in the freezer.
Object touching the
appliance.
Problem
Appliance is not doing
anything.
Temperature in freezer is too
high or too low.
Appliance is making a noise.
17
trouble shooting
FAULTS
16
tips on keeping food
Only buy food in undamaged packaging.
Place deep-frozen food in the freezer as soon
as possible after purchase. Make sure that it
doesn't defrost during transport.
energy tips
position and arrangement
High ambient temperatures have a negative
effect on energy use. Keep the refrigerator in
a position away from direct sunlight or other
sources of heat.
Keep ventilation openings free. Clogged (dirty)
openings lead to higher use of energy.
use
Cooling or freezing temperatures which are
too low contribute to an unnecessarily high
use of energy.
Allow dishes to cool off before placing them in
the refrigerator.
Open the door(s) as infrequently and briefly as
possible.
Switch the freezer off when not in use.
TIPS

19
installation
general
The electrical connection should always be
carried out in accordance with the national
and local regulations in force. Among other
things, these regulations specify that the
appliance should be grounded.
transport
If the refrigerator has been transported on its
side, it should not be turned on for half a day.
This is because the coolant must be allowed
to flow back to the compressor.
removing adhesive tape
The door is usually secured with adhesive
tape. Residues can be removed with soapy
water or benzine.
positioning
Not to be placed next to a heat source (oven)
or in the sun. The appliance works best at an
ambient temperature of 16-32 degrees Celsius.
ventilation
The refrigeration unit does not require any
maintenance, but does require good
ventilation! In tall kitchen cupboards, there
must be openings in the plinth and at the roof.
The dimensions of these openings are given
on the relevant drawings.
INSTALLATION
18
thawing
freezer
Defrost the freezer when the layer of ice
reaches a thickness of 5 mm.
Remove the contents of the freezer.
Switch the freezer off.
Defrost the freezer.
Clean and dry the freezer.
Switch the freezer on again.
When the freezer reaches its correct
temperature, replace the freezer's contents.
You can speed up the defrosting process by
placing a bowl of hot water in the freezer.
Keep the contents of the freezer in a cool
place and wrapped in blankets or
newspapers.
attention
Never remove the ice with the aid of sharp
objects, defrost sprays, a hair-drier, a radiant
heater, or the like. This may lead to unsafe
situations and may cause irreparable damage
to the appliance.
cleaning
attention
Before cleaning the appliance, disconnect the
plug from the wall socket. Never disconnect
the plug from the wall socket by pulling on the
lead!
Clean the interior of the appliance once a
month.
lean the interior of the appliance once a
month. For cleaning, use the suds of a neutral
cleansing agent (a general detergent or
washing-up liquid). After cleaning, rinse the
interior with clean water and rub dry. Leave
the appliance to dry for 1 or 2 hours.
You may, if you wish, clean the mantle with an
enamel cleaner.
attention
Never clean the refrigerator with the aid of a
steam cleaner. This is dangerous.
Do not use too much moisture.
Avoid any moisture getting into electrical
components.
MAINTENANCE
21
Fasten the appliance to the floor of the
cupboard by screwing two screws through the
holes in the bottom hinge holders (fig. 3b).
Fasten the appliance to the roof of the
cupboard by screwing two screws through the
decorative frame.
fig. 3b
fitting the doors
Open the kitchen cupboard and freezer doors.
First fit the brackets (fig. 4-E) to the freezer
door with the flat side against the door.
fig. 4
Open the kitchen cupboard and freezer doors
as far as possible.
Slide the door guides (fig. 5-F) into the
brackets E with the three screw holes towards
the outside of the freezer door.
fig. 5
Determine the position of the fixing holes for
the door guides F. The door guides should be
fitted at a distance of 25 mm from the edge of
the cupboard door.
Fix the door guides F to the cupboard door.
Screw the door guides in place with the wood
screws and stick the cover plates to the door
guides.
changing the direction in which the freezer
door opens
Using a knife or other sharp object, carefully
remove the cap from the top left of the freezer
door. Then remove the cap from the bottom
left of the freezer door). Close the freezer
door.
INSTALLATION
20
building in
before starting
Decide in which direction the freezer door
should open. If necessary, change the
direction in which the door opens.
The kitchen cupboard must be level and
square in all directions, so that the door of the
appliance will close perfectly.
Draw the plug and the mains flex through the
rear of the kitchen cupboard.
please note:
Wall socket and plug must be accessible at all
times
Fixing materials are in the bottom drawer of
the freezer.
installation
Check the height of the cupboard.
A small gap between the top of the appliance
and the roof of the cupboard is concealed
using the decorative frame. A wider gap is
concealed using the sealing strip supplied.
If necessary, slide the sealing strip B onto the
decorative frame C (see fig. 2).
fig. 2
Place the appliance in the cupboard.
please note:
The front of the decorative frame must be
level with the front of the top panel of the
cupboard.
The vertical gap between the appliance and
the cupboard at the side on which the freezer
door closes is concealed with the plastic
adhesive strip supplied.
Measure the height of the cupboard and cut
the adhesive strip to the correct length.
Pull the appliance forwards slightly out of the
cupboard.
Fasten the strip to the appliance
(see fig. 3a-D).
fig. 3a
Slide the appliance carefully back into the
cupboard with the side on which the door
closes tight against the cupboard wall.
INSTALLATION
B
C
D
E
F

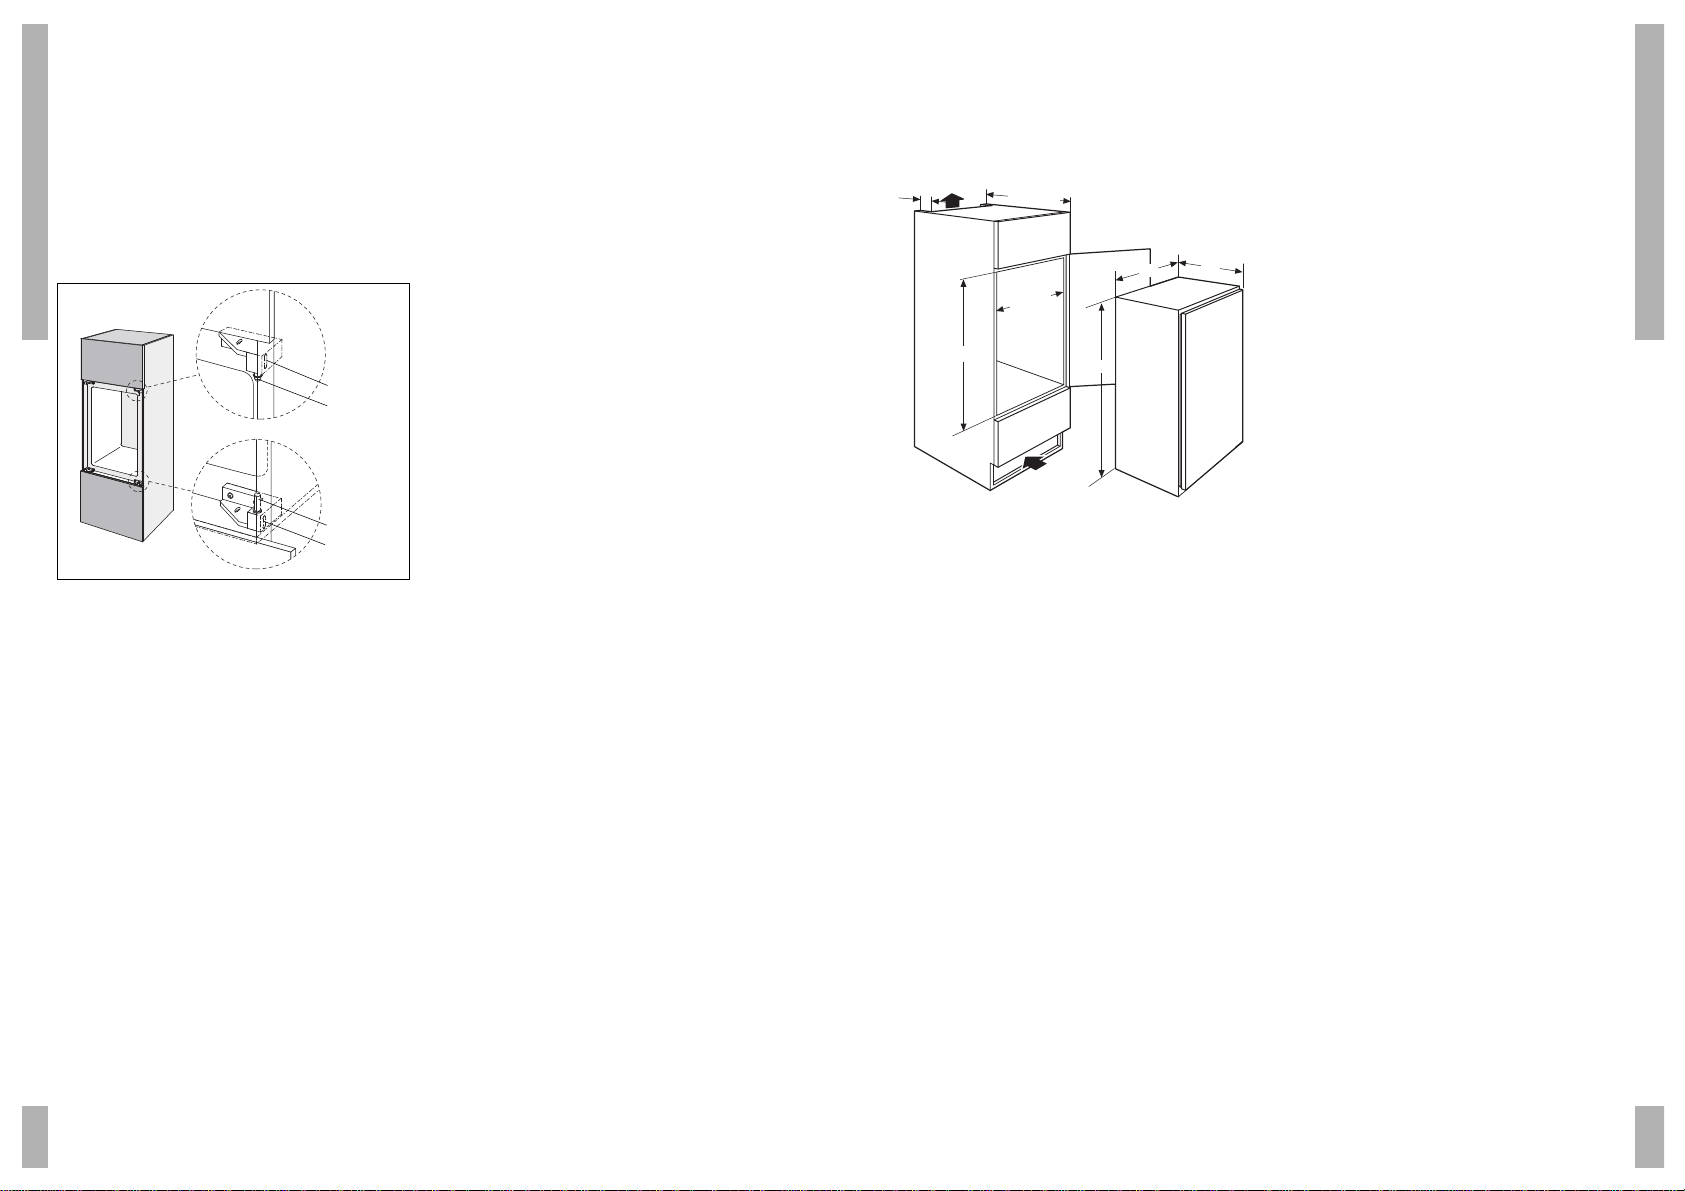
23
building-in dimensions and
ventilation
technical data
Type number KV 7144
Power supply 220/240 V 50 HZ
Capacity 75 l
Height 875 mm
Width 540 mm
Depth 540 mm
disposal of packaging and
appliances
Disable discarded appliances immediately.
This means removing the plug from the socket
and cutting through the connection cable.
Disable any lock on the refrigerator or remove
the doors.
It is important that old refrigerators are
disposed of responsibly and in accordance
with government regulations.
In the past, CFCs and HFCs were used in the
production of refrigerators and freezers in the
cooling circuits and insulating foam. These
substances can damage the atmosphere's
ozone layer if they are released.
Your new refrigerator is completely CFC- and
HFC-free.
Your new refrigerator's packaging should also
be disposed of responsibly.
Information on how to responsibly dispose of
discarded appliances can be obtained from
the local authorities.
TECHNICAL DATA
22
please note:
Now take a firm hold of the freezer door.
At the side of the freezer, first unscrew the
top locking screw S (fig. 6) on the hinged side
of the door.
fig. 6
Using the screwdriver, slide the top locking
screw upwards. Then tighten the screw again.
Hinge pen T is now completely in the hinge
holder. Put the plastic ring that was on the top
hinge pen to one side.
Unscrew the bottom locking screw S while
holding the door firmly. Using the screwdriver,
push the screw downwards and then tighten
the screw again.
Lift the door off the freezer.
Put the plastic ring that was on the bottom
hinge pen to one side.
Carefully lay the door on a scratch-free
surface.
Move the plastic guides for the hinge pen to
the left side of the door.
Put the caps into the holes which have been
left on the right side.
Unscrew the locking screw S on the left side
and lift the hinge pen at the bottom left up a
little. Tighten the locking screw again and put
the plastic ring on the hinge pen.
Lift the freezer door up and place it at the
correct position on the left hinge pen.
Unscrew the locking screw again and lift the
bottom hinge pen up further with the
screwdriver and then tighten the locking
screw again.
Unscrew the locking screw at the top left and
push the top hinge pen down a bit. Slide the
plastic ring onto the pen.
Push the hinge pen all the way down and
tighten the locking screw again.
INSTALLATION
50Air outflow
200 cm2
540
min. 550
880
min. 560
Air inflow
200 cm2
875
540
S
S
T
T

25
introduction
Votre nouveau congélateur est prévu pour
répondre à des objectifs domestiques.
L’appareil est approprié pour conserver des
produits alimentaires.
La durée de congélation est fortement en
fonction de la qualité des produits
alimentaires.
table des matières
introduction . . . . . . . . . . . . . . . . . . . . . . . . . . 25
Sécurité . . . . . . . . . . . . . . . . . . . . . . . . . . . . . . 26
Sécurité avant tout . . . . . . . . . . . . . . . . . . . . 26
Mise en service . . . . . . . . . . . . . . . . . . . . . . . 27
Avant d'utiliser votre appareil . . . . . . . . . . . 27
Conseils . . . . . . . . . . . . . . . . . . . . . . . . . . . . . 28
Conseils de conservation . . . . . . . . . . . . . . . 28
Conseils en matière d'énergie . . . . . . . . . . . 28
Problèmes . . . . . . . . . . . . . . . . . . . . . . . . . . . . 29
Problèmes à régler vous même . . . . . . . . . . 29
Entretien . . . . . . . . . . . . . . . . . . . . . . . . . . . . . 30
Décongeler . . . . . . . . . . . . . . . . . . . . . . . . . . . 30
Nettoyage . . . . . . . . . . . . . . . . . . . . . . . . . . . . 30
Installation . . . . . . . . . . . . . . . . . . . . . . . 31 – 34
Encastrement . . . . . . . . . . . . . . . . . . . . . . . . . 32
Données techniques . . . . . . . . . . . . . . . . . . . 35
Dimensions d'encastrement et aération . . . 35
Élimination d'emballage et appareil . . . . . . . 35
INTRODUCTION
24
description de l’appareil
1tableau de commande
2tiroirs amovibles
préface
Ce mode d'emploi vous offre une information
sur l'installation, la sécurité, la commande et
l'entretien de votre appareil.
Les consignes d'installation sont prévues pour
être lues. Les possibilités de votre appareil
vous seront ainsi vite familières.
Prenez soin de garder ce livret, afin qu’un
autre utilisateur puisse en profiter.
DESCRIPTION DE L’APPAREIL

27
avant d'utiliser votre appareil
nettoyage
Nettoyez d'abord l'intérieur, puis essuyez-le.
Utilisez pour le nettoyage une eau savonneuse
comprenant un produit d'entretien neutre
(nettoie-tout ou un produit vaisselle). Rincez
l'intérieur avec de l'eau propre, puis essuyez.
L'appareil a besoin d'1-2 heure(s) de séchage.
Réglez le thermostat sur la position du milieu.
Branchez l'appareil. L'appareil refroidit
maintenant en permanence jusqu'à ce que la
température programmée soit atteinte.
fig. 1
reglage de la temperature
Bouton congélation rapide (jaune) (A) pour la
congélation de produits frais.
Le témoin lumineux rouge s'enclenche lorsque
la température du congélateur est trop élevée.
Raisons :
– le congélateur vient d'être branché ;
– les produits frais sont en train d'être
congelés ;
– lorsque la porte reste ouverte trop
longtemps ou lorsque l'armoire est en
panne.
Témoin de fonctionnement (vert) (C). Allumé,
ce témoin indique que l’appareil à été mis en
service et fonctionne correctement.
Le témoin lumineux jaune "congélation rapide"
(D) s'enclenche lors du branchement du
congélateur et lorsque celui-ci a été réglé sur
la position "congélation rapide".
Thermostat (E). Le bouton est pourvu d'une
information, à savoir d'un point (correspond à
la position hors service) et de chiffres 1-4
(1 = moins froid ; 4 = très froid).
MISE EN SERVICE
26
sécurité avant tout
■L'installation domestique sur laquelle vous
branchez votre appareil doit répondre aux
consignes locales et nationales.
■Branchez l'appareil sur une prise fixe
installée selon les consignes en vigueur.
■Observez une distance suffisante entre
l'appareil et une source de chaleur. Le
revêtement ne doit pas être plus chaud
que 75 °C.
■Ne pliez pas les conduites de
refroidissement.
■Pour éviter d'endommager le système de
refroidissement, ne nettoyez pas l'appareil
avec des objets pointus. En cas de
dommages au système de refroidissement
provoquant la libération du liquide de
refroidissement, aérez l'espace. Prévenez
immédiatement le service après-vente.
■La plinthe, les bacs et les étagères ne
doivent pas servir de marchepieds.
■Ne laissez jamais les enfants jouer avec
l'appareil.
■Les réparations doivent seulement être
exécutées par un installateur de service
agréé.
■Si vous constatez des dégâts, contactez
immédiatement votre revendeur.
■Ne faites installer/réparer votre appareil
que par un installateur agréé.
■N'utilisez pas de rallonge pour brancher le
réfrigérateur.
■Ne débranchez jamais l'appareil en tirant
sur le cordon, mais en tirant la prise droit
devant vous.
■Ne conservez pas de substances
explosives et légèrement inflammables
dans l'armoire de congélation. Si vous
devez conserver des bouteilles contenant
de l'alcool et des liquides avec un
pourcentage élevé en alcool, fermez-les
bien et mettez-les debout.
■Ne conservez pas des bouteilles ayant un
liquide pouvant se congeler, elles peuvent
se casser en raison de la congélation.
■Si votre ancien congélateur est encore
chez vous et que vous ne l'utilisiez plus,
enlevez la (les) porte(s). Ceci pour éviter
aux enfants de s'y enfermer et de mettre
leur vie en péril.
SECURITE
12
34
A D B C E

Reméde
Branchez la prise.
Remplacez le(s) fusible(s).
Réglez correctement le
thermostat.
Placez correctement les
produits dans le congélateur.
Mettez l'objet à une autre
place.
Causes possibles
La machine n'est pas
branchée.
Fusible défectueux.
Thermostat mal réglé.
Mauvaise disposition des
aliments dans le congélateur.
Présence d'un objet contre
l'appareil.
Problème
Appareil ne fonctionne pas.
Température dans le
congélateur : trop haute ou
trop basse.
Appareil fait du bruit.
29
problèmes à régler vous-même
PROBLEMES
28
conseils de conservation
Vous pouvez régler le compartiment à une
humidité atmosphérique haute ou basse.
A une humidité atmosphérique élevée, vous
conservez des légumes et des fruits. Une
humidité atmosphérique basse est appropriée
pour de la viande, du poisson et de la volaille.
conseils en matière d'énergie
réglage
Des températures ambiantes élevées
influencent négativement la consommation
d'énergie. Evitez d'exposer l'appareil à la
lumière du soleil directe ou à d'autres sources
de chaleur.
N'obstruez pas les bouches d'aération. Des
bouches d'aération couvertes (sales)
conduisent à une consommation d'énergie
plus importante.
utilisation
Si les températures pour le réfrigérateur ou le
congélateur sont trop basses, il risque de se
produire une consommation d'énergie élevée
qui n'est pas nécessaire.
Attendez que les plats soient froids avant de
les mettre dans le réfrigérateur.
Ouvrez la/les portes qu'en cas de besoin. Ne
les laissez pas trop longtemps ouvertes.
Si vous n'utilisez pas le congélateur veillez
qu'il se trouve à l'arrêt.
CONSEILS

31
installation
généralités
Concernant le branchement électrique,
observez toujours les consignes nationales et
locales en vigueur Celles-ci déterminent,
entre autres, la mise à la terre de l'appareil.
transport
Si l'armoire a été transportée "couchée", il est
recommandé d'attendre une demi-journée
avant d'effectuer la mise en service, ceci pour
permettre au fluide caloporteur de se rendre
vers le compresseur.
elimination des bandes adhésives
La porte est souvent bloquée par des bandes
adhésives. Les éléments qui restent peuvent
s'éliminer avec une eau savonneuse et de la
benzine.
placement
Ne placez pas l'appareil directement à côté
d'une source de chaleur (four) ou au soleil.
L'appareil fonctionne correctement à une
température de 16-32 degrés Celsius.
ventilation
Le groupe frigorifique n'a pas besoin
d'entretien, mais il lui faut une bonne
ventilation ! S'il est encastré dans un placard
de cuisine, tenez compte d'une ouverture en
bas et en haut. Les dimensions de ces
ouvertures sont mentionnées dans les dessins
en question.
INSTALLATION
30
décongeler
Dégivrez le congélateur lorsque la glace a
atteint une épaisseur de 5 mm.
Enlevez les produits congelés.
Arrêtez le fonctionnement du congélateur.
Dégivrez le congélateur.
Nettoyez, puis séchez le congélateur.
Remettez en marche le congélateur.
Remettez les produits congelés lorsque le
congélateur est à bonne température.
Vous pouvez accélérer le dégivrage en
mettant un récipient d'eau chaude dans le
congélateur.
Conservez les produits congelés dans un
endroit froid, emballés dans des couvertures
ou des journaux.
attention
N'enlevez jamais la glace à l'aide d'objets
pointus, de sprays pour dégivrage, de sèche-
cheveux, d'un radiateur électrique ou des
choses de ce genre. Ceci peut conduire à des
situations dangereuses et causer des
dommages irréparables à l'appareil.
nettoyage
attention
Débranchez l'appareil avant de le nettoyer. Ne
débranchez jamais en tirant sur le cordon !
Nettoyez l'intérieur une fois par mois.
Utilisez pour le nettoyage une eau savonneuse
comprenant un produit d'entretien neutre
(nettoie-tout ou un produit vaisselle). Rincez
l'intérieur avec de l'eau propre, puis essuyez.
L'appareil a besoin d'1-2 heure(s) de séchage.
Vous pouvez traiter éventuellement le
revêtement avec un produit d'entretien pour
les draps.
attention
N'utilisez jamais un nettoyeur à vapeur pour
nettoyer le congélateur. C'est dangereux.
N'utilisez pas trop d'eau.
Evitez à l'humidité de pénétrer dans les
composants électriques.
ENTRETIEN
33
Fixez l'appareil au sol de la niche en vissant
deux vis à travers les trous dans les supports
à charnières inférieures (fig. 3b). Fixez
l'appareil au plafond de la niche en vissant
deux vis à travers la baguette décorative.
fig. 3b
montage des portes
Ouvrez les portes du placard de cuisine et du
congélateur.
Assemblez d'abord les étriers (fig.4-E) à la
porte du congélateur, côté plat contre la
porte.
fig. 4
Ouvrez les portes du placard de cuisine et du
congélateur au maximum.
Glissez les coulisses de portes (fig. 5-F) dans
les étriers E, les trois trous de vis étant
orientés vers l'extérieur de la porte du
congélateur.
fig. 5
Déterminez la position des trous de fixation
pour les coulisses de portes F. Les coulisses
de portes doivent être fixées à 25 mm à
compter du bord de la porte du placard de
cuisine.
Fixez les coulisses de portes F à la porte de
placard de cuisine.
Fixez les coulisses de portes en utilisant les
vis à bois, collez ensuite les plaques de
recouvrement sur les coulisses de portes.
comment changer le sens de rotation de la
porte du congélateur
Enlevez doucement avec un couteau ou un
autre objet pointu l'embout de recouvrement
qui se trouve en haut et à gauche sur le
congélateur. Enlevez ensuite l'embout qui se
trouve en bas et à gauche sur la porte du
congélateur. Fermez la porte du congélateur.
INSTALLATION
32
encastrement
avant de commencer
Déterminez le sens de rotation souhaité pour
la porte de l'armoire de réfrigération. Si
nécessaire, changez le sens de rotation de la
porte.
Le placard de cuisine doit être
perpendiculaire et horizontal dans toutes les
directions pour assurer le bon fonctionnement
de l'appareil.
Faites passer la fiche et le cordon à l'arrière
du placard de cuisine.
attention
La fiche et la prise de courant doivent toujours
être accessibles.
Le matériel de fixation se trouve dans le
dernier tiroir du congélateur.
placement
Contrôlez la hauteur de la niche.
Le petit interstice qui se trouve entre la partie
supérieure de l'appareil et le plafond de la
niche sera fermé par une baguette décorative.
Si cet interstice est plus grand, utilisez le
profil d'étanchéité (livré) à titre de finitions.
Si nécessaire, glissez le profil d'étanchéité B
sur la baguette décorative C (voir fig. 2).
fig. 2
Placez l'appareil dans la niche.
attention:
Le devant de la baguette décorative doit être
identique au devant du panneau supérieur de
la niche.
L'interstice vertical entre l'appareil et le
placard de cuisine, côté fermeture de la porte
du congélateur, sera fermé par une bande
adhésive en plastique (livrée).
Mesurez la hauteur de la niche et coupez la
bande adhésive à la bonne longueur.
Sortez quelque peu l'appareil de la niche.
Mettez la bande sur l'appareil (voir fig. 3a-D).
fig. 3a
Remettez l'appareil à sa place dans la niche,
côté fermeture de la porte bien contre la paroi
du placard.
INSTALLATION
B
C
D
E
F
35
dimensions d'encastrement et
aération
données techniques
Numéro du type KV 7144
Alimentation électrique 220/240 V 50 HZ
Contenu 75 L
Hauteur 875 mm
Largeur 540 mm
Profondeur 540 mm
élimination de l’emballage et
appareil
Mettez hors d'usage les appareils que vous
voulez mettre au rebut. Ce qui veut dire :
débranchez l'appareil et coupez le cordon
d'alimentation. En cas de fermeture sur
l'appareil, détraquez-la ou éliminez les portes.
Agissez de façon justifiée et respectez les
mesures administratives lorsque vous
souhaitez vous débarrasser d'un vieil appareil.
Autrefois, la fabrication de congélateurs et de
réfrigérateurs impliquait l'utilisation de CFC et
FCH dans le circuit de refroidissement et dans
la mousse isolante. Ce sont des substances
qui peuvent attaquer la couche d'ozone dans
l'atmosphère en se libérant.
Votre nouvel appareil a un taux de O% de CFC
et de FCH.
Agissez en responsable lorsque vous
souhaitez vous débarrasser de l'emballage de
votre nouvel appareil.
L’administration communale vous informera
des moyens adéquats de vous débarrasser de
vos anciens appareils ménagers.
DONNEES TECHNIQUES
34
attention:
Tenez maintenant comme il faut la porte du
congélateur.
Dévissez d'abord la vis de blocage supérieure
S qui se trouve sur le côté congélateur, côté
charnières de la porte (fig.6).
fig. 6
Remontez la vis de blocage supérieure en
utilisant un tournevis. Vissez de nouveau la
vis. L'axe de charnière T se trouve maintenant
entièrement dans le support à charnières.
Mettez de côté la bague en plastique qui se
trouve sur l'axe à charnières.
Dévissez tout en tenant bien la porte la vis de
blocage S qui se trouve en bas. Enfoncez la
vis en utilisant le tournevis puis vissez de
nouveau la vis de blocage.
Soulevez la porte du congélateur.
Mettez de côté la bague en plastique qui se
trouve sur l'axe de charnière inférieur.
Déposez la porte sur une surface qui ne risque
pas de la griffer.
Faites glisser vers la gauche de la porte les
coulisses en plastique qui se trouvent devant
l'axe de charnière.
Enfoncez à droite les embouts de
recouvrement dans les trous qui se sont
libérés.
Dévissez la vis de blocage S, côté gauche, et
soulevez quelque peu l'axe de charnière qui
se trouve en bas et à gauche. Fixez de
nouveau la vis de blocage, placez ensuite la
bague en plastique sur l'axe de charnière.
Soulevez la porte du congélateur et
positionnez-la correctement sur l'axe de
charnière située à gauche. Dévissez de
nouveau la vis de blocage. A l'aide du
tournevis, remontez l'axe de charnière avant
de revisser la vis de blocage.
Dévissez en haut à gauche la vis de blocage.
Pressez quelque peu vers le bas l'axe de
charnière supérieure. Glissez la bague en
plastique sur l'axe.
Pressez maintenant l'axe de charnière
entièrement vers le bas, puis revissez la vis de
blocage.
INSTALLATION
50Aération
200 cm2
540
min. 550
880
min. 560
Ventilation
200 cm2
875
540
S
S
T
T
Table of contents
Languages:
Other Pelgrim Freezer manuals

Pelgrim
Pelgrim PVS24088L User manual

Pelgrim
Pelgrim PVS5178N User manual

Pelgrim
Pelgrim VS6102NF/E01 User manual

Pelgrim
Pelgrim OVG260 User manual

Pelgrim
Pelgrim PVO3082 User manual

Pelgrim
Pelgrim PVS3102N User manual

Pelgrim
Pelgrim PVS35178N User manual

Pelgrim
Pelgrim VK8144A User manual

Pelgrim
Pelgrim PVS3102N User manual

Pelgrim
Pelgrim ZOPI1066 User manual


