Pentagram horNET Wi-Fi USB Lite User manual

2007-08-21
User Manual
PENTAGRAM horNET
Wi-Fi USB Lite (P 6122-07)
For the latest versions of manuals, drivers and software, visit www.pentagram.eu .

NOTE: All information and technical specifications provided in this manual are subject to
change without notice and/or indication.
© 2007 PENTAGRAM
All rights reserved. Unauthorized duplication and copying prohibited.

horNET Wi-Fi USB Lite (P 6122-07)
3
CONTENTS
INTRODUCTION ................................................................................................. 5
PACKAGE CONTENTS................................................................................... 5
REQUIREMENTS ........................................................................................... 5
INSTALLING THE ADAPTER AND SOFTWARE .................................................. 6
WIRELESS ADAPTER CONFIGURATION ........................................................... 8
PROFILE TAB................................................................................................. 8
LINK STATUS TAB ....................................................................................... 14
SITE SURVEY TAB....................................................................................... 15
STATISTICS TAB.......................................................................................... 16
ADVANCED TAB .......................................................................................... 17
ABOUT TAB.................................................................................................. 18
TROUBLESHOOTING ....................................................................................... 19

horNET Wi-Fi USB Lite (P 6122-07)
4

horNET Wi-Fi USB Lite (P 6122-07)
5
Introduction
PENTAGRAM horNET Wi-Fi USB Lite (P 6122-07) is a high-performance, easy-to-install 32-
bit wireless network adapter attached via USB. The adapter can be used in ad hoc mode to
establish peer-to-peer connections with other adapters for file sharing, or in infrastructure
mode to provide Internet access on home or office networks using an access point or a router.
PENTAGRAM horNET USB supports 802.11g connectivity with a maximum data rate of up to
54 Mbps! With a rich feature set, it can also interoperate with 802.11b (11 Mbps) products in
home or office environments, and with public hotspots. Regardless of the mode, your data
remain secure thanks to robust WPA encryption.
Package contents
1. PENTAGRAM horNET Wi-Fi USB Lite (P 6122-07) network adapter
2. USB Cable
3. CD with drivers, software and manuals
4. Quick installation instructions
If any of the package contents are missing, please contact your vendor.
Requirements
•PC with an available USB port
•Windows 98SE, ME, 2000, XP, 2003 or Vista operating system
•CD-ROM drive
•802.11g/802.11b-compliant access point (for infrastructure mode) or 802.11g/802.11b-
compliant wireless adapter (for ad hoc/peer-to-peer mode)

horNET Wi-Fi USB Lite (P 6122-07)
6
Installing the adapter and software
Note: Do not connect the adapter to your PC before installing drivers!
1. Insert the supplied CD into your CD-ROM drive. The setup wizard should launch
automatically. Under Windows Vista, you may also need to click Run SETUP.EXE when
the AutoPlay dialog box appears. If the program does not start automatically, click Start
and then select Run. In the box that appears, type X:\setup.exe (where Xis the letter
assigned to your CD-ROM drive).
2. Select Install Driver to run the installer.
3. Read the license agreement and click Yes to proceed with the installation.
4. Windows 98/Me/2000/XP/2003: Select Ralink Configuration Tool and click Next >.

horNET Wi-Fi USB Lite (P 6122-07)
7
5. Windows 98/Me/2000/XP/2003: Select Optimize for performance mode and click
Next >.
6. The drivers will be installed. After the operation completes, a message box will appear
saying Please plug-in the RT7x Wireless LAN Card on your computer. Connect the
adapter to an available USB port on the PC. Under Windows Vista, the Found New
Hardware dialog may appear. Select Ask me again later.
7. Select Yes, I want to restart my computer now, close all open applications, and then
click Finish. If no options are available in the dialog box, click Finish to complete driver
and software installation.

horNET Wi-Fi USB Lite (P 6122-07)
8
Wireless adapter configuration
A configuration application is installed with adapter drivers. The application’s icon is displayed
in the system tray (next to the clock), and its appearance depends on the adapter and/or
connection status.
The adapter is not attached
to the PC.
The adapter is not
connected to a wireless
network.
The adapter is connected to
a wireless network.
To launch the adapter’s configuration application, double-click the application’s icon.
Application features are organized into tabs: Profile, Link Status, Site Survey, Statistics,
Advanced and About.
Profile tab
This tab allows you to create profiles for the most frequently used wireless networks, i.e. home
network, company network or public hotspots. The profiles can be activated as required.
Profile Name: Displays the connection profile name. Icon background colors in this column
have the following meanings:
•Green – the connection has been established successfully using the selected profile.
•Red – the connection has not been established successfully using the selected profile.
SSID: Shows the wireless network service set identifier (SSID).
Channel: Shows the channel set up for each profile.
Authentication: Shows the authentication method set up for each profile.
Encryption: Shows the encryption type set up for each profile.
Network Type: Shows the network type set up for each profile.
Add: Click Add to create a new profile.
Delete: Click Delete to delete the selected profile.
Edit: Click Edit to change settings for the selected profile.
Activate: Click Activate to activate the selected profile.
OK: Minimizes the application to system tray.
Help: Displays a context help box.

horNET Wi-Fi USB Lite (P 6122-07)
9
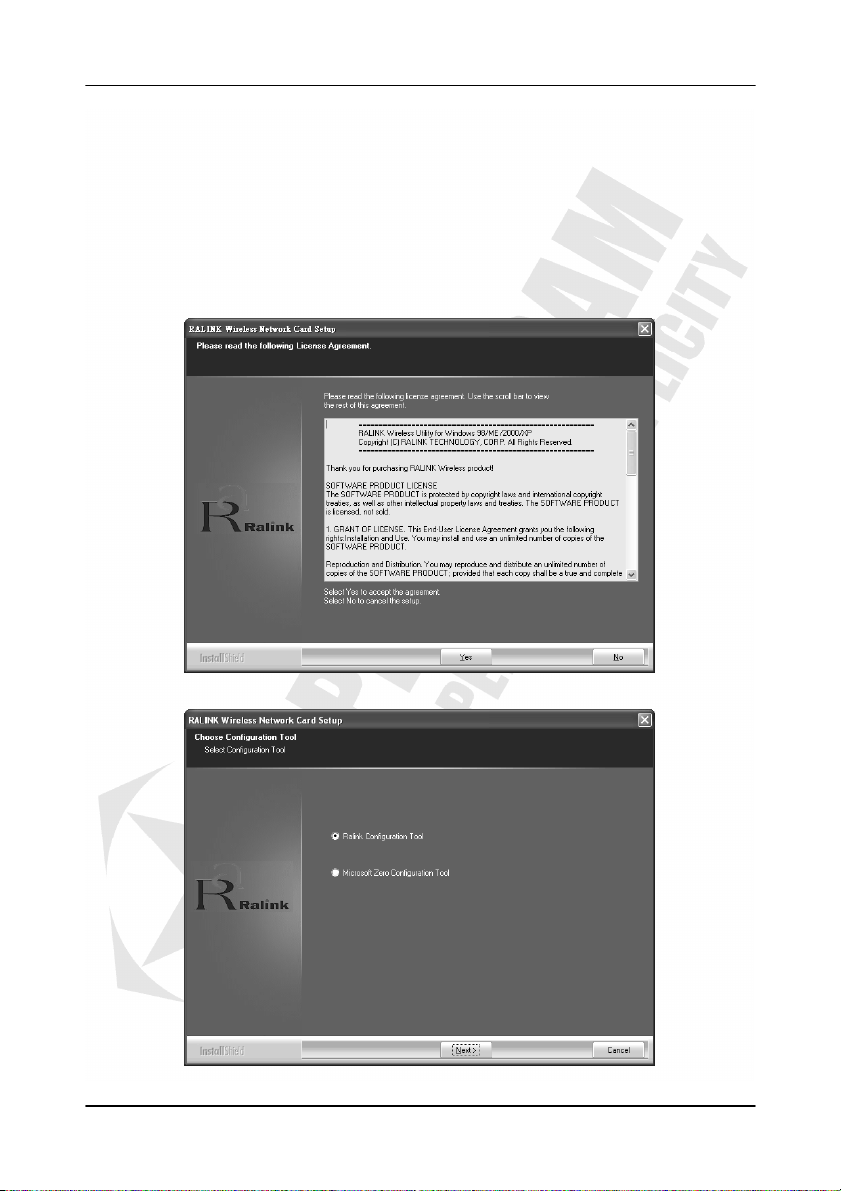
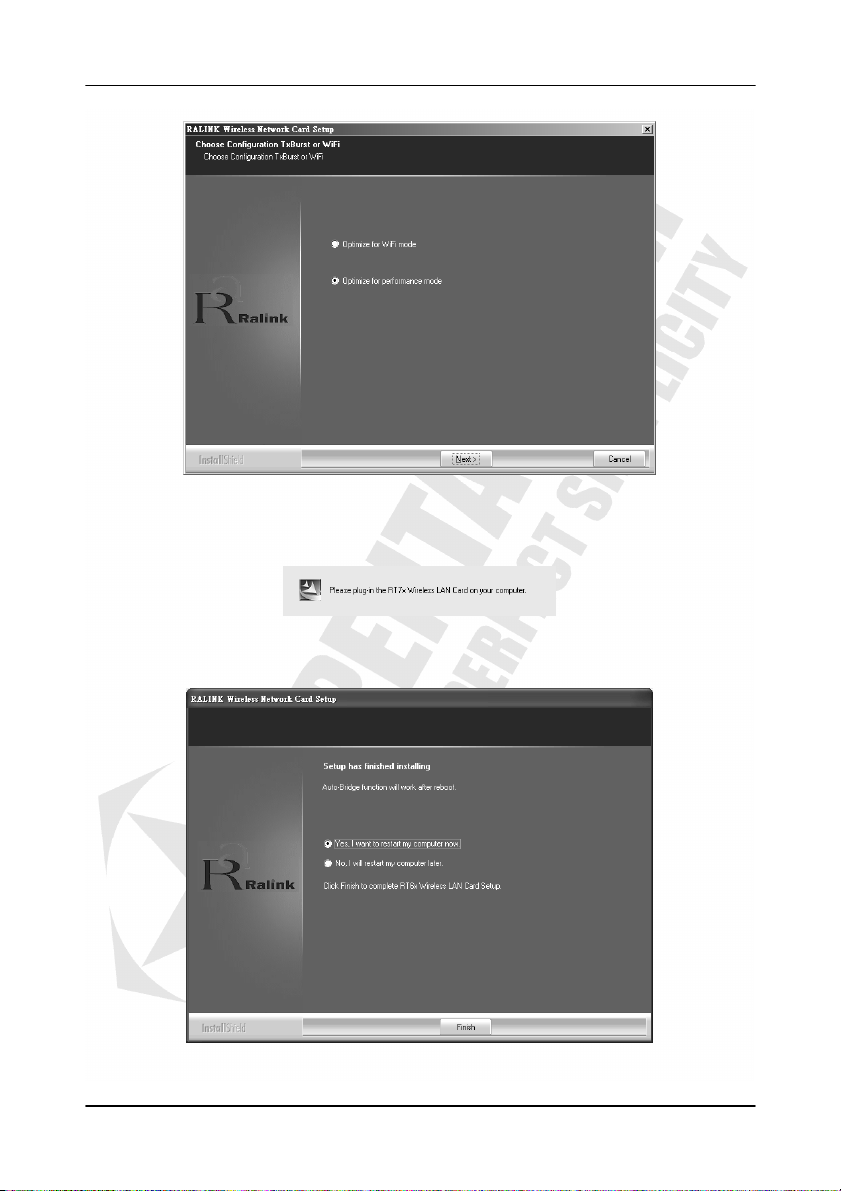
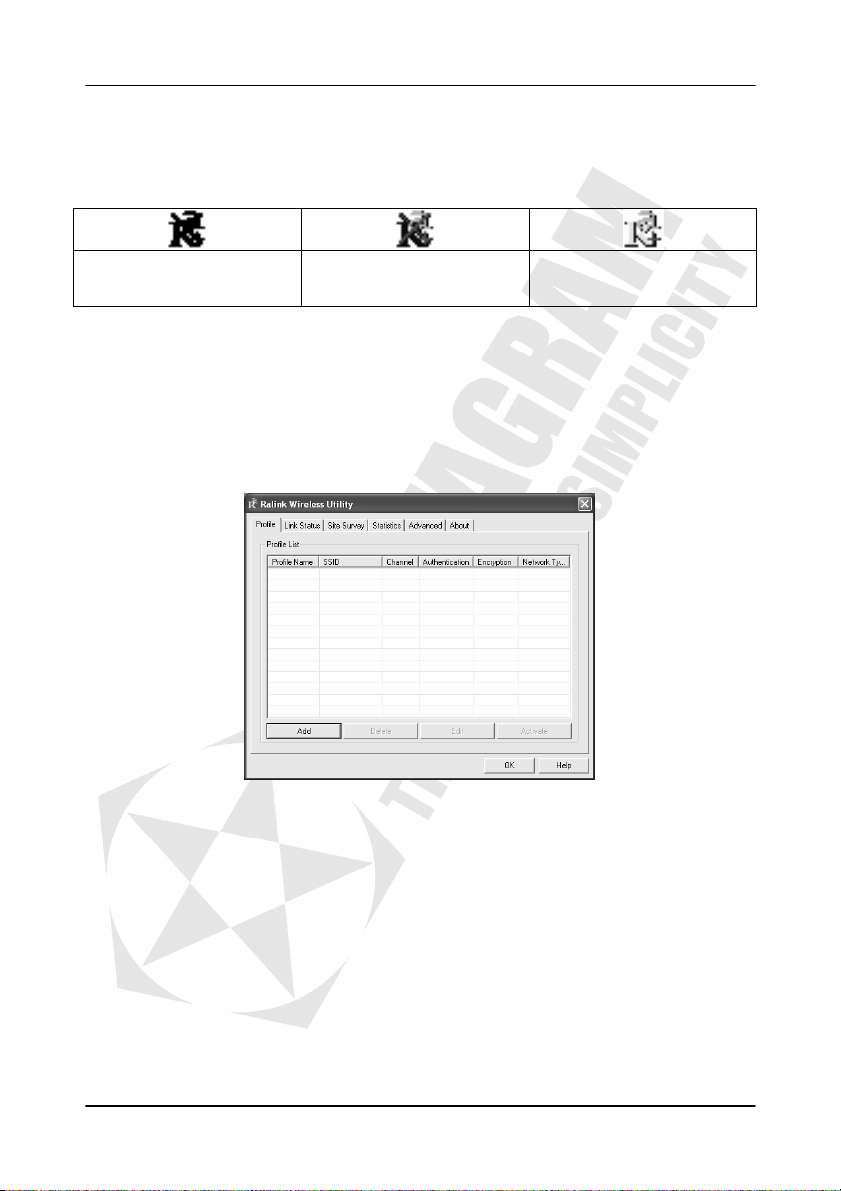
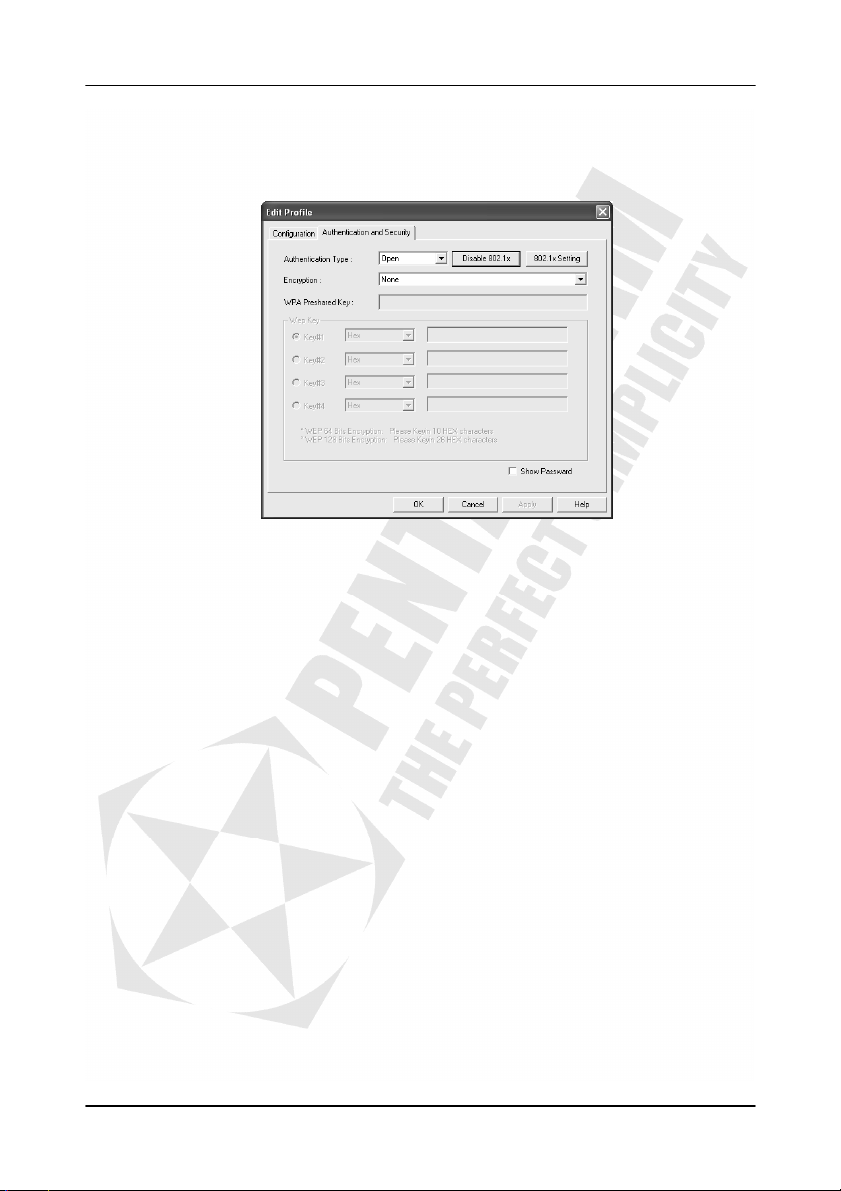
Creating a new profile
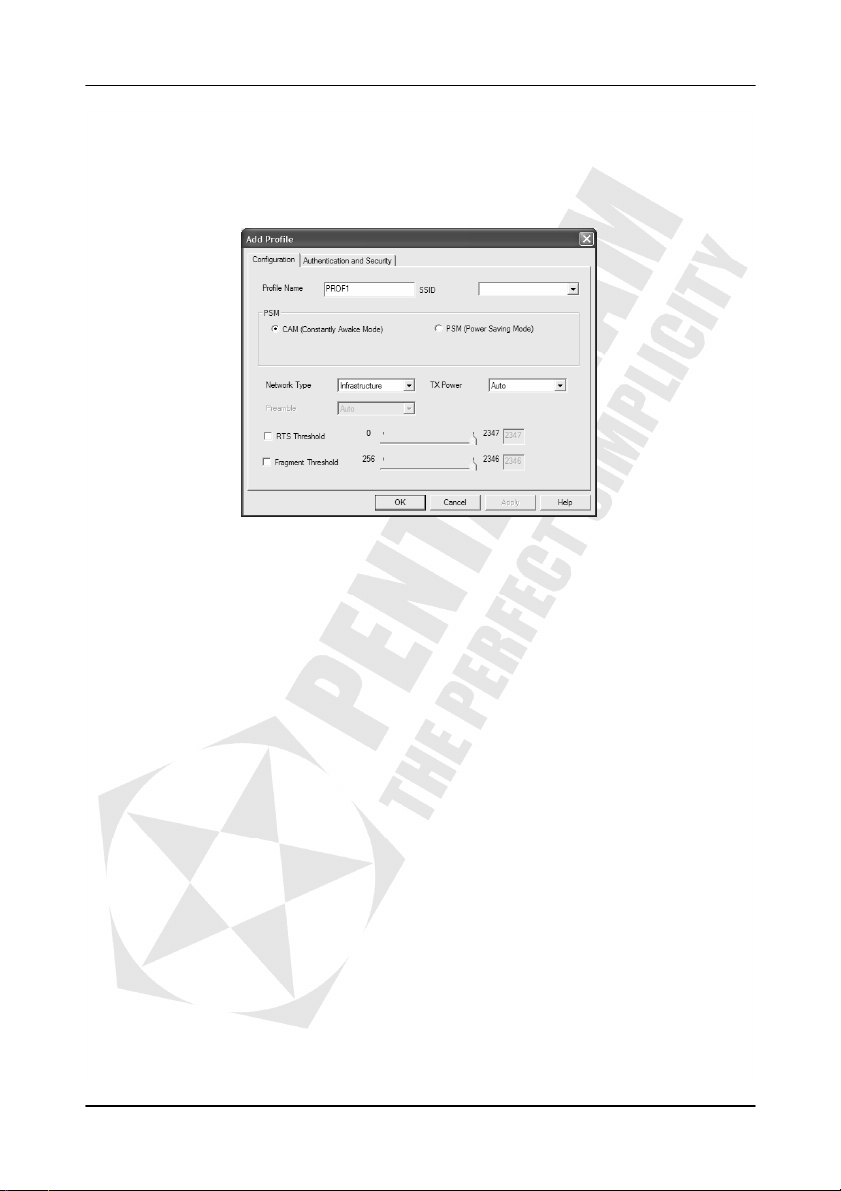
Clicking Add on the Profile tab opens the Add Profile dialog, which allows you to create a new
profile. The dialog contains two tabs:
Configuration
This tab provides basic profile and wireless network settings.
Profile Name: Enter a name to identify your profile.
SSID: Enter a network service set identifier (SSID) or select from a list of active networks.
PSM: Select the power saving mode.
•Using CAM (Constantly Awake Mode), the network adapter will operate at full power
when connected to mains.
•Using PSM (Power Saving Mode), the network adapter will enter power saving mode.
Network Type: You can select two wireless network types.
•The Infrastructure mode supports communications between a wireless network and
a wired network using an access point.
•The Ad hoc mode supports peer-to-peer communications between two wireless network
devices (without using an access point).
Preamble: Select the preamble length, i.e. Auto, Long or Short.
Ad hoc wireless mode: Select the protocol to be used for ad hoc connections, i.e. 802.11 B
only, 802.11 B/G mixed or 802.11 G only.
TX Power: Set the signal transmit power to be used by the radio transmitter. Choose the
appropriate value from the drop-down list.
RTS Threshold: Use the slider or enter a value for the RTS threshold in the field provided.
Default value: 2347.
Fragment Threshold: Use the slider or enter a value for the fragment threshold in the field
provided. Default value: 2346.
Channel: Select the channel to be used when establishing an ad hoc network.
OK: Closes the window and saves settings.
Cancel: Closes the window without saving settings.
Help: Displays a context help box.

horNET Wi-Fi USB Lite (P 6122-07)
10
Authentication and Security
This tab provides wireless network security settings. The appearance of this tab depends on
the option selected in the Authentication Type field.
•
••
•Authentication Type: Open or Shared
Authentication Type: With the Open method, every wireless station can request
authentication. With Shared authentication, the station requesting authentication must
provide a secret key (which can be obtained from the network administrator) using
a secure channel (independent of the 802.11 wireless communications channel).
Encryption: Select None or WEP.
WEP Key#1...4: When you select WEP encryption or Shared authentication without
802.1x, you need to enter a correct WEP key.
•If a 64-bit WEP key is used, enter 10 hexadecimal characters or 5 ASCII characters.
•If a 128-bit WEP key is used, enter 26 hexadecimal characters or 13 ASCII
characters.
Show Password: Select this box if you do not want password characters to be replaced
with “*”.
Use 802.1x: Click this button to use IEEE 802.1x for authentication. IEEE 802.1x
supports full user authentication and control.
802.1x Setting: If IEEE 802.1x is enabled, click this button to open a dialog box with
IEEE 802.1x parameters.

horNET Wi-Fi USB Lite (P 6122-07)
11
•
••
•Authentication Type: LEAP
Authentication Type: LEAP (Light Extensible Authentication Protocol) is an EAP
authentication method used primarily on Cisco Aironet wireless networks. This protocol
encrypts transmitted data using dynamically generated WEP keys, and supports two-way
authentication.
Identity: Enter your identity for the LEAP authentication service.
Password: Enter your password for the LEAP authentication service.
Show Password: Select this box if you do not want password characters to be replaced
with “*”.
•
••
•Authentication Type: WPA, WPA-PSK, WPA2 or WPA2-PSK
Authentication Type: Select WPA, WPA-PSK, WPA2 or WPA2-PSK.
Encryption: Select the encryption method to be used.
•TKIP (Temporal Key Integrity Protocol) uses stronger encryption algorithms and
MIC (Message Integrity Check) to provide security against hackers.

horNET Wi-Fi USB Lite (P 6122-07)
12
•AES (Advanced Encryption System) uses symmetrical 128-bit data block
encryption.
WPA Preshared Key: Enter the WPA preshared key (WPA-PSK and WPA2-PSK only).
The key should be 8 to 32 characters in length.
802.1x Setting (WPA and WPA2 only): Click this button to open a dialog box with IEEE
802.1x parameters.
Show Password: Select this box if you do not want password characters to be replaced
with “*”.
•
••
•802.1x Setting dialog box
Authentication Type: Select the authentication method to be used.
•PEAP: PEAP (Protected Extensible Authentication Protocol) uses tunneling to carry
credentials between PEAP clients and the authentication server. PEAP can
authenticate wireless LAN clients by using server-side certificates only, which
simplifies the implementation and administration of a secure wireless network.
•TLS/Smart Card: Transport Layer Security uses certificates and two-way
client/network authentication. TLS is based on authentication using client-side and
server-side certificates, and can be used to dynamically generate user/session
based WEP keys to secure further communications between a wireless network
client and the access point.
•TTLS: Tunneled Transport Layer Security uses certificates and two-way client and
network authentication, and the data required for authentication are transferred
using an encrypted channel. Unlike EAP-TLS, EAP-TTLS requires only server-side
certificates.
•MD5-Challenge: This EAP authentication method provides basic EAP support. Only
one-way authentication is supported, therefore two-way client and network
authentication is not possible. This method can only be selected if Open or Shared
is selected as Authentication Type in the profile edit dialog.
Session Resumption: Select the session resumption method, i.e. Disabled,
Reauthenticate, Roaming, SameSsid or Always.
Identity: Enter your identity for the server.
Password: Enter your password for the server.
Use Client Certificate: Enable the client certificate for server authentication.
Protocol: Select the tunneling protocol from the list.
Identity: Enter your identity for the tunnel.
Password: Enter your password for the tunnel.

horNET Wi-Fi USB Lite (P 6122-07)
13
If you wish to use a CA (Certification Authority) server, click the CA Server tab.
Depending on the EAP method used, only the server or both server and client can be
authenticated and require a certificate. Server certificates enable clients to identify the
server, usually an authentication server or a RADIUS server. Most EAP methods require
a certificate issued by major or trusted certification authorities.
Use certificate chain: Select this option to enable the certification feature.
Certificate issuer: Select the server which acts as the certificate issuer.
Allow intermediate certificates: Select this option to allow the use of intermediate
certificates. These certificates must be located on the certification chain between the
server certificate and the server selected in Certificate Issuer.
Server name: Enter the name of the authentication server.
Two methods are available for server name matching:
•Server name must match exactly
•Domain name must end in specified name.

horNET Wi-Fi USB Lite (P 6122-07)
14
Link Status tab
This tab displays network adapter and connection status information.
Status: Displays current connection details. When connected to a network, this field displays
the network’s SSID and BSSID. Disconnected means no wireless network connection, and
RF OFF means that the adapter’s transmit and receive capabilities are disabled.
Extra Info: Displays the current connection status and Channel.
Link Speed: Tx (Mbps) shows transmit data rate in megabits per second (Mbps). Rx (Mbps)
shows receive data rate in megabits per second (Mbps).
Throughput: Tx (Kbps) shows transmit data rate and Rx (Kbps) shows receive data rate in
kilobits per second (kbps).
Link Quality: Shows link quality as a percentage bar (0-100%).
Signal Strength: Shows signal strength as a percentage bar (0-100%).
Noise Level: Shows noise level as a percentage bar (0-100%).
dBm: Select this box to show Signal Strength and Noise Level as dBm (1 dB referenced to
1 mW) instead of percentages.

horNET Wi-Fi USB Lite (P 6122-07)
15
Site Survey tab
This tab enables searching for and connecting to active wireless networks.
SSID: Shows the wireless network service set identifier (SSID).
BSSID: Shows the wireless network basic service set identifier (BSSID).
Signal: Shows wireless network signal strength.
Channel: Shows the channel (frequency) used by the wireless network.
Encryption: Shows the encryption used.
Authentication: Shows the authentication method used.
Network Type: Shows the wireless network type (Infrastructure or Ad-hoc).
Rescan: Click this button to rescan for available wireless networks.
Connect: Select a wireless network from the list and click this button to connect to the
network. This tab cannot be used to connect to a network which uses authentication. You
need to create a profile instead.
Note: Under Windows Vista, the Connect button is not available. You need to create a profile
in order to connect to any network.
Add Profile: Click to create a profile for the network.

horNET Wi-Fi USB Lite (P 6122-07)
16
Statistics tab
This tab shows transmit and receive statistics.
Transmit statistics:
•Frames Transmitted Successfully shows the number of frames transmitted without
errors.
•Frames Transmitted Successfully Without Retry shows the number of frames
transmitted without errors and retries.
•Frames Transmitted Successfully After Retry(s) shows the number of frames
transmitted successfully after retrying.
•Frames Fail To Receive ACK After All Retries shows the number of frames which did
not receive acknowledgement after all retries.
•RTS Frames Successfully Receive CTS shows the number of RTS (Request To Send)
frames which received responses in the form of CTS (Clear To Send) frames.
•RTS Frames Fail To Receive CTS shows the number of RTS (Request To Send) frames
which did not receive responses in the form of CTS (Clear To Send) frames.
Receive statistics:
•Frames Received Successfully shows the number of frames received without errors.
•Frames Received with CRC Error shows the number of frames received with CRC
errors.
•Frames Dropped Due To Out-of-Resource shows the number of frames dropped due
to resource issue.
•Duplication Frames Receive shows the number of received duplicate frames.
Reset Counter: Click this button to reset all statistics.

horNET Wi-Fi USB Lite (P 6122-07)
17
Advanced tab
This tab can be used to change advanced wireless network adapter options.
Wireless mode: Select wireless stations to which the adapter can connect.
•802.11 B allows connecting to 802.11b wireless stations only.
•802.11 G allows connecting to 802.11g wireless stations only.
•802.11 B/G mix allows connecting to 802.11b or 802.11g stations.
B/G Protection: If both 802.11b and 802.11g stations exist on the network, it is recommended
that you enable the B/G protection capability.
•Auto: Enables and disables the protected mode automatically, depending on network
status.
•On: Always sends protected frames.
•Off: Always sends unprotected frames.
Tx Rate: Allows the transmit rate to be changed manually. Default value: Auto.
Tx Burst: Selecting this mode may accelerate frame transmission.
Enable TCP Window Size: Selecting this feature may improve TCP performance on wireless
connections.
Fast Roaming at: Switchover between access points will occur when the current access
point’s minimum signal strength threshold set in this field is exceeded.
Select Your Country Region Code: The item selected in this field determines the channels
(frequencies) available.
CCX 2.0: This enables support for Cisco Compatible Extensions.
LEAP turn on CCKM: Using LEAP allows taking advantage of CCKM (Cisco Centralized Key
Management).
Enable Radio Measurement: Enables support for the Radio Measurement feature used in
Cisco network hardware.
Turn off RF/Turn on RF: Disables or enables communications, respectively.
Apply: Applies changes.

horNET Wi-Fi USB Lite (P 6122-07)
18
About tab
The About tab contains driver, application and network adapter information.
RaConfig Version: Shows the version of the RaConfig application.
Driver Version: Shows the current driver version.
Date: Shows the application/driver release date.
EEPROM Version: Shows the current EEPROM revision.
IP Address: Shows the adapter’s current IP address.
Sub Mask: Shows the adapter’s current subnet mask.
Phy_Address: Shows the adapter’s physical address (MAC).
Default Gateway: Shows the adapter’s default gateway.

horNET Wi-Fi USB Lite (P 6122-07)
19
Troubleshooting
This section describes methods that can be used to solve problems, which may appear during
the installation and operation of the wireless network adapter. Please read the description
below for troubleshooting.
The application does not detect the wireless network adapter.
•Make sure the adapter has been installed correctly.
•Make sure drivers and the application have been installed correctly, and are compatible
with your hardware.
Cannot connect to a wireless network.
•Make sure the access device (access point, router, etc.) is in range.
•Make sure connection settings (e.g. SSID or authentication settings) are configured
correctly.
•Make sure that no equipment which may cause radio frequency interference is located in
the vicinity. Equipment such as mobile phones, microwave ovens, etc. may degrade
wireless connection quality.
If problems which are not addressed in this section occur, please look for a solution at
www.pentagram.eu or contact an authorized PENTAGRAM service dealer.

horNET Wi-Fi USB Lite (P 6122-07)
20
NOTES
This manual suits for next models
1
Table of contents
Other Pentagram Network Card manuals
Popular Network Card manuals by other brands

Asus
Asus PCI-G31 quick start guide

Laird
Laird SDC-EC15N Hardware integration guide

Linksys
Linksys WGA600N - Wireless-N Gaming Adapter Bridge Quick installation guide

Texas Instruments
Texas Instruments VLYNQ Port user guide

Texas Instruments
Texas Instruments DAC7741EVM user guide

IBM
IBM Ethernet Expansion Card At-a-glance guide