Perel LEDA3001RGB User manual

LEDA3001RGB
OUTDOOR LED FLOODLIGHT –RGB
LED-SCHIJNWERPER VOOR BUITENSHUIS - RGB
PROJECTEUR LED D'EXTÉRIEUR - RVB
PROYECTOR LED PARA EXTERIORES - RGB
LED-STRAHLER FÜR DEN AUßENBEREICH - RGB
PROJECTOR LED PARA EXTERIORES - RGB
USER MANUAL 4
GEBRUIKERSHANDLEIDING 11
MODE D'EMPLOI 18
MANUAL DEL USUARIO 25
BEDIENUNGSANLEITUNG 32
MANUAL DO UTILIZADOR 39

LEDA3001RGB
V. 03 –12/11/2015 2 ©Velleman nv
A1
A2

LEDA3001RGB
V. 03 –12/11/2015 3 ©Velleman nv
B1
B2

LEDA3001RGB
V. 03 –12/11/2015 4 ©Velleman nv
USER MANUAL
1. Introduction
To all residents of the European Union
Important environmental information about this product
This symbol on the device or the package indicates that
disposal of the device after its lifecycle could harm the
environment. Do not dispose of the unit (or batteries) as
unsorted municipal waste; it should be taken to a
specialized company for recycling. This device should be
returned to your distributor or to a local recycling service.
Respect the local environmental rules.
If in doubt, contact your local waste disposal authorities.
Thank you for choosing Perel! Please read the manual thoroughly
before bringing this device into service. If the device was damaged in
transit, do not install or use it and contact your dealer.
2. Safety Instructions
Keep this device away from children and unauthorized
users.
Risk of electroshock when opening the cover.
Touching live wires can cause life-threatening
electroshocks. Do not disassemble or open the housing
yourself. Have the device repaired by qualified personnel.
This luminaire does not have a built-in device to
disconnect it from the electric mains. Make sure to
electrically isolate the luminaire before installation or
maintenance activities are performed.
DO NOT disassemble or open the cover. There are no
user-serviceable parts inside the device. Refer to an
authorized dealer for service and/or spare parts.
Caution: possibly hazardous optical radiation emitted
from this product. Do not look at operating lamp. Eye
injury may result.

LEDA3001RGB
V. 03 –12/11/2015 5 ©Velleman nv
Caution: device heats up during use.
Respect a minimum distance of 1 m between the
device’s light output and any illuminated surface.
A qualified technician should install and service this device.
Make sure that the available voltage does not exceed the voltage
stated in the specifications of this manual.
Do not crimp the power cord and protect it against damage. Have
an authorised dealer replace it if necessary.
3. General Guidelines
Refer to the Velleman®Service and Quality Warranty on the last
pages of this manual.
Keep this device away from extreme temperatures.
Protect this device from shocks and abuse. Avoid brute
force when operating the device.
This device is not suitable for dimming.
Do not use the luminaire with a cracked or
broken protective glass. Disconnect immediately
from the mains and have it repaired by a
qualified technician.
Familiarise yourself with the functions of the device before actually
using it.
All modifications of the device are forbidden for safety reasons.
Damage caused by user modifications to the device is not covered
by the warranty.
Only use the device for its intended purpose. All other uses may
lead to short circuits, burns, electroshocks, lamp explosion, crash,
etc. Using the device in an unauthorised way will void the
warranty.

LEDA3001RGB
V. 03 –12/11/2015 6 ©Velleman nv
Damage caused by disregard of certain guidelines in this manual
is not covered by the warranty and the dealer will not accept
responsibility for any ensuing defects or problems.
Use the original packaging if the device is to be transported.
Keep this manual for future reference.
4. Features
floodlight for commercial or residential use
die-cast aluminium housing with tempered glass
ribbed for maximum heat dissipation
with adjustable bracket
suited for outdoor use (IP65)
with 30 cm unterminated cable
5. Overview
Refer to the illustrations on page 2 of this manual.
1
mounting bracket
3
protective glass
2
hinge
4
LED
Remote Control
A
brightness control
E
FADE:
slow colour fade
B
on-off buttons
C
FLASH:
fast colour skip
F
SMOOTH
fast colour fade
D
STROBE:
slow colour skip
G
colour selection
6. Installation
Guidelines
A qualified technician should install and service this device.
The construction to which the device is attached should be able to
support 4 times the weight of the device for one hour without
deformation.
Never stand directly below the device when it is being mounted,
removed or serviced. Have a qualified technician check the device
once a year and once before you bring it into service.

LEDA3001RGB
V. 03 –12/11/2015 7 ©Velleman nv
Overhead mounting requires extensive experience: calculating
workload limits, determining the installation material to be used…
Have the material and the device itself checked regularly. Do not
attempt to install the device yourself if you lack these
qualifications as improper installation may result in serious
injuries.
This device is not suitable for dimming.
Distances
Keep at least 50 cm distance at the top and 30 cm on either side.
Respect a minimum distance of 1 m between the device’s light
output and any illuminated surface.
Mounting the lamp
1. This luminaire does not have a built-in device to disconnect it
from the electric mains. Make sure to electrically isolate the
luminaire before installation or maintenance activities are
performed.
2. Use the mounting bracket [1] to determine the location of the
mounting holes.
3. Drill the holes and secure the bracket using screws and wall
plugs.
4. Connect the power cable to a suitable junction box (not incl.).
Make sure the connection is properly earthed. Make sure there is
no strain on the cable; leave sufficient slack.
N = neutral, blue
E = earth, yellow/green
L = line, brown

LEDA3001RGB
V. 03 –12/11/2015 8 ©Velleman nv
Warning:
If the power cable is damaged, it must be replaced by the
manufacturer, his service agent, or a similar qualified person in order
to avoid any hazard.
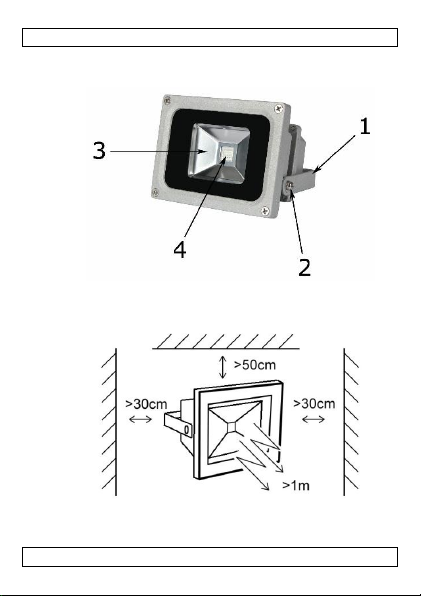
5. To point the lamp in the desired direction: loosen the hinges [2]
using a spanner.
6. Tilt the lamp in the desired angle and tighten the hinges.
7. Remote Control
Battery
Refer to illustration [B2] on page 3 of this manual.
The remote control uses 1 battery type 3 V lithium CR2025
(included). Remove the tag from the battery compartment before
use.
1. To (re)place a battery, press on the side of the battery cover
and pull to slide open.
2. Insert the battery with the correct polarity and close the battery
compartment by pushing back into the housing of the remote
control until it snaps into place.
Operation
1. Aim the remote control towards the floodlight to control the
output.
2. Switch on the floodlight with the ON button on the remote
control. To switch it off again, press the OFF button.
3. Refer to chapter 5. Overview for more information about
operating the remote control.
8. Cleaning and Maintenance
All screws should be tight and free of corrosion.
The housing, the visible parts, the mounting supports and the
installation location (e.g. ceiling, suspension, trussing) should not
be deformed, modified or tampered with; e.g. do not drill extra
holes in mounting supports, do not change the location of the
connections…
Mechanically moving parts must not show any signs of wear and
tear.
The electric power supply cables must not show any damage.
Have a qualified technician maintain the device.

LEDA3001RGB
V. 03 –12/11/2015 9 ©Velleman nv
If the protective glass [3] is damaged, disconnect the lamp
immediately from the mains. Have it repaired immediately by a
qualified technician. Do not use the lamp with a cracked or broken
protective glass.
This luminaire does not have a built-in device to disconnect it from
the electric mains. Make sure to electrically isolate the luminaire
before installation or maintenance activities are performed.
Wipe the device regularly with a moist, lint-free cloth. Do not use
alcohol or solvents.
There are no user-serviceable parts.
Contact your dealer for spare parts if necessary.
9. Technical Specifications
body colour
grey
electrical data
power LED module
1 * 10 W RGB COB LED
total nominal power
10 W
nominal voltage driver
230 VAC
nominal voltage LED module
red
6.5 V
green
9.6 V
blue
9.4 V
power factor
0.45
energy consumption
10 kWh/1000 h
cable
H05RN-F 3G1.0 - 30 cm
light technical data
colour
RGB
colour temperature
N.A.
beam angle
100°
luminous intensity
- cd
luminous flux
240 lm (white)
colour rendering index
N.A.
starting time
< 0.5 s
warm-up time (60 %)
< 1 s
lifespan
nominal life time
30 000 h
number of switching cycles
15 000

LEDA3001RGB
V. 03 –12/11/2015 10 ©Velleman nv
dimensions (W x H x D)
spot
115 x 89 x 90 mm
incl. bracket
-
weight
590 g
cable length
30 cm
Use this device with original accessories only. Velleman nv
cannot be held responsible in the event of damage or injury
resulting from (incorrect) use of this device. For more info
concerning this product and the latest version of this manual,
please visit our website www.perel.eu. The information in this
manual is subject to change without prior notice.
© COPYRIGHT NOTICE
The copyright to this manual is owned by Velleman nv. All
worldwide rights reserved. No part of this manual may be copied,
reproduced, translated or reduced to any electronic medium or
otherwise without the prior written consent of the copyright holder.

LEDA3001RGB
V. 03 –12/11/2015 11 ©Velleman nv
GEBRUIKERSHANDLEIDING
1. Inleiding
Aan alle ingezetenen van de Europese Unie
Belangrijke milieu-informatie betreffende dit product
Dit symbool op het toestel of de verpakking geeft aan
dat, als het na zijn levenscyclus wordt weggeworpen, dit
toestel schade kan toebrengen aan het milieu. Gooi dit
toestel (en eventuele batterijen) niet bij het gewone
huishoudelijke afval; het moet bij een gespecialiseerd
bedrijf terechtkomen voor recyclage. U moet dit toestel
naar uw dealer of naar een lokaal recyclagepunt brengen.
Respecteer de plaatselijke milieuwetgeving.
Hebt u vragen, contacteer dan de plaatselijke autoriteiten
betreffende de verwijdering.
Bedankt voor uw aankoop! Lees deze handleiding grondig voor u het
toestel in gebruik neemt. Werd het toestel beschadigd tijdens het
transport, installeer het dan niet en raadpleeg uw dealer.
2. Veiligheidsinstructies
Houd dit toestel buiten het bereik van kinderen en
onbevoegden.
Elektrocutiegevaar bij het openen van het toestel. Raak
geen kabels aan die onder stroom staan om dodelijke
elektrische schokken te vermijden. Open de behuizing niet
zelf. Laat het onderhoud van het toestel over aan een
geschoolde vakman.
Dit toestel is niet uitgerust met een aan/uit-schakelaar om
het van het lichtnet los te koppelen. Isoleer het toestel
elektrisch voor de installatie of onderhoud.
Demonteer of open dit toestel NOOIT. Er zijn geen
door de gebruiker vervangbare onderdelen in dit toestel.
Voor onderhoud of reserveonderdelen, contacteer uw
dealer.

LEDA3001RGB
V. 03 –12/11/2015 12 ©Velleman nv
Opgelet: mogelijk gevaarlijke optische straling
uitgezonden door dit product. Kijk nooit rechtstreeks in de
lichtbron. Dit kan leiden tot oogletsels.
Opgelet: dit toestel wordt zeer warm tijdens het gebruik.
Zorg voor een minimumafstand van 1 m tussen de
lichtuitgang van het toestel en het belichte
oppervlak.
Laat dit toestel installeren en onderhouden door een geschoolde
technicus.
De beschikbare netspanning mag niet hoger zijn dan de spanning
in de specificaties achteraan de handleiding.
De voedingskabel mag niet beschadigd zijn of ingekort worden.
Laat uw dealer zo nodig een nieuwe kabel plaatsen.
3. Algemene richtlijnen
Raadpleeg de Velleman® service- en kwaliteitsgarantie
achteraan deze handleiding.
Bescherm dit toestel tegen extreme temperaturen.
Bescherm tegen schokken. Vermijd brute kracht tijdens de
bediening van het toestel.
Dit toestel is niet geschikt om te dimmen.
Gebruik het verlichtingstoestel niet indien het
beschermglas gebarsten of gebroken is.
Ontkoppel het toestel onmiddellijk en laat het
herstellen door een geschoolde technicus.
Leer eerst de functies van het toestel kennen voor u het gaat
gebruiken.
Om veiligheidsredenen mag u geen wijzigingen aanbrengen.
Schade door wijzigingen die de gebruiker heeft aangebracht aan
het toestel valt niet onder de garantie.

LEDA3001RGB
V. 03 –12/11/2015 13 ©Velleman nv
Gebruik het toestel enkel waarvoor het gemaakt is. Andere
toepassingen kunnen leiden tot kortsluitingen, brandwonden,
elektrische schokken, enz. De garantie vervalt automatisch bij
ongeoorloofd gebruik.
De garantie geldt niet voor schade door het negeren van bepaalde
richtlijnen in deze handleiding en uw dealer zal de
verantwoordelijkheid afwijzen voor defecten of problemen die hier
rechtstreeks verband mee houden.
Gebruik de oorspronkelijke verpakking wanneer u het toestel
vervoert.
Bewaar deze handleiding voor verdere raadpleging.
4. Eigenschappen
schijnwerper voor residentieel of commercieel gebruik
gegoten aluminium behuizing met gehard glas
geribbeld voor maximale dissipatie
met regelbare beugel
geschikt voor gebruik buitenshuis (IP65)
met kabel (30 cm)
5. Omschrijving
Raadpleeg de afbeeldingen op pagina 2 van deze handleiding.
1
montagebeugel
3
beschermglas
2
scharnier
4
LED
Afstandsbediening
A
lichtsterkteregeling
E
FADE:
langzame
kleurovergang
B
aan/uit-knoppen
C
FLASH:
snel kleur overslaan
F
SMOOTH
snelle
kleurovergang
D
STROBE:
langzaam kleur
overslaan
G
kleurselectie

LEDA3001RGB
V. 03 –12/11/2015 14 ©Velleman nv
6. Montage
Richtlijnen
Laat dit toestel installeren en onderhouden door een geschoolde
technicus.
De constructie waaraan het toestel wordt bevestigd, moet
gedurende 1 uur 4 x het gewicht van dit toestel kunnen dragen
zonder te vervormen.
Sta nooit recht onder het toestel wanneer u het monteert,
verwijdert of herstelt. Laat het toestel controleren door een
geschoolde technicus voor u het in gebruik neemt en laat het 1 x
per jaar volledig nakijken.
Het ophangen vereist een degelijke praktijkervaring: u moet de
maximumbelasting van de draagconstructie kunnen berekenen,
weten welk constructiemateriaal u kunt gebruiken, … Laat het
materiaal en het toestel regelmatig nakijken. Monteer het toestel
niet zelf indien u er geen ervaring mee heeft. Een slechte montage
kan leiden tot verwondingen.
Dit toestel is niet geschikt om te dimmen.
Afstanden
Laat minstens 50 cm vrij aan de bovenkant en 30 cm aan
weerszijden.
Zorg voor een minimumafstand van 1 m tussen de lichtuitgang
van het toestel en het belichte oppervlak.
De schijnwerper monteren
1. Dit toestel is niet uitgerust met een aan/uit-schakelaar om het
van het lichtnet los te koppelen. Isoleer het toestel elektrisch
voor de installatie of onderhoud.
2. Gebruik de beugel [1] om de plaats van de montagegaten te
bepalen.
3. Boor de gaten en bevestig de beugel met schroeven en
muurpluggen.
4. Sluit de voedingskabel aan op een geschikte kabeldoos (niet
meegelev.). De aansluiting moet correct geaard zijn. Zorg
ervoor dat de kabel niet te strak vast zit; laat voldoende speling.

LEDA3001RGB
V. 03 –12/11/2015 15 ©Velleman nv
N = neutraal, blauw
E = aarding, geel/groen
L = fasedraad, bruin
Waarschuwing:
Als de voedingskabel beschadigd is, moet deze door de fabrikant,
technische dienst, of een andere bevoegde persoon vervangen
worden om elk mogelijk risico te vermijden.
1. Om de lamp in de gewenste stand te richten: draai de
scharnieren [2] los met een moersleutel.
2. Draai de lamp in de gewenste stand en zet de scharnieren vast.
7. Afstandsbediening
Batterij
Raadpleeg afbeelding [B2] op pagina 3 van deze handleiding.
De afstandsbediening wordt gevoed door 1 x 3 V-lithiumbatterij type
CR2025 (meegeleverd). Verwijder het label uit het
batterijcompartiment voor gebruik.
1. Om de batterij te vervangen, druk op de batterijhouder en trek
uit.
2. Plaats de batterij (let op de polariteit) en duw de batterijhouder
terug in de afstandsbediening tot het erin past.
Gebruik
1. Richt de afstandsbediening naar de schijnwerper, om de
lichtstroom te regelen.
2. Schakel de schijnwerper in met de ON-knop van de
afstandsbediening. Schakel de schijnwerper uit met de OFF-
knop.

LEDA3001RGB
V. 03 –12/11/2015 16 ©Velleman nv
3. Zie hoofdstuk 5. Overzicht voor meer informatie over het
gebruik van de afstandsbediening.
8. Reiniging en onderhoud
Alle gebruikte schroeven moeten goed zijn aangespannen en
mogen geen sporen van roest vertonen.
Behuizing, zichtbare onderdelen, montagebeugels - en plaats
(bijv. het plafond of het gebinte) mogen niet vervormd zijn of
aangepast worden (geen extra gaten in montagebeugels,
aansluitingen niet verplaatsen, enz.).
Mechanisch bewegende delen mogen geen sporen van slijtage
vertonen en mogen niet onregelmatig bewegen.
De voedingskabels mogen niet beschadigd zijn. Laat het toestel
onderhouden door een geschoolde technicus.
Indien het beschermglas [3] beschadigd is, ontkoppel de lamp
onmiddellijk. Laat het onmiddellijk herstellen door een geschoolde
technicus. Gebruik de lamp niet indien het beschermglas
gebarsten of gebroken is.
Dit toestel is niet uitgerust met een aan/uit-schakelaar om het
van het lichtnet los te koppelen. Isoleer het toestel elektrisch voor
de installatie of onderhoud.
Maak het toestel geregeld schoon met een vochtige, niet
pluizende doek. Gebruik geen alcohol of oplosmiddelen.
Er zijn geen onderdelen die de gebruiker zelf kan vervangen.
Bestel eventuele reserveonderdelen bij uw dealer.
9. Technische specificaties
kleur behuizing
grijs
elektrische gegevens
vermogen (led-module)
1 * 10 W RGB COB-LED
totaal nominaal vermogen
10 W
nominale spanning (driver)
230 VAC
nominale spanning (led-
module)
rood
6.5 V
groen
9.6 V
blauw
9.4 V

LEDA3001RGB
V. 03 –12/11/2015 17 ©Velleman nv
vermogensfactor
0.45
energieverbruik
10 kWh/1000 h
kabel
H05RN-F 3G1.0 - 30 cm
technische gegevens
kleur
RGB
kleurtemperatuur
N.A.
stralingshoek
100°
lichtsterkte
- cd
lichtstroom
240 lm (wit)
kleurweergave-index
N.V.T.
starttijd
< 0.5 s
opwarmtijd (60 %)
< 1 s
levensduur
nominale levensduur
30 000 u
aantal schakelcycli
15 000
afmetingen (B x H x D)
spot
115 x 89 x 90 mm
met beugel
-
gewicht
590 g
kabellengte
30 cm
Gebruik dit toestel enkel met originele accessoires. Velleman
nv is niet aansprakelijk voor schade of kwetsuren bij
(verkeerd) gebruik van dit toestel. Voor meer informatie over
dit product en de laatste versie van deze handleiding, zie
www.perel.eu. De informatie in deze handleiding kan te allen
tijde worden gewijzigd zonder voorafgaande kennisgeving.
© AUTEURSRECHT
Velleman nv heeft het auteursrecht voor deze handleiding.
Alle wereldwijde rechten voorbehouden. Het is niet toegestaan
om deze handleiding of gedeelten ervan over te nemen, te kopiëren,
te vertalen, te bewerken en op te slaan op een elektronisch medium
zonder voorafgaande schriftelijke toestemming van de
rechthebbende.

LEDA3001RGB
V. 03 –12/11/2015 18 ©Velleman nv
MODE D'EMPLOI
1. Introduction
Aux résidents de l'Union européenne
Informations environnementales importantes concernant ce
produit
Ce symbole sur l'appareil ou l'emballage indique que
l’élimination d’un appareil en fin de vie peut polluer
l'environnement. Ne pas jeter un appareil électrique ou
électronique (et des piles éventuelles) parmi les déchets
municipaux non sujets au tri sélectif ; une déchetterie
traitera l’appareil en question. Renvoyer l'appareil à votre
fournisseur ou à un service de recyclage local. Il convient
de respecter la réglementation locale relative à la protection de
l’environnement.
En cas de questions, contacter les autorités locales pour
élimination.
Nous vous remercions de votre achat ! Lire attentivement le présent
mode d'emploi avant la mise en service de l’appareil. Si l’appareil a
été endommagé pendant le transport, ne pas l’installer et consulter
votre revendeur.
2. Consignes de sécurité
Garder l'appareil hors de la portée des enfants et des
personnes non autorisées.
Risque d’électrocution lors de l’ouverture du boîtier.
Toucher un câble sous tension peut causer des
électrochocs mortels. Ne jamais démonter ni ouvrir le
boîtier soi-même. Confier la réparation de l'appareil à du
personnel qualifié.
Cet appareil n'est pas équipé d'un interrupteur ON/OFF
pour le déconnecter du réseau électrique. Veiller à isoler
électriquement l'appareil avant l'installation ou
l'entretien.

LEDA3001RGB
V. 03 –12/11/2015 19 ©Velleman nv
NE JAMAIS désassembler ou ouvrir le boîtier. Il n’y a
aucune pièce réparable par l’utilisateur. Commander des
pièces de rechange éventuelles chez votre revendeur.
Attention : possibilité de rayonnements optiques
dangereux émis par ce produit. Ne jamais regarder
directement dans le faisceau lumineux de la lampe. Cela
peut causer des lésions oculaires.
Attention : l'appareil chauffe pendant l’usage.
Respecter une distance minimum de 1 m entre la
sortie lumière de l’appareil et la surface illuminée.
Confier l’installation et l’entretien à un technicien qualifié.
S'assurer que la tension ne dépasse pas la tension indiquée dans
les spécifications de ce mode d'emploi.
Le câble d’alimentation ne peut pas être replissé ou endommagé.
Demander à votre revendeur de le remplacer si nécessaire.
3. Directives générales
Se référer à la garantie de service et de qualité Velleman® en
fin de ce mode d'emploi.
Protéger cet appareil contre les températures extrêmes.
Protéger l’appareil des chocs et de l'abus. Traiter l'appareil
avec circonspection pendant l’opération.
Cet appareil ne convient pas à l'utilisation avec un
variateur.
Ne pas utiliser le luminaire si le verre de
protection est fissuré ou cassé. Déconnecter
immédiatement l'appareil du réseau électrique
et confier la réparation à un technicien qualifié.
Se familiariser avec le fonctionnement de l'appareil avant de
l'utiliser.

LEDA3001RGB
V. 03 –12/11/2015 20 ©Velleman nv
Toute modification est interdite pour des raisons de sécurité. Les
dommages occasionnés par des modifications par le client ne
tombent pas sous la garantie.
N’utiliser l'appareil qu’à sa fonction prévue. Tout autre usage peut
causer des courts-circuits, des brûlures, des électrochocs,
explosion de lampe, chute, etc. Un usage impropre annule d'office
la garantie.
La garantie ne s’applique pas aux dommages survenus en
négligeant certaines directives de ce mode d'emploi et votre
revendeur déclinera toute responsabilité pour les problèmes et les
défauts qui en résultent.
Transporter l’appareil dans son emballage originel.
Garder ce mode d'emploi pour toute référence ultérieure.
4. Caractéristiques
projecteur pour usage commercial ou résidentiel
boîtier en aluminium coulé avec verre trempé
cranté pour une dissipation thermique max.
avec support ajustable
convient à l'usage extérieur (IP65)
avec câble (30 cm)
5. Description
Se référer aux illustrations en page 2 de ce mode d'emploi.
1
support de montage
3
verre de protection
2
charnière
4
LED
Télécommande
A
contrôle de
luminosité
E
FADE :
transition de
couleurs lente
B
boutons on/off
C
FLASH:
saut de couleurs
rapide
F
SMOOTH
transition de
couleurs rapide
D
STROBE :
saut de couleurs
lent
G
sélection de
couleurs
Table of contents
Other Perel Floodlight manuals

Perel
Perel ELS3B User manual

Perel
Perel EFL5PL User manual

Perel
Perel LEDA3001 P Series User manual

Perel
Perel LEDA402 Series User manual

Perel
Perel LEDA4002 Series User manual

Perel
Perel LEDA4001 Series User manual

Perel
Perel LEDA500 NW-BM Series User manual

Perel
Perel LEDA250NW User manual

Perel
Perel ELS3W User manual

Perel
Perel ELS3WD User manual

Perel
Perel LEDA2001NW-B User manual

Perel
Perel EWL311 CW-R User manual

Perel
Perel LEDA401 Series User manual

Perel
Perel LEDA251NW User manual

Perel
Perel LEDA7001NW-B User manual

Perel
Perel LEDA500 NW-BM Series User manual

Perel
Perel LEDA500xxW Series User manual

Perel
Perel ELS3 User manual

Perel
Perel LEDA7001NW-BP User manual

Perel
Perel ELS3D User manual