Perfect Choice PC-171669 User manual

Welcome to the PERFECT CHOICE Design’s world
Before start using this product it is important to read the manual.

A4 Portable Scanner
PC-171669
V.PCD 1.2

Content
• Portable scanner 1 piece
• USB cable 1 piece
• Travel bag 1 piece
• Batteries 4 pieces
• Installation disk 1 piece
• Calibration card 1 piece
• User´s manual 1 piece
Features
• Letter/A4 maximum scanning size.
• Color or gray scale.
• 600 and 300 DPI resolution.
• Stores JPG les directly into the microSD memory.
• Compatible with up to 32GB microSD cards.
• No driver required for Windows XP / Vista / 7 (storing mode).
Scanner

Status Icons
Part Function
1 USB port Downloads image to PC via the USB cable. It can also be used to provide power to the
scanner.
2 Battery compartment Holds 4 AA batteries.
3 Turn ON button Press once to turn it on. Press again to turn it off.
4 Card slot
To insert microSD card.
5 Effect / Up Selects between color or gray scale scanner modes. Display will show the color or
monochromatic icon depending on selection.
6 Format button Formats the microSD memory.
7 Enter Press this button to confirm the entries or changes.
8 DPI / Down Selects high resolution (600 DPI) or low resolution (300 DPI). High/Low icon will be shown
in the display depending on selection.
9 LCD Screen Displays scanner status.
10 Time adjust Press this button to enter the DATE AND TIME mode.

Installing the Batteries
1. Open the battery compartment lid.
2. Place 4 AA batteries inside the compartment verifying the correct polarity.
3. Close the lid.
4. Turn on the scanner by pressing the Turn ON button.
Inserting the MicroSD Memory Card
You must have a microSD card (not included) installed to store images.
To insert the microSD memory card:
1. Turn off the scanner.
2. Insert the memory card in the slot by gently pressing the card until it holds itself.

Note: Do not force the card into the slot; otherwise you can damage both, the slot
and the card. Align the card as shown in the drawing and try again in case you have
problems inserting it.
Date and Time Adjustment
1. Press the “Time Set” button.
2. Display will show 1 XX, then press the Effect and DPI button to select the desired
numbers.
3. Press “Enter” to conrm selection.
4. Display will show the following settings, in sequence: 1 XX year, 2 XX month,
3 XX day, 4 XX hour, 5 XX minutes.
5. After entering the desired information, press the “Time Set” button again to exit the
date and time mode adjusting.
Formatting the MicroSD memory
1. Insert a new microSD card in the slot and turn on the scanner.
2. Press the “Format” button. “F” will be shown in the display.
3. Press the “Enter” button to start formatting the memory.
4. Card indicator will blink until formatting is completed.
Selecting the Resolution
Press the “DPI” button to select between high/low resolution. Selected resolution will
be shown in the screen.

Adjusting the Scanning Mode
Press the “Effect” button to select between color or mono. Selection will be shown in
the display.
Scanning
1. Press the Turn ON button.
2. Scanner will be set to standby mode. Select the color and resolution.
3. Adjust the width selector to match your document.
4. Place the document with the information facing down.
5. Once the scanner detects the document, scanning process will start and the Turn
ON button light will turn green.
6.Scanner will pull the document and store the image automatically. When the
counter increases the number by one, the scanner will be ready to scan a new
document.

Compatibility
System requirements:
• Windows®XP SP2/Vista and Mac OS 10.4 or greater
• Pentium III or greater
• 256 MB RAM
• Free USB slot
Connecting to Computer
1.You can also connect the scanner to your computer to download or visualize the
scanned images.
2.Connect the scanner using the USB cable, turn on the scanner and press “Enter”
to enable the storing mode.
3. Press the ON button again to turn off the scanner and exit the storing mode.
4. Turn ON the scanner to enable the standby mode and scan other documents.

Calibration
• To start the scanner calibration you must take out the MicroSD card from the scanner.
• Turn ON the scanner by pressing the power button.
• Insert the white balance calibration card as arrow direction.
• And the scanner will start scanning the card for auto white balance calibration.
• Turn off the scanner after scanning finished.
Note: Calibration must be done only when the whites balance needs adjustment.
Troubleshooting
Scanner does not turn on.
• Batteries might be worn out or not properly placed.
• Verify the batteries polarity. Replace them for new batteries in case they are worn
out.
Image is not stored when scanning.
• It is necessary to have a microSD memory installed to store information.
• If memory is full, it will be necessary to free up space by downloading images to a
computer or deleting them.
• It might be necessary to format the memory from the scanner in order to have it
working properly.

Computer does not recognize the scanner when it is on.
• Verify the cable is securely connected. Restart your computer.
Turn ON button LED is on in red.
• Scanner needs to be re calibrated.
Safety and Care Information
• Turn OFF the equipment and store it properly protected against heavy objects and
shocks.
• Do not store at high temperatures (higher than 110ºC), such as in a car under the
direct sun light.
• Do not spill or expose it to liquids.
• To clean, do it with a slightly damp cloth.
• Do not throw away or smash it.
• Keep it away and protected of dust.
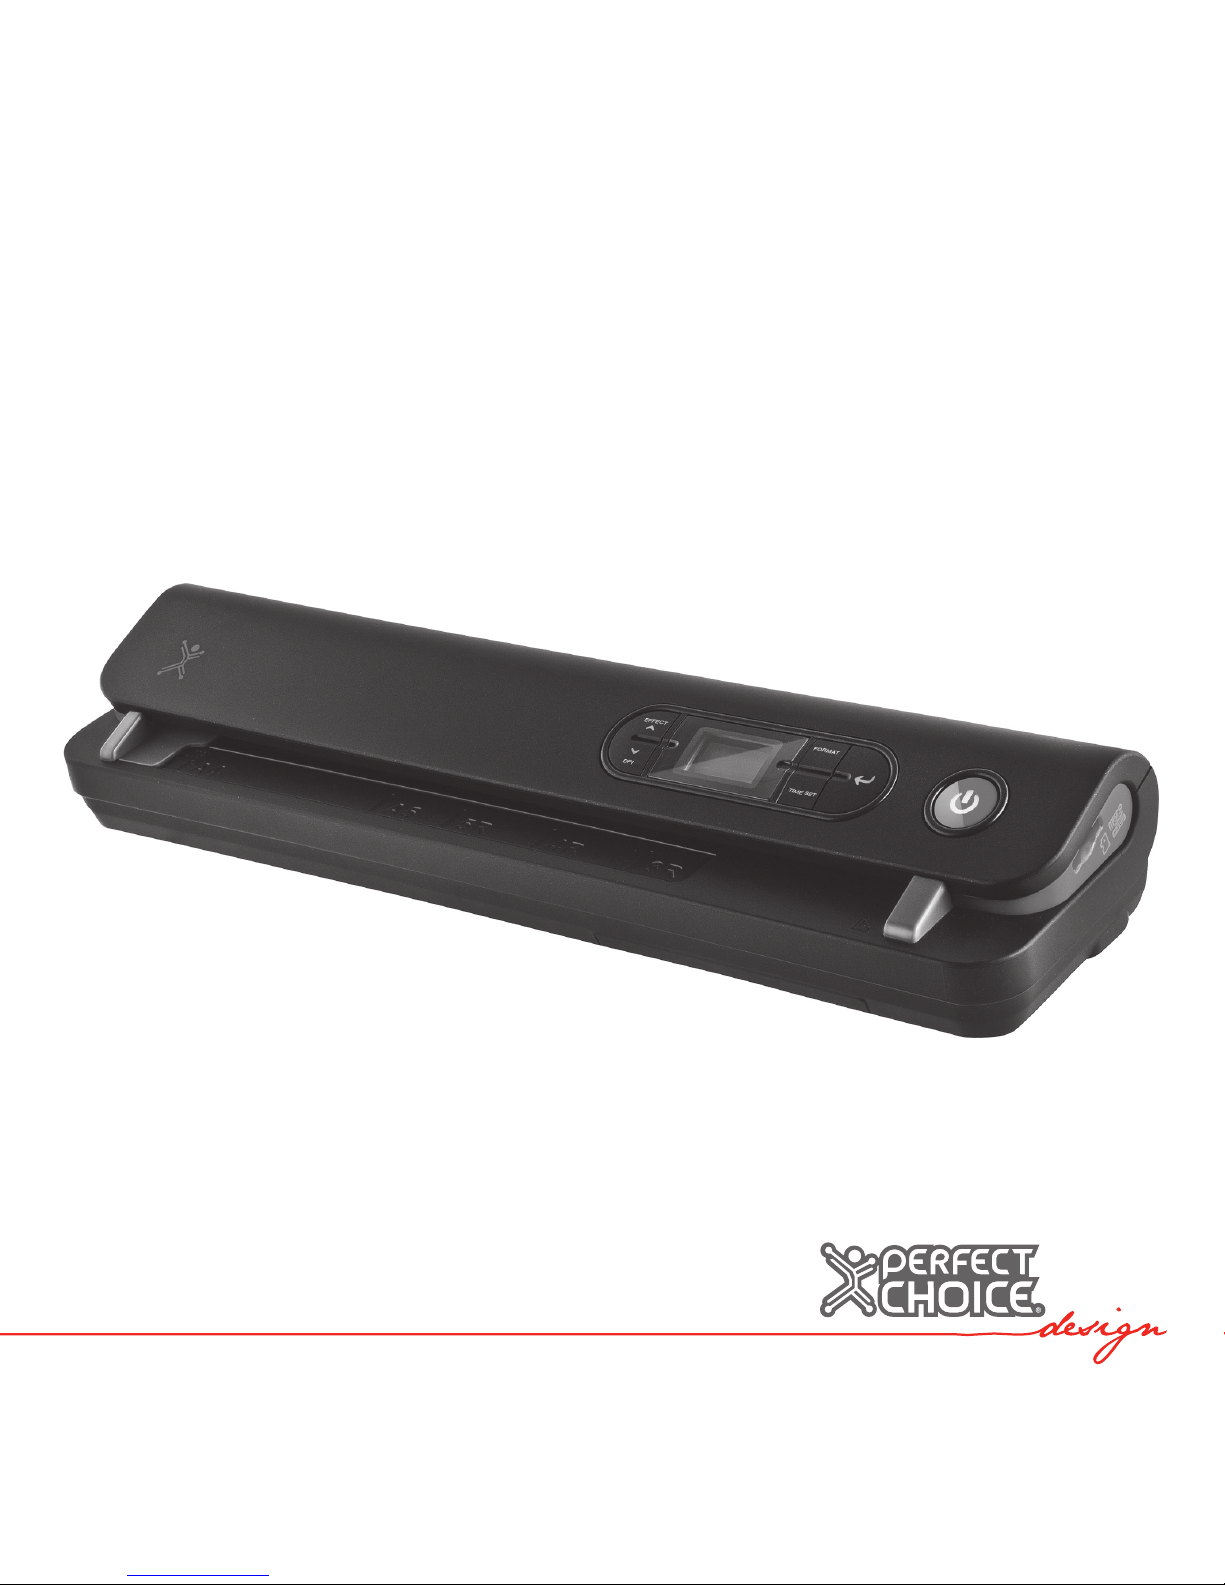
Technical Specications
Power supply:...............................................................................6 V (4 AA batteries)
Resolution:.........................................................Low 300 x 300 DPI High 600 x 600 DPI
Scanning speed of a A4 document:................................................................6 seconds
Maximum width of scanning document:....................................................21 cm (8.27’’)
Maximum length of scanning document:................................at 300 DPI: 127 cm (50’’),
at 600 DPI: 63.5 cm (25’’)
File format:..............................................................................................................JPEG
Automatic power off:................................................................................after 3 minutes

USB port:............................................................................................................USB 2.0
External memory:...............................................................................................microSD
Batteries:..................................................................................................................4 AA
Technical and electrical characteristics provided herein are for standard units and
may change without notice in order to provide a better product
Please contact us in case of questions or doubts.
Technical Support:
Guadalajara, México and Monterrey
47 77 08 53
Rest of the country
01 800 PCHOICE (724-6423)
1 800 PCHOICE (724-6423) for the US

MANUAL DE USO

Bienvenidos al mundo PERFECT CHOICE Design
Antes de comenzar a usar el producto es importante que leas este manual.

Escáner Portátil A4
PC-171669

Contenido
• Escáner portátil 1 pieza
• Cable USB 1 pieza
• Bolsa de viaje 1 pieza
• Baterías 4 piezas
• Disco de instalación 1 pieza
• Tarjeta de calibración 1 pieza
• Manual de usuario 1 pieza
Características
• Tamaño máximo de escaneo hasta hoja carta / A4.
• Modo a color y monocromático.
• Selección de resolución de 600 y 300 DPI.
• Guarda directamente archivos JPG a la memoria microSD.
• Compatible con tarjetas microSD de hasta 32GB.
• No necesita controladores (modo de almacenamiento) en Windows XP / Vista / 7.
Partes del Escáner

Iconos de Estados
Parte Función
1Puerto USB Descargar imágenes a la computadora por medio del cable USB. También
puede ser alimentado por medio del puerto USB.
2 Compartimiento para baterías Para 4 baterías AA
3 Botón de encendido Al presionar el botón se enciende, al presionarlo de nuevo se apaga.
4 Ranura para tarjeta Para insertar las memorias microSD
5Efecto / Arriba Seleccionar escaneo a color o mono. Cambiará en la pantalla el icono de color
o mono.
6 Botón de formateo Para formatear la memoria microSD.
7 Enter Presiona este botón para confirmar los cambios.
8DPI / Abajo Selecciona resolución alta (600 DPI) o baja (300 DPI). En la pantalla cambiará el
icono “high/ low” dependiendo de la selección.
9Pantalla LCD Despliega el estado del escáner.
10 Ajustar Tiempo Al presionar este botón entrará al modo de fecha y hora.

Instalar las Baterías
1. Abre la tapa de las baterías.
2. Inserta 4 baterías AA en el compartimiento revisando la polaridad.
3. Cierra la tapa.
4. Enciende el escáner al presionar el botón de encendido.
Insertar la Memoria MicroSD
Debes insertar la memoria microSD (no incluida) para grabar la imágenes.
Para insertar la memoria microSD:
1. Apaga el escáner.
2. Inserta la memoria en la ranura presionando suavemente hasta que la memoria se
asegure.

Nota: no fuerces la tarjeta en la ranura, al forzarla puedes dañar la ranura y la tarjeta.
Alinea la posición de la tarjeta como se marca e inténtalo de nuevo.
Ajustar la Fecha y Hora
1. Presiona el botón “Time Set”.
2. En la pantalla mostrará 1 XX, presiona el botón Effect y DPI para seleccionar los
números arriba y abajo.
3. Presiona “Enter” para conrmar la selección.
4. En la pantalla se mostrarán los siguientes ajustes en secuencia: 1 XX año,
2 XX mes, 3 XX día, 4 XX hora, 5 XX minutos.
5. Después de que ingreses la información presiona el botón “Time Set” de nuevo
para salir.
Formatear la Memoria microSD
1. Inserta una tarjeta microSD nueva y enciende el escáner.
2. Presiona el botón “Format”. Se mostrará una “F” en la pantalla.
3. Presiona el botón “Enter” para iniciar el formato de la memoria microSD.
4. El indicador de la tarjeta parpadeará hasta que el formato este completo.
Ajuste de la Resolución
Presiona el botón “DPI” para seleccionar la resolución “high/low”. La resolución
elegida se mostrará en la pantalla.

Ajuste del Modo de Escaneo
Presiona el botón “Effect” para seleccionar “color/mono”. La selección será mostrada
en la pantalla.
Para Escanear
1. Presiona el botón de encendido
2. El escáner estará en estado de espera. Selecciona el modo de color deseado y la
resolución.
3. Ajusta el selector de ancho que se ajuste a tu documento.
4. Pon el documento con la información de la hoja viendo hacia abajo.
5. Una vez que el escáner detecte el documento este empezará a escanearloy la luz
del botón de encendido encenderá en color verde.
6. El escáner tomará la hoja automáticamente y guardará la imagen. Cuando el
contador incremente su número entonces el escáner estará listo para tomar el
siguiente documento.

Compatibilidades
• Windows XP SP2/Vista y Mac OS 10.4 o superior
• Pentium III o superior
• 256 MB de RAM
• Puerto USB libre
Conectando a la Computadora
1. También puedes conectar el escáner a tu computadora para descargar o visualizar
las imágenes escaneadas.
2. Conecta el escáner por medio del cable USB, enciende el escáner y presiona
“Enter” para habilitar el modo de almacenamiento.
3. Presiona el botón de encendido para apagar el escáner y salir del modo de
almacenamiento.
4. Enciende el escáner para habilitar el modo en espera y escanear otros
documentos.
Table of contents
Languages:
Popular Scanner manuals by other brands

Automation Technology
Automation Technology FebriScan user guide

Epson
Epson WorkForce DS-40 Start here

Microtek
Microtek ScanMaker s460 Start here

Fujitsu
Fujitsu fi-6670 Series Operator's guide

Adaptive Recognition
Adaptive Recognition Osmond L user manual

Image Access
Image Access WideTEK 12 Setup instructions