Performance Tool M673 User manual

WARNING:
It is the owner and/or operators’ responsibility to study all WARNINGS, operating, and
maintenance instructions contained on the product label and instruction manual prior to
operation of this product. The owner/operator shall retain product instructions for future reference.
The owner and/or operator are responsible for maintenance, maintaining all decals or warning
labels and while in use, maintaining the unit in good working order. If the owner and/or operator
are not fluent in English, the product warnings and instructions shall be read and discussed with
the operators’ native language by the purchaser/owner or his designee. Make sure that the
operator comprehends its contents. Safety information shall be emphasized and understood prior
to usage. The product shall be inspected per the operating instructions.
Users of this product must fully understand these instructions. Each person operating this product
must also be of sound mind and body and must not be under the influence of any substance that
might impair their vision, dexterity or judgment.
Protect yourself and others by observing all safety information.
Failure to comply with instructions could result in personal injury and/or property damage!
If you encounter any problems or difficulties, please contact our customer service department at:
1-800-426-1262 between 6:30 a.m. and 4:30 p.m. Pacific time.
3-IN-1 PNEUMATIC NAILER
OWNER'S MANUAL
Stock Number M673

SPECIFICATIONS
Specifications are subject to change without notice
WARNING!
READ, UNDERSTAND AND FOLLOW ALL INSTRUCTIONS AND WARNINGS
BEFORE OPERATING THIS TOOL. FAILURE TO DO SO MAY RESULT IN
PERSONAL INJURY AND/OR PROPERTY DAMAGE AND WILL VOID WARRANTY.
1. Keep the work area clean and well lighted. Cluttered benches and dark areas
increase the risks of accidents.
2. Do not operate the tool in explosive atmospheres, such as in the presence of
ammable liquids, gases, or dust. The tool creates a spark which may ignite
ammable liquids, gases or dust.
3. Keep visitors away. Do not let visitors handle the tool. All visitors should be
kept safety away from work area.
4. Never engage in horseplay with the tool. Respect the tool as a working
implement.
5. Operators and others in work area must wear safety glasses with side shields.
When operating the tool, always wear safety glasses with side shields, and
make sure others in work area wear safety glasses. Safety glasses must con-
form to the requirements of American National Standards Institute, ANSI z87.1
and provide protection against ying particles both from the front and side.
6. Always wear ear and head protection. Always wear ear protection to protect
your ears from loud noise. Always wear head protection to protect your head
from ying objects.
7. Use safety equipment. A dust mask, non-skid safety shoes and a hard hat must
be used for the applicable conditions. Wear a full face shield if you are produc-
ing metal lings or wood chips.
Weight: ............................................................................2.93Ibs(1.33kg)
Normal Operating Pressure:................................................... 60-110PSI
Magazine Capacity:.................................................................. 100 Nails
Firing Mode: .................................................................... Sequential Fire
Fastener Size Range:
18 Gauge Brads: 3/8"-2"(10-50mm)
16 Gauge Finish: 3/4"-2"(19-50mm)
18 Gauge Staples: 1/2"-1-5/8"(13-40mm)
Average Air Consumption (CFM)........................................................... 1
Air Inlet (NPT)................................................................................. 1/4 in.
Hose Size (ID) ................................................................................ 3/8 in.
Warning!
Oil tool before each use. 4 to 5 drops of a good grade Air Tool Oil placed in the
air inlet is sufficient. Use proper air pressure and CFM rating listed for this tool.
2
IMPORTANT SAFETY INFORMATION

IMPORTANT SAFETY INFORMATION
8.
Dress properly. Do not wear loose clothing or jewelry. Contain long hair. Keep
your hair, clothing, and gloves away from moving parts. Loose clothes, jewelry,
or long hair can be caught in moving parts and increases the risk of injury.
9. Stay alert, watch what you are doing and use common sense when operat-
ing a power tool. Do not use tool while tired or under the inuence of drugs,
alcohol, or medication. A moment of inattention while operating the tool may
cause serious injury.
10. Avoid unintentional ring. Keep ngers away from trigger when not driving
fasteners, especially when connecting the tool to the air supply.
11. Do not overreach. Keep proper footing and balance at all times. Proper foot-
ing and balance enable better control of the tool in unexpected situations.
12. Make sure air hose is free of snags and obstructions. Do not attach an air
hose or tool to your body. Entangled or snarled hoses can cause a loss of
balance or footing in addition to unintentional tool operation. Attach the hose
to the structure to reduce the risk of loss of balance of the hose shifts.
13. Never point tool at yourself or others in work area. Always assume the tool
contains fasteners. Never point the tool at yourself or others, whether it
contains fasteners or not. If fasteners are mistakenly driven, it can lead to
severe injuries. Never engage in horseplay with the tool. Respect the tool as a
working implement.
14. Keep ngers away from trigger when not driving fasteners to avoid acciden-
tal ring. Never carry the tool with nger on trigger since you could drive a
fastener unintentionally and injure yourself or someone else. Always carry the
tool by the handle only.
15.
Never modify or alter a tool. Doing so may cause malfunction and personal injuries.
16. Know this tool. Read manual carefully, learn its applications and limitations,
as well as the specic potential hazards related to this tool.
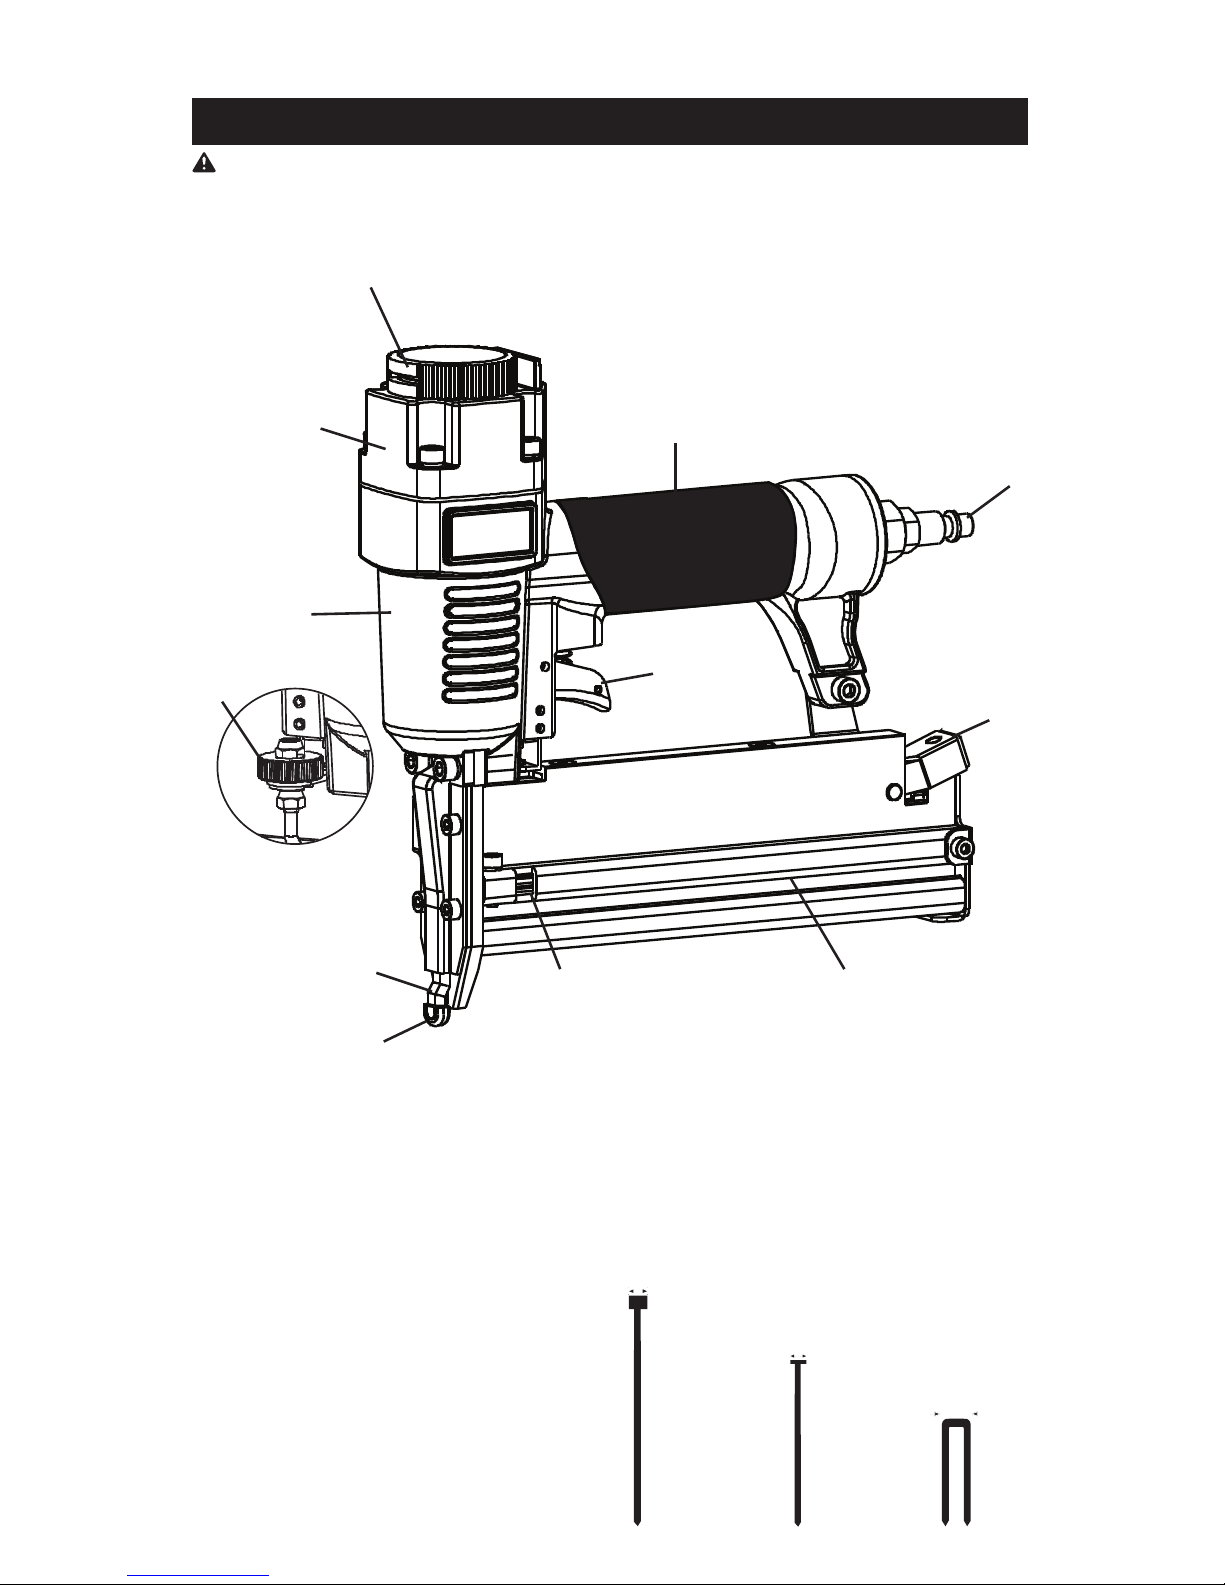
17. Use only fasteners that are recommended for your model. Do not use the
wrong fasteners or load the fasteners incorrectly.
18.
Check for misalignment or binding of moving parts, breakage of parts, and any
other condition that may aect the tool's operation. If damaged, have the tool
serviced before using. Many accidents are caused by poorly maintained tools.
19. Check safety before use. Make sure the safety operates properly. Never use
the tool unless the safety is operating properly, otherwise the tool could drive a
fastener unexpectedly. Do not tamper with or remove the safety, otherwise the
safety becomes inoperable.
20. Do not use tool if trigger does not actuate properly. Any tool that cannot be
controlled with the trigger is dangerous and must be repaired.
21.
Never use tool which is defective or operating abnormally. If the tool appears to
be operating unusually, making strange noises, or otherwise appears defective,
stop using it immediately and arrange for repairs by an authorized service center.
22. Maintain tools with care. Keep the tool clean and lubricated for better and safer
performance.
23. Never carry the tool by air hose.
24. Store tools out of the reach of children and other untrained people. Tools are
dangerous in the hands of untrained users.
25.
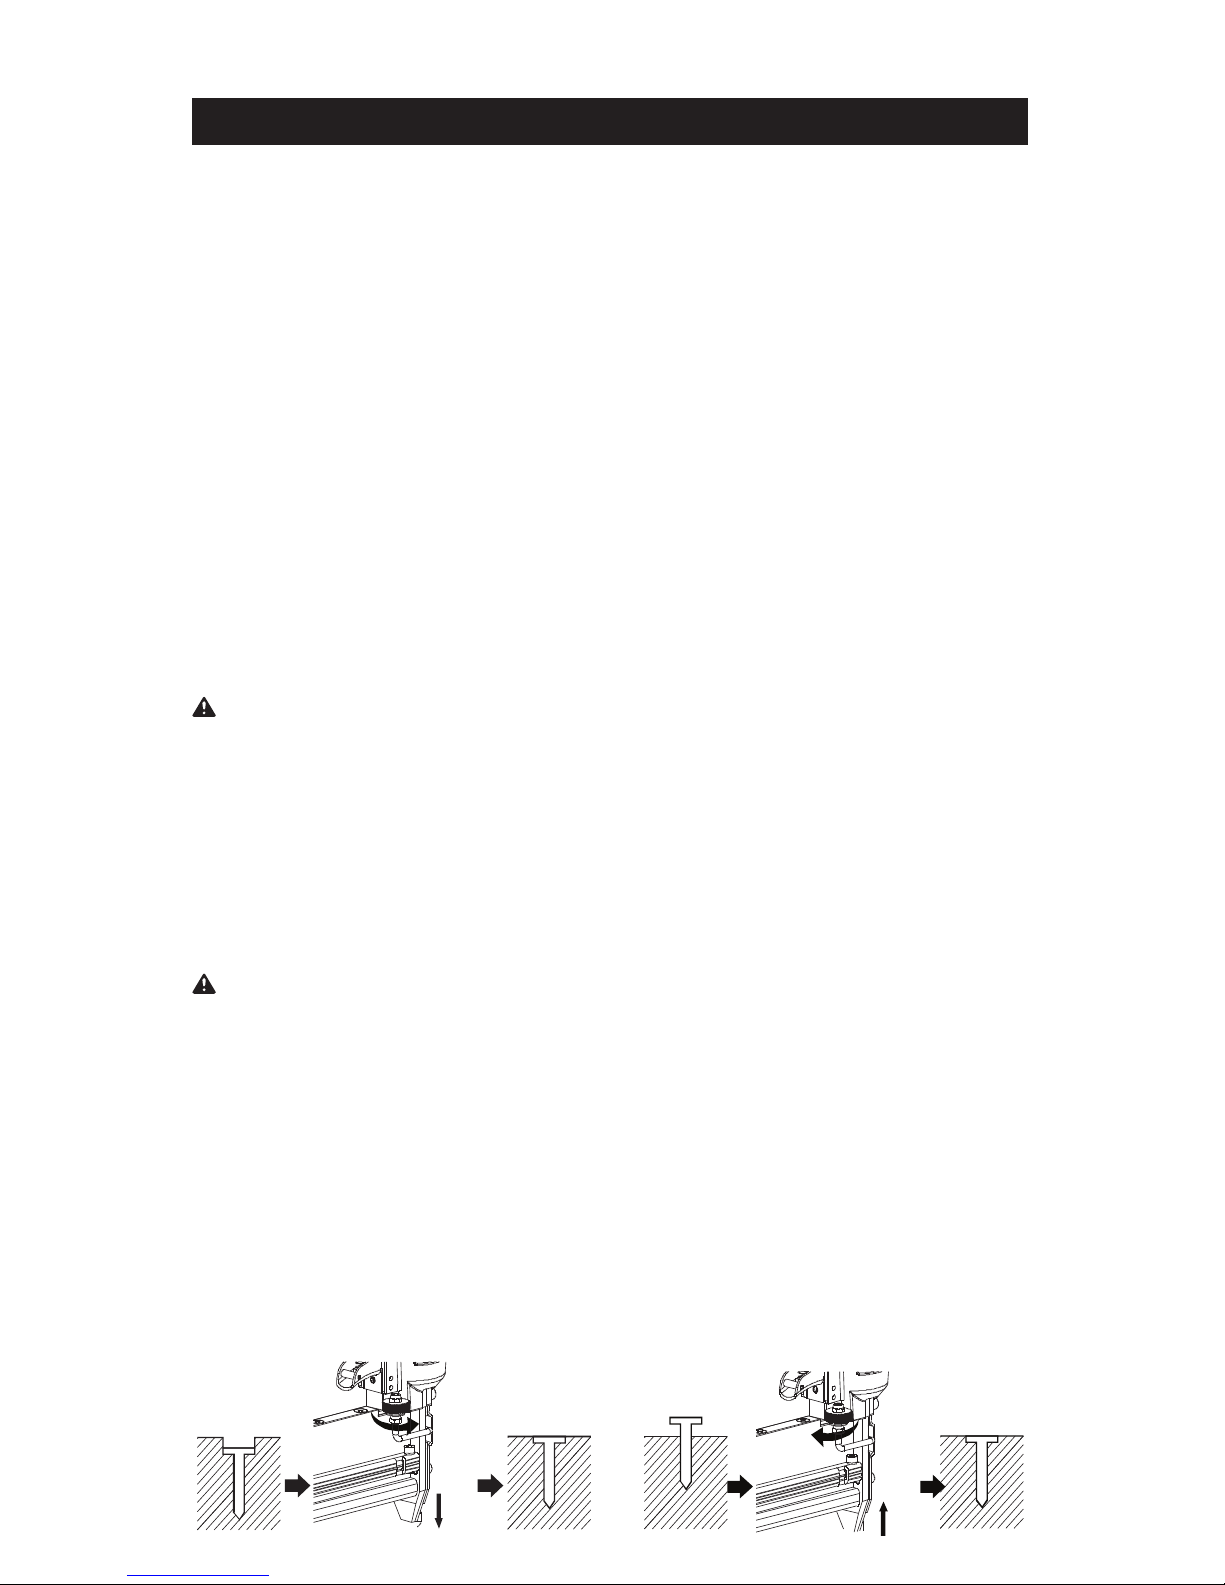
Place tool properly on workpiece. Do not drive fasteners on top of other fasteners or
with the tool at too steep of an angle; the fasteners can ricochet and hurt someone.
IMPORTANT SAFETY INFORMATION
3

26. Do not use the tool as a hammer.
27. Keep all screws and covers tightly in place. Keep face, hands and feet away
from ring head at all times. Never place your face, hands or feet near the
ring head.
28. Do not disconnect air hose from tool with nger on trigger. The tool can re
when reconnected to an air supply.
29. Do not load fasteners with trigger pulled or safety depressed.
30. Never place a hand or any part of body in fastener discharge area of tool.
31. Do not drive fasteners into thin boards or near corners and edges of work-
piece. The fasteners can be driven for a way from the workpiece and hit
someone.
32. Disconnect air hose from tool when: Doing maintenance and inspection;
Turning the adjuster and top cover; Attaching or removing the no-mar tip;
Clearing a jam; It is not in use; Leaving work area; Moving it to another loca-
tion; Handing it to another person.
Never attempt to clear a jam or repair the tool unless you have disconnected air
hose from the tool and removed all remaining fasteners from the tool. The tool
should never be left unattended since people who are not familiar with the
tool might handle it and injure themselves.
33. Use only accessories that are identied by the manufacturer for the specic
tool model. Use of unauthorized parts or failure to follow maintenance instruc-
tions may create a risk of injury.
34. Use only the lubricants supplied with the tool or specied by the
manufacture.
35. Tool service must be performed only by qualied repair personnel.
36. Never use oxygen or other bottled gases as a power source. Explosion may
occur. Combustible gases and other bottled gases are dangerous and may
cause the tool to explode.
37. Do not exceed maximum recommended air pressure marked on the tool. Use
only clean, dry, regulated, compressed air within the rated pressure range
marked on the tool. Never connect the tool to pressure as which potentially
exceeds 200PSI the tool can burst.
38. Do not abuse the air hose. Protect all hoses from kinks, restrictions, solvents
or sharp objects. Keep air hose away from heat, oil, sharp edges or moving
parts. Replace damaged hoses immediately. Damaged hoses can burst or
whip around.
39. Check all ttings, hoses, pipes, connections and compressor before each
use of this tool. Repair or replace damaged or leaking hoses and connections
immediately. Damage to a hose or connection can cause a pressure hose to
break and whip around the work area, and can lead to injury.
WARNING: This product and its packaging contain a chemical known to the
State of California to cause cancer, birth defects, or other reproductive harm.
WARNING: The warnings, cautions, and instructions discussed in this
instruction manual cannot cover all possible conditions and situations that may
occur. It must be understood by the operator that common sense and caution
are factors which cannot be built into this product, but must be supplied by the
operator. Read and understand all of the instructions provided in the instruction
manual of this product, as well as, any other tool(s) used with this product.
IMPORTANT SAFETY INFORMATIONIMPORTANT SAFETY INFORMATION
4

WARNING:
Disconnect the tool from the air source before making any adjustments,
changing accessories o storing the tool. Such precautionary safety measures reduce the
risk of unintentional tool operation.
PRODUCT DESCRIPTION
Item # Description
1 Adjustable Exhaust Deector
2 Top Cap
3 Body
4 Hand Grip
5 Trigger
6 Air Plug
7 Magazine Latch
8 Magazine
9 Safety
10 No-Mar Tip
11 Depth of Drive Adjustment
12 Nail Indicator
2
3
4
5
9
11
8
6
10
12
7
1
3/4"
1"
1-1/4"
1-3/8"
1-1/2"
1-5/8"
1-3/4"
2"
19mm
25mm
32mm
35mm
38mm
40mm
45mm
50mm
16 Ga
0.118"(3mm)
1/2"
5/8"
3/4"
1"
1-1/4"
1-1/2"
1-5/8"
13mm
16mm
19mm
25mm
32mm
38mm
40mm
18 Ga
1/4"(5.7mm)
3/8"
5/8"
3/4"
1"
1-3/16"
1-1/4"
1-3/8"
1-1/2"
1-5/8"
1-3/4"
2"
10mm
15mm
20mm
25mm
30mm
32mm
35mm
38mm
40mm
45mm
50mm
18 Ga
0.079"(2mm)
Fastener Type
Fastener Size Range:
18 Gauge Brads: 3/8"-2"(10-50mm)
16 Gauge Finish: 3/4"-2"(19-50mm)
18 Gauge Staples: 1/2"-1-5/8"(13-40mm)
5
Brad
Finish
Staple

Install a lter, regulator, lubricator unit and moisture trap on your air delivery system per
the manufacturer's instructions for these devices. Additionally, install a pressure gauge as
close as practical to the tool, preferably within 10 feet. Select hoses with a minimum inner
diameter of 1/4 inches and a maximum length of 100 feet.
WARNING:
To reduce the risk of injury from a hose bursting, select hoses that are
rated at least 200PSI.
Select fittings that are appropriate size for the selected hoses. The tool and air hose must
have a hose coupling so that all pressure is removed from the tool when the
coupling joint is disconnected.
WARNING:
Never use non relieving couplers and/or female quick disconnect
couplings on the tool. Non relieving couplings and female couplings will trap high pressure
air in the tool when the air line is disconnected. This will leave the tool charged with
enough air after it has been disconnected to drive a nail. Only MALE pneumatic type air
connectors should be fitted to the tool, so that high pressure air in the tool is vented to
atmosphere as soon as the air line is disconnected.
Set the regulator at the air delivery system to a PSI that falls within the tool's operating
range of 60-110PSI. The correct pressure is the lowest pressure that will do the job.
Lubrication
WARNING:
Use only the air tool lubricants supplied with the tool. Do not use other
lubricants as they may damage the tool.
If the tool is not used with an in-line lubrication system on the air supply it is necessary to
periodically lubricate the tool with air tool lubrication. Under low use, lubricate once a day.
Under heavy use, lubricate twice a day. To lubricate, insert 2-3 drops of lubricant into the
air plug attached to the tool handle. Using too much oil will cause it to collect in the tool
and be noticeable in the exhaust.
Do not use detergent oil, WD-40, transmission fluid, motor oil, or other lubricants not
specifically designated as air tool lubricants. These lubricants will cause accelerated wear
to the seals, o-rings, and bumpers in the tool, resulting in poor tool performance and
frequent maintenance.
Air Supply
Adjust the air pressure at recommended operating pressure 60-110PSI according to the
length of nails and the hardness of workpiece. The correct air pressure is the lowest
pressure which will do the job. Using the tool at a higher than required air pressure
unnecessarily over stresses the tool. Don't exceed 115PSI.
WARNING:
Never use oxygen or other bottled gases as a power source. Explosion
may occur. Combustible gases and other bottled gases are dangerous and may cause the
tool to explode.
WARNING:
Never connect the tool to an air source that is capable of producing air
OPERATION
6

pressure exceeding 200PSI. Excessive pressure can cause abnormal operation or cause
the tool to burst, resulting in personal injury.
WARNING:
Do not exceed maximum recommended air pressure marked on the tool.
Verify prior to using the tool that the air source has been adjusted within the rated air-
pressure rang. Be sure the air pressure gauge is operating properly and check it at least
twice a day. Tools operated in excess of their maximum pressure rating may operate
abnormally or burst resulting in personal injury. To connect the tool to the compressor only
use pneumatic air hoses that meet the following criteria:
Minimum hose pressure rating, 200PSI.
Minimum hose inner diameter, 1/4 in.
Maximum hose length, 100 ft.
Connect the air supply.
• Snap the air hose onto the quick connector.
• Check for air leakage. If leakage is noted, stop using the tool immediately and
performed by qualified repair personnel.
•
Be sure the air pressure gauge is operating properly and check it at least twice a day.
Tool Testing
Before actually beginning the nailing work, test the tool by using the check list below.
Conduct the test in the following order.
If abnormal operation occurs, stop using the tool and performed by qualified repair
personnel immediately.
1. Disconnect air hose from tool. Remove all nails from tool. All screws must be tightened.
If any screws are loose, tighten them. The safety and trigger must move smoothly.
2. Adjust the air pressure to 60PSI, connect the air hose. Do not load any nails in the tool.
The tool must not leak air.
3. Remove the finger from the trigger and press the safety against the wood. The tool
must not operate.
4. Separate the safety from the wood. Next, point the tool downward, pull the trigger and
then wait in that position for 5 seconds or longer. The tool must not operate.
5a.
Without touching the trigger, depress the safety against the workpiece. Pull the
trigger. The tool must operate.
b. Hold the trigger back while separating the safety from the wood. The tool will
remain in operated status(the driver blade will remain at the bottom).
c. Remove the finger from the trigger. Tool operation will end (the driver blade will
return to the top).
6. If no abnormal operation is observed, you may load nails in the tool. Drive nails into
the workpiece that is the same type to be used in the actual application. The tool
must operate properly.
OPERATION
7

Nail Loading
WARNING:
When loading the tools magazine, check that the nail tips contact the
wear rail and slide smoothly against the surface of the magazine. If the nails are not
loaded properly, the tool will misre and nails can be deected, causing the tool to react in
an unexpected manner, and damage the tool.
1. Connect air supply.
2. Press magazine latch and pull magazine to open position.
3. See tool specification to determine appropriate nail sizes.
Insert appropriate nail strips, with the nail tips
contacting the wear rail.
4. Push the nail strip against the nose.
5. Push magazine fully closed. Magazine latch will
maintain fully closed position.
WARNING: Keep the tool pointed away from yourself and others when loading
fasteners. Failure to do could result in possible serious personal injury. Never load
fasteners with the workpiece contact or trigger activated. Doing so could result in possible
serious personal injury.
Removing Nails
1. Disconnect air supply.
2. Push magazine latch and pull magazine to open position.
3. Grasp the head of the nail strip and remove it from magazine.
OPERATION CONT.
PRESS
PULL OPEN
CORRECT INCORRECT
BRAD - 18 Ga.
Finish - 16 Ga.
Finish - 16 Ga.
Brad- 18 Ga.
Staple- 18 Ga.
8

OPERATION CONT.
This tool is equipped with the safety and does not operate unless the safety is depressed.
The methods of operation to drive nails with this tool is single actuation mechanism.
1. Position the nail outlet on the workpiece with finger off the trigger.
2. Depress the safety firmly until it is completely depressed.
3. Pull the trigger to drive a nail.
4. Remove finger from the trigger.
To continue nailing a separate location, move the tool along the wood, repeating steps
(2-4) as required.
NOTE: Always handle nails and package carefully. If nails are dropped, collating bent may
be broken, which will cause mis-feeding and jamming.
After nailing:
1. Disconnect air hose from the tool.
2. Remove all nails from the tool.
3. Supply 5-10 drops of pneumatic tool lubricant into the air plug on the tool.
4. Open the petcock on the air compressor tank to drain any moisture.
WARNING: Do not use a frozen tool. Allow tool to thaw before using. Moisture frozen
in the tool may impede internal components resulting in the risk of injury and/or tool
damage.
When using the tool in cold conditions the tool will cycle slower than usual while driving
the first nails. The cycle rate will increase as the tool warms up. Keep tool warm to avoid
reduced cycle rate.
Adjusting Nailing Depth
WARNING: Disconnect the tool from the air source before making adjustments. Such
precautionary safety measures reduce the risk or unintentional tool operation.
1. Disconnect tool from air supply.
2. Remove nails from the tool.
3. Adjust tool driving depth:
• To reduce the nail depth , turn the adjustment knob counter clockwise.
• To drive the nail deeper, turn the adjustment knob clockwise.
4. Reload nails as described in the "Nail Loading" sectionof this manual.
5. Reconnect air supply.
To reduce the nail depth , turn the
adjustment knob counter clockwise.
To drive the nail deeper, turn
the adjustment knob clockwise.
Flush
Flush
Too
Deep
Too
Shallow
9

OPERATION CONT.
Adjusting the Exhaust
The direction of the exhaust vent can be changed by
turning the top cover.
Nail Indicator
The red indicator bars are used to show when the tool
needs to be reloaded. When the tool is loaded with
a nail strip, the red indicator bars will no longer be visible
in the indicator window. As then nails strip is consumed,
the red indicator bars will start to become visible. The
tool should be reloaded when the red indicator bar is
half way exposed in the indicator window.
Using the No-Mar Tip
WARNING: When attaching or detaching the No-Mar Tip, be sure to remove your
nger from the trigger and disconnect the air house from the nailer.Do not use a frozen
tool. Allow tool to thaw before using. Moisture frozen in the tool may impede internal
components resulting in the risk of injury and/or tool damage.
If you like to protect the surface of workpiece against
scratches or markings made by the safety, attach the
accessory No-Mar Tip to the safety.
To replace the No-Mar Tip:
1. Disconnect air hose from tool.
2. Put the No-Mar Tip to the toe of the safety.
To remove the No-Mar Tip: Pull the no mar tip directly
away from tool.
NOTE: The nose cap may reduce nailing depth due to its thickness. Re-adjustment of
nailing depth is required.
Jam Clearing
Remove a jammed nail in the following order:
1. Disconnect air hose.
2. Remove all nails.
3. Completely remove the small nose screws and
the top nose plate to remove the jammed fastener.
4. Removed the jammed nail with a slotted
head screwdriver.
5. Close the nose plate and latch.
NAIL
INDICATOR
NO-MAR TIP
SAFETY
MAINTENANCE
10

Cleaning
WARNING: When cleaning a tool be careful not to disassemble any portion of the tool
since internal components may be misplaced or safety components may be improperly
mounted. Certain cleaning agents such as gasoline, carbon tetrachloride, ammonia. etc.
may damage plastic parts and o-rings.
WARNING: Do not attempt to clean by inserting pointed objects through openings.
Sharp edges may damage internal components causing a serious hazard. Ventilation
openings, the work contact element, and the trigger must be kept clean and free of foreign
matter. Periodically clean the tool with compressed air. Clean the magazine. Remove
metal or wooden chips which may have accumulated in the magazine. Periodically clean
magazine with compressed air.
Storage
WARNING:
Keep out of reach of children and personnel unfamiliar with tool
operation. Lock the storage area. Tools are dangerous in the hands of personnel
unfamiliar with the tool. When not in use, the tool should be disconnected and stored
in the storage case in a warm and dry place. When tool will not be in use for an
extended period, apply a thin coat of the lubricant to the steel parts to avoid rust. Do
not store the tool in a cold weather environment.
MAINTENANCE CONT.
MAINTENANCE CONT.
PROBLEM POSSIBLE CAUSE SUGGESTED SOLUTION
Air leaking near the
top of the tool or in
the trigger area.
1. Loose screws.
2. Worn or damaged O-rings
or seals.
1. Tighten screws.
2. Install overhaul kit.
Air leaking near the
bottom of the tool.
1. Loose screws.
2. Worn or damaged O-rings
or seals.
1. Tighten screws.
2. Install overhaul kit.
Tool does nothing
or operates
sluggishly.
1. Inadequate air supply.
2. Tool is too dry.
3. Exhaust blocked.
4. Worn or damaged O-rings
or seals.
1. Make sure the air compressor is set
between 60PSI and 110PSI.
2. Add about 2-3 drops of lubrication
into the air connector.
3. Clean exhaust channel.
4. Install overhaul kit.
Fasteners are
jammed in the tool
frequently.
1. Driver channel is worn.
2. Piston is broken or worn.
3. Bent fasteners.
4. Dirty magazine.
5. Loose magazine.
6. Wrong fasteners.
1. Fix the drive channel.
2. Replace the piston.
3. Remove the bent fasteners, replaced
with the right fasteners.
4. Clean magazine.
5. Tighten screws.
6. Verify that fasteners are the
correct size.
11

1 YEAR LIMITED WARRANTY
PERFORMANCE TOOL® extends only the following warranties, and only to original retail
purchasers. These warranties give specific legal rights. Except where prohibited by local law, the
law of the State of Washington governs all warranties and all exclusions and limitations of
warranties and remedies. There may be other rights which vary from state to state.
PERFORMANCE TOOL® warrants the product to be free from defects in materials and
workmanship under normal use and service. A defective product may be returned for a free
replacement within 90 days from the date of purchase, provided that product is returned to place
of purchase immediately after discovery of defect. After 90 days and up to one year from date of
purchase, PERFORMANCE TOOL® will replace at no charge any parts which our examination
shall disclose to be defective and under warranty. These warranties shall be valid only when a
sales receipt showing the date of purchase accompanies the defective product or defective part(s)
being returned. For part(s) after 90 days, please remit your request, postage prepaid to:
PERFORMANCE TOOL, P.O. Box 88259 Tukwila, WA 98138
These warranties exclude blades, bits, punches, dies, bulbs, fuses, hoses, and other
consumables which must be replaced under normal use and service. These warranties shall not
apply to any product or part which is used for a purpose for which it is not designed, or which has
been repaired or altered in any way so as to affect adversely its performance or reliability, nor
shall these warranties apply to any product or part which has been subject to misuse, neglect,
accident or wear and tear incident to normal use and service. PERFORMANCE TOOL® does not
authorize any other person to make any warranty or to assume any liability in connection with its
products. Except for warranties of title and the limited express warranties set forth above,
PERFORMANCE TOOL® makes no express or implied warranties of any kind with respect to its
products. In particular, PERFORMANCE TOOL® makes no implied warranty of merchantability
and no implied warranty of fitness for any particular purpose, except that for goods purchased
primarily for personal, family or household use and not for commercial or business use,
PERFORMANCE TOOL® makes an implied warranty of merchantability (and, if otherwise
applicable, an implied warranty of fitness for a particular purpose), but only for the particular
qualities or characteristics, and for the duration, expressly warranted above. The laws on
limitation of implied warranties may differ from state to state, so the above limitations may not
apply in all cases. PERFORMANCE TOOL® shall not be liable for consequential, incidental or
special damages resulting from or in any manner related to any product, or to the design, use, or
any inability to use the product. The sole and exclusive remedy for a defective product or part
shall be the repair, or replacement thereof as provided above. The laws on limitation of remedies
or on consequential, incidental or special damages may vary from state to state, so the above
limitations may not apply in all cases.
© Copyright 2017 WILMAR CORPORATION, P.O. Box 88259 Tukwila, WA 98138
Table of contents
Other Performance Tool Nail Gun manuals
Popular Nail Gun manuals by other brands

Rapid
Rapid Airtac PBS121 operating instructions

MasterCraft
MasterCraft AIR-POWERED BRAD NAILERS operating instructions

Everwin
Everwin MCN40 Operation and maintenance manual

Makita
Makita DBN500 instruction manual

Bosch
Bosch GSK 18 V-LI Professional Original instructions

Interchange
Interchange NSJH38-34 Operator's manual