Perma child safety Ultimate 2726 User manual

#2726 Warm Black
#2745 White
Ultimate
Safety Gate
INSTRUCTION MANUAL
This product complies with safety standard EN 1930:2011 & ASTM F1004-19
IMPORTANT! READ AND FOLLOW
THESE INSTRUCTIONS
CAREFULLY AND KEEP
FOR FUTURE REFERENCE.
INSTALLATION VIDEO
FITS OPENINGS
79cm
(31”)
73cm - 82cm
(28.8” - 32.3”)
TALL

TABLE OF CONTENTS
SAFETY INFORMATION
General
Maintenance
Warnings
WHAT’S IN THE BOX
Parts
INSTALLATION
Gate Placement
Inside Opening or Doorway
OPERATION
How to Operate
Cleaning Instructions
SUPPORT
Warranty Certificate
Warranty Card
After Sales Support
03
03
04-05
06
07-08
09-11
12
13
14
15
15
02

Read this instruction manual carefully and keep it in a safe place for
future reference.
The correct use and maintenance of this product is essential.
Regularly check that the gate is functioning correctly, lubricate hinges and
moving components. Tighten and adjust mounts to ensure secure smooth
operation. Inspect all components regularly and stop using if any
component is damaged or missing.
Refer to pages 12 & 13 for operation and cleaning instructions.
GENERAL
MAINTENANCE
SAFETY INFORMATION
03

• To prevent serious injury or death, securely install gate or
enclosure and use according to manufacturer instructions.
• Incorrect installation can be dangerous.
• Do not use the safety barrier if any components are damaged
or missing.
• The safety barrier must not be fitted across windows.
• Never install this product on glass doors. Install this product against
reliable doors or walls.
• If the safety barrier is used at the top of the stairs, it should not be
positioned below the top level.
• The minimum distance to the first step of the stairs is 25cm (10”)
when used at the top of stairs.
• If the safety barrier is used at the bottom of the stairs, it should
be positioned at the front of the lowest tread possible.
• This safety barrier has an automatic closing system.
• Never leave child unattended when using this product.
• Children have died or been seriously injured when gates /
enclosures are not securely installed.
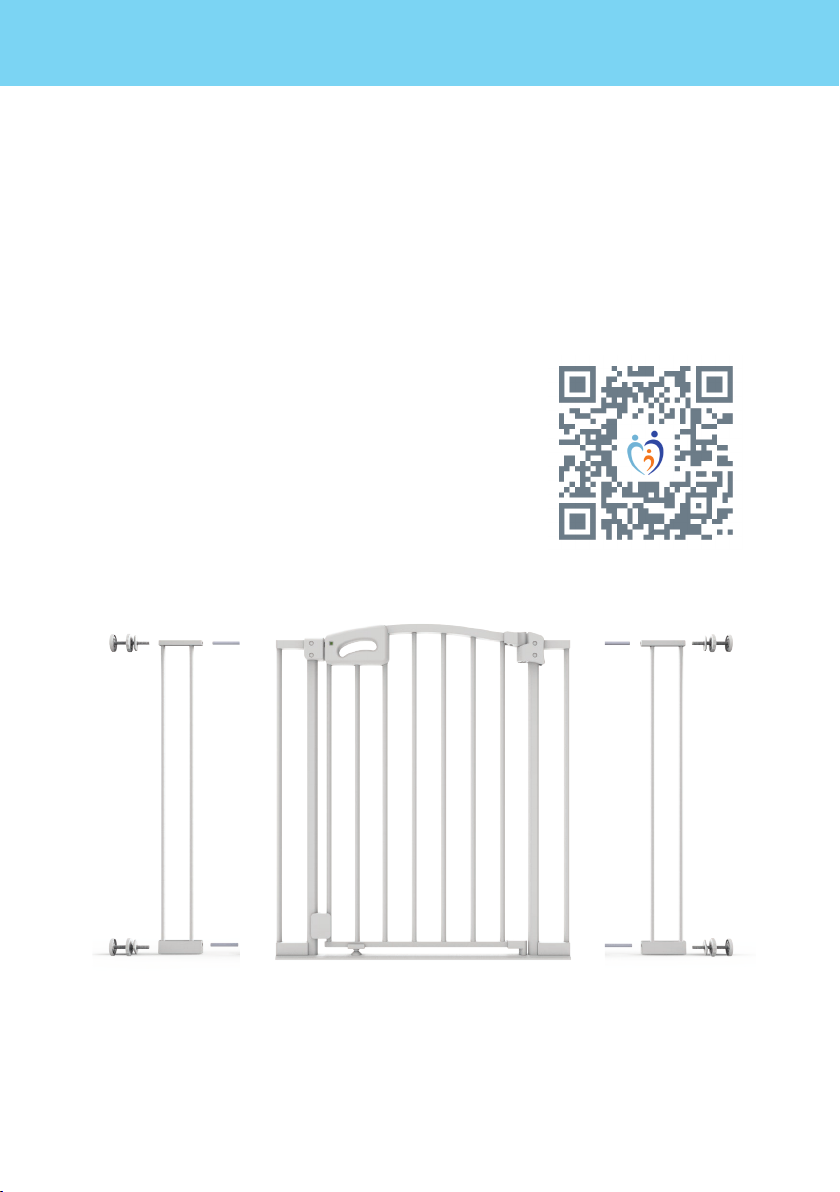
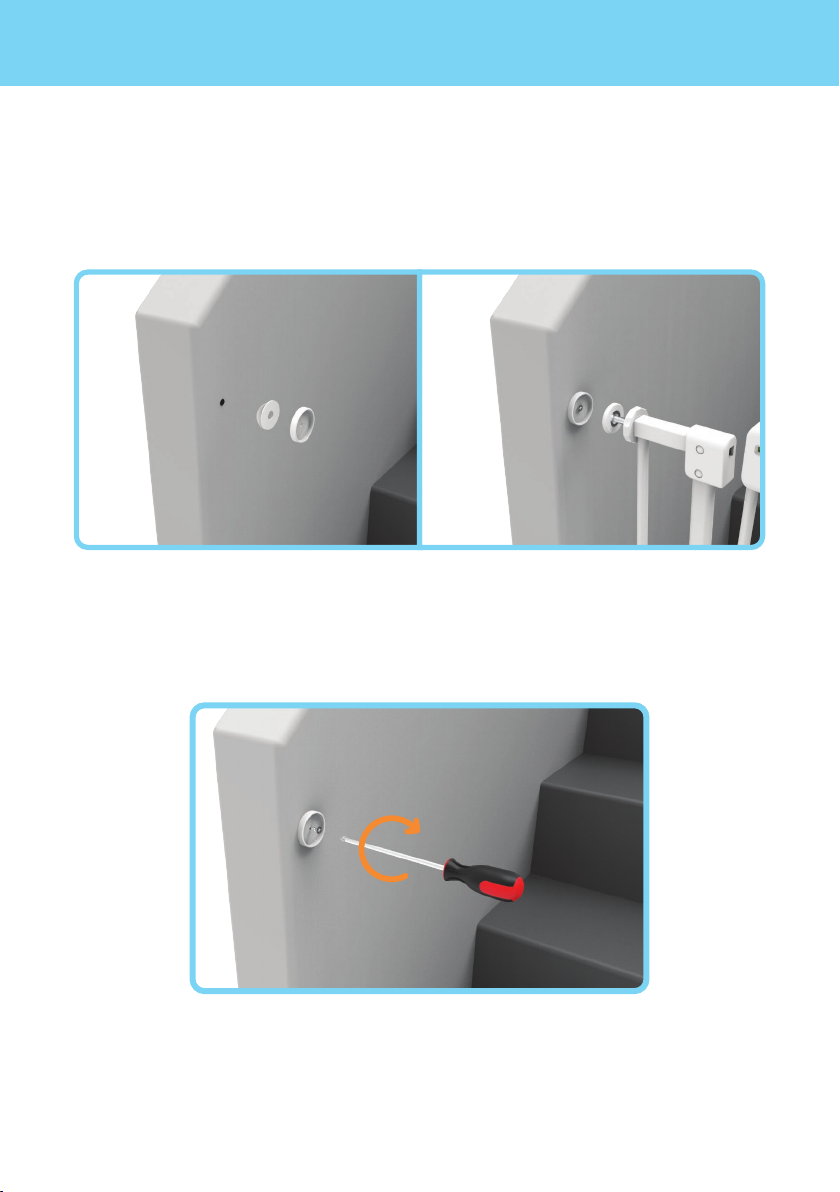
• You MUST install wall cups to keep gate in place, without wall cups
child can push out and escape.
04
WARNING

• Always check that the safety barrier is correctly closed.
• Use only with the locking / latching mechanism securely engaged.
• Gate must be installed as close to the ground as possible, as per the
installation guides.
• Never use with a child able to climb over or dislodge / open the gate
or enclosure.
• Danger to older children if climbing over the product.
• Regularly check that the safety barrier is properly installed and secure.
• ALWAYS install and use gates / enclosures as directed, using all
required parts. All parts should be obtained from after sales support.
• Barrier must be fitted between rigid surfaces such as plaster board,
timber or hard wall.
• This product is intended for use with children from 6 to 24 months or
small to medium pets from 4.5kg (10 Ibs) up to 18kg (40 Ibs).
• Do not put any goods which can be grabbed by children or pets near
this product to prevent injury.
• Before using this product, carefully inspect for any loose parts and
whether any parts need to be tightened.
• NEVER use to keep child away from pool.
• This safety barrier is for domestic use only.
05
WARNING

WHAT’S IN THE BOX
PARTS
1 x Safety Gate
4 x Mounting Cups
4 x Adjuster Bolts 4 x Screws 1 x Swing Direction
Control *Pre-Installed
4 x Adhesive Pads 4 x Adjuster Screws
06

Gate Placement
When the gate is unpacked, you may notice a gap at the
door opening. This is normal with pressure mounted gates
and the gap will disappear when it is installed correctly.
INSTALLATION
07

INSTALLATION
NOTE: Only use one extension on each side of gate.
Gate Placement
Gate must be installed in a structurally sound opening.
Ensure mounting surface (e.g. wall, door frame, stair way)
is strong, rigid and has an even surface. Measure the space
to be enclosed.
08
Gate extensions are availiable
through our website.
Scan the QR Code to try our Gate
Extension Calculator:

Inside Opening or Doorway
Step 1.
Screw Adjuster Bolts and Screws together, then place into
mounting holes in each corner of the gate.
Step 2.
Place the gate in desired opening, ensure the bottom rail is
completely flat on the floor and the Mounting Cups are
aligned directly above each other, mark position of each
Mounting Cup with a pencil.
INSTALLATION
09

INSTALLATION
Step 3.
Stick the Mounting Cup in position with the Adhesive Pads and
then place gate into position.
NOTE: This gate must only be fixed to a solid and secure surfce.
If unsure, check with a qualified builder or trades person that the installation
you intend is suitable and safe in chosen location.
10
For added security, fix each cup to the wall using a small Phillips
head screwdriver and the Screws provided.

INSTALLATION
NOTE: For top of stairways, the gate should never open out over stairs.
Step 4.
Align gate with Mounting Cups and tighten the Adjuster
Screws by turning clockwise, start with the bottom Adjuster
Screws then move to the top. Tighten equally until there is
only a 1.5mm (0.5”) gap in the locking mechanism. Regularly
check tension of all Adjuster Bolts and tighten if necessary.
Step 5.
Determine which direction the gate should open. Screw in
Swing Direction Control piece opposite to the desired
opening direction. Use images below as a guide.
11
MAX
63mm
(2.4”)
EQUAL
LEFT SIDE
OPENING
BOTH SIDE
OPENING
RIGHT SIDE
OPENING

OPERATION
12
HOW TO OPEN
1.
Using one hand, place thumb
on the button and grip Gate Panel
with fingers. Slide button and lift
Gate Panel.
2.
Open gate in either direction.
When released gate will swing
closed automatically.
3.
To enable stay open feature,
open gate to a 90°angle.
The gate will not swing closed.
NOTE: Always check gate is properly closed
and secure at all times.
90°
Slide
Lift

Simply use a soft damp cloth to wipe gate, dry after
cleaning. Do not use chemical or abrasive cleaners.
CLEANING INSTRUCTIONS
13

WARRANTY CERTIFICATE
SUPPORT
Congratulations! You have made an excellent choice of this quality product. Our commitment to
quality also includes our service. Should you, contrary to expectations, experience defects due to
manufacturing faults, we will provide you with a warranty against defects as follows:
WARRANTY
The product is guaranteed to be free from from defects in workmanship and parts for a period of 12
months from the date of purchase. Defects that occur within this warranty period, under normal use
and care, will be repaired, replaced or refunded at our discretion. The benefits conferred by this
warranty are in addition to all rights and remedies in respect of the product that the consumer has
under the Competition and Consumer Act 2010 and similar state and territory laws.
Our goods come with guarantees that cannot be excluded under the Australian Consumer Law. You
are entitled to a replacement or refund for a major failure and for compensation for any other
reasonably foreseeable loss or damage. You are also entitled to have the goods repaired or replaced
if the goods fail to be of acceptable quality and the failure does not amount to a major failure.
PROOF OF PURCHASE
This warranty is valid for the original purchase and is not transferable. Please keep your purchase
docket, tax invoice or receipt as proof of purchase and date of which the purchase was made.
EXTENT OF WARRANTY
This warranty is limited to defects in workmanship or parts. All defective products or parts will be
repaired or replaced. This warranty does not cover consumable items.
NORMAL WEAR AND TEAR
This warranty does not cover normal wear and tear to the products or parts.
EXCLUSIONS
This warranty does not cover:
• Any defects caused by an accident, misuse, abuse, improper installation or operation, lack of
reasonable care, unauthorised modification, loss of parts, tampering or attempted repair by a person
not authorised by the distributor.
• Any product that has not been installed operated or maintained in accordance with the
manufacturer operating instructions provided with the product.
• Any product that has been used for purposes other than domestic use.
TO MAKE A CLAIM
If a defect in the goods appears within 12 months, you are entitled to claim a warranty. Please
contact after sales support via the link below:
www.permachildsafety.com/contact-us
Please ensure that you have a copy of proof of purchase so that we are able to respond as quickly
and efficiently as possible.
14

DETAILS:
PRODUCT NAME: Ultimate Safety Gate
PRODUCT NUMBER: White 2745, Warm Black 2726 (Please Circle)
YOUR NAME:
ADDRESS:
PHONE:
EMAIL:
DATE OF PURCHASE:
LOCATION OF PURCHASE:
We recommend that you keep a copy of your receipt, showing the date of purchase, with this
warranty certificate and keep for your reference. In the event of a product fault, please contact
after sales support. Ensure that you include the product details (as shown on this card) so that
we are able to respond as quickly and efficently as possible.
WARRANTY CARD
AFTER HOURS SUPPORT
SUPPORT
Scan the QR code for Live Chat Support
or visit: permachildsafety.com/contact-us
15

Scan the QR code for Live Chat Support
or visit: permachildsafety.com/contact-us
Perma Child Safety @permachildsafety
This manual suits for next models
1
Table of contents
Other Perma child safety Indoor Furnishing manuals
Popular Indoor Furnishing manuals by other brands

Ergotron
Ergotron Elevate II Assembly instructions

Naterial
Naterial ORION GAMMA II 2022R09P01-0050 Assemby - Use - Maintenance Manual

Bonaldo
Bonaldo Art Extension Dining Table Assembly instructions

Walker Edison
Walker Edison WQ44CCR Assembly instructions

Costway
Costway JV10906 manual

Forte
Forte CETK331 Assembling Instruction