Perten Aquamatic 5200 User manual

Operation Manual AM 5200 (-A) E5200EN3 v 1.0 May 2013
1 (36)
Aquamatic 5200 (-A)
Operation Manual

Operation Manual AM 5200 (-A) E5200EN3 v 1.1 May 2013
2 (36)

Operation Manual AM 5200 (-A) E5200EN3 v 1.1 May 2013
3 (36)
1 Safety
1.1 Warning
Ensure that the transport locks are disengaged before switching the
instrument on. Follow the instructions in Section 5.1.
To prevent operator injury or damage to the instrument, verify that the
line voltage is correct before connecting the mains power. This
information is located on the name plate of the instrument. Also, ensure
the main power cable is connected to a power outlet with protective earth
ground.
Apart from the measurement cell, accessed through removal of the top
cover, there are no user serviceable parts inside the instrument. Perten
Instruments takes no responsibility for injury or damages caused by
personnel not specially trained for AM 5200 (-A) service.
In the event of a power cable connector failure, the replacement must be
made only by qualified personnel.
1.2 Caution
The AM 5200 (-A) must only be used for analysis of unground grain,
oilseed, beans, pulses and similar product.
The Transport Locks (see section 5.1.2) are located near sharp edges.
Wear gloves and use caution when removing and setting Transport Locks.

Operation Manual AM 5200 (-A) E5200EN3 v 1.1 May 2013
4 (36)
2 General Description
Introduction
The AM 5200 (-A) is a grain analyzer, designed to determine moisture, temperature and specific
weight. The instrument measures the dielectric constant of grain at 150 MHz. The instrument
requires no sample preparation other than cleaning or the removal of large impurities.
Applications
The AM 5200 (-A) is intended for the measurement of many types of grains and oilseeds. For a
complete list of grain and seed types for which the instrument is approved for use in your location,
please consult the current Approved Uses information at www.perten.com/am5200usda. This
listing includes the range of moisture content and temperature for each type of sample to be
measured.
Method
Typically, a 700 ml sample is poured into the hopper. The instrument automatically starts
measuring the sample when a sufficient amount of sample has been received.
Features
The instrument includes a large color touch-screen for operation and presentation of results. The
internal scales are used for calculating specific weight (density) of the sample. Specific weight is
commonly referred to as Test Weight, or Hectoliter Weight.
Calibration
Through the use of the specific weight measurements and the UGMA (Unified Grain Moisture
Algorithm, developed by the United States Department of Agriculture) only one calibration is
required for all products, although with individual settings for bias, slope and other product
specific factors.
Optional Equipment (Data Entry)
A USB barcode scanner or USB keyboard may be utilized for data entry.
Optional Equipment (Flow Through Mode)
The flow through catch drawer may be purchased to allow grain to flow through and into a larger
user supplied container.
Optional Equipment (Printer)
A serial ticket printer such as the
* Citizen CD-S500A-RSU(Matrix printer) along with a FTDI chipset USB to Serial adapter cable is
supported by the AM 5200/5200-A.
* Star TSP 654 RF (Thermal printer) along with a FTDI chipset USB to Serial adapter cable is
supported by the AM 5200/5200-A.
Optional Equipment (Data transfer)
USB memory stick
Note
Pictures in this manual may change depending on UI Version. Current pictures based on UI
20130130.04.

Operation Manual AM 5200 (-A) E5200EN3 v 1.1 May 2013
5 (36)
3 Table of Contents
1Safety…………………………………………………………………………………………………. 3
1.1 Warning……………………………………………………………………………………… 3
1.2 Caution………………………………………………………………………………………. 3
2General Description…………………………………………………………………………………. 4
3Table of Contents……………………………………………………………………………………. 5
4Liability………………………………………………………………………………………………... 6
4.1 Declaration of Conformity (CE)…………………………………………………………… 7
5Setting up the Instrument…………………………………………………………………………… 8
5.1 Unpacking and Installation………………………………………………………………… 8
5.2 Configuration and Adjustment…………………………………………………………… 10
6User’s Quick Guide – Analyzing Samples………………………………………………………. 11
7User’s Reference Guide………………………………………………………………………… 12
7.1 Instrument Overview……………………………………………………………………… 12
7.2 Operating the AM 5200 (-A)……………………………………………………………... 13
7.3 Analyzing Samples……………………………………………………………………….. 14
7.4 Settings and Features……………………………………………………………………. 16
7.5 Error messages…………………………………………………………………………… 29
8Maintenance……………………………………………………………………………………… 33
8.1 Cleaning sample sensors………………………………………………………………... 33
8.2 Cleaning the RF cell……………………………………………………………………… 33
9Technical Specification……………………………………………………………………………. 34
9.1 Technical data…………………………………………………………………………….. 34
9.2 Environmental operating conditions…………………………………………………….. 35
This operation manual has Perten Instruments’ part number E5200EN3.

Operation Manual AM 5200 (-A) E5200EN3 v 1.1 May 2013
6 (36)
4 Liability
The AM 5200 (-A) is designed to measure moisture in grains and oilseeds. The correctness of the
results provided by the instrument is influenced by factors that Perten Instruments cannot monitor
nor take responsibility for.
It is the responsibility of the operator to ensure that the results are correct, for example by using
daily check samples to monitor the instrument and to perform periodic checks on the scale as
provided in the instructions. Perten Instruments or its distributors can never be responsible for any
damages caused by incorrect results by this product.

Operation Manual AM 5200 (-A) E5200EN3 v 1.1 May 2013
7 (36)
4.1 Declaration of Conformity (CE)

Operation Manual AM 5200 (-A) E5200EN3 v 1.0 May 2013
8 (36)
5 Setting up the Instrument
5.1 Unpacking and Installation
Notice how the instrument was packed upon arrival. If the instrument is to be transported, return
in original packaging. It is important that all packing materials are saved. Be sure to remove
the transportation locks on the load cell before use. Lift the instrument from the box using the
handles located on both sides of the foam packing material. Remove all tape and protective covers.
5.1.1 Box contents
This delivery contains:
The AM 5200 (-A)
Mains Power Cable
Operation Manual for the AM 5200 (-A)
5.1.2 Removing transport locks
There are two built-in transport locks protecting the load cell. These must to be lowered to the
“operate” position before switching the instrument on. The instrument can be carried carefully
without using the transport locks. For shipping or transportation on carts or similar, return the
transport locks to the lock position
To disengage the transport locks, first put the instrument on its back and remove the catch drawer.
The red locks are indicated by the arrows in the picture on the following page.

Operation Manual AM 5200 (-A) E5200EN3 v 1.1 May 2013
9 (36)
The Transport Locks (see section 5.1.2) are located near sharp edges. Wear gloves and use
caution when removing and setting Transport Locks.
1. Transport Lock 1 is secured by a magnetic catch. To unlock, tilt the red plate to release the
locking pin and slide the red plate to the lower position. Ensure the locking pin enters the top
hole for unlocked position.
The figures below show Transport Lock 1 in the Locked and Unlocked positions.
Transport Lock 1 in Locked position. Note the
position of the locking pin in the bottom hole.
Transport Lock 1 in Unlocked position. Note
the position of the locking pin the top hole.

Operation Manual AM 5200 (-A) E5200EN3 v 1.1 May 2013
10 (36)
2. Transport Lock 2 is secured by three thumbscrews. Remove thumbscrews A and B and
loosen thumbscrew C. Then slide lock bracket to the Unlock position as displayed in the
graphic below. Reinstall thumbscrew A in its original position and B in the unlocked
position. Ensure all thumbscrews are snug.
The two images below show Transport Lock 2 in Locked and Unlocked positions.
Transport lock 2
Transport lock 2
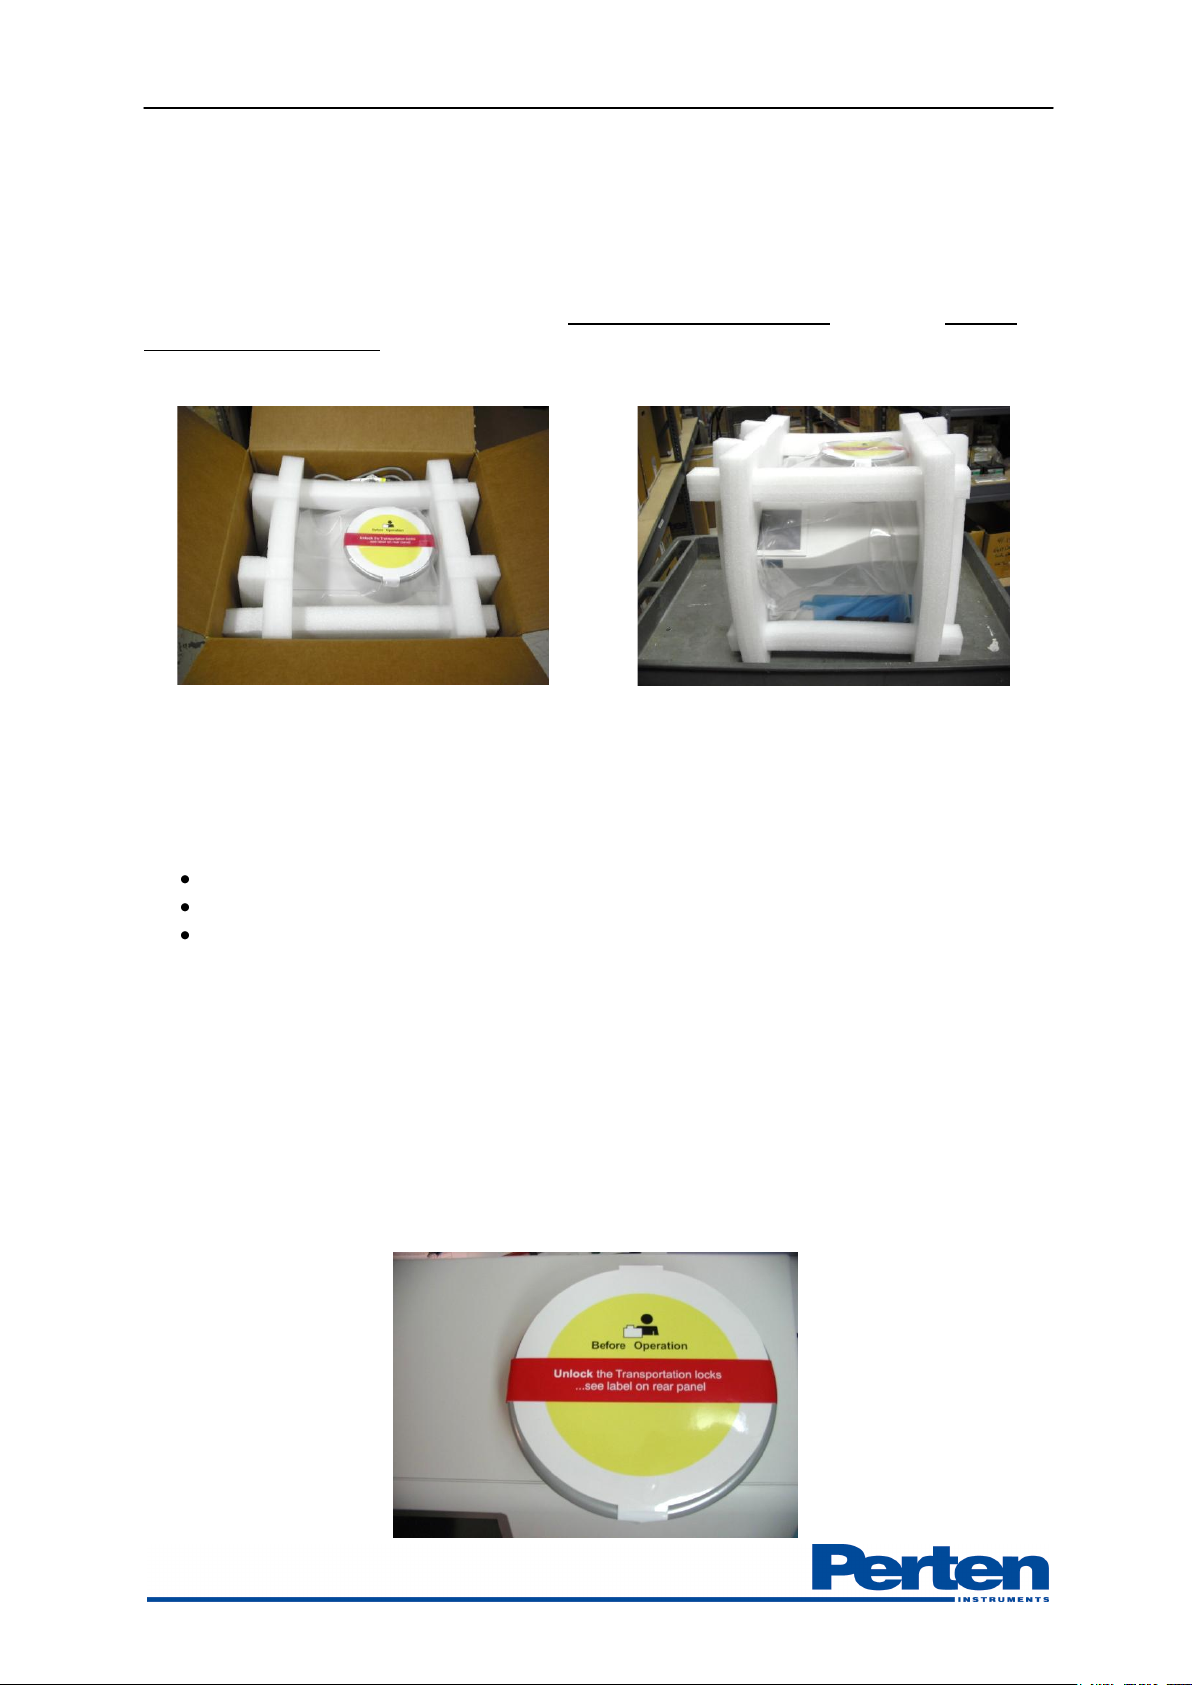
Before moving or shipping the AM 5200 (-A), please ensure both Transportation Locks are
properly secured. To lock, simply reverse the unlocking procedure.
5.1.3 Placement of the AM 5200 (-A)
Place the AM 5200 (-A) on a vibration-free, level surface with less than 5% slope.
The AM 5200 (-A) should not be placed near radio transmitters such as mobile/cellular phones.
AM 5200 (-A) leveling procedures
For optimal performance, this procedure should be followed each time the instrument is moved.
Ensure all feet are free to rotate prior to adjustment.
Remove the top cover to gain access to the level indicator mounted on the top flat plate, located
near the front and center of the instrument. Remove the top cover with a slight pull upward or
push downward. Do not pull or push on the finger guards of the funnel assembly as damage may occur.
Adjust the feet as necessary to ensure the instrument is level and each of the feet can no longer be
turned. Check the stability by attempting to push the instrument front to back and side to side
while watching the level. The bubble should remain steady. Once the feet are in the desired
positions, lock the lock nut (located on the screw above the rubber foot) in place by using a
wrench to tighten the nut securely to the bottom of the instrument.
5.2 Configuration and Adjustment
The AM 5200 (-A) is supplied with the Unified Grain Moisture Algorithm developed by the
United States Department of Agriculture and provides unparalleled accuracy.
The instrument has been thoroughly adjusted at the factory, but local reference methods for
moisture and specific weight may differ from the methods the AM 5200 (-A) is referenced against.
Perten Instruments recommends the user verify adjustments by analyzing a few samples of each
product using both the reference method and the AM 5200 (-A), comparing the results.
It is recommended that the user select products to be displayed in the “Products list”. This is
explained in Section 7.4.3.4. To set analysis options such as the use of sample ID. Please refer to
Section 7.4.1.21 for detailed information.
To change settings for date, time, units for temperature, and specific weight please refer to Section
7.4.1.1.
A
B
C
A
C
B

Operation Manual AM 5200 (-A) E5200EN3 v 1.0 May 2013
11 (36)
6 User’s Quick Guide – Analyzing Samples
See Section 7.33 for additional information.
Ste
p
Instruction
Illustration/Picture
1
Select product by pressing the corresponding
button. Use arrow keys to scroll down and up the list.
2
Enter Sample ID (only if an ID is desired).
Press the input field and the keyboard will be activated.
Enter sample ID and press “Enter”. The user can also
enter other sample information into the “Info” field by
pressing the input field.
3
Pour sample into top funnel.
Stop pouring when
the grain level reaches
the bottom of the
metal funnel.
The AM 5200 (-A) automatically starts the analysis.
4
The result is calculated and displayed.
5
Empty the catch drawer and replace. To analyze the
next sample of the same sample type, just pour the
sample into the funnel.
6
To analyze a different sample type, press “Cancel” from
the Analyze screen or “Products” from the Results
screen and follow instructions in step 1 above.
Quick Guide

Operation Manual AM 5200 (-A) E5200EN3 v 1.1 May 2013
12 (36)
7 User’s Reference Guide
7.1 Instrument Overview
Mains switch, USB, and Ethernet
The power switch is located on the rear side, beside the mains
power inlet.
Two USB (ψ) ports are located next to the power switch. The AM
5200 (-A) is a USB master, and can be connected to memory sticks
and printer, but not to a computer (with the exception of
recording serial or standard output). Note that only specific
printer models can be used with the AM 5200 (-A).
The Ethernet port is designed for receiving future updates to
firmware or calibrations.
Touch screen
Catch drawer
Funnel

Operation Manual AM 5200 (-A) E5200EN3 v 1.1 May 2013
13 (36)
7.2 Operating the AM 5200 (-A)
The AM 5200 (-A) is operated through a color touch screen. As a resistance-type touch screen, it is
intended to be operated by touch, with the user touching screen elements by hand. It is possible to
use when wearing gloves or with a stylus pen. Multi-touch is not supported. Only one key can be
pressed at a time.
The picture below shows a typical screen in the AM 5200 (-A). The grey field at the top of the
screen is the Menu name field, which is the currently selected menu. The user will also find date
and time at the top right of this field.
To select one of the blue buttons, simply touch it. The user will hear a clicking sound when
pressed. The white fields display the current setting, and the text to the left explains the setting. By
pressing the white fields, the user can change the setting. When the white field is pressed, the
content of the field will change. To save changes, simply press “Save” at the bottom right. To scroll
through the list, press the up or down arrow button.
In other screens, there may be white fields intended for text entry. When pressed, an on-screen
keyboard is displayed.

Operation Manual AM 5200 (-A) E5200EN3 v 1.1 May 2013
14 (36)
7.3 Analyzing Samples
7.3.1 Preparations
This Section describes necessary preparations required to begin analysis.
Step
Action
Description
Illustration/Picture
1
Switch the instrument
on.
The AM 5200 (-A)
automatically starts a self-test
when the instrument is
switched on. The instrument is
off when the bottom of the
button is pressed and on when
the top is pressed.
2
Empty and insert catch
drawer.
The catch drawer must be
emptied and inserted before
analysis can begin. A reminder
is displayed when the
instrument has completed the
self-test.
3
Prepare the sample.
Approximately 700 ml of
sample is required.

Operation Manual AM 5200 (-A) E5200EN3 v 1.1 May 2013
15 (36)
Begin analysis
The following Section is a step-by-step instruction of how to run sample analysis.
Step
Action
Description
Illustration/Picture
1
Select
product.
Select the product by pressing the
corresponding button in the list. Use the
arrow keys to scroll up and down in the
list to display more products.
2
Enter sample
ID if desired
The instrument can be set to store a
sample ID to track analyzed samples. If
this feature is used, the instrument will
ask for a sample ID. Press the white field,
and an on-screen keyboard will be
displayed. Should a mistake be made
necessitating the user to return to the
Products menu, press “Cancel”. Should
the user need to empty the sample into
the catch drawer, press “Abort”.
3
Pour the
sample into
the funnel.
The analysis starts immediately.
4
Read the
result.
The result is then calculated and
displayed.
5
Empty the
catch drawer.
Empty the catch drawer and put it back
again. Keeping the catch drawer in place
can prevent rodents from entering the
unit and causing damage.
[Type a quote from the
document or the summary of
an interesting point. You can
position the text box
anywhere in the document.
Use the Text Box Tools tab
to change the formatting of
the pull quote text box.]
[Type a quote from the
document or the summary of
an interesting point. You can
position the text box
anywhere in the document.
Use the Text Box Tools tab
to change the formatting of
the pull quote text box.]
[Type a quote from the
document or the summary of
an interesting point. You can
position the text box
anywhere in the document.
Use the Text Box Tools tab
to change the formatting of
the pull quote text box.]

Operation Manual AM 5200 (-A) E5200EN3 v 1.1 May 2013
16 (36)
6
Run the next
sample.
The instrument now assumes that it will
analyze another sample of the same
product type. If this is the case, simply
continue from step 4 above. If a different
product is to be analyzed, press “Cancel”
to return to the Product list and proceed
from step 1.
7.4 Settings and Features
To access settings and features, press the “Menu” key. The following menu items will be seen:
Item
Description
General Settings
Local settings, analysis options and basic maintenance features.
Profiles
Contains a list of the calibrations installed in the instrument.
Products
Select which products appear in the “Products” menu and change settings for
the respective products.
Reports
Access all analysis results.
Import/Export
Import and export data, results, and settings.
Logbook
Shows all changes and warnings that have appeared in the instrument.
System info
Lists software version and other system information.

Operation Manual AM 5200 (-A) E5200EN3 v 1.1 May 2013
17 (36)
7.4.1 General settings
Item
Description
Local Settings
Language, date, time, etc….
Change Access
Right
Log in as Administrator to access configuration and adjustment features.
Analysis Options
Set preferences for analysis and how results are displayed.
Maintenance
Adjust the built-in balance, clean, and access additional maintenance
functions.
7.4.1.1 Local settings
In “Local settings”, the user can view basic instrument configuration. The settings can be changed
when logged in as an Administrator. Please read Section 7.4.1.2 for detailed information on
changing access rights. For all settings, press the white field to toggle or select options.
Setting
Description
Date Format
Select to show dates as yyyy-mm-dd or mm/dd/yyyy.
Time Format
Use 24h or 12h time display.
System Mode
Select Normal or Flow through operating modes. Normal mode requires the
drawer to be emptied after each test. Flow though mode allows samples to be
run rapidly, with the grain flowing through an optional drawer and collecting
in a larger receptacle placed underneath the instrument.

Operation Manual AM 5200 (-A) E5200EN3 v 1.1 May 2013
18 (36)
Sampling Mode
Select automatic or manual. Automatic starts a test when the cell is filled.
Manual waits for a button press to run a sample.
Language
Select the language to use when operating the instrument.
Test Weight
Unit
Select Test weight units. Test weight (also called Specific Weight or Hectoliter
Weight) can be calculated and displayed as lb/bu, kg/hl, g/0.5, g/L.
Temp Unit
Select display sample temperature in C or F.
Output Mode
Print –Compatible with Citizen CD-S500 Impact printer or equivalent.
Output is NTEP Compliant.
Perten –Output record compatible with most grain receiving software.
Control - Interfaces with special control and recording programs that can select
product type and initiate a sample reading (in flow through mode), then accept
results from the unit.
Multi - with available multi-port adapter, simultaneously provides all output
formats on four separate connections (ports): Printer, Perten, Custom, and
Control.
Volume
0 to 5 (Low to High)
Baud Rate
Baud Rate Selections for printing purposes (2400, 4800, 9600, 19200, 38400,
57600, 115,200). The printer provided by Perten Instruments requires a baud
rate of 19200.
Change Log
Print
Sends the record of changes made to settings to printer.
Show Products
Allows the user to change the mode of default products shows. Toggle
between Full and Favorite.
Diagnostic Log
Allows the user to Enable or Disable the Diagnostic Log. (Administrator only).
Date
Set the current month, day, and year. This can be done by selecting “Date” and
the correct day on the calendar. Selecting the Month and Year at the top of the
calendar allows a month to be chosen and the arrows allow scrolling to choose
the correct year.

Operation Manual AM 5200 (-A) E5200EN3 v 1.1 May 2013
19 (36)
Time
Set the current hour, minute, and am/pm. This can be done by selecting Time
and the setting to be changed and entering the number into the keypad on the
display.
7.4.1.2 Change access right
Upon initialization, the access right is set to “Default”, meaning no adjustments or configuration
changes are allowed.
To log in as “Administrator”, allowing changes, enter “Change Access Right” in the “General
Settings” menu, and then press the top field, displaying “Access Right: Default”. The user will see
the keyboard and can enter the password: 142857. Press Enter and Access Right will be changed to
“Administrator”. The user will also see a small icon of an ID Card in the middle of the field at the
top of the display.
To log out and return to a default user, access the feature again, and leave the field blank when the
keyboard appears and press “Enter”, or click “Login” at the bottom right of the screen. A Message
will confirm the Default Access Right. Any incorrect login will return the use to Default Access
Right.

Operation Manual AM 5200 (-A) E5200EN3 v 1.1 May 2013
20 (36)
7.4.1.3 Analysis Options
In “Analysis Options”, default analysis options can be changed. These settings will be used by
individual products whenever “Default” is selected. It is possible to override these default settings
on individual products.
Setting
Description
Decimals
Select whether to display moisture results with one or two decimals.
ID required
“No” means that the sample ID feature is disabled and it is not possible to enter
ID when analyzing a sample.
“Optional” means that it is possible, but sample ID is not required.
“Required” means that the instrument will not display any results unless a
sample ID is entered.
“Auto-increment” means that the instrument will automatically increment the
sample ID, from “1” to “2” and so on.
“Show last” will return the previous sample ID, and is useful if you analyze
many samples with similar IDs.
Printout text
Enter the text to be displayed at the top of each printout. Useful for displaying
the company name on the printout.
Auto print
“Yes” –results will always be printed after each analysis.
“No” – no printout will be made. It is still possible to create a printout
manually after an analysis has been performed.
What to Print
Moisture results are always printed. The user can select whether to include
specific weight and temperature. (Moisture, Moist/TW, Moist/TW/Temp,
Moist/Temp)
This manual suits for next models
1
Table of contents
Other Perten Measuring Instrument manuals
Popular Measuring Instrument manuals by other brands

ELGO Electric
ELGO Electric AZ16E-300 Series installation manual

HyQuest Solutions
HyQuest Solutions PreciBal user manual

Tektronix
Tektronix RSA3303B instructions

POWER-Z
POWER-Z KT001 user manual

REV Ritter
REV Ritter DT-816 instruction manual

Keysight Technologies
Keysight Technologies N9030B Installation note

GEISMAR
GEISMAR rectirail-dl2 user manual

Endress+Hauser
Endress+Hauser Proline Promag 50P technical information

ACM
ACM WINDY quick start guide

STEP
STEP OD-02 Technical description and operating instructions

Teledyne Lecroy
Teledyne Lecroy AP015 Operator's manual

Agilent Technologies
Agilent Technologies E8364BPNA Series Service note