manuals.online logo
Brands
  1. Home
  2. •
  3. Brands
  4. •
  5. Pessl Instruments
  6. •
  7. Accessories
  8. •
  9. Pessl Instruments METOS SolAntenna User manual

Pessl Instruments METOS SolAntenna User manual

Thank you for choosing SolAntenna. The SolAntenna is a multi-sensor de-
vice that measures the key parameters within the storage season amongst
your tubers by providing real-time information. It is designed to collect
and analyse data to help support decisions to control storage conditions.
SolAntenna sensors:
• Temperature
• Relative Humidity
• CO2
• Mechanical Shocks
Thanks to Solantenna, you’ll know the conditions in the storage at all
times which will help prevent crop damage/rotting before it occurs. It
will help you understand pile temperature and other conditions which
leads you to ne tuning the environmental conditions inside the storage
unit. Hot spots are easily detected thereby helping to mitigate the prob-
lem with chemical or other applications.
Key Features:
• Preventing crop damage and money loss
• Suitable for any type of storage (bulk or box)
• Precise and specic measurements for quick actions
• Completely wireless
• Easy to use and setup
• Flexible solution for every tuber grower
SolAntenna
USER MANUAL
Version 1.0, 03-2023
Pessl Instruments GmbH
Werksweg 107, 8160 Weiz, Austria
ofc[email protected]
+43 317 255 21
ENGLISH
YOUR SolAntenna
The SolAntenna consists of one plastic egg-shell-like plastic case
containing the electronics and the battery. In the package with the
SolAntenna is a sticker with a unique serial number and the keys that
grants you access to the FieldClimate platform.
There is also a sticker glued on the SolAntenna labelled NFC Antenna
which indicates the NFC scanning area to activate your device.
START-UP THE SolAntenna
By default, the SolAntenna station comes with a soldered battery in
deep sleep mode.
To activate your device from deep sleep mode:
• You can use any NFC scanner mobile App to scan your device (It is
important to know the location of your NFC detector on your mobile
device. This will make activation very easy). Place the NFC device on
the NFC Antenna sticker on the SolAntenna. A beep or vibration on
your phone indicates successful activation of your device.
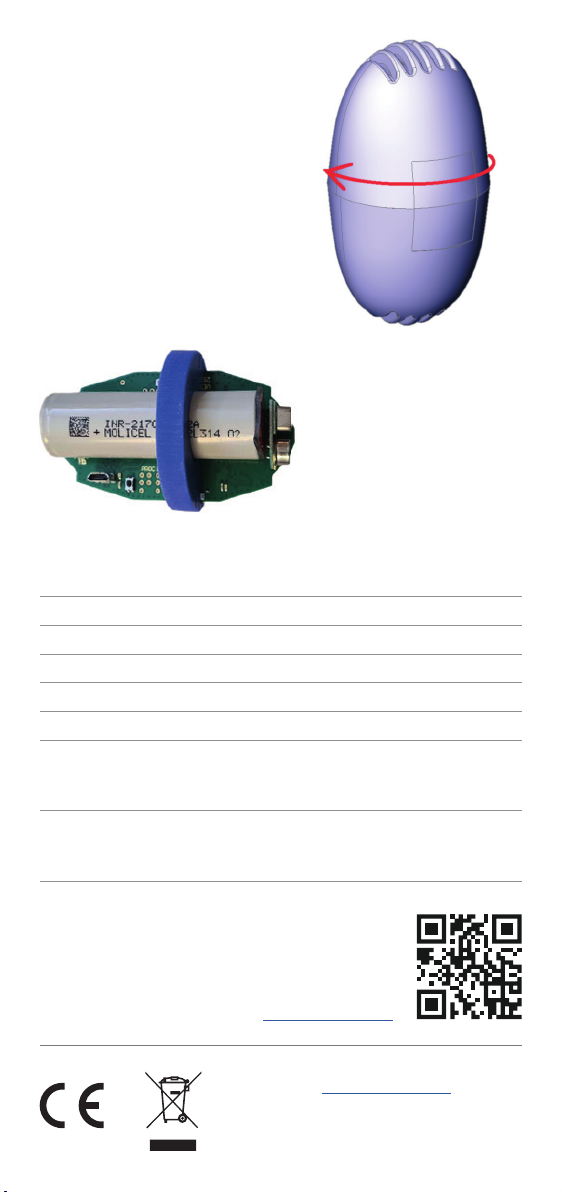
• Alternatively, you can open your device and connect a Micro USB
cable to the device and to the PI Service Terminal Application on
your computer
- After connecting your device,click on the Esc key on your keyboard
to activate the SolAntenna device.
-Device Activated message indicates successful activation of your
end device.
Once the device is activated, it is ready to measure and transfer the data.
For successful data transmission, TTN LoRaWAN® network coverage
should be available at the deployment location of the SolAntenna device.
In situations where ne tuning of the conguration or parameter
settings are needed, the user can access the service menu via the PI
Service Terminal application.
Close the cover to its nal position after setting of parameters.
INSTALLING SolAntenna
This is a plug and play device.
• Put the SolAntennas amongst the crop in storage to collect data –
normally you need 3 to 5 SolAntennas.
• Make sure there is a TTN LoRaWAN® network coverage on the location
• By default, data is measured every 5 minutes and transmitted to
FieldClimate every 15 minutes.
USE YOUR SolAntenna
To start using services we provide, the device needs to be registered
on the FieldClimate platform, which gives access to the data in graphs
and tables. FieldClimate also provides a powerful decision support
system for growing crops.
REGISTER AS A NEW USER ON FieldClimate.com
1. Open eldclimate.com and log
in as an existing user or register
as a new FieldClimate user
2. After creating a new account you will receive an email with a conrmation
link with which you conrm creation of your FieldClimate prole.
ADD YOUR SolAntenna DEVICE TO YOUR FiledClimate ACCOUNT
1. Locate the sticker with the device serial
number and Key1 and Key2 passwords on the
product. Key 1 gives you full (admin) access
and enables you to change all the settings
and set up the SolAntenna. With Key 2, the user is not allowed to
change the station parameters, but can access all the data.
2. To add your SolAntenna device, click on the User Menu icon at the top
right corner. Click on Add/Remove station.It will ask you for the Station
Serial number (SN) and the station key. There is also an option to add
the name of the station (This should be any name of your choice)
3. Click on the ADD STATION button once done.
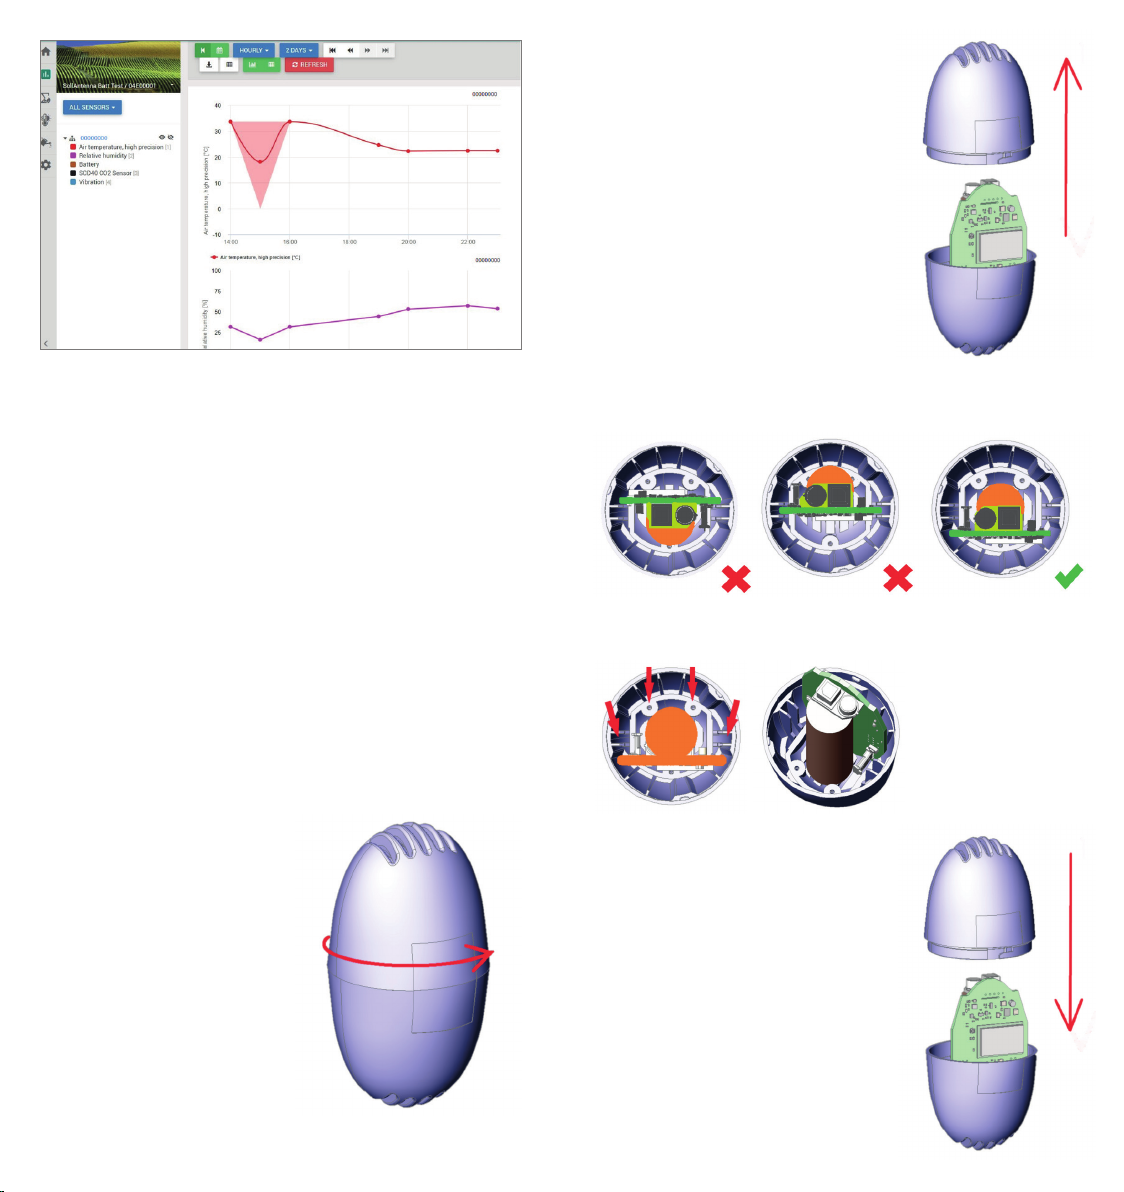
THE FieldClimate DASHBOARD, STATION DATA AND SETTINGS
In the new Dashboard, the user can manage the fast access to the
services of highest interest. On the top right corner, the station list
allows you to choose among all registered devices. On the navigation
bar, select the data page from your device. Data can be viewed in
detailed graphs and tables. You can access the structured menu, which
allows you to dene time series resolution and export data in a chart
or table. On the left side, you can see all the sensors connected to your
SolAntenna.
On the Station settings page, you can congure your SolAntenna device
by navigating through settings > Sensors and nodes: You can dene a
custom name for your SolAntenna. For convenient viewing of data, you
can also rename each sensor and customise its colour in the graph. For
further inquiries visit metos.at/eldclimate-manual.
MAINTAINING YOUR SolAntenna
The SolAntenna should be checked periodically to ensure that the
sensors are in optimal conditions. Regular maintenance is necessary for
awless operation and durability. At the beginning of the new storage
season, check that the device is working correctly, and that there is no
low battery level and that the data is transmitted at the set intervals
to FieldClimate.
INSTRUCTIONS ON HOW TO OPEN AND CLOSE THE SOLANTENA DEVICE
1. To Open the SolAntenna
A: Press and hold the SolAntenna
Device at both ends and rotate it anti-
clockwise. A click sound indicates
that its successfully opened.
B: Separate the case by lifting it up as
indicates in the image below to access
the electronics.
2. To Close the SolAntenna
A: Make sure the PCB is properly placed inside the case.
B: Check that the battery faced the proper direction als indicated below.
C: Close the case after ensuring that PCB
is inserted properly.
D: Pressed and rotate clockwise
to close.
NOTE: The SolAntenna
comes with a blue plastic
holder which helps to keep
the electronics tight in place.
TECHNICAL SPECIFICATIONS
Measuring range (MR) CO2: 0 – 40.000 ppm
Temperature (MR) -5°C – +60°C
Humidity (MR) 0% – 99% RH
Measuring accuracy (MA) CO2 ± 40 ppm +5% of the measured value
Temperature (MA) ± 0,5°C
Humidity (MA)
0% – 90%, ±1.8% RH,
90% – 95%, ± 2.3% RH
95% – 100%, accuracy ± 3% RH
Sensors Types
SCD41 0-40000ppm
HYT-221 – temperature sensor
TWLM1001 – humidity sensor
For full user manuals please visit:
metos.at/manuals
Visit metos.at/terms-of-use/ to view
legal information for Pessl Instruments
products and services.

Popular Accessories manuals by other brands

Atal EPND-2S-3C-POE quick start

Atal

Atal EPND-2S-3C-POE quick start

Linea 2000 DOMO DO601ED Instruction booklet

Linea 2000

Linea 2000 DOMO DO601ED Instruction booklet

Honeywell Home RDWL515A2000 Installation and operation guide

Honeywell Home

Honeywell Home RDWL515A2000 Installation and operation guide

KIVOS KDB02 user manual

KIVOS

KIVOS KDB02 user manual

Salus WLS600 quick guide

Salus

Salus WLS600 quick guide

Gemini 7709 Installation and use manual

Gemini

Gemini 7709 Installation and use manual

Stitch 33841 user manual

Stitch

Stitch 33841 user manual

Rice Lake MSI-8000 Operation manual

Rice Lake

Rice Lake MSI-8000 Operation manual

SELT DAKAR installation manual

SELT

SELT DAKAR installation manual

Schweitzer Engineering Laboratories SEL-734W Field reference guide

Schweitzer Engineering Laboratories

Schweitzer Engineering Laboratories SEL-734W Field reference guide

Pepperl+Fuchs UC-18GS Series manual

Pepperl+Fuchs

Pepperl+Fuchs UC-18GS Series manual

Dicota BluePoint user guide

Dicota

Dicota BluePoint user guide

Avidsen Bamboo manual

Avidsen

Avidsen Bamboo manual

EVERSPRING 312620 Operator's manual

EVERSPRING

EVERSPRING 312620 Operator's manual

LORENZ MESSTECHNIK DR-2800 Operation manual

LORENZ MESSTECHNIK

LORENZ MESSTECHNIK DR-2800 Operation manual

Art DUALZDIRECT user manual

Art

Art DUALZDIRECT user manual

woundwo TRENDLINE SMARTBOX Mounting instructions

woundwo

woundwo TRENDLINE SMARTBOX Mounting instructions

Yolink YS7805-UC Installation & user guide

Yolink

Yolink YS7805-UC Installation & user guide

manuals.online logo
manuals.online logoBrands
  • About & Mission
  • Contact us
  • Privacy Policy
  • Terms and Conditions

Copyright 2025 Manuals.Online. All Rights Reserved.