manuals.online logo
Brands
  1. Home
  2. •
  3. Brands
  4. •
  5. Steren
  6. •
  7. Accessories
  8. •
  9. Steren PIR-100 User manual

Steren PIR-100 User manual

Product / Producto: PASSIVE
INFRARED SENSOR / SENSOR DE
MOVIMIENTO INFRARROJO
Model / Modelo: PIR-100
Brand / Marca: Steren
CONDICIONES
1. Para hacer efectiva esta garantía se requiere: La presentación de esta póliza y del producto, en el lugar en donde fue adquirido o en ELECTRONICA STEREN S.A. DE C.V.
2. ELECTRONICA STEREN S.A. DE C.V. se compromete a reparar el producto en caso de estar defectuoso sin ningún cargo al consumidor.
3. El tiempo de reparación en ningún caso será mayor a 30 días contados a partir de la recepción del producto en cualquiera de los sitios en donde pueda hacerse efectiva la
garantía.
4. El lugar donde puede adquirir partes, componentes, consumibles y accesorios, así como hacer válida esta garantía es: En cualquiera de las direcciones arriba mencionadas.
ESTA GARANTIA NO ES VALIDA EN LOS SIGUIENTES CASOS:
1. Cuando el producto ha sido utilizado en condiciones distintas a las normales.
2. Cuando el producto no ha sido operado de acuerdo con el instructivo de uso.
3. Cuando el producto ha sido alterado o reparado por personas no autorizadas por ELECTRONICA STEREN S.A. DE C.V.
Nota: El consumidor podrá solicitar que se haga efectiva la garantía ante la propia casa comercial, donde adquirió el producto. Si la presente garantía se extraviara, el
consumidor puede recurrir a su proovedor para que le expida otra póliza de garantía, previa presentación de la nota de compra o factura respectiva.
DATOS DEL DISTRIBUIDOR
DISTRIBUTION / NOMBRE / DISTRIBUIDOR:
ADDRESS / DOMICILIO:
PRODUCT / PRODUCTO: BRAND / MARCA:
MODEL / MODELO: SERIAL NUMBER / No. DE SERIE:
DATE OF DELIVERY / FECHA DE ENTREGA:
Call Center / Centro de Atención a Clientes
del Interior 01 800 500 9000
Mexico City / Cd. de México: 53 54 22 90
CONDITIONS:
1. This warranty card with all the required information, the invoice or purchase ticket, the product box or package, and the product, must be presented with the product
when warranty service is required.
2. If the product stills on the warranty time, the company will repair it free of charge even the transportation charges.
3. The repairing time will not exceed 30 natural days, from the day the claim was received.
4. Steren sells parts, components, consumables and accessories to customer, as well as warranty service, at any of the following addresses:
THIS WARRANTY IS VOID ON THE NEXT CASES:
If the product has been damage by an accident, acts of God, mishandling, leaky batteries, failure to follow enclosed instructions, improper repair by unauthorized
personal, improper safe keeping or otherwise.
Notes:
a) The customer can also claim the warranty service on the purchase establishment.
b) If you lose the warranty card, we can reissue it just showing the invoice or purchase ticket.
Póliza de Garantía
This Steren product is warranted under
normal usage against defects in
workmanship and materials to the original
purchaser for one year from the date of
purchase.
Garantiza este producto por el término de
un año en todas sus partes y mano de
obra contra cualquier defecto de fabricación
y funcionamiento, a partir de la fecha de
entrega.
Warranty
INSTRUCTIVO DE USO DE SENSOR DE MOVIMIENTO INFRARROJO
Modelo: PIR-100
Marca: Steren
Antes de utilizar su nuevo Sensor de movimiento Infrarrojo lea este
instructivo para evitar cualquier mal funcionamiento. Guárdelo para
futuras referencias.
Su nuevo equipo utiliza un Sensor infrarrojo pasivo (PIR) que responde al
movimiento detectando cambios en las emisiones infrarrojas dentro un
rango establecido de hasta 120° en una distancia aproximada de entre 3 y
6 metros. Cuenta con dos controles para uso en el día o uso en la noche,
así como un control de tiempo de retardo de hasta 100 segundos.
IMPORTANTE
No realice ninguna conexión eléctrica con la energía presente en la línea.
Si no tiene conocimientos de electricidad, consulte a un técnico.
Si necesita realizar alguna reparación en la instalación, baje el interruptor
general de energía.
No exponga el equipo a temperaturas extremas.
No use ni almacene este equipo en lugares donde existan goteras o
salpicaduras de agua. Puede causar un mal funcionamiento o un choque
eléctrico.
INSTALACIÓN CON UNA LÁMPARA
Para comenzar la instalación del sensor de movimiento, es necesario
que cuente con una caja de montaje de pared (chalupa).
1.- Desconecte la energía eléctrica antes de realizar las conexiones.
2.- Seleccione el lugar donde desea instalar el equipo y coloque la tapa
posterior en la caja de montaje. Asegúrela utilizando un par de tornillos.
3.- Ubique los cables de energía eléctrica y colóquelos a través de la caja
de montaje de pared a fin de que sobresalgan las puntas.
4.- Utilice un desarmador pequeño para liberar los orificios donde podrá
colocar los cables de energía (Fig. 1).
5.- Localice el cable de la energía (Rojo) e introdúzcalo en el orificio
identificado con la letra L.
6.- Localice el cable neutral (Negro) e introdúzcalo en el orificio
identificado con la letra N.
7.- Realice un pequeño corte en el cable neutral (Negro) a fin de quitar el
aislante.
8.- Conecte una de las terminales de la lámpara al cable neutral.
9.- Inserte la otra terminal de la lámpara en el orificio identificado con las
letras LD.
10.- Atornille firmemente para lograr un buen contacto y evitar su
desprendimiento.
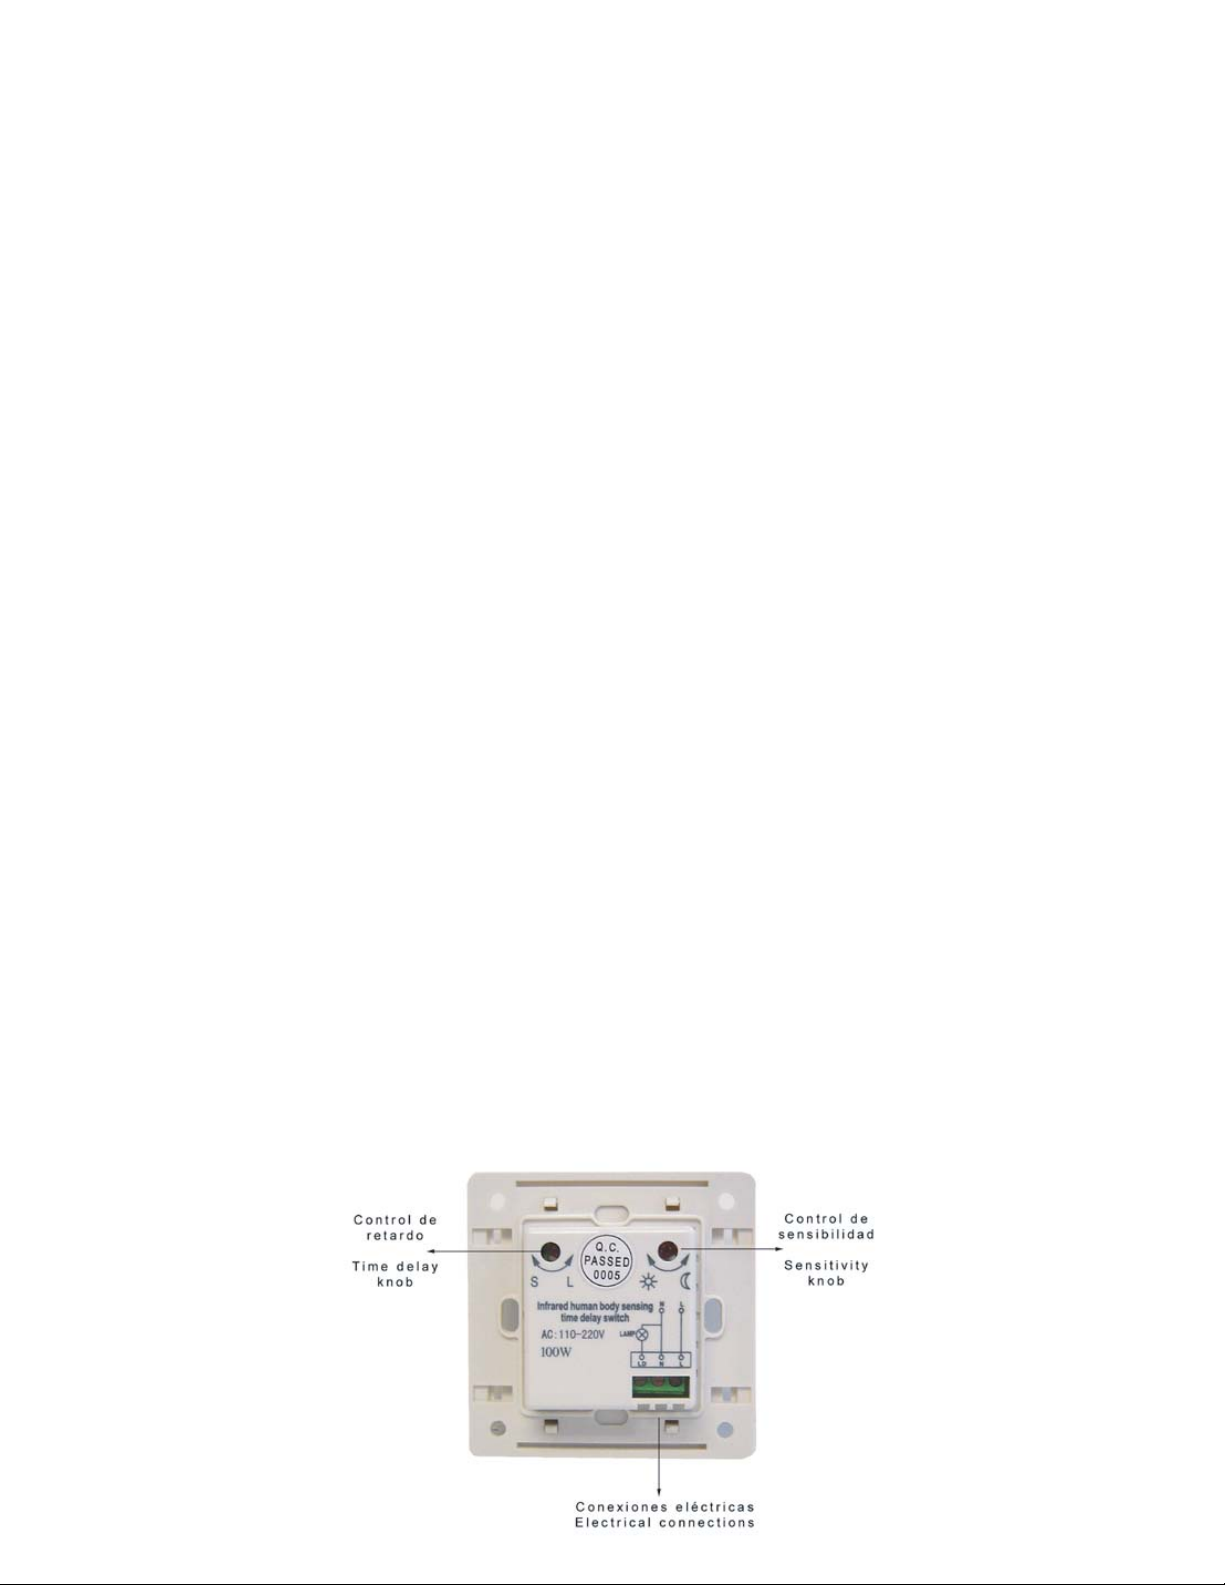
11.- Si desea utilizar el sensor durante la noche, cambie la posición del
control de sensibilidad -utilizando un desarmador- hacia el dibujo de la
luna. Si desea mayor sensibilidad o utilizarlo durante el día, cambie la
posición hacia el dibujo del sol.
12.- El tiempo de encendido de la lámpara varía de los 30 a los 100
segundos. Para ajustar el tiempo de encendido, ajuste el control de
retardo hacia la posición S si desea
períodos cortos (30 segundos) y hacia
la posición L si desea períodos largos
de encendido (hasta 100 segundos).
13.- Una vez que haya terminado de
realizar las conexiones eléctricas,
inserte el cuerpo principal del equipo
en la caja de montaje y coloque la
cubierta exterior (Fig. 2).
14.- Conecte la energía eléctrica y
espere unos segundos para que el
equipo comience a funcionar.
15.- Cualquier movimiento de un ser
humano, mascotas u objetos será
detectado por el equipo y encenderá
la lámpara por el período de tiempo
programado.
INSTRUCTION MANUAL FOR PASSIVE INFRARED SENSOR
Model: PIR-100
Brand: Steren
Before using your new Passive Infrared Sensor please read this
instruction manual to prevent any damage. Put them away in a safe
place for future references.
Your new equipment use a Passive Infrared (PIR) sensor which responds
to movement by detecting changes in infrared emissions within its field of
view, up to 120° in a distance of 3 to 6 meters approximately. It counts with
two adjusting knobs, one of them is the sensitive adjusting knob and the
other one is the delay time knob with a delay time up to 100 seconds.
IMPORTANT
Make sure to disconnect the electrical current system, before make any
installation.
If you don't have any electricity knowledge, go with an electrician.
If you need to make reparations on the electrical connections, disconnect
the electrical current system.
Do not expose to extreme temperatures.
Do not use or store the equipment near wet places. May cause
malfunction or shock hazard.
.
HOW TO INSTALL THE PIR WITH A LAMP
To start the installation of the passive infrared sensor, is necessary
that you have a back box.
1.- Disconnect the electrical current system before to install the
equipment.
2.- Select the place where you want to out the equipment and place the
back cover on the back box. Fasten it using a pair of screws.
3.- Locates the energy wires and put through the back box in order to get
the wire ends.
4.- Use a small screwdriver to release the holes where you can insert the
energy wires.
5.- Locates the energy wire (Red) and put it on the hole marked with letter
L.
6.- Locates the neutral wire (Black) and put it on the hole marked with
letter N.
7.- Make a small cut on the neutral wire (Black) and remove the insulator
from the cable.
8.- Connect one of the wire ends from the lamp to the neutral wire.
9.- Insert the other wire end from the lamp to the hole marked with letters
LD on the PIR.
10.- Screw them firmly, in order to have a good contact and avoid their
detachment.
11.- If you want to use the sensor by night, set the sensitivity control -using
a screwdriver- in position to the moon draw. If you want more sensitivity or
use the equipment by day, change the position to the sun draw.
12.- Time delay goes from 30 to 100 seconds. To set this parameter, move
the delay knob to S if you want small periods (30 seconds) or to L position
if you want long periods (up to
100 seconds).
13.- Once you have finished to
make the electrical connections,
place the main body on the back
box and put the exterior cover.
14.- Turn AC wall switch on and
wait few seconds. Then the
equipment will be ready to work.
15.- If the sensor detects
occupancy by a human being,
pets or objects automatically
power the lamp on for the
programmed delay time.
Notes:
The passive infrared sensor is compatible only with incandescent bulb
lamps, do not try to use fluorescent bulb lamps.
The equipment emits three flashes when you change the position of the
sensitive knob to Sun draw. This means that the equipment is ready to
use.
If you need to make a reparation on electrical connections, disconnect the
electrical current system.
The first time, set the sensitivity knob in the middle. In this way you can
adjust it in accord to the environment necessities.
CONEXIONES
SPECIFICATIONS
Input: 120 - 250 V~ 60/50Hz
Charge: 25W to 200W
Time delay: 30 to 100 seconds (adjustable)
Detection angle: 120°
Range: 9,8 to 19,6ft
Note:
Product design and specifications are subject to change, without notice.
Notas:
El sensor de movimiento únicamente es compatible con lámparas
incandescentes, no intente utilizar lámparas fluorescentes.
El equipo emitirá tres destellos cuando cambia la posición del control de
sensibilidad a la posición del Sol, esto indicará que estará listo para
utilizarse.
Siempre que vaya a realizar ajustes al equipo, se recomienda desconectar
la energía eléctrica.
Coloque el control de sensibilidad a la mitad, la primera vez de uso, a fin
de ajustarlo de acuerdo a las necesidades del entorno.
CONEXIONES
ESPECIFICACIONES
Entrada: 120 - 250 V~ 60/50Hz
Carga: 25W a 200W
Tiempo de encendido: 30 a 100 segundos ajustables
Angulo de detección: 120°
Distancia: 3 a 6 metros
Nota:
El diseño del producto y las especificaciones pueden cambiar sin previo
aviso.
Fig. 1 Fig. 2
Cable a la entrada LD
Wire to LD input
Unión al cable neutral (Negro)
Join to neutral wire (Black)
Cables de corriente eléctrica
Electrical current system wires
Cable rojo a la entrada L
Red wire to L input
Cable negro a la entrada N
Black wire to N input

Other Steren Accessories manuals

Steren Elite Line CCTV-088 User manual

Steren

Steren Elite Line CCTV-088 User manual

Steren MOV-1065 User manual

Steren

Steren MOV-1065 User manual

Steren COM-563 User manual

Steren

Steren COM-563 User manual

Steren Smart Home SHOME-125 User manual

Steren

Steren Smart Home SHOME-125 User manual

Steren LAM-071 User manual

Steren

Steren LAM-071 User manual

Steren TIM-305 User manual

Steren

Steren TIM-305 User manual

Steren Clavija V1007 User manual

Steren

Steren Clavija V1007 User manual

Steren ALA-036 User manual

Steren

Steren ALA-036 User manual

Steren MOV-1060 User manual

Steren

Steren MOV-1060 User manual

Steren MOV-1085 User manual

Steren

Steren MOV-1085 User manual

Steren smart home SHOME-100 User manual

Steren

Steren smart home SHOME-100 User manual

Steren CCTV-2121 User manual

Steren

Steren CCTV-2121 User manual

Steren PIR-135 User manual

Steren

Steren PIR-135 User manual

Steren ALA-055 User manual

Steren

Steren ALA-055 User manual

Steren LAS-010 User manual

Steren

Steren LAS-010 User manual

Steren VGA-210 User manual

Steren

Steren VGA-210 User manual

Steren TIM-320 User manual

Steren

Steren TIM-320 User manual

Steren TIM-270 User manual

Steren

Steren TIM-270 User manual

Steren PIR-105 User manual

Steren

Steren PIR-105 User manual

Steren LAM-055 User manual

Steren

Steren LAM-055 User manual

Steren TIM-250 User manual

Steren

Steren TIM-250 User manual

Steren 905-110 User manual

Steren

Steren 905-110 User manual

Steren ALA-034 User manual

Steren

Steren ALA-034 User manual

Steren COM-560 User manual

Steren

Steren COM-560 User manual

Popular Accessories manuals by other brands

Quincy lab 140AE-1 operating manual

Quincy lab

Quincy lab 140AE-1 operating manual

HomePro ZIR000 user manual

HomePro

HomePro ZIR000 user manual

DOL 20SCR Technical user guide

DOL

DOL 20SCR Technical user guide

RAB Smart Task installation manual

RAB

RAB Smart Task installation manual

Kemppi KMS 300 quick guide

Kemppi

Kemppi KMS 300 quick guide

Stearns 57,500 Series Installation and service instructions

Stearns

Stearns 57,500 Series Installation and service instructions

iGuzzini TWILIGHT COPENAGHEN manual

iGuzzini

iGuzzini TWILIGHT COPENAGHEN manual

Adelaide Annexe & Canvas Avan Deluxe installation guide

Adelaide Annexe & Canvas

Adelaide Annexe & Canvas Avan Deluxe installation guide

OHAUS 5000 instruction manual

OHAUS

OHAUS 5000 instruction manual

HOME8 WLS1300 quick start guide

HOME8

HOME8 WLS1300 quick start guide

MAXBOTIX MaxSonar quick start guide

MAXBOTIX

MAXBOTIX MaxSonar quick start guide

ioSmart iSmart56 Installation and user guide

ioSmart

ioSmart iSmart56 Installation and user guide

Focusrite Scarlett 18i8 user guide

Focusrite

Focusrite Scarlett 18i8 user guide

Velleman ED38105 user manual

Velleman

Velleman ED38105 user manual

JumpSport SkyBounce user manual

JumpSport

JumpSport SkyBounce user manual

Prima-Temp PRIYA Instructions for use

Prima-Temp

Prima-Temp PRIYA Instructions for use

Tefcold BC85I-BC85I W user manual

Tefcold

Tefcold BC85I-BC85I W user manual

Vaisala WMS302 user guide

Vaisala

Vaisala WMS302 user guide

manuals.online logo
manuals.online logoBrands
  • About & Mission
  • Contact us
  • Privacy Policy
  • Terms and Conditions

Copyright 2025 Manuals.Online. All Rights Reserved.