Petromax HK500 User manual

Petromax
HK500
User Manual


3
CAUTION! Remove the pink packaging rings around the glass
before using the lamp for the fi rst time.
CAUTION

4
USER MANUAL FOR PETROMAX
PRESSURE LAMP
HK500
Read these instructions carefully and keep
them in a safe place!
CAUTIONS
• Only use the lamp outdoors. Do not use in-
doors!
• The lamp must not be used close to objects
that are flammable or sensitive to heat!
• You must not place the lamp on delicate sur-
faces!
• Never leave the lamp unattended while it is in
use!
• Only use pure paraffin oil or kerosene. Do not
use scented or colored oils!
• This lamp must not be used by children! Keep
out of reach of children and animals! This
lamp is not a toy!
• You must not cover the lamp!
• Risk of fire! You must not touch the lamp abo-
ve the tank during use or 1 hour after use.
After use let it cool down entirely!
• Release the pressure completely after each
use by opening the bleeder screw.
• Never add or remove fuel while the lamp is in
use!
• Always use original Petromax spare parts. The
warranty is void if you use other spare parts!
• We assume no liablity for any misuse!
• You must not stare into the incandescent
mantle!
• You must not inhale the smoke emitted by
the burning incandescent mantle!
PRODUCT DESCRIPTION
The Petromax is the most well-known pressu-
re lamp in the world. It has been widely used
for more than 100 years as a weather-resistant
and reliable external light source. It provides an
output of 500 CP (Candle Power). The bright-
ness level cannot be adjusted. With the appro-
priate accessories, the lamp can be used for he-
ating or converted in an efficient way to cook.
SCOPE OF DELIVERY
Your Petromax lamp comes with a package that
contains the following items:
• 1 x funnel
• 1 x accessories and spare parts set
(6 pieces)
• 1 x fuel can
• 2 x incandescent mantle
PARTS DESCRIPTION
The Petromax lamp is composed of more than
200 individual parts. The figure below shows all
main parts. You will find a complete overview of
all parts on www.petromax.com, or contact our
customer service for further information.
1) Hood
2) Inner casing
3) Mixing chamber
4) Burner
5) Knurled nuts
6) Spray nozzle +
needle
7) Carburetor
8) Bleeder screw
9) Rapid preheater
10) Handwheel
11) Manometer
12) Hand pump
13) Preheat cup

5
USING THE LAMP
Prior to starting the lamp
• Damaged mantles must be replaced immedi-
ately.
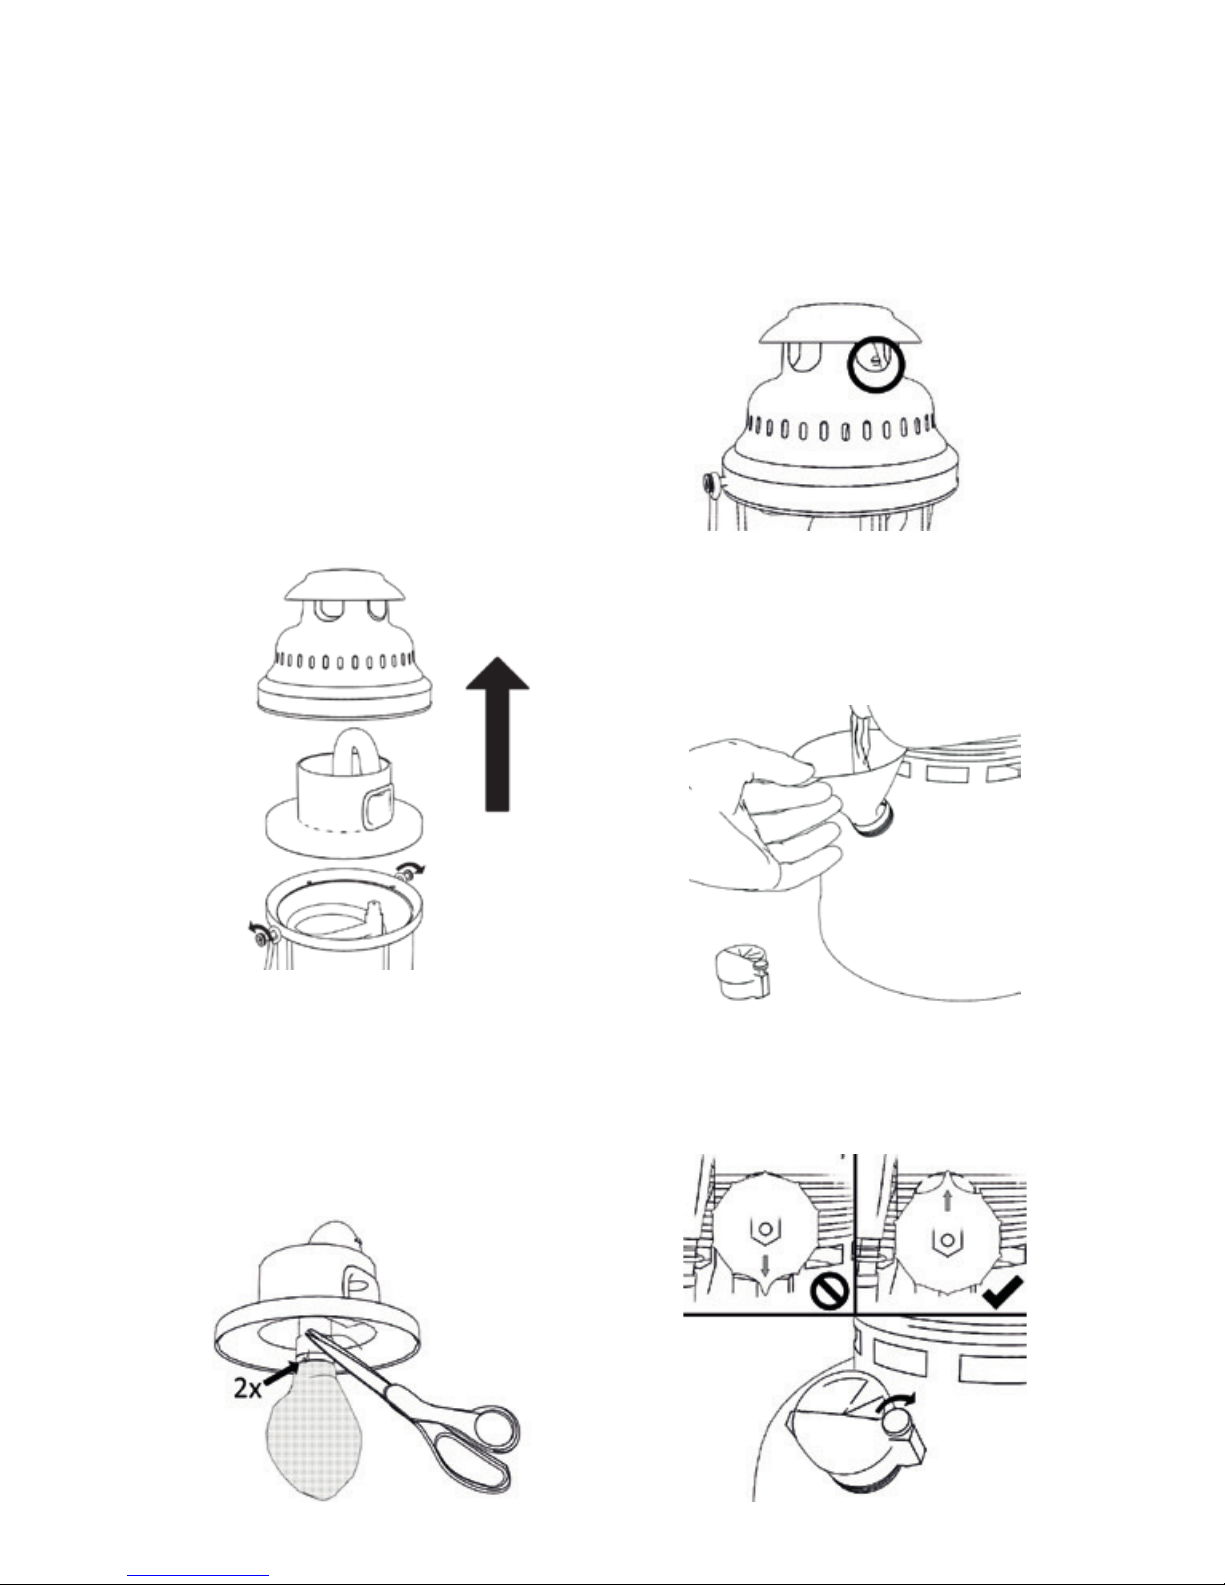
• Make sure that needle, spray nozzle, mixing
chamber, and burner are properly tightened
and connected.
Starting the lamp
• See “Starting: Step by Step.”
After starting the lamp
• When the pressure falls below 1 bar, carefully
add pressure to the tank using the hand
pump (approx. 2.5 bar).
Extinguishing the lamp
• To extinguish the lamp, release the pressure
via the bleeder screw.
• In the case of unpredicted flames develop-
ment, open the bleeder screw immediately.
• Finish by turning the handwheel upward.
TROUBLESHOOTING
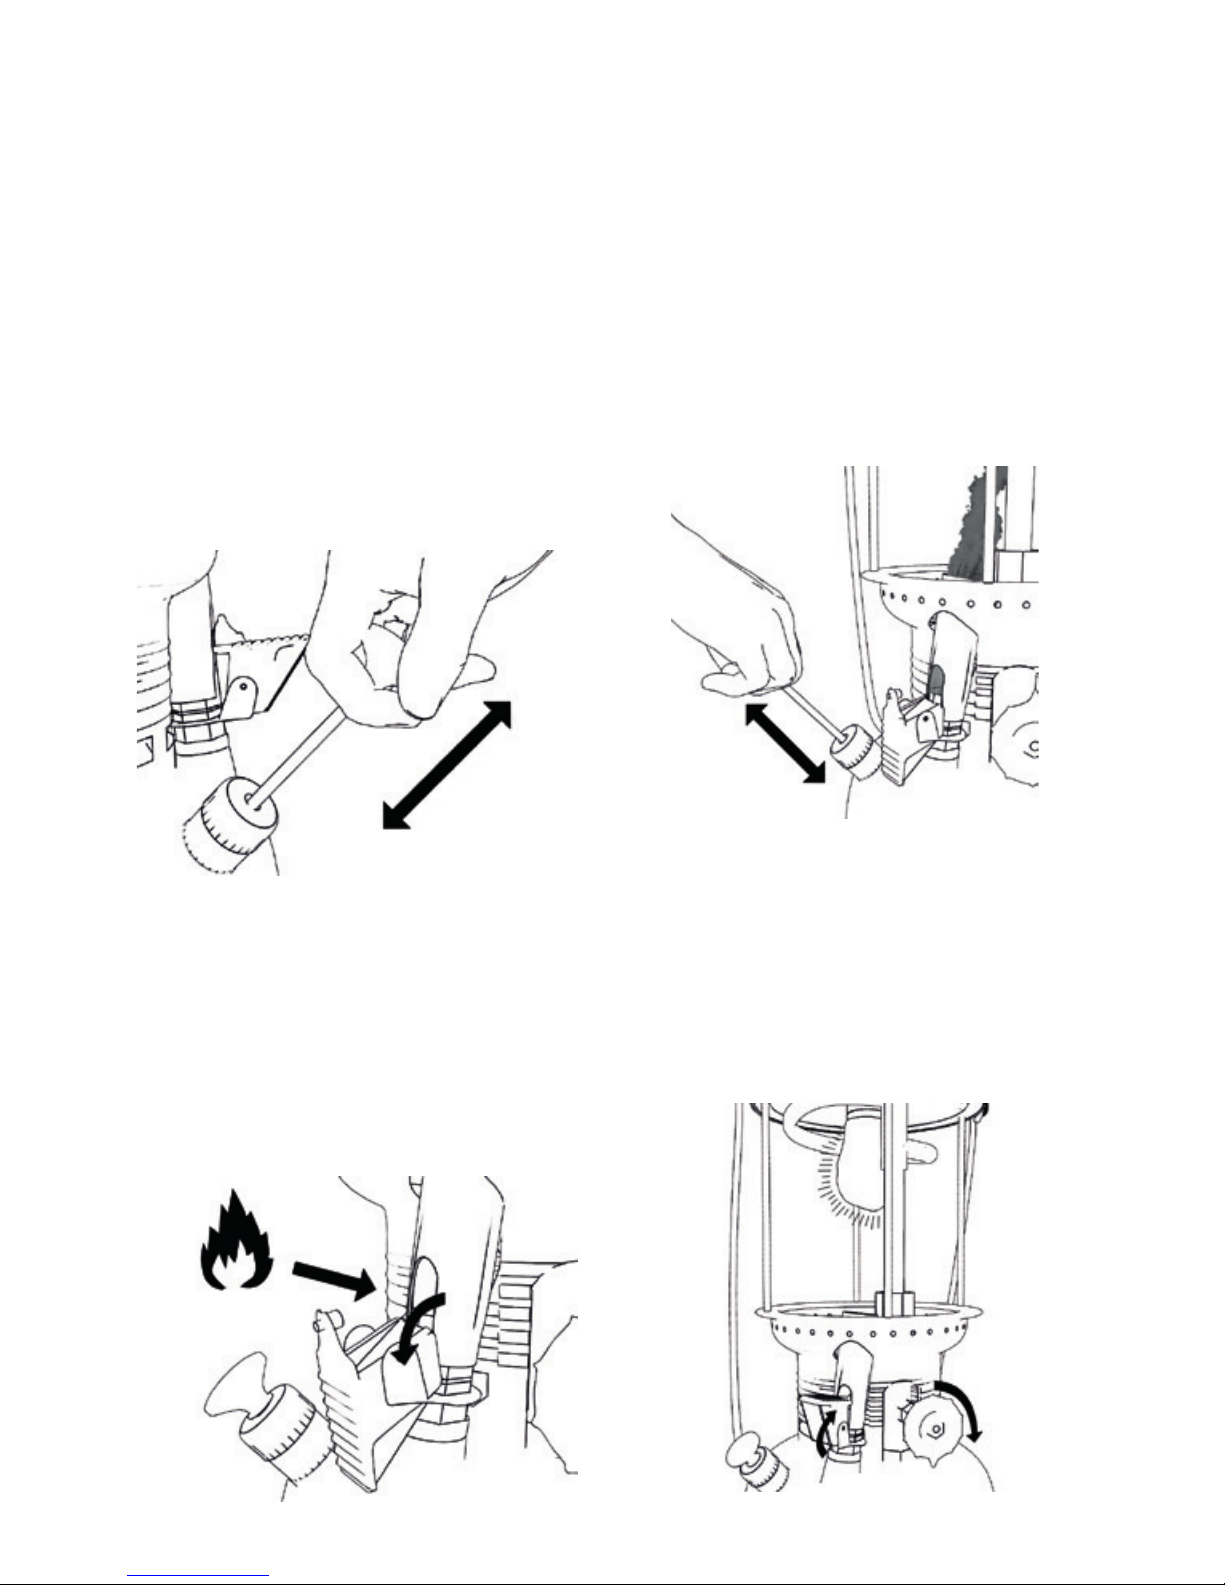
The pump does not work properly.
Pull out the pump plunger, grease the leather
seal and gently widen the leather seal (replace
it if necessary!). Push the pump plunger back
into the cylinder of the pump by turning the
pump plunger.
The upper part of the lamp catches fire.
Preheat the lamp for at least 90 seconds using
the rapid preheater. When pre-heating with the
use of fuel (preheat cup), use at least two full
cups of fuel.
The incandescent mantle does not burn properly.
When using the rapid preheater, position the
incandescent mantle in a way that it can easily
catch fire via the rapid preheater.
The rapid preheater does not ignite/burn properly.
Ensure that there is neither too much nor too
little pressure in the tank. The manometer
needle should be just below the red line! If ne-
cessary, clean the nozzle of the rapid preheater
with the cleaning needle included in the spare
parts set.
The light flickers or gets darker.
Make sure that there is enough pressure and
fuel in the tank. If necessary, rapidly turn the
handwheel 360 degrees to free the spray nozzle
of any particles via the needle.
PREHEATING THE LAMP WITH
DENATURATED ALCOHOL
The Petromax HK500 comes with a preheat cup
in addition to a rapid preheater. Preheating
with denaturated alcohol is more gentle on the
mantle.
Preheating the lamp through the preheat cup
• Sprinkle the new mantle with denaturated
alcohol.
• Fill the preheat cup with denaturated alcohol
using the fuel can.
• Burn the denaturated alcohol in the preheat
cup and wait until the cup has burned to the
point of being empty.
• Again, put denaturated alcohol in the preheat
cup and ignite it.
• Wait until the denaturated alcohol has almost
completely burned out, and then turn the
handwheel (with the nose pointing down).
WARRANTY
Under proper use, a warranty period of two years
will apply to your Petromax pressure lamp from
the date of purchase. This does not apply to nor-
mal wear and tear. If you cannot use your HK500
due to a defect in material or workmanship, you
are entitled to a warranty repair. Contact your
dealer for that purpose.
SERVICE
If you have questions regarding the con-
tents of the manual, or if you need additio-
nal information, please let us now. You can
contact our customer service via e-mail at:
services@petromax.com. Further technical
advice is available in the service area at
www.petromax.com.

6
STARTING THE LAMP:
STEP BY STEP
Before using your Petromax lamp,
read the Cautions very carefully.
You must not inhale the smoke emit-
ted by the lamp, its parts, and the
mantle!
The lamp must not be used indoors!
STEP 1
•Loosen the knurled nuts.
•Remove the hood and the inner casing.
STEP 2
•Tie the mantle to the burner bead with
a double knot. Do not tie the mantle to
the mixing chamber!
•Trim loose threads as short as possible.
STEP 3
•Install the inner casing and the hood
(for older models of HK500 make sure
that the regulating screw at the mixing
tube is visible).
•Tighten the knurled nuts by hand.
STEP 4
•Unscrew the manometer.
•Add fuel to the tank (see Cautions).
STEP 5
• Make sure that the nose is pointing upward.
• Screw the manometer onto the tank by hand.
1
2
3
4
5

7
•Make sure that the bleeder screw on the
manometer is properly tightened.
STEP 6
•Unlock the pump by turning the pump
knob.
•Repeatedly push the hand pump’s
plunger until 1.5 bar (red line on the
manometer).
STEP 7A
•Push the lever of the rapid preheater
downward, and immediately ignite the
flowing fuel with a lighter.
STEP 7B
(with new mantle only)
•With a newly installed mantle, close
the lever after approx. 10 seconds. Let
the mantle burn down completely until
dyed grey appears, and make sure that
the mantle has no black bits.
•Finish by pushing the lever downward
and immediately ignite the flowing
fuel.
STEP 8
•Repeatedly push the hand pump’s plun-
ger to keep the pressure at 1.5 bar.
•The rapid preheater will now preheat
the carburetor. It must be preheated for
at least 90 seconds. The time needed
depends on the outside temperature.
STEP 9
•After 90 seconds, turn the handwheel
nose down.
•As soon as the lamp lights, close the le-
ver of the rapid preheater.
•Bring the lamp to operating pressure
(2.5 bar).
6
7
8
9

Petromax Inc.
2500 Wilcrest
Suite 300
Houston 77042
USA
Phone: +18323844074
E-mail: info@petromax.com
Internet: www.petromax.com
Copyright © All Rights Reserved.
Petromax and the dragon brand are registered trademarks. The content of this catalog must not be
replicated in any way, edited, copied, or distributed by any means without permission.
Printed in Germany
Other manuals for HK500
2
Table of contents
Other Petromax Outdoor Light manuals
Popular Outdoor Light manuals by other brands

Serenity
Serenity G2749 instruction manual

Tommee Tippee
Tommee Tippee Penguin manual

Agilight
Agilight SignRayz Ultra Mini Colors installation guide

LI-TIAN LIGHTING
LI-TIAN LIGHTING LTOK Series installation instructions

LIGMAN
LIGMAN NYB-80337 installation manual

Philips
Philips Symmetry Series Assembly, installation and operating instructions

Clas Ohlson
Clas Ohlson Altis manual

Thorn
Thorn TEA BOLLARD installation instructions

shada
shada LED's light Outdoor Series Installation and operating manual

Safavieh Lighting
Safavieh Lighting FLL4067A Assembly instructions

Safavieh
Safavieh TBL4064 quick start guide

ML Accessories
ML Accessories LSPIKEA Installation & maintenance manual