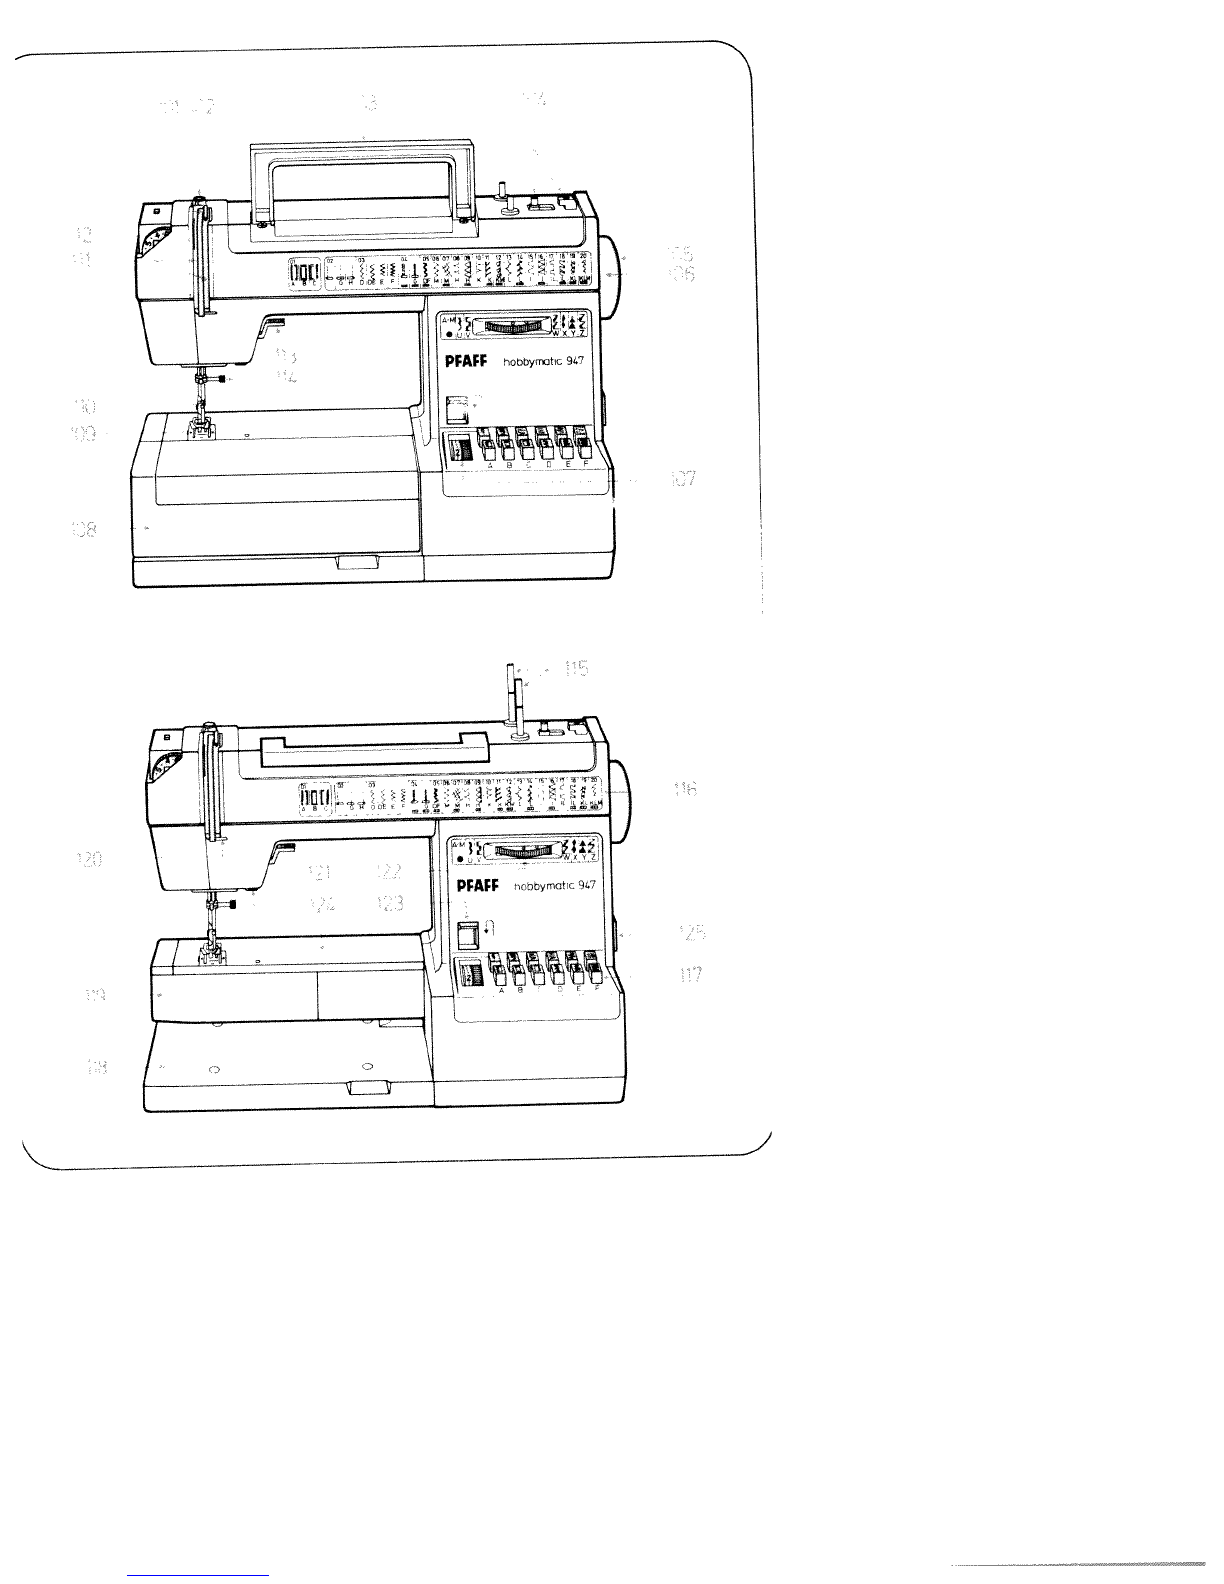
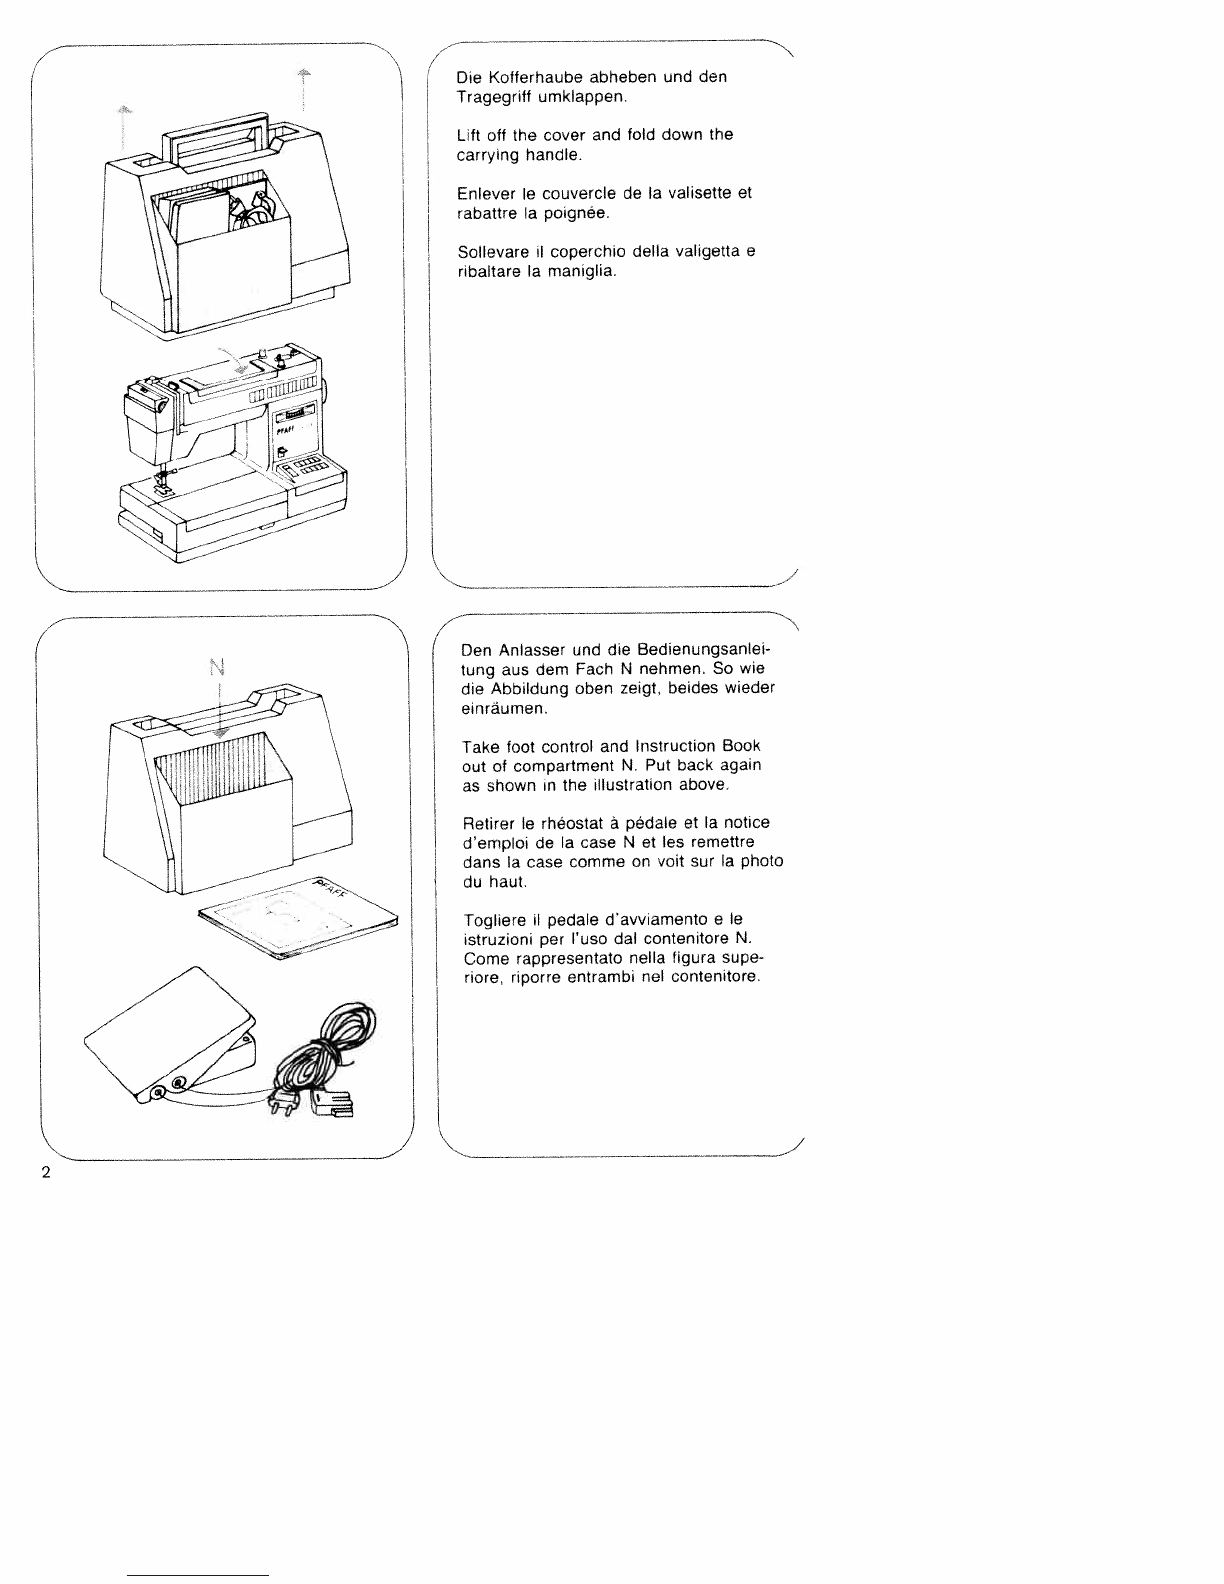
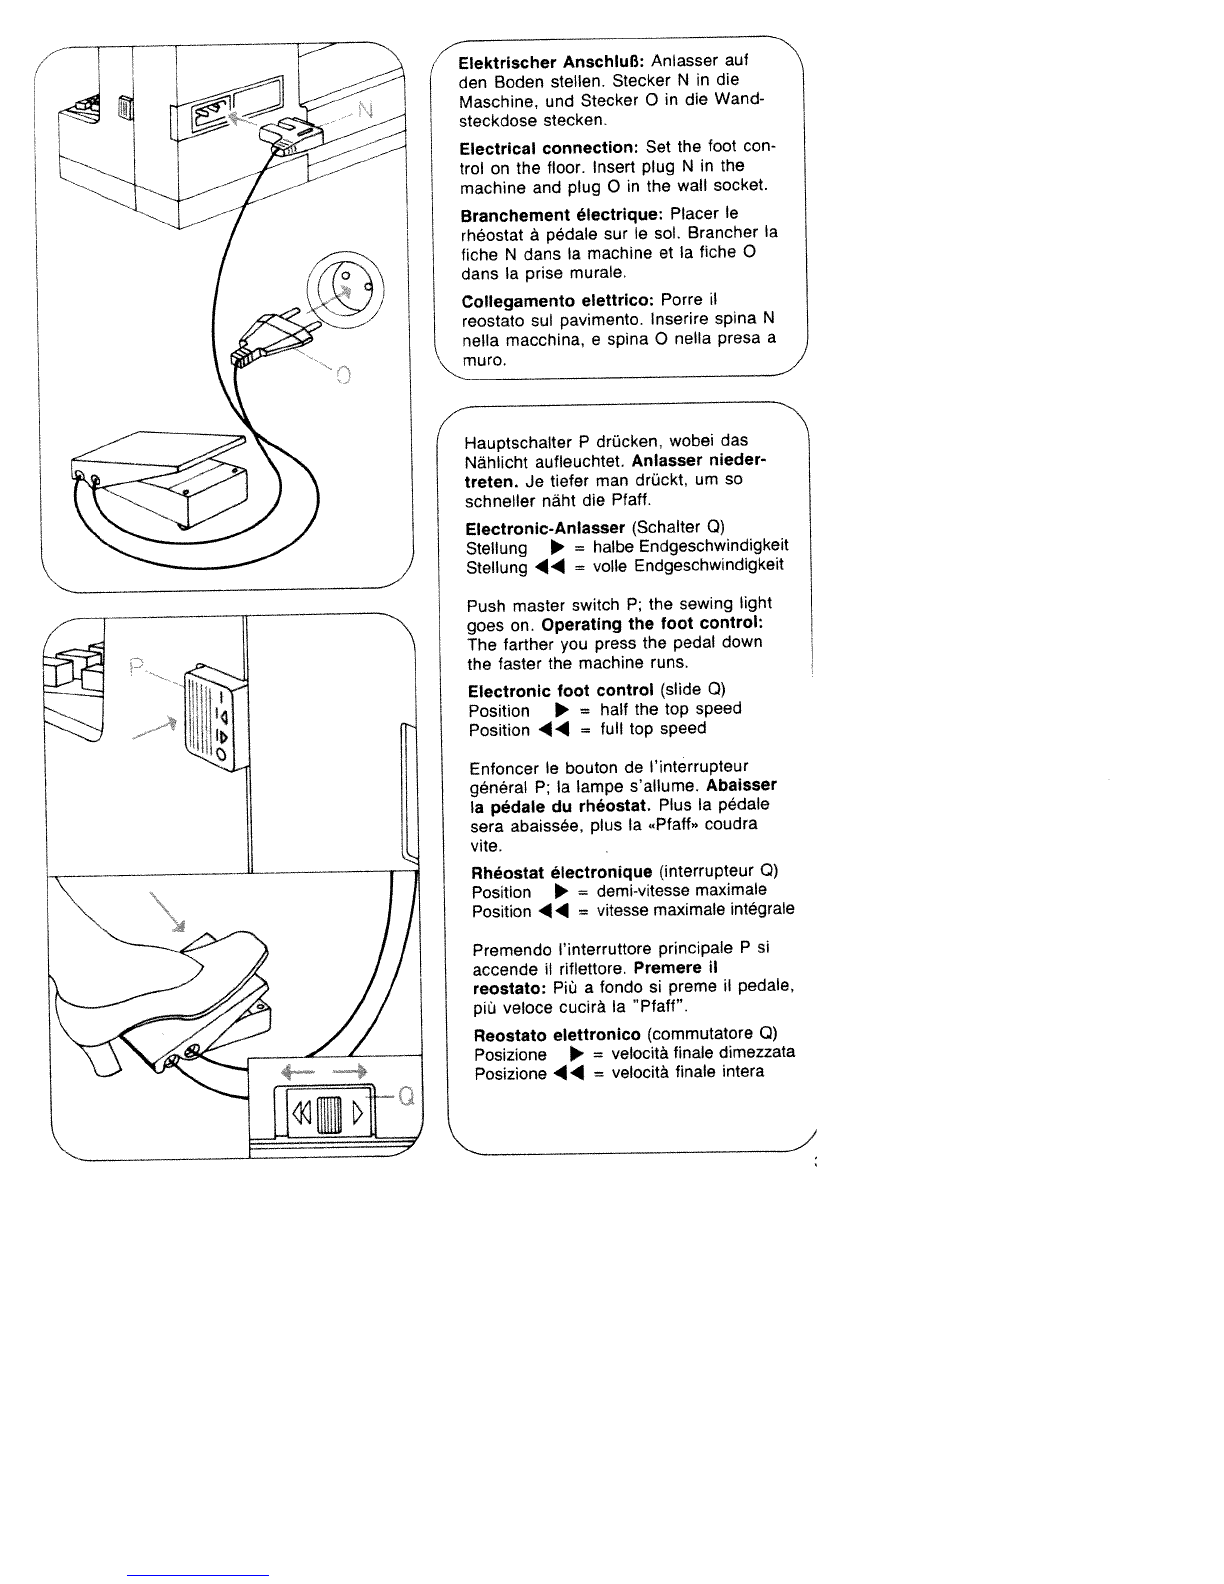
Pfaff HOBBYMATIC 947 User manual

Bedienungsanleitung
Instruction
Book
Mode
d’emploi
Libretto
istruzioni
PFAFF

I

Teile
der Nähmaschine
Parts
of
the
sewing
machine
101
Fadenhebel
101
Take-up
lever
102
Spuler-Vorspannung
102
Bobbin
winder
tension
103
Tragegrifl
103
Carrying
handle
104
Spuler
104
Bobbin
winder
105
Handrad
105
Hand
wheel
106
Auslösescheibe
106
Stop
motion
knob
107
Stichtangen-Einsteller
107
Stitch
length
key
108
Verwandlungsnähflãche
108
Detachable
work
support
with
mit
Zubehärfach
accessory
compartment
109
Stichplatte
109
Needle
plate
110
NähfuBhalter
mit Nâhful3
110
Sewing
foot
holder
with
sewing
foot
111
Einfädelschlitze
111
Threading
slots
112
Oberfadenspannung
112
Needle
thread
tension
113
Stoffdruckerhebel
113
Presser
bar
lifter
114
Nadelhalter
mit
Halteschraube
114
Needle
holder
with
screw
115
Garnrollenstjfte
115
Spool
pins
116
Stichmustertabelte
116
Table
of
stitch
patterns
117
Tipptasten
117
Finger-tip
controls
118
Grundplatte
118
Bedplate
119
VerschluBklappe
dahinter
Greifer
119
Free
arm
cover
120
FadenfUhrung (enclosing sewing
hook)
121
Anschlag
zum
Stopfen
120
Thread
guide
122
Zierstich-Einstellrad
121
Stop
for
darning
operations
123
Rückwärtstaste
122
Fancy-stitch
thumb
wheel
124
Freiarm
123
Reverse-feed
control
125
Hauptschalter
124
Free
arm
125
Master
switch

Pièces
de
Ia
machine
Parti
della
macchina per cucire
101
Levier
releveur
de
fil
101
Leva
tendifilo
102
Pretension
du
dévidoir
102
Tensione
dello
spolatore
103
Poignee
103
Maniglia
104
Dévidoir
104
Spolatore
105
Volant
105
Volantino
106
Disque de
débrayage
du
volant
106
Disco
di
disinnesto
107
Règle-point
107
Regolatore
lunghezza
punto
108
Plaque
do
rangement
avec
boite
a
108
Piano
variabile
con
scomparto
per
accessoi
res
accessori
109
Plaque
a
aiguille
109
Placca
d’ago
110
Support avec
pied
presseur
110
Supporto
del
piedino
con
piedino
111
Fentes
d’enfilage
111
Fessura
per
infilatura
112
Tension
du
fil
d’aiguille
112
Tensione superiore
113
Levier
presse-tissu
113
Leva
aizapiedino
114
Pince-aiguille
avec
vis
de
fixation
114
Morsetto
d’ago
con
vite
115
Broches
a
bobines
115
Perni
portarocchetti
116
Tableau
de
points
116
Tabella
dei
punti
117
Touches
de
commande
117
I
tasti automatici
118
Plaque
do
base
118
Base
piana
119
Compartiment
du
crochet
119
Sportello,
dietro
crochet
120
Guide-fil
120
Guidafili
121
Butée
pour
travaux
do
reprisage
121
Fermo
per
rammendo
122
Disque
do
reglage
des
points
122
Regolatore
punto
ornamentale
d’ornementation
123
Tasto
per
cucire
indietro
123
Touche marche
arrière
124
Braccio
libero
124
Bras
libre
125
Interruttore
principale
125
Interrupteur
general

Die
Kofterhaube
abheben
und
den
Tragegriff
umklappen.
carrying
handle.
Lift
off
the
cover and
fold
down
the
rabattre
a
polgnée,
Enlever
le
couvercie
de
avalisette
et
Sollevare
1
coperchio
della
valigetta
e
ribaltare
Ia
maniglia.
uIf1L9
jjfr
-*----
(Den
Anlasser
und
die
Bedienungsan!ei
tung
aus
dem Fach
N
nehmen.
So
wie
einráumen.
die Abbildung
oben
zeigt,
beides
wieder
Take
foot
control
and
Instruction
Book
out
of
compartment
N.
Put
back again
as
shown
in
the
illustration
above.
Retirer
le
rheostat
a
pédae
et
Ia
notice
d’emploi
de
Ia
case
N
et
les
remettre
dans
a
case
comme
on
volt
sur
Ia
photo
du
haut.
Togliere
1
pedale
davviamento
e
le
struzioni per
Iuso
dal
contenitore
N.
Come
rappresentato
nella figura
supe
riore,
riporre
entrambi
nd
/

Elektrischer
AnschluB:
Anlasser
auf
den
Boden
stellen.
Stecker
N
in
die
Maschine,
und
Stecker
0
in
die
Wand
steckdose
stecken.
Electrical
connection:
Set the
foot
con
trol
on
the
floor.
Insert
plug
N
in
the
machine
and
plug
0
in
the
wall
socket.
Branchement
électrique:
Placer
le
rheostat
a
pédale
sur
le
sol.
Brancher
a
fiche
N
dans
Ia
machine
et
Ia
fiche
0
dans
Ia
prise
murale.
Collegamento
elettrico:
Porre
il
reostato
sul
pavimento. Inserire
spina
N
nella
macchina,
e
spina
0
nella
presa
a
muro.
Hauptschalter
P
drücken,
wobei
das
Nählicht
aufleuchtet.
Anlasser
nieder
treten.
Je
tiefer man
drückt,
urn
so
schneller
näht
die
Pfaff.
Electronic-Anlasser
(Schalter
Q)
Stellung
=
halbe
Endgeschwindigkeit
Stellung
14
=
voIle
Endgeschwindigkeit
Push master
switch
P;
the sewing
light
goes
on.
Operating
the
toot control:
The
farther
you
press
the
pedal
down
the
faster
the
machine
runs.
ElectronIc
foot control
(slide
Q)
Position
=
half
the
top
speed
Position
41
=
full
top
speed
Enfoncer
le
bouton
de
l’interrupteur
general
P;
Ia
lampe
s’allume.
Abaisser
Ia
pédale
du
rheostat.
Plus
Ia
pédale
sera abaissée,
plus
Ia
Pfaft”
coudra
vite.
Rheostat électronique
(interrupteur
Q)
Position
=
demi-vitesse
maximale
Position
44
=
vitesse
maxirnale
integrale
Prernendo
l’interruttore
principale
P
si
accende
il
riflettore.
Premere
II
reostato:
Piü
a
fondo
si
preme
1
pedale,
piü
veloce
cucirà
Ia
“Pfaff”.
Reostato
elettronlco
(corn
mutatore
Q)
Posizione
=
velocità
finale
dirnezzata
Posizione
44
=
velocité
finale
intera
4

Spulen
vorbereiten:
Verwandlungsnähfläche etwas
anheben
und
herausnehmen.
Preparation
for
bobbin
winding:
Lift
detachable
work
support
and
remove
it.
Preparation
des
canettes:
Lever
queique
peu
Ia
boite
de
rangement
et
Ia
sortir.
Preparazione
per
avvolgere
Ia
spolina:
Sollevare
leggermente
il
piano variabile
e
toglierlo.
Verschlul3klappe
119
nach
unten
Offnen.
Open
free
arm
cover
119.
Ouvrir
le
capot
119
vers
le
bas.
Aprire
sportello
119
verso
basso.
7T.tschaIter
125
ausschalten.
Klappe
N
anheben
und
die
Spulenkapsel
herausziehen.
•
Switch
off
master
switch
125.
Raise
latch
N
and
pull
out
the
bobbin
case.
•
Tourner
l’interrupteur
general
125
sur
Arrêt’.
Lever
le
loquet
N
et
retirer
Ia
bolte
a
canette.
•
Disinserire
I
interruttore
principale
125.
Sollevare
il
chiusion
N
e
togliere
Ia
\.capsi.adella
spolina.
Klappe
N
loslassen
und
die
Spule
her
ausnehmen.
Release
latch
N
and
take
out
the bobbin.
Làcher
le
loquet
N
et
retirer
Ia
canette.
Rilasciare chiusino
N
e
togliere
Ia
spolina.
4
4
4

d_)
.)
4
Spule
auf
den
Spuler
104
stecken.
Stift
N
mul3
in
Schlitz
0.
Place
abobbin
on
spindle
104,
making
sure
pin
N
enters
slot
0.
Mettre
a
canette
sur
le
dévidoir
104;
le
tenon
N
doit
s’engager
dans
Ia
fente
0.
Mettere
Ia
spolina
su
spolatore
104.
Perno
N
devo
entrare
in
fessura
0.
Spule
nach rechts
gegen
den Anschiag
P
drücken.
Push
the
bobbin
to
the
right
against
stop
P.
Pousser
Ia
canette
vers
Ia
droite,
contre
Ia
butée
P.
Spingere
Ia
spolina
verso
destra
contro
ii
fermo
P.
Nähwerk
ausschalten:
Handrad
105
test
halten
und
Scheibe
106
nach
vorn
drehen.
Disengaging
the
sewing mechanism:
Hold
the
hand
wheel
steady
and
turn
knob
106
toward
you.
Débrayer
le
mécanisme
de
couture:
Retenir
le
votant
105
et
tourner
le
disque
106
vers
l’avant.
Disinnestare
meccanismo
del
cucito:
Tenere
fermo
ii
volantino
105
e
girare
disco
106
in
avanti.
Garnrollenstifte
115
ganz
hochziehen
und
Garnrolle
aufstecken.
Pull
thread
stand
pins
115
up
completely
and place
thread
reels
on
them.
Tirer
les
broches
115
a
fond
vers
le
haut
et
mettre
a
bobine
en
place.
Estrarre
completamente
i
perni
porta
rocchetti
115
e
sistemarci
H
rocchetto
del
fib.
4
4

N
Spulen
Hauptschalter einschalten.
Den
Faden
von
der
Garnrolle
in
die
Spulervorspannung
102
ziehen,
nach
rechts
führen
und
etnige
Male
in
Pfeil
richtung
urn
die
Spule
wickeln.
Dann
den
Ful3anlasser
betätigen
und
spulen.
1st
die
Spule
voll,
bleibt
sie
stehen.
Die
voile
Spule
nach
links
drücken,
abnehrnen
und
den
Faden
abschneiden.
Bobbin winding
Switch
on
master
switch.
Pull
thread
from
thread
reel
into
thread
retainer
102,
lead
to
the
right
and
wind
a
few
times around
the
bobbin
in
the
direc
tion
of
the
arrow.
Then
actuate
the
foot
control
and
wind
the
bobbin. The bobbin
stops
as
soon
as
it
is
full.
Push
the
full
bobbin
to
the
left,
remove
it
and
cut
off
the thread.
Bobinage
Tourner
l’interrupteur
general.
Tirer
le
fit
de
Ia
bobine
dans
Ia
préten
sion
102
du
dévidoir,
le
coucher
a
droite
et
l’enrouler
de
quelques
tours,
dans
le
sens
de
Ia
flèche,
sur
a
canette.
Agir
sur
Ia
pédale
du
rheostat
et
bobiner. Des
que
Ia
canette
est
pleine,
le
dévidoir
s’arrête.
Pousser
Ia
canette
vers
Ia
gauche,
Ia
reti
rer
et
couper
le
fil,
4
Avvolgere
a
spolina
Inserire
linterruttore
principal
e.
Tirare
il fib
dab
rocchetto
nelba
tensione
debbo
spolatore
102,
riportarlo
verso
destra
e
avvolgerbo
alcune
volte
in
senso
della
freccia
attorno
Ia
spotina.
Quindi
azionare
it
reostato
e
avvobgere
Ia
spolina.
Quando
Ia
spolina
è
piena
si
ferma
da
sola.
Premere
Ia
spolina
piena
verso
sinistra,
togbierla
e
tagliare
ii
fib.

4
L
Nähwerk
einschalten:
Handrad
festhal
ton
und
Scheibe
106
nach
hinten
drehen.
Dann
Handrad
nach
vorne
drehen,
bis
es
einrastet.
Engaging
the
sewing mechanism:
Hold
the
hand
wheel
firmly
and
turn disk
106
toward
the
back,
then
turn
the
hand
wheel
forward
again
until
it
snaps
in.
Embrayage
du
mécanisme:
Rotenir
le
volant
et
tourner
le
disque
106
vers
I’arrière.
Tourner
le
volant
vers
l’avant
jusqu’á
ce
qu’il
s’enclenche.
Inserlmento
meccanismo
dl
cuclto:
tenere
fermo
ii
volantino
e
girare
ii
disco
106
verso
dietro.
Girare
quindi
II
volantino
in
avanti
finché
s’innesta.
Spule
elniegen
N
(Faden
nach
hinten).
Den
Faden
in
den
Schlitz
0
und
bis zur
Offnung
P
ziehen.
uing
the
MIse
en
place
de
Ia
canette
(N),
le
fil
se
__-—
dóroulant
vers
l’arrière.
Tiror
le
fil
par
Ia
fente
0
jusqu’a
l’ouverture
P.
fib
va
rivolto
verso
dietro).
Introdurre
ii
fib
nebla
fessura
0,
quindi
tirare
fino
Inserimento
della
spolina
N
(ii
capo
del
(bID
all’apertura
P.

4
LJnterfadenspannung
prUfen:
Kapsel
Ieicht
ruckartig
aufwartsbewegen.
Sie
muB
stufenweise
niedersinken.
(Einstell
schraube
N
nach
links
drehen
=
loser,
nach
rechts drehen
=
fester).
Checking
the
bobbin
thread
tension:
With
a
brief,
sharp
upward
movement
of
your
hand,
the
bobbin
must
gradually
slip
downwards.
(Turn
screw
N
counterclock
wise
for
a
weaker
tension,
or
clockwise
for
atighter
tension.)
Tension
du
fit
de
canette:
Laisser
pendre
Ia
canette
garnie
au
fil
de
Ia
canette.
Elle
doit
descendre
graduelle
ment
quand
on
imprime
a
Ia
main
de
legéres
saccades
ascendantes.
Rotation
de
Ia
vis
N
vers
Ia
gauche:
reduction
de
Ia
tension;
rotation
vers
Ia
droite:
renforcement.
Controllo
della
tensione
inferiore:
Tirare
Ia
capsula
con
leggeri
colpetti
verso
l’alto.
Deve
abbassarsi
gradatamente
(girando
Ia
vite
di
regolaggio
N
a
sinistra
si
allenta,
verso
destra
si
rinforza).
N
Spulenkapsel
einsetzen:
•
Hauptschaltor
125
ausschalten.
Klappe
0
anheben
und
die
Kapsel
bis
zum
Anschlag
auf
Stift
P
schieben.
Aus
schnitt
Q
muB
dabei nach
oben
zeigen.
Inserting
the
bobbin
case:
•
Switch
off
master
switch
125.
Raise
latch
0
and
push
the
bobbin
case
onto
stud
P
as
far
as
it
will
go,
making
sure
cutout
Q
points
upwards.
Mise
en
place de
Ia
boite
a
canette:
•
Tourrier
linterrupter
général
125
sur
“Arrét’..
Relever
le
loquet
0
et
glisser
a
boite
a
canette,
I’ouverture
Q
en
haut,
a
fond
sur
le
tourillon
P.
Come
inserire
Ia
capsula
delta
spolina:
•
Disinserire
I’interruttore
principale
125.
Sollevare
il
chiusino
0
e
inserire
Ia
cap
sula
fino
aIl’arresto
sul
perno
P.
L’aper
tura
Q
deve
essere
rivolta
verso
I’alto.

Obertaden
elniegen:
•
Hauptschalter
125
ausschalten.
Nadel
und
Fadenhebel
101
müssen
oben
stehen.
Nâhful3
anhe
ben.
Den
Faden
von
cier
Garnrolle
in
die
Spulervorspannung,
durch
die Offnung
N,
den
Schlitz
0,
hinter
das
Führungs
stuck
p,
nach
oben
in
den
Schlitz
Q,
durch
den
Fadenhebel
101,
zurück durch
den
Schlitz
Q,
hinter
die
Fuhrung
P
und
in
die
rechte
FadenfUhrung
S
am
Nadel
halter ziehen.
Upper
threading:
•
Switch
off
master
switch
125.
Both
needle
and
take-up
lever
must
be
in
the
“up”
position.
Raise
sew
ing
foot.
Pull
thread
from
spool
and
draw
it
into
the
bobbin
tension
stud,
through
piece
P,
upwards
through
slot
Q,
through
opening
N,
slot
0,
behind
guiding
take-up
lever
101,
back
through
slot
0,
behind
guide
P
and
then
into
the
right
.r
I
thread
guide
S
on
the
needle
holder.
Entilage
de
I’aiguille:
•
Tourner
linterrupteur
general
125
sur
rArrêt,.
L’aiguille
et
le
levier
releveur de
fil
doi
vent
se
trouver
en position
haute.
Lever
le
pied
presseur.
Tirer
le
fil
de
Ia
bobine
dans
Ia
pretension
du
dévidoir,
par
les
fentes
N
et
0.
derriere
le
guide-fil
P.
Remonter
dans
Ia
fente
0,
par
le
rele
veur
de
fil
101,
redescendre
par
Ia
fente
Q
et
passer
derriere
le
guide-fil
R
et
dans
le
guide-fil
droit
S
du
pince-aiguille.
I
Inserimento
del
fib
superiore:
•
Disiri
serire
I
‘iriterruttore
principale
125.
Ago
e
leva
tendifilo
devono
essere
in
alto.
Levare
il
piedino.
Portare
il
fib
dal
rocchetto
nella
tensione
delbo
spolatore,
attraverso
l’aper
tura
N,
nella
fessura
0,
dietro
Ia
guida
P,
tendifilo
101,
di
ritorno
attraverso
Ia
fes
verso
‘alto
nella
fessura
0,
nella
leva
sura
Q,
dietro
Ia
guida
R
e
nel
guidafilo
S
a
destra
dell’ago.
<.‘
-
____________________
4
Den
Oberfaden
von vorn
nach
hinten
durch
das
Nadelähr
fädeln.
Thread
the
needle
from
front
to
back.
Enfiler
be
fib
d’aiguilbe
de
‘avant
en
arriè
re
par
be
chas
d’aiguible.
lnfibare
ib
fib
superiore
dal
davanti
verso
dietro
attraverso
Ia
cruna
deIl’ago.
9

7-
/
Untertaden
heraufholen:
Oberfaden
test
halten.
Handrad
nach
vorn
drehen
und
eir,en
Stich
nahen
bis Nadel
und
Faden
hebel
wieder
oben
stehen.
Mit
dem
Ober
faden
den Unterfaden nach
oben
ziehen.
Drawing
up
the
bobbin
thread:
Hold
the
needle
thread
taut.
Turn
the
hand
wheel
towards
you
and sew
a
stitch
until
both
needle
and take-up
lever
are
up.
Pull
out
the
bobbin
thread
by
means
of
the
needle
thread.
Remontée
du
fil
inférieur:
Tendre
legé
remerit
le
fil
daiguille.
Tourner
le
volant
vers
avant
et
coudre
un
point
jusquã
ce
que
l’aiguille
et
le
releveur
de
hI
se
trouvent
a
nouveau
en
position
haute.
Remonter
le
fil
de
canette
a
Faide
du
fil
daiguille.
Far
salire
ii
fib
inferiore: Tenere
fermo
1
fib
superbore.
Girare
il
vobantino
in
avanti
e
cucire
un
punto
finchè
ago
e
eva
tendifibo
siano
di
nuovo
in
posizione
superiore.
Tirare
con
ii fib
superiore
il fib
nfenore
in
sU.
Ober- und
Unterfaden nach
rechts
unter
den
Nähful3
legen
(etwa
10
cm).
Place
both
threads
towards
the
right
under
the sewing
foot,
(approx
10
cm).
Coucher
es
deux
fils
vers
l’arriére
a
droite
sous
le
pied
presseur.
Les
laisser
dépasser
d’environ
10
cm.
Porre
i
fibi
superiore
ed
inferiore
sotto
il
piedino,
(circa 10cm).
Verschlul3klappe
119
schlieBen.
Close
free-arm
cover
119.
Fermer
be
capot
119.
/
4
Chiudere
lo
sportebbo
119.

4
11
Nähfläche,
wie
der
PfoiI
zeigt,
an
die
Maschine
schieben.
Push
work
support
against
the machine,
as
shown
by
the
arrow.
Placer
a
boite
de
rangement
contre
Ia
machine, comme
le
montre
Ia
flèche.
Applicare
II
piano
variabile
alla
macchina,
come
indicato dalla
freccia.
Hauptscha!ter ausschalton.
Stoff
unter
den
Nähful3
legen.
•
Switch
off
master
switch
125.
Place
fabric
under
the sewing
toot.
•
Tourner
I’interrupteur
génOral
125
sur
rArrêt”.
Placer
du
tissu
sous
le
pied
presseur.
•
Disinserire
I’interruttore
principale
125.
Porre
a
stoffa
sotto
ii
piedino.
4
Beim
Einlegen
extrem dicker Stofflagen
Hebel
113
höher
anheben.
To
insert
extra-thick
fabric
plies
raise
lever
113.
Pour les
tissus
très
epais,
lever
davantage
le
levier
113.
In
caso
di
spessori
di
stoffa
estre
mamente
grossi alzare
ulteriormente
Ia
eva
113.
4
Hauptschalter
einschalten.
Stoffdrückerhebel
113
sen
ken.
Switch
on
master
switch.
Lower
presser
bar
lifter
113.
Tourner
l’interrupteur
general.
Descendre
le
levier
113.
Inserire
l’interruttore
principale.
Abbassare
Ia
leva
premistoffa
113.

Anlasser
niedertreten.
Je
tiefer
man
drückt,
um
so
schneiier
näht
die
Pfaff.
Operating
the toot
control:
The more
you
press
down
the
pedal, the
faster
the
machine
runs.
Abaisser
Ia
pedale
du
rheostat.
Pius
Ia
pédale
sera
abaissóe,
pius
a
Pfaff
coudra
vite.
Premere
ii
reostato:
Piü
a
fondo
Si
preme
ii
pedale,
piu
veloce cuciré
a
“Pt
aff”,
Oberfadenspannung
112
N
=
Einsteilmarkierung.
Needle
thread
tension
112
N
=
Setting
mark.
Tension
du
fit
d’aiguille
112
N
=
repere
de
regiage.
Tensione superiore
112
N
=
marcatura
per
Ia
regolazione.
Checking
the
needle
thread
tension
The
normal
setting
is
between
3
and
5.
The
higher
the
number,
the
tighter
the
tension.
To
check
the
tension,
set
the
machine
at
a
wide
zigzag
stitch.
Sew
a
short
seam.
The
threads
should
interlock
in
the
middle
of
the
material.
4
7
Fadenspannung
Uberprufen
Die
normale
Einstellung
liegt
im
Bereich
von
3-5.
Je
höher
die
Zahi,
je
fester
die
Spannung.
Die
Uberprüfung
wird
mit
einem
breiten
Zickzackstich
vorgenom
men.
Elne
kurze
Naht
nähen.
Die
Faden
verknotung
soil
in
der
Mitte
der
Stoffiagen
ilegen.

Tensions
des
hIs
Position
de
reglage
normate
entre
3
et
5.
Tension
d’autant
plus
forte
que
le
chiffre
est
grand.
Contrôler
a
l’aide
d’un
point
zigzag
large.
Coudre
quelques
points.
Les
fits
doivent
se
nouer
dans
l’épais
seur
des
tissus.
Controllo
delta
tensione
del
fib
La
tensione
normale
si
trova
net
settore
da
3—5.
PiU
alto
ii
numero,
piü
forte
sara
Ia
tensione.
II
controtto
viene
fatto
con
to
zig-zag
piü
largo.
Cucire
una
breve
cucitura.
Lannodamento
dei
fiti
deve
avvenire
at
centro
detlo
spessore
del
materiale.
/L
Stoffdruckerhebet
113
hochstelten.
Stoff
nach
hinten
herausnehmen.
Raise
presser
bar
lifter
113.
Remove the
fabric
by
putting
it
toward
the
back.
Retever
le
levier
113.
Degager
le
tissu
vers
larrière.
Atzare
Ia
teva
alzapiedino
113.
Togliere
Ia
stoffa
verso
dietro.
J
I
Fadenabschneider
N.
Fäden
einlegen
und
nach unten ziehen.
Thread
cutter
N.
Draw
the
threads
into
the
slot
and
putt
them
downwards.
Coupe-fbi
N.
Coucher
los
fits
dans
Ia
fente
et los
tirer
vers
to
bas.
Tagitattlo
N.
Inserire
i
fili
e
tirarli
verso
it
basso.

Stichlänge
einstellen
Die
Zahlen
auf
dem
Stichlangen-Ein
steller
107
geben
die
Stichlange
in
mm
an.
Der
Einstellbereich
1st
0
bis
6
mm.
Die
gewunschte
Stichlànge
wird
an
die
Einstellmarkierung
N
gedreht.
Die
Abbildung
0
unten
zeigt
die
EinsteI
lung
des
Stichlangen-Einsteuers
zum
Nähen
der
rot
abgebildeten
Stretchstiche
auf
den
Tasten.
Regulating the
stitch
length
The
numbers
on
stitch
length
control
107
indicate
the
stitch length
in
milli
meters.
The
stitch
length
range
is
0
to
6
mm.
Turn
the
control
to
set
the
number
indicating
the
stitch length at
mark
N.
Fig.
0
(bottom)
shows
how
to
set
the
stitch
length control
for
sewing
stretch
stitches
(red
stitch
symbols
on
push
but
tons).
Reglage
de
Ia
longueur
du
point
Les
chiftres
sur
le
disque
107
indiquent
Ia
longueur
du
point en
mm.
Celle-ci
est
reglable
entre
0
et
6
mm.
La
Iongueur
de
point
choisie
est
indiquée
face
au
repére
N.
L’illustration
0
(en
bas) montre
le
réglage
du
règle-point
pour
Ia
couture
des
points
élastiques marques
en rouge
sur
es
touches.
Regolazione
della
lunghezza
del
punto
I
numeri
sul
bottone regolatore
della
lunghezza
del
punto
107
corrispondono
alla
lunghezza
del
punto
in
mm.
La
rego
lazione
si
estende
da
0
a
6
mm.
La
lunghezza
del
punto
desiderata
si
regola
sulla
marcatura
N.
La
figura
0
sotto
mostra
Ia
regolazione
del
bottone
regolatore
per
cucire
i
punti
flexi
(stretch)
raffigurati
in
rosso
sui
tasti.
IA

N
Rückwärtsnähen
Die
Taste
123
niederdrücken Solange
die
Taste
gedrückt
wird,
nâht
die
Maschine
ruckwärts.
Reverse
sewing
Press
button
123.
As
long
as
you hold
this
button
the
machine
sews
back
wards.
Couture
en
marche
arrière
Abaisser
Ia
touche
123.
La
machine
coud
en
arrière
aussi longtemps que
Ia
touche
est
maintenue
en
bas.
La
cucitura
indietro
Premere
ii
tasto
123.
Finché
ii
tasto
rimane premuto
a
macchina cuce
indietro.

4
4
Some
safety
rules
a)
Take
care
to
avoid
injury
to
your
fingers
by
the
needle
during
sewing.
b)
Make
sure
you
unplug the
power
cord
whenever
you
have
to
leave
the
machine
or
want
to
clean
it,
oil
it
or
change
mechanical
and
accessory
parts.
C)
Be
sure
to
use
only
a15-watt
light
bulb
in
the
sewing
lamp.
Safety
rules
for
United Kingdom
see
page
36.
Norme
dl
slcurezza
per
macchine
per
cuclre per uso
famlglia
secondo
DIN
57700
parte
28
0
IEC
335
parte
28
a)
In
virtü
del
movimento
alternativo
dell’ago,
lutente
dove
prestare
suffi
ciente attenzione
e
tenere
constante
monte d’occhio
ii
punto
di
lavoro.
b)
Nel
cambiare
ago,
piedino,
spolina
e
placca
dago,
nelle
interruzioni
non
custodite
del
lavoro
e
durante
lavor
di
manutenzione
si
dove
disinserire
I
corrente
della
macchina
togliendo
Ia
spina
dalla
presa
amuro.
c>
La
potenza
massima
consentita
per
Ia
Iampadina
è
di
15
Watt.
L
Sicherheitshlnweise
für
Haushaltnähmaschlnen
nach
DIN
57700
Tell
28
bzw.
IEC
335
Teil
28
a)
Der
Benutzer
hat
wegen
der
auf-
und
abgehenden
Nadel
genugend Vor
sicht
walton
zu
Iassen
und
die
Nâh
stelle
bei
der
Arbeit
ständig
zu
beobachten.
b)
Beim
Verlassen
der
Maschine,
bei
Wartungsarbeiten
odor
beim
Wech
seln
von
mechanischen
Teilen
oder
Zubehör,
ist
die
Maschine
durch
Her
ausziehen
des
Netzsteckors
aus
der
Steckdose
vom Netz
zu
tren
non.
C)
Die
maximal
zulàssige
Leistung
der
Lampe
betrãgt
15
Watt.
Mesures de
sécurité
a)
Toujours
faire
preuve
do
prudence
ot
continuellement
surveiller
Ie
travail.
b)
Toujours
dôbrancher
Ia
machine
du
secteur
avant de
quitter
Ia
machine,
avant
los
travaux
d’ontrotien et
en
cas
de
remplacement
de
pièces
mecaniques
ou
daccessoires.
C)
Puissance
maximale
admissible
de
lampoule:
15
Watts.

A,
B,
C
Knopflochtasten
Die
Taste
B
1st
gleichzeitig
die
Aus
schalttaste
zum
Lösen
der getippten
Tasten
und
linke
Stichiage (siehe
Seite
25).
D
Zickzackstich
2
mm
E
Zickzackstich
3,5
mm
F
Zickzackstich
5
mm
G
Geradstich
M
Elasticstich
In
der Programmtabelle
auf
den Seiten
78—79
sind
die
Stiche
und
Stichkombina
tionen
mit
Hinweisen
für
ihre
Verwen
dung
angegeben.
Die
Buchstaben
der
Tasten
ihrer
Maschine
bestimmen
die
Programme
und Kombinationen,
welche
genaht
wer
den
können.
Finger-tip
controls
(models
without
stretch
stitches)
The
various models have
differing
num
bers
of
finger-tip
controls
and programs.
A,
B,
C;
Buttons
for
buttonholing
Button
B
is
also
used
as
clearing
button
for
releasing
the
pushed
buttons
and
for
setting
the
left
needle
position
(see
page
25).
D
2-mm
zigzag
stitch
E
3.5-mm
zigzag
stitch
F
5-mm
zigzag
stitch
G
Straight
stitch
M
Elastic
stitch
All
stitches
and
stitch
combinations
are
listed
in
the
stitch
program
chart
on
pages
80—81.
This
chart
also
contains
possible
applications.
The
letters
of
the buttons
on
your
machine
determine
the programs
and
combinations
that can
be
sewn.
J
4
Tlpptasten
(Modelle
ohne Stretchstiche)
Die
verschiedenen
Modelle
haben
eine
unterschiedliche
Anzah(
von
Tipptasten
und
Programmen.
1*
Table of contents
Other Pfaff Sewing Machine manuals

Pfaff
Pfaff 1293 Guide

Pfaff
Pfaff select 1520 User manual

Pfaff
Pfaff 2481-980/30 PLUSLINE User manual

Pfaff
Pfaff Creative 7530 User manual

Pfaff
Pfaff powerLine 2595 Manual

Pfaff
Pfaff 1571 Guide

Pfaff
Pfaff 481 A User manual

Pfaff
Pfaff 900/51 User manual

Pfaff
Pfaff 1571 User manual

Pfaff
Pfaff Automatic 260 User manual

Pfaff
Pfaff perfomance 2054 User manual

Pfaff
Pfaff tipmatic tiptronic 1151 User manual

Pfaff
Pfaff 1245 User manual

Pfaff
Pfaff 337 User manual

Pfaff
Pfaff 3371-10 series User manual

Pfaff
Pfaff Hobby 301 User manual

Pfaff
Pfaff 3734 - 2/01 User manual

Pfaff
Pfaff hobby 350 User manual

Pfaff
Pfaff 918 User manual

Pfaff
Pfaff quilt ambition 2.0 User manual