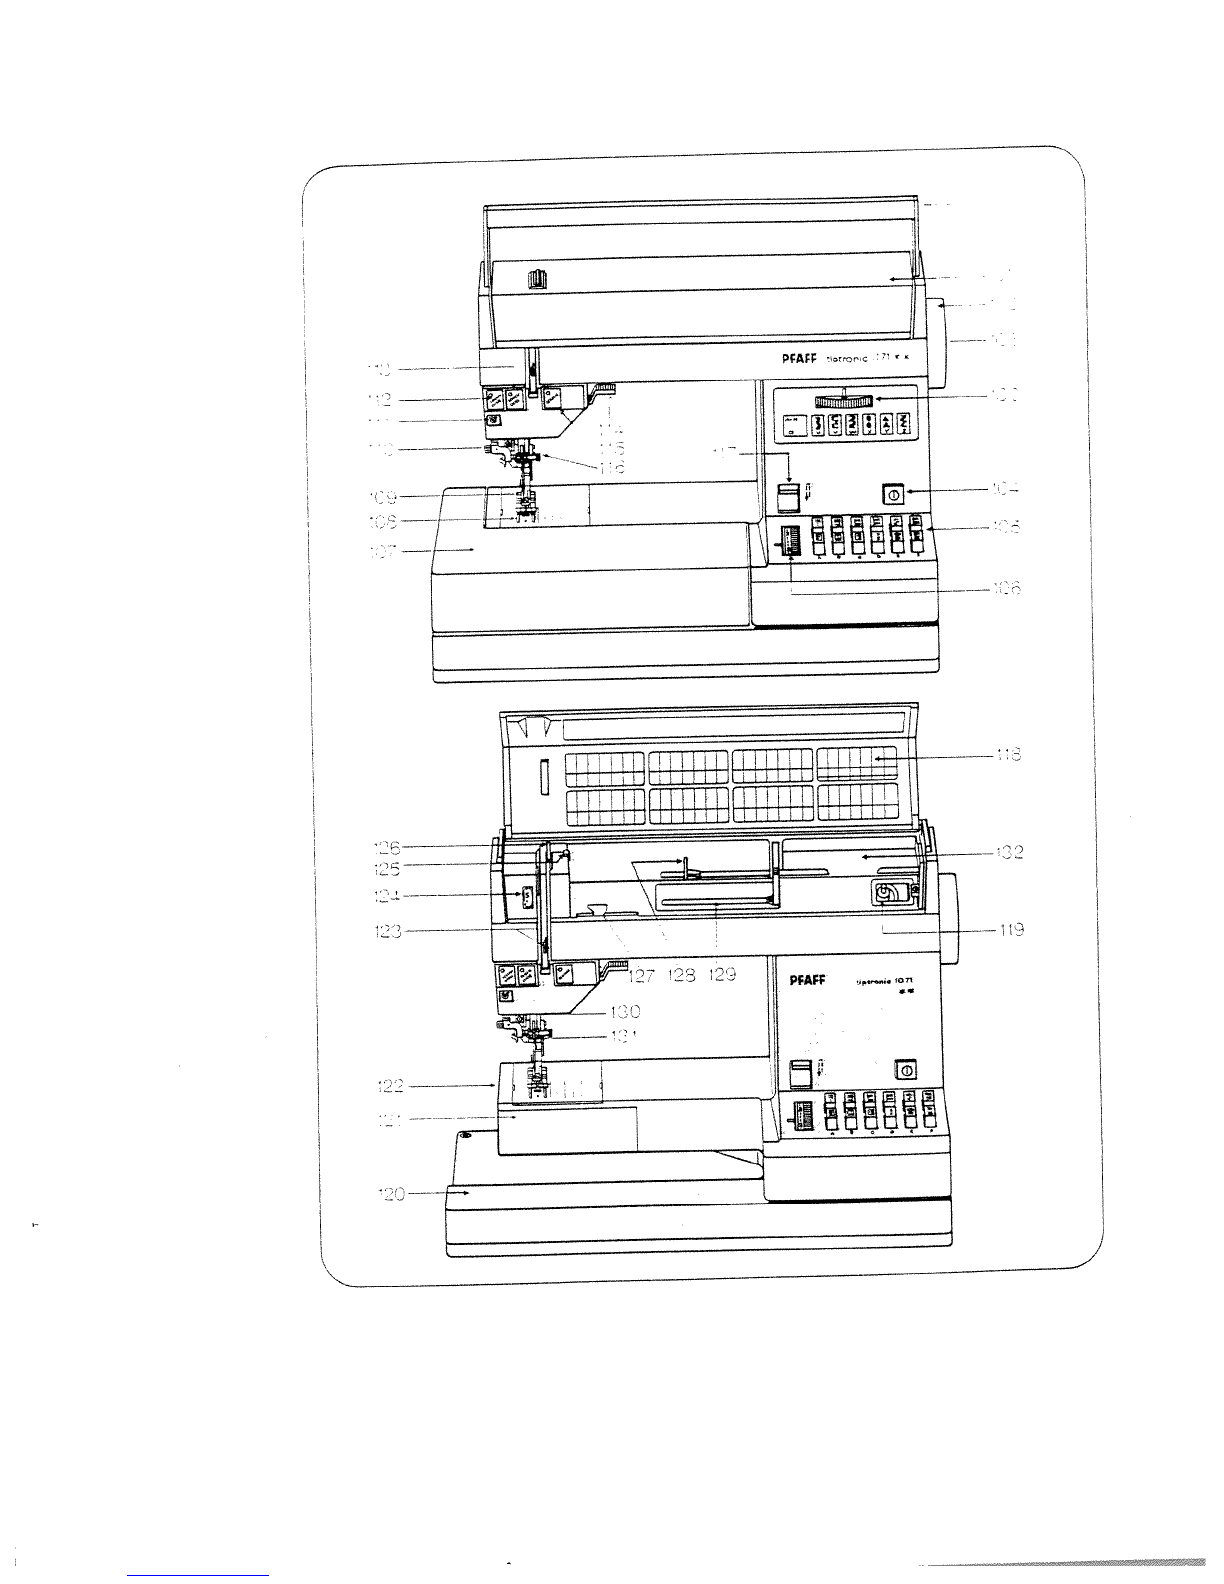
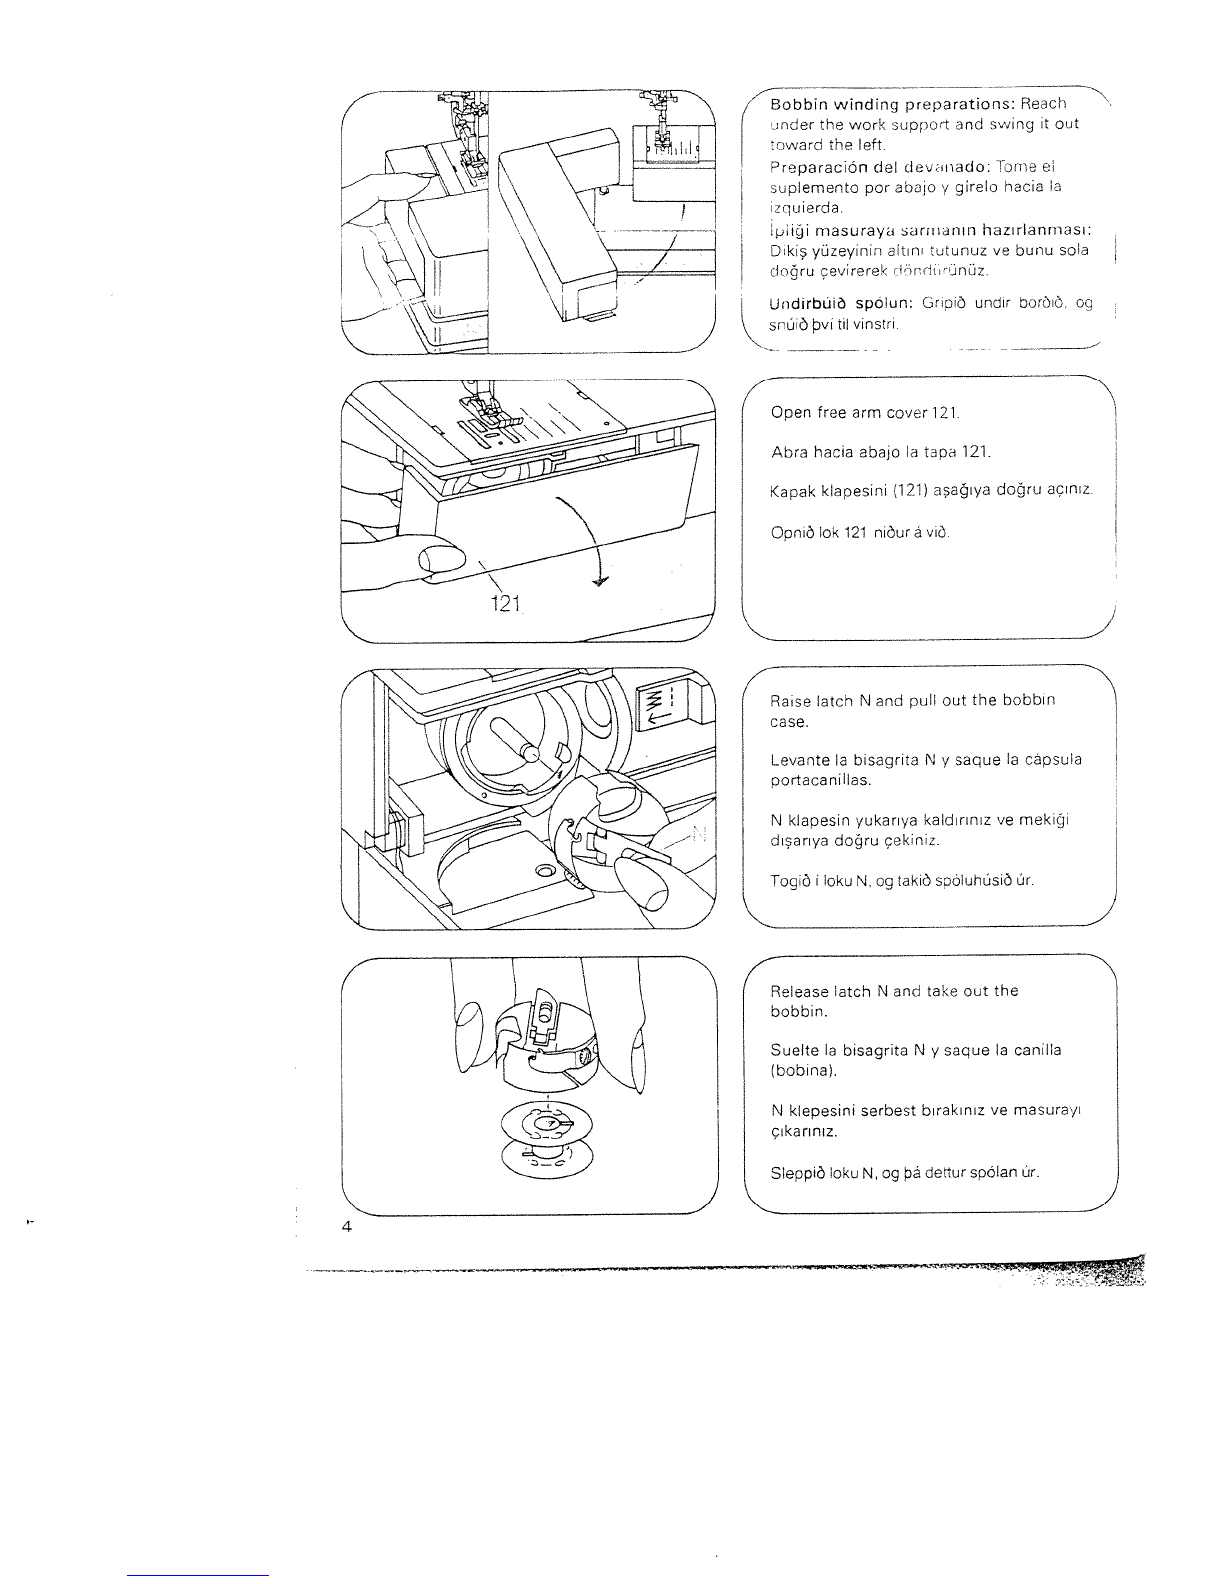
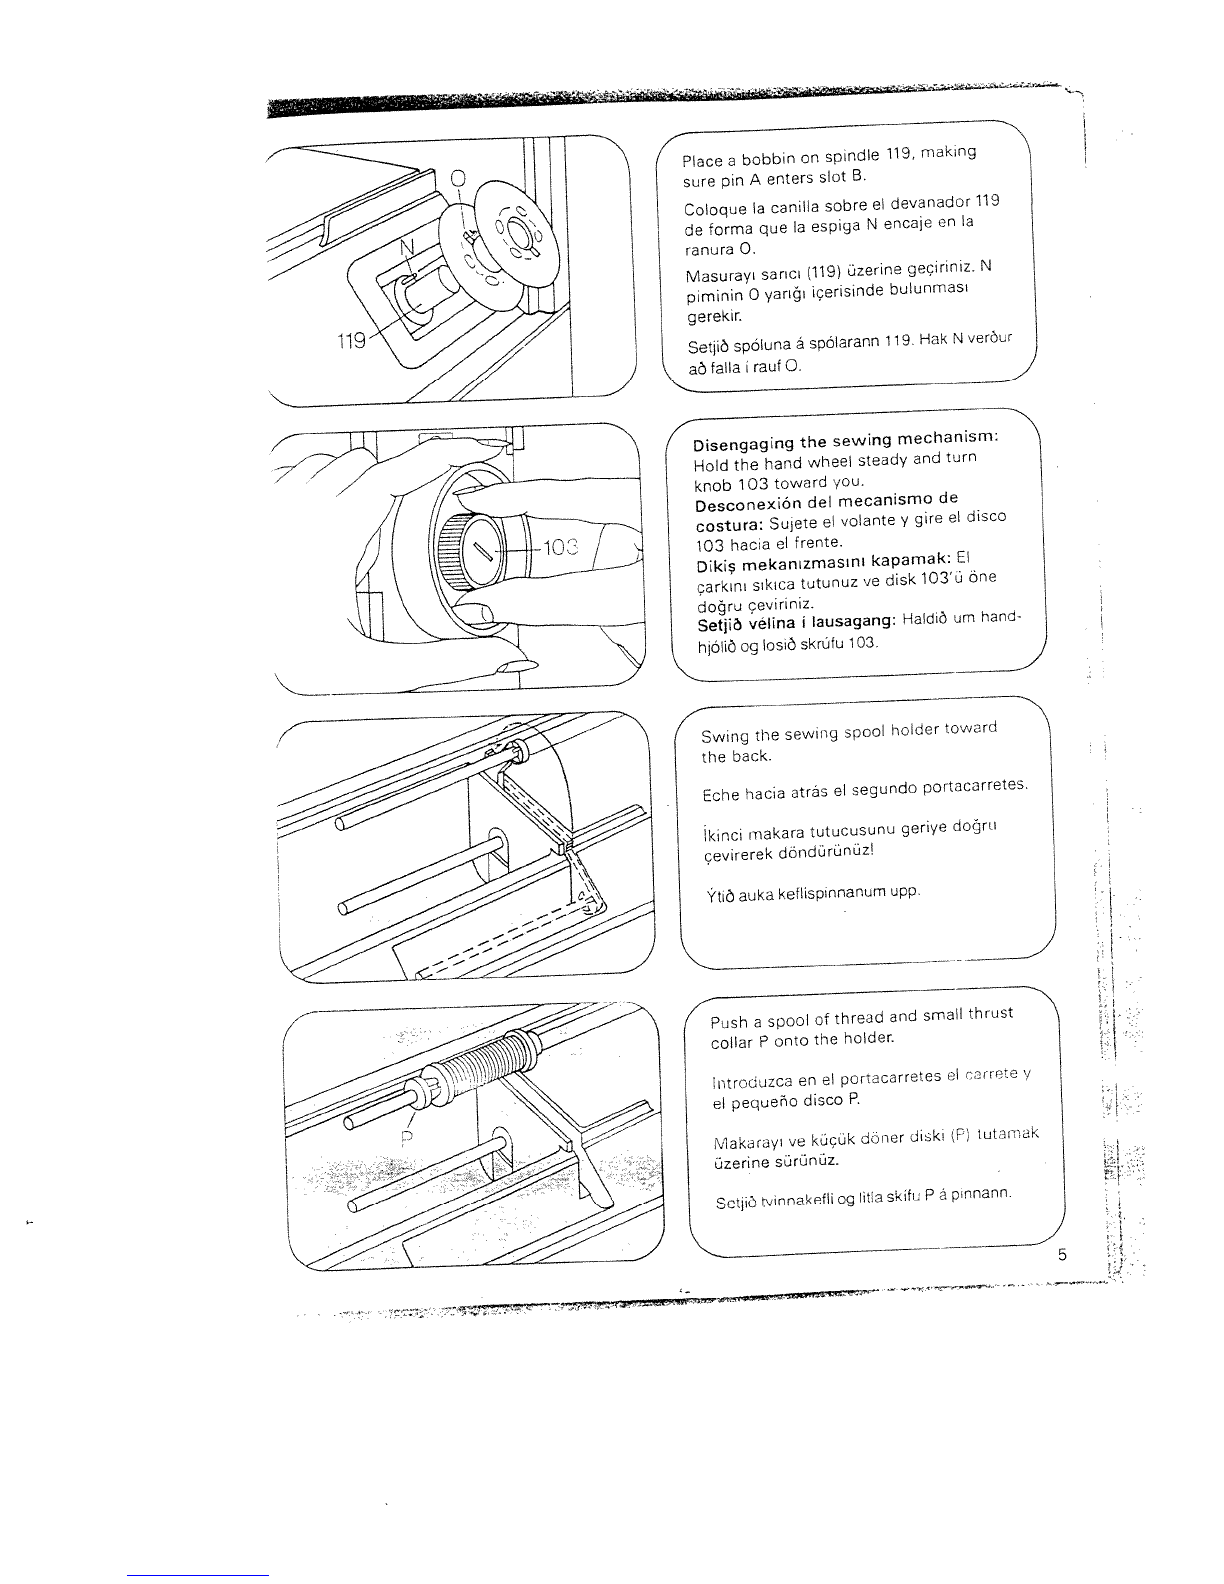
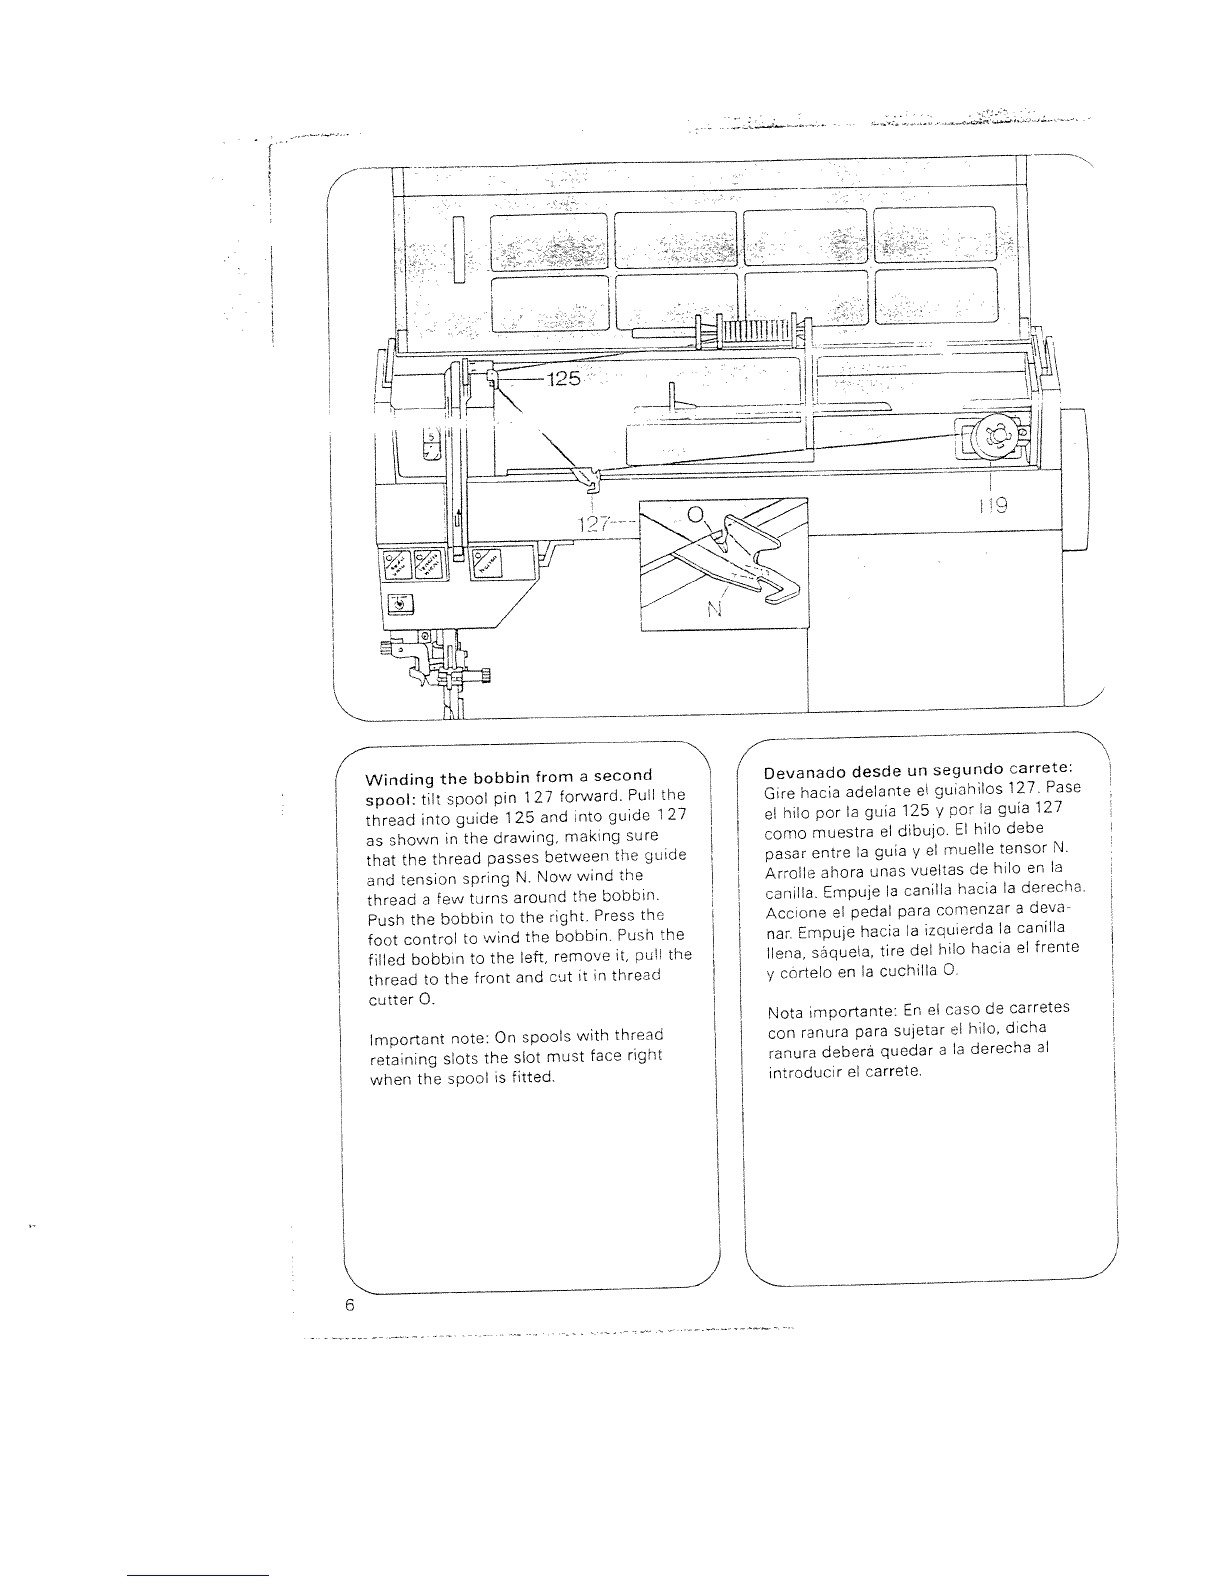
Pfaff Tiptronic 1071 User manual

>I00
UOEDflijSU
aw
D
c
A1No

Parts
of
your
sewing
machine
100
Carcing
handle
101
Hinged
lop
cover
102
Hand
wheel
103
Stop
motion
knob
1
04
Master
switch
105 Finger-tip
stitch
buttons
106
Stitch
length
control
107
Detachable
work
support
with
accessorY
box
and
comøartment
108 Needle
piate
1
09
Sewing
foot
holder
with
sewing
foot
110
Needle
threader
111
Bobbin
thread
indicator
light
11
2
‘Needle
down”
button
11 3
“Sew
slow”
button
1
1
Presser
bar
lift
11
5
“Basting
stitcn”
outton
116
Needle
holder
with
retaining
screw
11
7
Reverse-feed
control
118
Stitch
program chart
11 9
Bobbin
winder
1
20 Base
plate
121
Free
arm
cover
enclosing
sewing
hook
1
22
Free
arm
1
23
Threading
slots
1
24
Needle
thread
tension
1
25
Bobbin
winder
thread
guide
1
26
Take-up
lever
1
27
Bobbin
winder thread
guide
(swing-out)
1
28
Spool
holder
with
unreeling
disc
1
29
Sewing
spool
holder
(swing
up)
1
30
Dual
fabric
feed
with
thread
cutter
131
Presser
bar
1
32
Compartment
for
border-stitch
table
1
33
Fancy-stitch
thumb
wheel
(1171)
1zz
17—
j!l
llJt!i1iiij
)-
___
I
Ufl[I
H1H
I
H
_z
4
118
2
pcAFc
L
L

—,,_,—.-—,‘——-
Fold
out
this
page
Extienda
esta
hoja
Bu
sayfayi
diaryi
‘!oru
k-”n
Opno
I
pessa
sIou
(it
__--
Some
safety
rules
a)
Tae
care
to
avoid
njury
to
your
fin
gers
by
the needle
during
sewing.
b>
Be
sure
to
unplug
the
power cord
whenever
you
leave
the machine
or
wish
to
clean
it,
oil
it
or
change
mechanical
and
accessory
parts.
c)
Be
sure
to
use
only
a
15watt
light
bulb
in
the
sewing
lamp.
For
safety
rules
applicable
to
the
UK
please
see
page
56.
Normas
de
seguridad
para
máquinas
de
coser
domésticas
segün
DIN
57730,
parte
2
C
a>
Debido
al
movmiento
vertical
de
Ia
aguja,
el
usuarlo
deberd
tener
todo
el
cuidado
posible
durante
ci
trabajo
y
or
deberd
apartar
a
vista
de
Ia
zona
de
costura.
b)
Al
cambiar
Ia
aguja,
el
pie
prensatelas,
Ia
canilla
o
Ia
placa
de
aguja,
lo
mismo
que
al
limpiar,
enyrasar
o
reparar
Ia
maquina,
o
siempre
que
no
Ia
use,
deberá
desconectarla
eldctricamente,
es
decir dehera
sacar
el
enchufe
de
a
red.
c)
La
potencia
mdx
admisible
de
Ia
bom
billa
es de
15
W
Contents
on
page
65
Indce:
Dag.
67
-
DIN
(Alman
Endüstri
Normu)
57730
Kisim
2C’ye
gore
evde
kullaralan
diki
makinalari
icin
guvenhik
talimatlan
a)
Makinayi
kullanan
kimsenin,
yukariya
ye
asaya
doru
hareket eden
ne
dolayinyla,
yeteri
kadar
dikkatlt
day
ranmasi
ye
caItma
esnasmda
dikig
yerini
devamh
olarak gOzlemesi
gerekir.
b)
Makinanin
terkedilmesi
esnasinda,
bakim
ileri
esnannda
veya
parca
lannin
veya
ildve
parçalann
dejitiriI
mesi
sirasinda
makinanin
fidini
prizden
cikarmak
suretiyle,
ceryanin kesilmesi
gerekir.
c>
Ldmbanin
rnUsaade olunan
azami
gdcu
15
Vattir.
Nokkrar
OryggisrOstafanir
a)
Gti5
>ess
aS
fingur
verSi ekki
fyrir
ndlinni,
)egar
sauma5
er
b)
GenS
)a
5
aS
venju
ySar
aS
taka
vélina
ür
samoandi,
)egar
skipta
)sarf
um
ndl,
saumfOt,
eSa
)egar
ér
eruS
aS
hreinsa
og
smyrja
vélina.
c)
Aldrei
ma
vera sterkari
pera
vélinni
en
15W
Icindekiler
Sayfa
69
Efnisyfirlit
er
a
bls,
71
)


1
N
/1

Lift
ff
tre
cover
Saque
a
maleta
funda.
canta
Kapagnl
ko)dinruz
Lydia
Ickiru
Tilt
cover
1
0
1
hacwards
Abra
a
taco
supehor
101.
Acilir
kaoanr
kapai
101)
acinz.
OpniO
lelhokiO
101.
Plug
in
the machine.
Conecte
ci
cable
aa
red
y
aa
mac;u
Pa.
Ceryan
kabiosunu
balaytniz.
TengiO
véiina
viO
rafmagn.
Machine
connection
:::zflan
-
.....
Elektrik
balantisi
-
Tasma
koLru
P’aya
dor
i
Tenging
vélarinnar
LeggO
harctar-cn0
pOur
-——--,
-.
_____
:2iH
i
_—>i
HF
j

power
lead
Out
of
the
foot
Saque
el
cable
del
pedal.
Kabloyu
martan
danya
doru
cekinz.
TogO
eOsluna
Ur
rnOtstoOunn.
coloqu:
:te1u1
aa
mdquina
y
unaagoL
7
H
K
U
K
N
Push
master
switch
104;
the
sewing
light
goes
on.
pg
La
lám
Ana
saltere
(104)
basnz
bu
arada
dik
hryshOaaOalrofann
104
og
urn
eiO
kviknar,J

4
4
Bobbin
winding
preparations:
Reach
if
S
—
pigi
masurayu
s<JHuanIn
flazirlanrnasi:
/
j
Di
ydzeyinin
atm
ttunuz
ye
bunu
so
1
a
doru
cevirerek
inrdnüz
Undirbuiôspoun:
Gr
cO
undir
corOO og
Openfreear:c:v:r12:
121
/
J
Kapak
klapesini
(121)
aaya
doru
agmniz
OpniO
ok
21
nOuravO
iselatchNand
pull
Out
the
bobbin
N
1
N
y
saque
Ia
capsula
N
kiapesin
yukarmya
kaldrmnmz
ye
rnekijm
I
disariya
doru
cekmniz
______________________________
Oi
loku
N.
og
taOsoOluhdsiO
ür.
R&ease
latch
N
and
take
out
the
S
bobbin.
Suelte
a
bisagrita
N
y
saque
a
canilla
(bobina).
N
kiepesmni
serbest
brakniz
ye
masuraym
gikarmnmz.
SleppiO
loku
N
og
a
dePur
spOlan
ür.

o
Place
a
bobbin
on
spindle
119,
making
sure
pin
A
enters
slot
B.
Coloque
Ia
canilla
sobre
ci
devanador
119
N
de
forma
que
Ia
espiga
N
encaje
en
a
‘
ranura
0.
Masurayi
sarici
(119)
üzerine
geciriniz.
N
pirninin 0
yarii
içerisinde
bulunmasi
119
gerekir.
SetjiO
spOluna
a
spdlarann
119.
Hak
N
verOur
Z
aO
talla
i
rauf
0.
W
-Ul
N
)_—
L.
‘
(
Disengaging
the
sewing
mechanism:
/
Hold
the
hand
wheel
steady
and
turn
_
doru
çeviriniz.
Setjiô
véfina
I
Iausagang:
HaIdO
urn
hand
hjOliO
og
asia
skrUfu
103.
ing
the
sewing spool
holder
toward
Eche
hacia atrds
ci
segundo
portacarretes.
Ikinci
makara
tutucusunu
geriye
dorii
cevirerek
dOndOrünüzl
\\
YtiO
auka
ketIispinnanum
upp.
Push
a
spool
of
thread
and
small
thrust
collar
P
onto the
holder.
ntroduzca
en
ci
porracarretes
si
cairete
ci
pequeño
disco
P.
Makarayi
vu
kdcük
dbrier
oisk
tutanak
Ozerine
sürdnüz.
SetjiO
tvnnakefli
og
litia
skitu
P
a
pinnann.

7
(I
Winding
the
bobbin
from
a
second
spool:
tilt
spool
pin
127
fonvard.
PuH
the
thread
into
guide
125
and
into
gude
127
as
shown
n
the
drawing, making sure
that
the
thread
passes
between
th
dO
de
and
tension
spring
N.
Now
wind
the
thread
a
Few
tjrns
around
the bobuin.
Push the
bobbin
to
the
rignt.
Press
the
foot
control
to
wind
the
bobbin.
P
ish
the
filled
bobbin
to
the
left
remove
it,
pull
the
thread
to
the
front
and
cut
it
in
thread
cutter
0.
Important
note:
On
spools
with
threac
retaining
slots
the
slot
must
face right
when
the
spool
is
fitted.
Devanado
desde
un
segundo carrete:
Gire
hacia
adelante
ci
guichilos
127.
Pase
ci
hilo
par
Ia
guia
125
y
po
a
guia
127
coma
muestra
el
dibujo.
El
hilo
debe
pasar entre
a
guia
y
el
muelle
tensor
N.
Arrolle
ahora unas
vueltas
de
hilo
en
Ia
oaniila
Empule
a
canilla
hacia
a
derecho.
Accione
Cl
pedal
para
comenzar
a
deva
nar.
Empuje hacia
Ia
izquierda
a
canilla
llena,
saquela.
tire
del
hilo
hacia
ci
frente
y
cortelo
en
a
cuchilla
0.
Nota
mportante:
En
el
caso
de
carretes
con
ranura pare
suletar
el
bib.
dicha
ranura
deberã quedar
a
a
derecha
al
introducir
el
carrete.
—
l.
I
H
_______
_
Ii
U125
_-
d
rL
,
N
7
--_
j
6

(
Ikinci
bir
makaradan
ipIii
sarmak:
Sarici-iplik
kavuzunu
(127)
one
doru
qevrirerek
dOndürünUz.
lplii,
kavuz
125
icerisine
ye
9ekiide
gdrOldüO
gibi,
ki)avuz
127
icerisine
cekiniz;
bu
arada
pliin,
kila
vuz
ye
gerilim
yayi
(N)
arasina
gelmesi
gerekir.
Simdi
iplii
birkac
data
masuraya
sanniz. Masurayi
saa
doru
bastiriniz.
Mari
çaIitiriniz
ye
iplii
masuraya
sariniz.
Dolmus
olan
masurayi
sola
doru
bastiriniz,
cikariniz,
ipi
one
doru
ceki
niz
ye
0
kesicisinde
kesiniz.
Onemli:
plik
tutamak
yariini
(kertiifli(
haiz
makaralarda,
makaranin
sOrulmesi
(takilmasi)
esnasinda,
yarnin,
yini
kertiin
sada
bulunmasi
gerekir.
SpóIaô
af
tvinnakefli:
SmeWO
st’nngu
127
tram
a
viO.
PrOiO
tvinn
ann
st’ringu
125.
og
ems
og
myndmn
synir
styr:ngu
127,
en
gtiO
aâ
vi
aO
hann
rOist
‘mndir
spennif)oôur
N.
SnumO
siOan
Mnnanum
nokkrum
smnnum
kringum spOluna.
YtiO
nO
spOlaranum
Ill
hgri.
ShgiO
nO
a
motstóOuna
09
soohO
a
spóluna.
Pegar
spOlan
er
full
er
henni
9ff
til
vmnstri,
hOn
‘ekmn
at, 09
tvinnmnn
er
skonnn
meâ
hnifnum
0
st9rmngu
127.
AnOandi
er
aO
au
tvmnnakefli,
scm
eru
meO
skOraut,
sOu
sett
annig
a
pmnnann
aO
raufin
.‘ism
lii
hgn.
-
-
__--
Engaging
the
sewing
mechanism
:N
Hold
the
hand wheel
firmly
and
turn
disk
1
03
toward the
back,
then
turn
the
hand
vheel
forward again
until
it
snaps
in.
ConexiOn
dcl
mecanismo
de
costura:
S:ete
el
volante
y
cira
el
disco
103
bc
-
010
LmQ
,
.
1)0
000
l
rei)LJ
hasta
qua
encaje.
D)frs
mekanizma’nnmn
colistirilmasi:
F
carkmni
sikica
tutunuz
ye
010Km
(103i
g)m
doru
çeviriniz.
Daha
sonra
el
carkmni,
yerine
oturuncaya
kadar
One
doru
cevirm
0hz.
Gangverk
vélarmnnar
tengiO
ér
nO
attur.
Hald
om
handhjOliO
oa
‘estmO
skrufu
103.
SnOO
nandhlolinu
aOemns
‘ram a
via.
ar
til
)er
bevm
0
sma
smell.
/
///,./
//
/
/
./
.1/’
7
—
7
.7
//
Lr1.
7

rItl
Pi____
1i
—f
____
__
/17i
N\
___‘:
//
___
,
iz__
_
/
Winding
through
the
needle
eye
(0)
Raise
the
sewing
foot.
Tne
neeole
must
he
in
its
‘up’
position. Place
a
bobbin
on
spindle
119.
Disengage
the
sewing
mechanismDraw
the
needle
thread
under
the
sewing
foot, up
and
into
guide
127
(see
drawing
Wind
the
thread
arouno
tue
hoobin
a
few
times and
push
the
bobbn
toward
the
right.
Press
the
foot
control
cede!
and
wind
the boboin.
Push
the
full
bobbin
toward
the
left
and
take
it
Out,
pulling
the
thread
nto
thread
cutter.
Reengage
the
sewing
mechanism.
Devanado
a
través
de
a
aguja:
Alce
el
pronsatelas
y
eleve
a
aguji.
Cooque
ic
canuiia
snore
el
devanador
119.
Desco
necte
ci
necinismo
de
costura.
Paso
ci
hilo
superior
uor
debajo
dei
prensotelas,
haca
a
derecha,
y
por
Ia
guia
127
(vease
dbujo).
Arrolle
ones vueltas
cc
hilo
en
Ia
canilla
y
empujela
hacia
Ic
derecr-a.
Aco:ore
el
pedal
para
devaiar.
Empuje
Ia
caniila
lena
hacia
la
izquerda,
sequoia,
tire
del
h
o
haca
ci
recte
y
cOrtelo
en
Ia
cuchula
N.
/
8
••
H
-.
1JLj
‘1’
____
1
FE

4
Ine
vasitastyla
iplii
masuraya
sar
ma
k
Dki
ayani
yukarya
kaldiriniz.
lnenin
durumu:
yukarida. Masurayl,
sarici
(119)
dzerine
takiniz
Dikis
mekanizmasini
apatiniz.
Dikis
ayai
altindaki
dst
iplii,
saa
doru
ye
kiiavuz
127’den
gecirmek
suretiyie
cekiniz
(sekle
hakiniz).
Ipiii
bir
kac
defa
masuraya
sariniz
ye
masurayt
saa
doru
bastr’niz.
Mari
calitinniz
ye
ipj
masuraya
sanniz.
Doimu
olan
masurayt sola
doru
bastiriniz,
cikariniz,
pii
one
doru
çekiniz
ye
“N”
kesicisinde
Kesiniz.
Spólaà
gegnum
náina:
Fotlyftir
og
nOl
efstu
stoOu.
Setpô
sijOiu
0
spOlarann
119.
takiO
gangverkO
Or
sambandi
DragiO
tvinnann
undir
saurnfOt:nn
‘gra
meg-
in.
og siOan
i
stringu
127
ems
og
myndin
snir.
Snuiâ
Ivinnanurn nokkrum
sinnum
kring
urn
spOluna,
og
tiO
henri
siOan
nI
hgn.
Stig
ô
nO
a
rnOtstoOuna
og
spoO
a
spOiuna.
egar
spOian
er
full
er
henri
tt
hI
vinstr’
hOn
‘ekin
af
og
tvinninn
or
skonnn
meO
hnifnurn
N
-I,
______
Ii
Z.
/
_____
N,
Engaging
the
sewing
mechanism:
Hold
the
hand
wheel
firmly
and
turn disk
103
toward
the
back,
then
turn
the
hand
wheel
forward
again
until
it
snaps
n.
Conexión
del
mecanismo
de
costura:
Sujete
el
,ulante
y
gire
ci
disco
103
hacia
atrOs.
Gre
luego
ci
volante
hacia
ci
frente
hasta
que
encaje.
Diki
mekanizmasinin
çalttirilmast:
El
çarkini
sikica
tiitunuz
ye
diski
(103)
geriye
doru
çe
i:in:
jdna
sonra
ci
parkini,
verne
Qtjrui”
kadar
One
doru
ceviri
Gangverk
velarinnar
tengiO
er
nu
aftur.
Hald
O
urn
‘/e’IO
og
tes:
6
skruIu
03
SnOlO
handh
1
cIinu
ai3eins tram
a
v6
ba
ér
hevriO
ama
sm”I.
9

4
44
Inserting
the
bobbin
(N),
with
the
thread
‘-
-
unreeling
toward
the
bacL
Draw
the
thread
into
Slot
0
cod
into eve
P.
rmaqueelhclocaicrnasase
N
FeOl
ri
pr
a
ranura
0
hasta
salir
Masuray
yerIetirmek
N
plik
arkaya
doru).
Iplii
0
yartna
ye
P
detjine
kadar
çekiniz.
Spélan
sett
I.
Tvinninn
a
aO
renna
aftur
af
spOlunni
N.
brOiO
tvinnann
siOan
i
rauf
0
undir
fjdOrina
og
üt
urn
op
P.
Checking
the
bobbin
thread
tension:
With
a
brief,
sharp
upward
movement
of
your
hand,
the
bobbin
must
gradually
slip
downwards.
(Turn
screw
0
counterclock
wise
for
a
weaker tension,
or
clockwise
for
a
tighter
tension.)
Comprobacián
de
Ia
tension
del
bib
inferior:
Suspendiendo
Ia
cápsula
con
Ia
canilla
de
su
propio
hilo,
a
cdpsula
no
deberd deslizarse
más
que
a)
dar
tironci
tos
del hilo
(girando
el
tornillo
regulador
hacia
Ia
izquierda,
Ia
tensiOn
disminuye;
girandolo
hacia
Ia
derecha,
a
tensiOn
aumenta.
Alt
p11k
gerginIiinin
kontrol
edilmesi:
Mekii,
hafifce
aniden
yukanya
doru
hareket
ettiriniz.
Mekiin
kademeli
olarak
agaiya
inmesi
gerekir.
)Ayar
vida
Q’yu,
sole
geviriniz
=
daha
gevek,
saga
çeviri
niz
=
daha
siki).
Rétt
undirspenna:
LOtiO
spOluhOsiO
hanga
niOur,
rjkkiâ lauslega
i
tvinnann
og
á
a
aO
aO
—
.
renna
aOeins
niOur
(StilliskrOta
0
=
vinstri
snOningur
losar.
hgri
snOningur
herOir).
10

lnseing
the
bobbin
case:
Raise latch
N
and
push
the
bobbin
case
onto
stud
0
as
far
as
it
will
go,
making
sure
cutout
P
points
upwards.
/7
/
o
‘
i
Cotocacián
tie
Ia
cápsula
con
a
canilla:
7
/
‘/
0
Levante
Ia
bisagrita
N
e
introduzca
a
cap
sula
en
a
espiga
0
hasta
el
tope.
La
o
muesca
P
tiene
que
mirar
hacia
Mekii
tskmak
N
klapesni kaldinnz
ye
mekii
dayanaa
kadar
0
pimi
dzerine
sürdnüz.
Bu
sirada
P
kesiminin yukanya
doru
ydnelmi
olmasi
gerekir.
::i:tri
7)
\
I
Placing
spo&
of
thread
:n
n:
Ha:e
large
unreeling
disc
R
in
front
of
large
s\’,”
1)1))’
spools.
ColocaciOn
de
los
carretes
de
hilo:
Para
carretes pequeños
coloque
el
disco
pequeno
o
mediano
de forma
que
quede
döner
rondeayiQbüyükrnakar&ann
I..
\,
Tvinnakeflin
sefl
a:
Fyrir
litil
kefli
er
litla
skifan
0
sett
fyrir
framan
kefllO
en
skifa
R
rir
srri
kefli.
__
-.
:
‘‘-r’n
.4
.
I

Upper
threading:
\lVoh
th
needle
paso
toned
at
the
top,
raise
tao
sewing
aot.
Drn
:e
thread
into
slot
N
to
the
left
past
gude
from
below
into
slot
0
and
take-un
lever
1
26
(see
arrows),
then
back
sn:
0
und
intO
tho
af
-
tn:ea
jiac
the
needle
holder
Press
button
B
(see
page
21).
Enhebrado
del
hilo
superior:
La
aquja
debera ester
elevada.
Levante
el
pia
uren
satelas
Conforme
a
as
flechas,
pase
el
hilo
desde
el
carrete
por
a
erura
N,
par
Ia
izquierda
en
a
gule
P
haste
a
palanca
trahilos
126.
A
cont:nuación,
páseio
par
Ii
ranura
0
haste engancharlo
en
i
gua
hues
derecho
del
portagujas.
Pulse
ci
baton
s
(peg.
22).
Ust
ipliin
takilmase
renin
durumu,
yukenda.
Diku ayeunu
ukanya
kaldunnuz.
)p)uOi,
ok
istikametinde
olmak
Ozere,
N
‘eruuna,
P
kulavuzunun
so)
tarafundar’
Jecirip,
alt
taraftan
0
yaruuna,
horoz)i26)
ucerusune,
ger)ye
doru
0
yaruuna
ye
upluk
tutamaunda
bu)unan
saj
ku
avuz
ucerisune
cekuniz.
8
tusuna
basunuz
)Say-fa
22).
Prôing:
Ndlin
I
elstu
stdOu.
FOtur
upp
PrOuO
ems
og
brvarnar
syna
rauf
N,
v
nsra
megun
vuO
st’nngu
P
aà
neOan
I
raut
0
I
raOgjafa
126.
aftur
raaf
0
og slOan
hasgr:
s:vnngu
a
nalaholdunnu.
Yt6
a
takka
B
Ibis.
23).
1’
N
0
N
12
Place
the
needle thread
behind
hook
0
and
hold
it
there.
Pull
thread
110
fully
downwards.
Coloque
ci
hilo
superior
detràs
del
gancho
Q
y
sujételo.
Tire
del
enhebrador
110
hacia
abajo
dci
todo.
Ust
piui
acengeim
arkesuna
yerletirinuz
ye
tutunuz.
ineye
ipiik
gegiruciyi
(110)
tarnamen
asauya
doru
cekiniz.
LegguO
yfirtvinnann aftur
fyrir
hak
0
og
haidiO
i
tvinnann.
ToguO
siOan
irOarann
110
aiveg
niOur.
N
)
N
-
t-ij
/8’
/./
/
0
/
0.

Push
the
threader
foard
against
the
Gire
ci
enhebrador
haca
ci
frente
hasta
‘\
introducrlo
en
ei
ojo
de
Ia
aguja.
geciriciyi,
nenin
On
tarafina
SnuO
nO
ráaranum anng
aO
hann
tan
i
nru
rn
nIr
ntr’
iplii.
asadan
R
cengeline
asniz.
LegglO
tvinnann
nO
undir
krokinn
R
a
raOar
Turn
the
threader
to
the
left,
ethng
go
of
ho
‘hredd
at
tne
same
zme,
and
allow
I
I
the
threader
to
move
.ipwards.
Pull
the
thread
fully
through
the
needle
eye.
_________
Gire
ci
enhebrador
hacia
atrás,
suelte
ci
hilo
y
eleve
el
enhebrador.
Seguidamente
enhebre
ci
hilo
por
ci
ojo
de
Ia
aguja.
jneye
ipiik
gecriciyi
arkaya
doru
getiri
nz,
bu
arada
iplii
serbest
brakiniz
ye
neye
ipIik
geciriciyi
yukariya
doru
kaydirtniz,
Daha
sonra
iplii
tamamen
/
ne
deliinden
geginniz.
Lo’O
nO
prOarann
ganga
hgt
tl
bake,
og
I
/
alla
eO
upp.
Tvinninn
kemur
nO
scm
ykkja
I
gegnum
nOlaraugaO
og
ér
getO
nO
dregO
‘c
.-
A
endannigegn.
/9
/
V
_____
1

—
I
-
--
I
/
/
Hold
the
needle
thread
taut.
Turn
the
0
/
hand toward
you
until
the
nedP
moves
aown
ana
up
again.
Pull
t’e
bobbin
toread
uo
by
puilq
on
th
thrau
/
Sujete
el
bib
superior.
Gire
ci
ebb
rterrnrtradodeb
ntY.bUe
Ust
pb
i
sKIca
atunuz
El
carkini
on
/
dogru
ceviriniz. Sir
batis
cnjniz.
Ust
iplikle,
alt
plii
yukariya
dojru
çekiniz
o
Haidià
yf
rtvinnann
Sr’GO
nandhjó
nu
ham
a
-
iâ
r
tb
násn
hebur
fanO
niâur
og
smLr
uoo
.
‘ç
acu
I
ogiO
unairtvinnann
upp.
(“ac:Dcththads
toward
the
right
under
Coboque
ambos
bibs
hacia
a
derecha
O
-
-‘‘---.
dehajo
del
prensatelas.
saadoru,dikiaya
Close
the tree
arm
cover.
Cierre
a
tapa
121
Kapak
klapesini
(121)
yukariya
doru
kapatiniz.
LokiO
okinu
121
14

4
L
.-
.-
/
:°:
5
fl
don
N
es
para
zurcidos).
LI
Kuma
bastirma
kolunu
(114)
asaiya
mdi
\
\__
riniz,
(N,
örerek
tamir
etme
—
yama
yapma
\\_
\
—
durumudur).
SetmOfOUyrhrmnn
14
nmOur.
StaOa
NCr
rjnr
.$
:
4
Swing
work
support
107
back
against
the
free
arm.
Acople
el
suplemento
107
a
Ia
máquina.
Dmkis
ydzeyini
(107)
makinaya
doOru
çevi
rerek
dOndürünüz.
‘(hO
vmnnuborOi
107
aO
armmnum
4
Place
fabric
under
the
sewing
foot.
Coloque
a
tela
debajo
del
pie
prensatelas.
Kumai
diki
ayai
aItmma
koyunuz.
SetiiO
efnmO
undir
fotmrn.
4
To
insert
extra-thick
fabric
plies
raise
ever
1
14
Pare
telas
muy
gruesas,
eleve
más
Ia
palanca
114.
cok
kahn
ohan
kumasharmn
yerlestirilmesi
esnasmnda,
kolu
(ha)
daha
yukarmya
kahdmrmnmz.
St
tOr
eruO
rreO
mbg
bykk
efni.
a
tmO
bér
lOthyftinum
114
harra.

Checking
the
needle
thread
tension:
The
normal
setting
is
in
the
white
range
between
3
and
5,
The
higher the
number,
the
tighter
the
tension.
To
check
the
tension,
set
the
machine
at
the
zigzag
stitch.
Sew
a
short
seam.
The
threads
should
interlock
in
the
middle
of
the
material.
Operating
the
foot
control:
The
more
you
n:ess
down
hu
pedal,
the
faster
thu
rnacnne
uns
Accionamiento
del
pedal:
Cud
:o
profundo
pise
el
pedal
tanto
mayor
sera
Ia
velocidad
de
costura
de
a
Creatise.
Marsa
ayakla
basiniz.
Marsa
nekadar
fazia
bir
sekilde
haslirsa.
“ceative”
oke
dar
sdratli
diker.
Stigiô
a
mótstOuna:
Pvi
fastarsem
érs
‘&bvnraO.arsarnarvélin
Needle
thread
tension
124
N
=
Setting
mark.
TensiOn
del
hilo
superior
124
N
=
Marca pare
Ia
regulaciOn.
Ust
iplik
gerginlii
124
N
=
Ayar
iaretlemesi.
Yfirspenna
124
N
=
vOrniOun
,rIr
rétta
spennu.
Comprobación
de
a
tensiOn
del
hilo
superior.
La
regulacion
normal
se
halla
en
Ia
zona
blanca
entre
3
y
5.
Cuanto
más
alto
sea
el
ndmero
tanto
mayor
será
Ia
tensiOn.
La
comprobacion
se
hace
con
puntada
zig
zag.
Haga
una
costura
corta.
Los
bibs
deberàn
quedar anudados
dentro
del
material.
N
)
16
This manual suits for next models
1
Table of contents
Other Pfaff Sewing Machine manuals

Pfaff
Pfaff 8390 User manual

Pfaff
Pfaff 433 User manual

Pfaff
Pfaff HOBBYMATIC 947 User manual

Pfaff
Pfaff 5483 Series User manual

Pfaff
Pfaff Smarter User manual

Pfaff
Pfaff 2144 User manual

Pfaff
Pfaff 3119 User manual

Pfaff
Pfaff 3582-2/01 User manual

Pfaff
Pfaff 463 User manual

Pfaff
Pfaff Creative stylist MN 110 Instruction Manual
Popular Sewing Machine manuals by other brands

Atlanta Attachment Company
Atlanta Attachment Company 1347D Technical Manual & Parts Lists

Happy
Happy HK634020XB Maintenance manual

Singer
Singer 15K91 Illustrated parts list

Singer
Singer 247-1 Instructions for using and adjusting

HIGHLEAD
HIGHLEAD GC0318-1A Instruction manual parts catalog

Singer
Singer 240K12 instructions