phase II+ Custom Cordless Roman Shade User guide

Custom Cordless Roman Shade
owner's handbook
Cords and bead chains can loop around a child’s neck and strangle.
• Always keep cords and bead chains out of children’s reach.
• Move furniture away from cords and bead chains. Children can climb furniture to get to cords.
• Do not tie cords together. Make sure cords do not twist together and create a loop.
IMPORTANT INFORMATION ABOUT YOUR ROMAN SHADE
This product is designed to make your shade safer for children and pets. However, this shade is
substantially different than the traditional shades that you might be accustomed to.
This shade has a double cording system on the back of the shade to help minimize the possibility of a
child or pet becoming entangled in the cords.
See the operating instructions toward the back of this handbook for additional information about the
function of your shade.
WARNING
INSTALLATION INSTRUCTIONS
Step 1. Check Package Contents
Missing part? Call 1-800-264-1190
Mounting hardware kit includes the following:
Part Quantity
Mounting Bracket 2 (for shades 24” to 36” wide)
3 (for shades 36” to 54” wide)
4 (for shades 54” to 84” wide)
1” Screws 2 per bracket
Control Handle 2
(attaches to bottom rail)
Note: one extra screw of each noted size is included for convenience
Step 2. Tools Required
Screwdriver, tape measure, pencil, drill, step ladder.
Note: use #6 plastic anchors for dry wall or plaster mounting (not included)
Drill Bits: for screws, use a 3/32” drill bit - for wall anchors, use 1/4” drill bit.
Step 3. Attach Pleat Stiffeners
If the Pleat Stiffeners are not pre-attached, snap them onto the bottom hem as
illustrated, by pressing down firmly on each end of each stiffener. Do not press
down in the center of the stiffener as it can break. The bottom pleat must have
rigidity in order for the shade to function properly.
Step 4. Bracket Location and Installation
Your shade may be installed either inside the window frame or outside the window
frame.
A mounting bracket should be positioned about 1” to 6” from each end of the head
rail. For wider shades that require 3 or more brackets, these should be spaced evenly
between the two outermost brackets. Always position the brackets such that there is
no interference with the cords and mechanisms inside the head rail. The procedure
outlined below will assure proper bracket placement.
Note that the shape of head rails and mounting brackets varies by style of shade.
For style ‘A’ [see illustration]: To attach the brackets the locking arm should be facing out. Then position the bracket so that it engages the inner
front and outer back of the head rail, and then push the locking arm inward to lock it in place.

For style ‘B’ [see illustration below]: Lift the Head Rail into position such that the front edge of the bracket is under the inner front edge of the head
rail, and then push the head rail upward until the flexible tab at the bottom of each bracket snaps onto the back of the head rail. Check carefully to
assure that each bracket is properly secured.
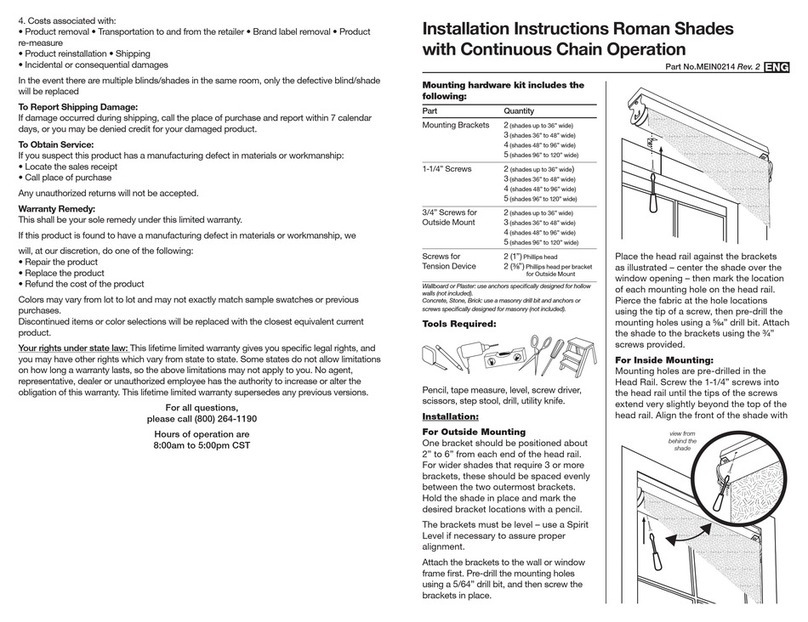
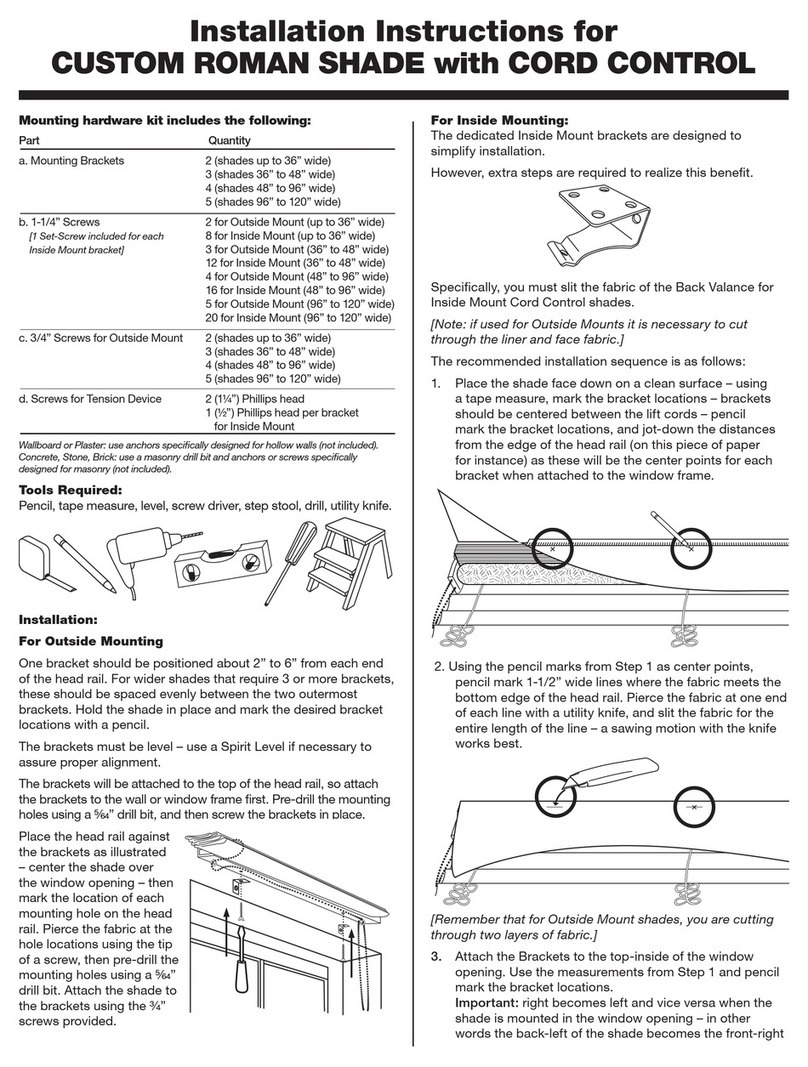
For Outside Mounting:
Attach the brackets to the head rail as described above. Hold the shade level at the height desired and center it over the window
opening. Mark the exact location of each bracket with a pencil.
Remove the brackets from the head rail and position the top of each bracket at the marked location and screw each bracket into the wall
or window molding using the 1” screws, pre-drill the screw holes using a 4” drill bit.
For Inside Mounting:
Clip the brackets onto the head rail as described above. Hold the shade in place and make a pencil mark at the rear of each bracket
where it contacts the inside of the window frame.
Remove the brackets from the head rail and align them with the marks. Attach each bracket using the 1” screws, pre-drill the screw
holes using a 4” drill bit.
Step 5. Securing the Head Rail
Place the head rail on the brackets as described in Step 4 above, and lock in place.
Check carefully to assure that each bracket is properly secured.

Step 6. Attach Handle / How to Operate
Attach the handles to the bottom of the shade as illustrated.
Positioning: Divide the width of the shade by 4, and place a handle that distance from each end of the shade. The handles are designed to
minimize contact with the shade fabric.
Lowering the Shade: Grip the handles and slowly pull straight down.
Raising the Shade: SLOW is the functional word in achieving proper operation of your cordless shade. To lift the shade, place your hands
on the handles with palms facing up. Pull the bottom pleat very slightly away from the window and then push upward slowly. The pleats
should fold like an accordion. If the bottom pleat is pushed straight up, it will tend to go behind and overlap the other pleats which prevents
the shade from operating properly. If the bottom pleat is pulled too far it likewise will not function properly. See the video for a demonstration
of the recommended lifting technique.
IMPORTANT
Always keep the bottom rail level (i.e. parallel to the top of the shade) when lifting and lowering
the shade. If the shade becomes uneven, slowly pull it all the way down and then lift to the
desired position. If necessary, reach behind the shade and manually pull the cording slowly
out of the head rail until the bottom of the shade is level.
Pull the bottom pleat very slightly away from
the window and then push upward slowly
Use your phone camera to scan code for instructional video or visit:
https://www.youtube.com/watch?v=h_N4AeJ-v1E&feature=youtu.be
Correct(!) – pleats are folding neatly
Do not let the bottom pleat go behind and
overlap the other pleats as the shade will
not operate properly
Do not pull the bottom pleat out too far or
the shade will not function properly

Cleaning your Shades
To clean the shade fabric, use a feather duster or vacuum lightly using the soft brush attachment.
For 100% Polyester, Cotton/Poly blends and 100% Cotton or 100% Linen fabrics you may: Spot clean with warm soapy water using mild
detergent and a clean sponge. Air dry, and then steam or iron.
Ironing
100% Polyester: If necessary, steam polyester or gently iron on a low heat setting to remove stubborn wrinkles. 100% Polyester fabrics
release wrinkles easily. Steam or iron on the Polyester /
Synthetic Fabrics setting (Low), but be aware that Polyester will melt if the iron is too hot.
Cotton/Poly blends: If necessary, gently iron on a Blended Fabric (Medium) setting to remove stubborn wrinkles.
100% Cotton and 100% Linen: If necessary, gently iron on a Cotton (High) setting to remove stubborn wrinkles.
Replacement Parts
In the event that replacement parts are ever needed, you may call: 1-800-264-1190
Please be sure to provide the following information, if possible:
• The complete model or catalog number of your product
• A description of the product
• A description of the part needed
LIMITED LIFETIME WARRANTY
The enclosed product is warranted to the original residential retail purchaser as long as the product remains in the original window
Covered:
Lifetime: Entire product against manufacturing defects (i.e. a flaw in the product design, materials, or workmanship that causes the product to
no longer function.
3 Years:Cords, including internal cords such as those found in cordless blinds or shades.
5 Years: All fabric
Not Covered:
Normal Wear and Tear
Any product that fails due to: • abuse • exposure to salt air
• improper installation • accident • extraordinary use
• improper operation • alterations • improper cleaning
• misapplication • damage from pests/insects/pets
• improper handling • misuse
Costs associated with: • product removal • transportation to and from the retailer • brand label removal • product re-measure
• incidental or consequential damages • product reinstallation
• shipping
In the event there are multiple blinds/shades in the same room, only the defective blind/shade will be replaced.
To Report Shipping Damage: If damage occurred during shipping, call place of purchase and report within 7 calendar days or else you may
be denied credit for your damaged product.
To Obtain Service: If you suspect this product has a manufacturing defect in materials or workmanship: 1. Locate the sales receipt 2. Call
place of purchase. Any unauthorized returns will not be accepted.
Warranty Remedy: THIS SHALL BE YOUR SOLE REMEDY UNDER THIS LIMITED WARRANTY.
If this product is found to have a manufacturing defect in materials or workmanship, we will (at our discretion) do one of the following:
• repair the product • replace the product
• refund the cost of the product
Colors vary from lot to lot and may not exactly match sample swatch or previous purchases.
Discontinued items or color selections will be replaced with the closest equivalent current product.
YOUR RIGHTS UNDER STATE LAW:
This lifetime limited warranty gives you specific legal rights, and you may have other rights, which vary from state to state. Some states do not
allow limitations on how long a warranty lasts, so the above limitations may not apply to you. No agent, representative, dealer, or unauthorized
employee has the authority to increase or alter the obligation of this warranty. This lifetime limited warranty supersedes any previous versions.
For all questions, please call (800) 264-1190
Hours of operation are 8:00am to 5:00pm CST
Table of contents
Other phase II+ Indoor Furnishing manuals
Popular Indoor Furnishing manuals by other brands

Furniture of America
Furniture of America CM3196T Assembly instructions

JWA
JWA HENSLEY 74713 Assembly instruction

Flexsteel home
Flexsteel home W1047-90K manual

Powell
Powell 993-230A Assembly instructions

Lightolier
Lightolier Calculite R7029 specification

Golden Elite
Golden Elite Carrera installation instructions

PAIDI
PAIDI LOTTE & FYNN 125 6544 instructions

Accent
Accent OSLO TABLE Assembly guide

Fontanot
Fontanot Genius 030 Q Assembly instructions

Coaster
Coaster 224283 Assembly instructions

Argos
Argos 548/5259 Assembly instructions

Home Decorators Collection
Home Decorators Collection JAMISON SK18215A Assembly instructions