manuals.online logo
Brands
  1. Home
  2. •
  3. Brands
  4. •
  5. phase II+
  6. •
  7. Indoor Furnishing
  8. •
  9. phase II+ Roman Shades with Continuous Chain Operation User manual

phase II+ Roman Shades with Continuous Chain Operation User manual

Mounting hardware kit includes the
following:
Part Quantity
Mounting Brackets 2 (shades up to 36” wide)
3 (shades 36” to 48” wide)
4 (shades 48” to 96” wide)
5 (shades 96” to 120” wide)
1-1/4” Screws 2 (shades up to 36” wide)
3 (shades 36” to 48” wide)
4 (shades 48” to 96” wide)
5 (shades 96” to 120” wide)
3/4” Screws for 2 (shades up to 36” wide)
Outside Mount 3 (shades 36” to 48” wide)
4 (shades 48” to 96” wide)
5 (shades 96” to 120” wide)
Screws for 2 (1”) Phillips head
Tension Device 2 (”) Phillips head per bracket
for Outside Mount
Wallboard or Plaster: use anchors specifically designed for hollow
walls (not included).
Concrete, Stone, Brick: use a masonry drill bit and anchors or
screws specifically designed for masonry (not included).
Tools Required:
Pencil, tape measure, level, screw driver,
scissors, step stool, drill, utility knife.
Installation:
For Outside Mounting
One bracket should be positioned about
2” to 6” from each end of the head rail.
For wider shades that require 3 or more
brackets, these should be spaced evenly
between the two outermost brackets.
Hold the shade in place and mark the
desired bracket locations with a pencil.
The brackets must be level – use a Spirit
Level if necessary to assure proper
alignment.
Attach the brackets to the wall or window
frame first. Pre-drill the mounting holes
using a 5/64” drill bit, and then screw the
brackets in place.
Place the head rail against the brackets
as illustrated – center the shade over the
window opening – then mark the location
of each mounting hole on the head rail.
Pierce the fabric at the hole locations
using the tip of a screw, then pre-drill the
mounting holes using a 4” drill bit. Attach
the shade to the brackets using the ¾”
screws provided.
For Inside Mounting:
Mounting holes are pre-drilled in the
Head Rail. Screw the 1-1/4” screws into
the head rail until the tips of the screws
extend very slightly beyond the top of the
head rail. Align the front of the shade with
4. Costs associated with:
• Product removal • Transportation to and from the retailer • Brand label removal • Product
re-measure
• Product reinstallation • Shipping
• Incidental or consequential damages
In the event there are multiple blinds/shades in the same room, only the defective blind/shade
will be replaced
To Report Shipping Damage:
If damage occurred during shipping, call the place of purchase and report within 7 calendar
days, or you may be denied credit for your damaged product.
To Obtain Service:
If you suspect this product has a manufacturing defect in materials or workmanship:
• Locate the sales receipt
• Call place of purchase
Any unauthorized returns will not be accepted.
Warranty Remedy:
This shall be your sole remedy under this limited warranty.
If this product is found to have a manufacturing defect in materials or workmanship, we
will, at our discretion, do one of the following:
• Repair the product
• Replace the product
• Refund the cost of the product
Colors may vary from lot to lot and may not exactly match sample swatches or previous
purchases.
Discontinued items or color selections will be replaced with the closest equivalent current
product.
Your rights under state law: This lifetime limited warranty gives you specific legal rights, and
you may have other rights which vary from state to state. Some states do not allow limitations
on how long a warranty lasts, so the above limitations may not apply to you. No agent,
representative, dealer or unauthorized employee has the authority to increase or alter the
obligation of this warranty. This lifetime limited warranty supersedes any previous versions.
For all questions,
please call (800) 264-1190
Hours of operation are
8:00am to 5:00pm CST
view from
behind the
shade
Part No.MEIN0214 Rev. 2
Installation Instructions Roman Shades
with Continuous Chain Operation
ENG
the front edge of the window opening (or
position as desired), making sure that the
shade is centered in the window opening
– then push up on the screws so that the
screw heads leave tiny impressions in the
top of the window frame. Now, use the
impressions as a guide and pre-drill the
mounting holes using a 5/64” drill bit –
then screw the shade in place.
Attach the Chain Tension Device
The Tension Device must be attached per
these instructions in order for your shade to
function properly.
Carefully unwrap the control cord/chain and
tension device. Cut and remove the zip-tie.
While holding the tension device in one
hand, pull the plunger away from the bead
chain with the other hand. Lift the bead
chain out of the bead locking groove and
slide the tension device to the bottom of the
chain loop.
Pull the tension device down until the bead
chain is fully tensioned (plunger will be at the
top) and then move the tension device up
approximately 1/8”.
Mark the screw locations on the wall or
window frame with a pencil.
Inside Mount: If mounting into wood, predrill
screw holes and then install the tension
device using the 1” Phillips head screws
provided.
If not securing into wood, use appropriate
anchors for the substrate and follow the
anchor manufacturer’s instructions.
Outside Mount: Align the mounting bracket
screw holes with the pencil marks. If
mounting into wood, predrill screw holes and
then install the mounting bracket using the
1” Phillips head screws provided.
If not securing into wood, use appropriate
anchors for the substrate and follow
manufacturer’s instructions.
Press the tension device onto the mounting
bracket posts. Carefully install the ⅜3/8”
Phillips head screws provided, through the
tension device into the mounting bracket
using a Phillips head screwdriver.
DO NOT OVER-TIGHTEN!
How to Operate Cord Control Shades
Pulling the cord smoothly and slowly in one
direction raises the shade; pulling it in the
other direction lowers it. On shades where
the fabric rolls against the window, the front
cord lifts the shade. On shades where the
fabric rolls toward the room, the rear cord
lifts the shade.
General Cleaning Guidance:
• Dry Cleaning is the best method to
clean soiled soft window treatments.
• However, on 100% Polyester, Cotton/
Poly blends and 100% Cotton or 100%
Linen you may: Spot clean with warm
soapy water using mild detergent and a
clean sponge. Air-dry and then steam or
iron.
LIMITED LIFETIME WARRANTY
The enclosed product is warranted to the original residential retail purchaser as long as the
product remains in the original window.
Covered
Lifetime: Entire product against manufacturing defects (i.e. a flaw in the product design,
materials, or workmanship that causes the product to no longer function.
3 Years: Cords, including internal cords such as those found in cordless blinds or shades.
5 Years: All fabric
Not Covered
1. Normal wear and Tear
2. Any product that fails due to:
• Abuse • Alterations • Exposure to salt air • Improper cleaning
• Improper installation • Misapplication • Accident
• Damage from pests/insects/pets • Extraordinary use
• Improper handling • Improper operation • Misuse
3. Natural Wood Products that have:
• Loss of color intensity • Variations in color, grain or texture
• Warping of wood slats in high humidity areas
Tension
Device &
Bracket for
Outside
Mount
Chain
Tension
Device
Bracket for
Outside Mount
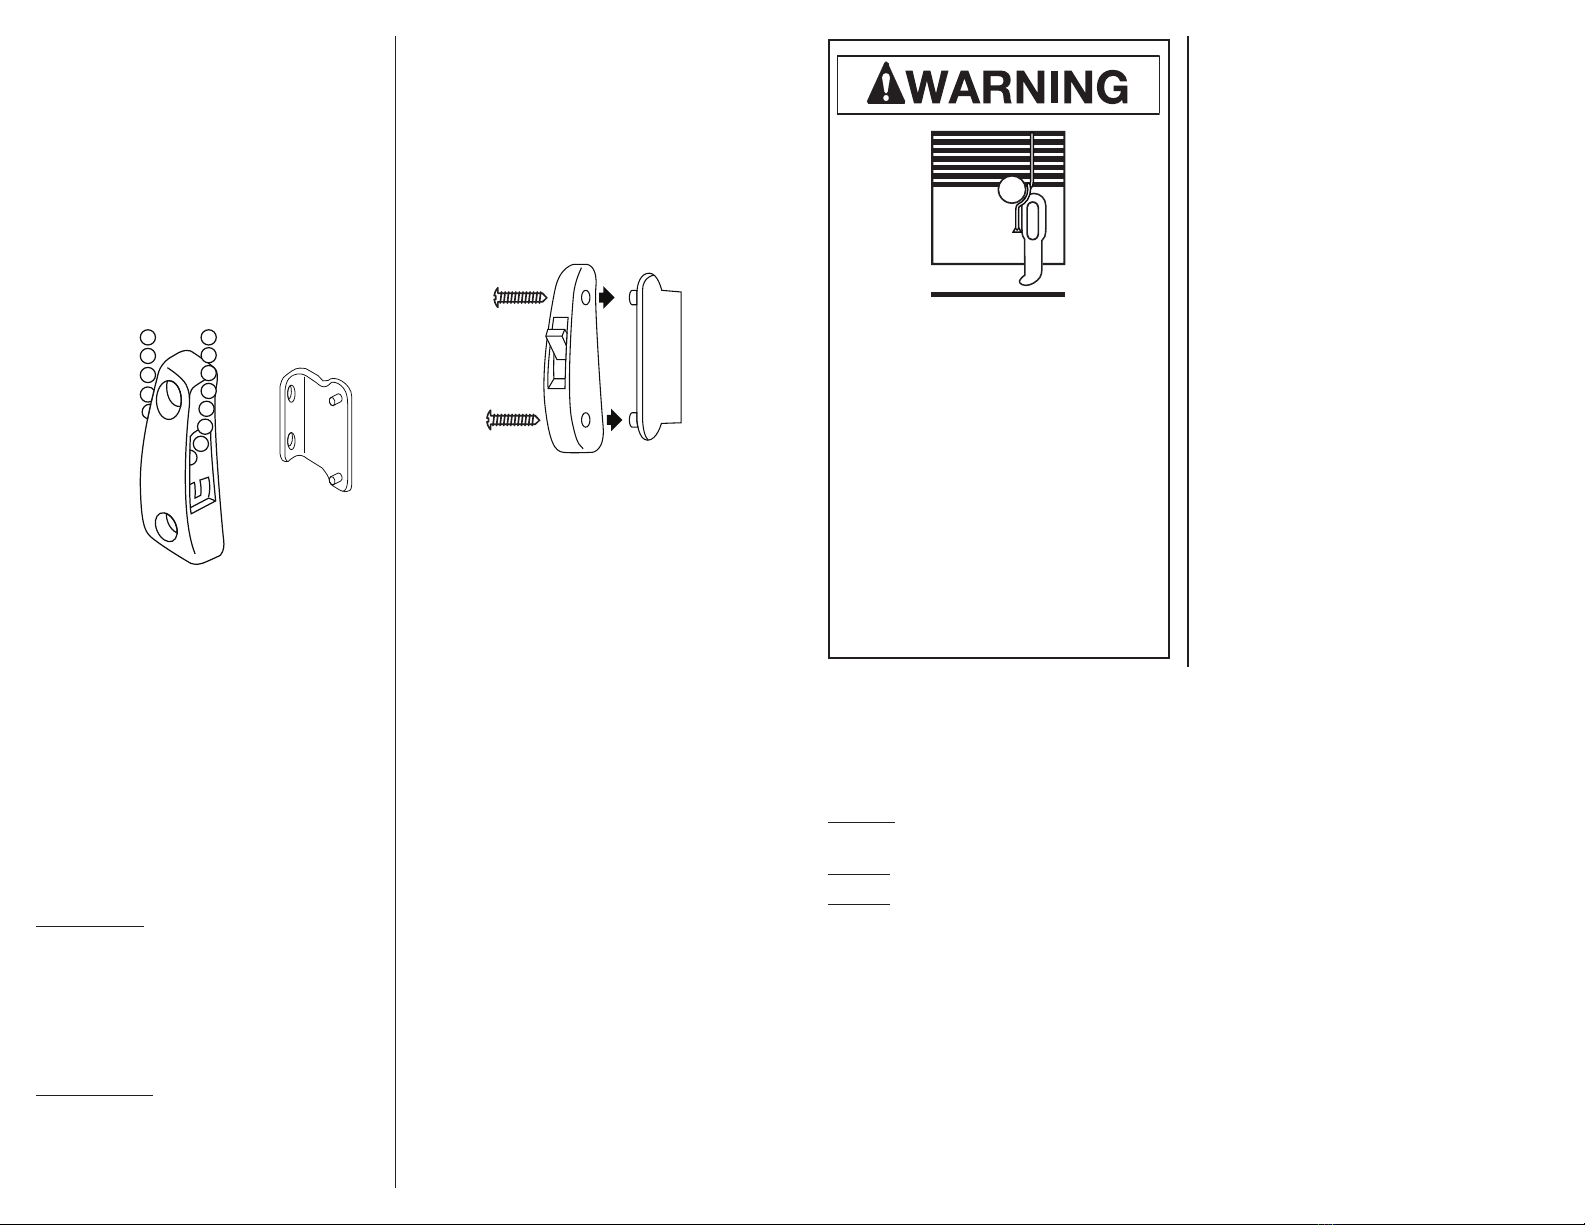
Window Blind Cord Can STRANGLE
Your Child
• Children can climb furniture to
reach cords.
• Move crib and furniture away.
• Keep all cords out of children’s
reach.
• Attach tension device to wall or
floor.
• Fasteners provided with tension
device may not be appropriate for
all amounting surfaces.
• Use appropriate anchors for the
mounting surface conditions.

Other phase II+ Indoor Furnishing manuals

phase II+ Custom Roman Shade with Cord Control User manual

phase II+

phase II+ Custom Roman Shade with Cord Control User manual

phase II+ Custom Cordless Roman Shade User guide

phase II+

phase II+ Custom Cordless Roman Shade User guide

Popular Indoor Furnishing manuals by other brands

atmosphera TEDY 185052 manual

atmosphera

atmosphera TEDY 185052 manual

Verco Spyne operating instructions

Verco

Verco Spyne operating instructions

Million Dollar Baby Palermo Assembly instructions

Million Dollar Baby

Million Dollar Baby Palermo Assembly instructions

Homelegance 5747W-36RD Assembly instruction

Homelegance

Homelegance 5747W-36RD Assembly instruction

VECELO KHD-XF-NS04 Assembly instructions

VECELO

VECELO KHD-XF-NS04 Assembly instructions

Lorell LLR20979 Assembly instructions

Lorell

Lorell LLR20979 Assembly instructions

Oka DL1 Q50 Desk Assembly instructions

Oka

Oka DL1 Q50 Desk Assembly instructions

Habitat Hester 804537 manual

Habitat

Habitat Hester 804537 manual

Amart Furniture VALKYRIE 74934 Assembly instruction

Amart Furniture

Amart Furniture VALKYRIE 74934 Assembly instruction

Philips LB-MB2424 instructions

Philips

Philips LB-MB2424 instructions

J.Burrows ETON JBETONHBBK Assembly instructions

J.Burrows

J.Burrows ETON JBETONHBBK Assembly instructions

ROOMS TO GO BFGP 1280-122 Assembly instructions

ROOMS TO GO

ROOMS TO GO BFGP 1280-122 Assembly instructions

Silver Fox 51000 quick start guide

Silver Fox

Silver Fox 51000 quick start guide

Cattelan Italia RAPA NUI GLASS Assembling instructions

Cattelan Italia

Cattelan Italia RAPA NUI GLASS Assembling instructions

JWA MADEIRA 68032 Assembly instruction

JWA

JWA MADEIRA 68032 Assembly instruction

JWA JARVIS 74678 Assembly instruction

JWA

JWA JARVIS 74678 Assembly instruction

kupper 12490 Assembly instruction

kupper

kupper 12490 Assembly instruction

Vinsetto 920-071V70 Assembly & instruction manual

Vinsetto

Vinsetto 920-071V70 Assembly & instruction manual

manuals.online logo
manuals.online logoBrands
  • About & Mission
  • Contact us
  • Privacy Policy
  • Terms and Conditions

Copyright 2025 Manuals.Online. All Rights Reserved.