phase II+ Custom Roman Shade with Cord Control User manual

Installation Instructions for
CUSTOM ROMAN SHADE with CORD CONTROL
Mounting hardware kit includes the following:
Part Quantity
a. Mounting Brackets 2 (shades up to 36” wide)
3 (shades 36” to 48” wide)
4 (shades 48” to 96” wide)
5 (shades 96” to 120” wide)
b. 1-1/4” Screws 2 for Outside Mount (up to 36” wide)
[1 Set-Screw included for each 8 for Inside Mount (up to 36” wide)
Inside Mount bracket] 3 for Outside Mount (36” to 48” wide)
12 for Inside Mount (36” to 48” wide)
4 for Outside Mount (48” to 96” wide)
16 for Inside Mount (48” to 96” wide)
5 for Outside Mount (96” to 120” wide)
20 for Inside Mount (96” to 120” wide)
c. 3/4” Screws for Outside Mount 2 (shades up to 36” wide)
3 (shades 36” to 48” wide)
4 (shades 48” to 96” wide)
5 (shades 96” to 120” wide)
d. Screws for Tension Device 2 (1¼”) Phillips head
1 (½”) Phillips head per bracket
for Inside Mount
Wallboard or Plaster: use anchors specifically designed for hollow walls (not included).
Concrete, Stone, Brick: use a masonry drill bit and anchors or screws specifically
designed for masonry (not included).
Tools Required:
Pencil, tape measure, level, screw driver, step stool, drill, utility knife.
Installation:
For Outside Mounting
One bracket should be positioned about 2” to 6” from each end
of the head rail. For wider shades that require 3 or more brackets,
these should be spaced evenly between the two outermost
brackets. Hold the shade in place and mark the desired bracket
locations with a pencil.
The brackets must be level – use a Spirit Level if necessary to
assure proper alignment.
The brackets will be attached to the top of the head rail, so attach
the brackets to the wall or window frame first. Pre-drill the mounting
holes using a 4” drill bit, and then screw the brackets in place.
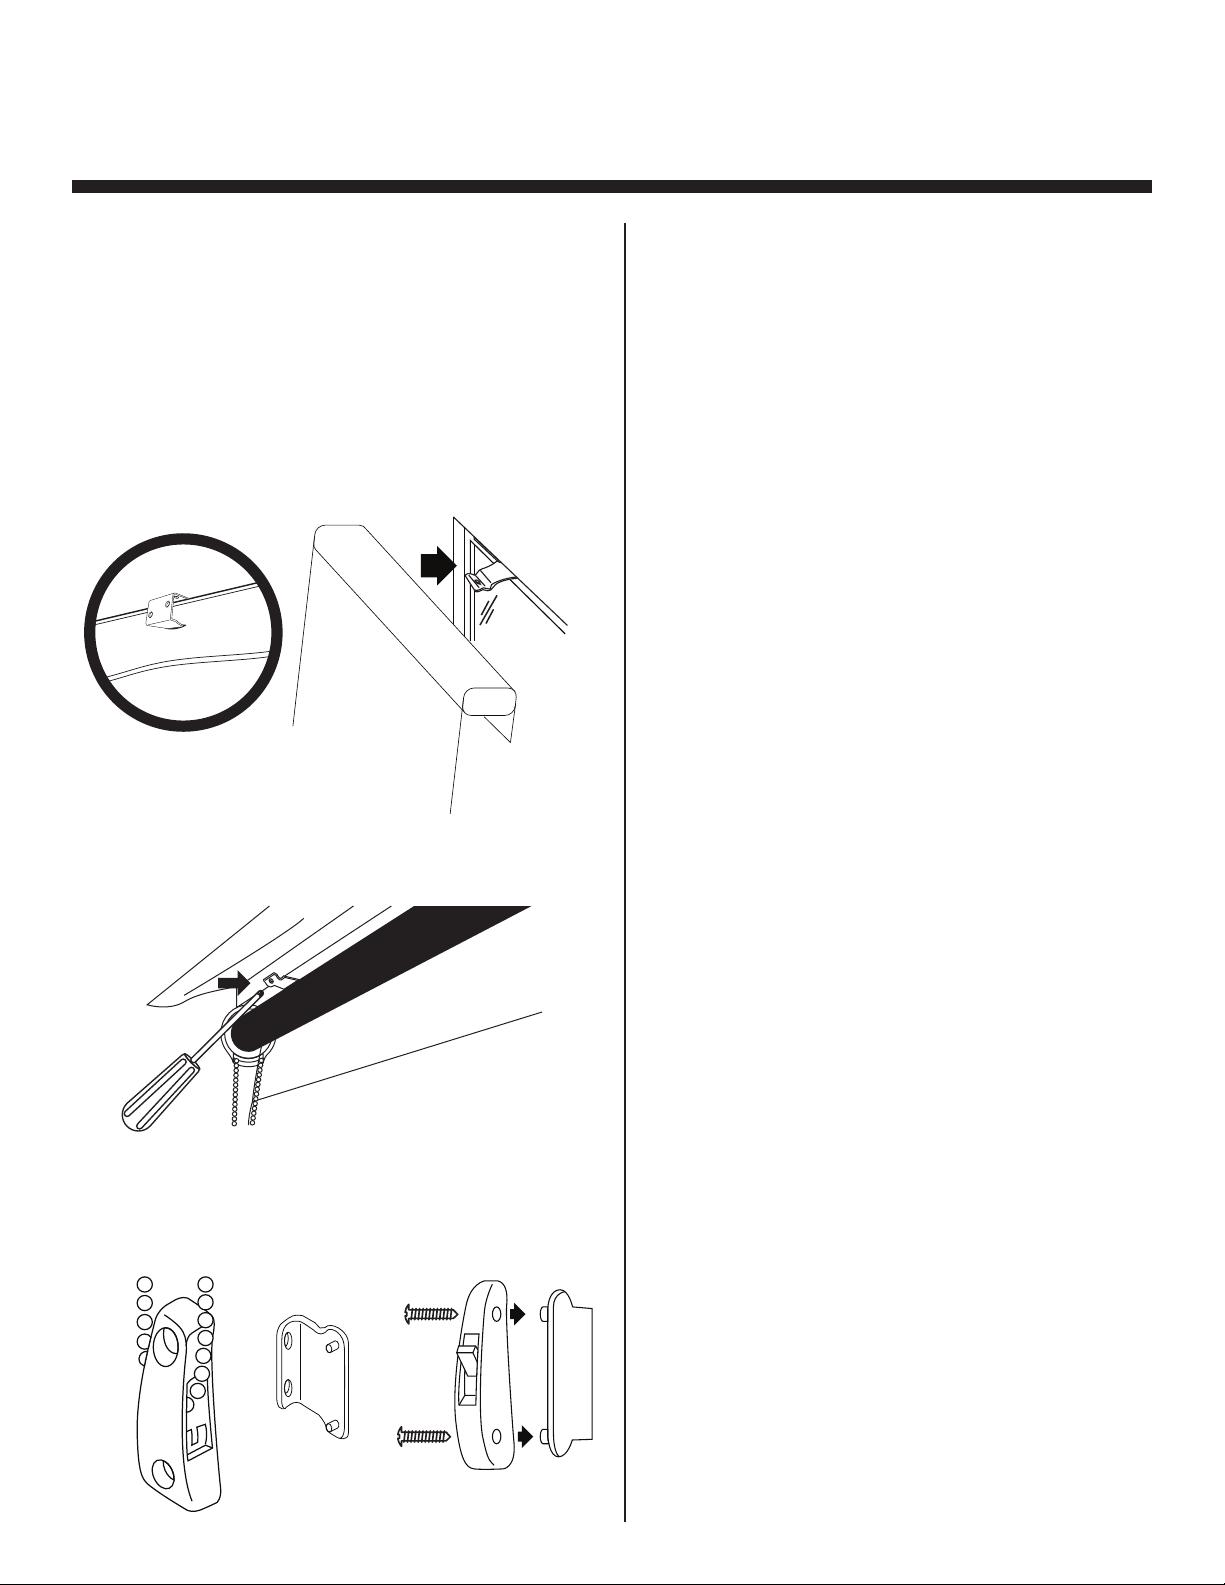
Place the head rail against
the brackets as illustrated
– center the shade over
the window opening – then
mark the location of each
mounting hole on the head
rail. Pierce the fabric at the
hole locations using the tip
of a screw, then pre-drill the
mounting holes using a 4”
drill bit. Attach the shade to
the brackets using the ¾”
screws provided.
For Inside Mounting:
The dedicated Inside Mount brackets are designed to
simplify installation.
However, extra steps are required to realize this benefit.
Specifically, you must slit the fabric of the Back Valance for
Inside Mount Cord Control shades.
[Note: if used for Outside Mounts it is necessary to cut
through the liner and face fabric.]
The recommended installation sequence is as follows:
1. Place the shade face down on a clean surface – using
a tape measure, mark the bracket locations – brackets
should be centered between the lift cords – pencil
mark the bracket locations, and jot-down the distances
from the edge of the head rail (on this piece of paper
for instance) as these will be the center points for each
bracket when attached to the window frame.
2. Using the pencil marks from Step 1 as center points,
pencil mark 1-1/2” wide lines where the fabric meets the
bottom edge of the head rail. Pierce the fabric at one end
of each line with a utility knife, and slit the fabric for the
entire length of the line – a sawing motion with the knife
works best.
[Remember that for Outside Mount shades, you are cutting
through two layers of fabric.]
3. Attach the Brackets to the top-inside of the window
opening. Use the measurements from Step 1 and pencil
mark the bracket locations.
Important: right becomes left and vice versa when the
shade is mounted in the window opening – in other
words the back-left of the shade becomes the front-right
Installation Instructions for
CUSTOM ROMAN SHADE with CORD CONTROL
from the bead chain with the other hand. Lift the bead chain out
of the bead locking groove and slide the tension device to the
bottom of the chain loop.
Remove the twist-tie from the Cord Control Mechanism.
Pull the tension device down until the bead chain is fully
tensioned (plunger will be at the top) and then move the tension
device up approximately 1/8”.
Mark the screw locations on the wall with a pencil.
Inside Mount: If mounting into wood, pre-drill screw holes and
then install the tension device using the 1¼” Phillips head screws
provided.
If not securing into wood, use appropriate anchors for the
substrate and follow anchor manufacturer’s instructions.
Outside Mount: Align the mounting bracket screw holes with the
pencil marks.
If mounting into wood, predrill screw holes and then install the
mounting bracket using the 1¼” Phillips head screws provided.
If not securing into wood, use appropriate anchors for the
substrate and follow manufacturer’s instructions.
Press the tension device onto the mounting bracket posts.
Carefully install the ⅜” Phillips head screws provided, through the
tension device into the mounting bracket using a Phillips head
screwdriver.
DO NOT OVER-THIGHTEN!
How to Operate Cord Control Shades
Pulling gently on the cord in one direction raises the shade;
pulling it in the other direction lowers it.
Care Instructions
The packaging and shipping of soft treatments frequently results
in minor wrinkling of the fabrics used.
There are different characteristics and handling needs for the
variety of fabrics offered in this program.
Please refer to the descriptions below for guidance on how to
remedy minor wrinkles upon delivery.
First, allow all items to hang for a few days so wrinkles relax and
begin to fall out.
Silk fabrics:
• Natural irregularities give the fabric its unique and desired
character. The appearance of slubs, nubs, loops and barre
ridges are universally accepted as normal and should not be
considered defects.
• If necessary, steam silk to remove stubborn wrinkles. Please
note that a good quality steamer is needed so water spots
won’t form from water spitting out from the steaming device.
Rayon/Poly blends:
• If necessary, steam rayon/poly to remove stubborn wrinkles.
Please note that a good quality steamer is needed so water
spots won’t form from water spitting out from the steaming
device.
100% Polyester:
• If necessary, steam polyester or gently iron on a low heat
when turned around to go into the window.
Center the brackets at the pencil marks, and then mark the
screw hole locations for each bracket.
Pre-drill the screw holes with a 3/32” drill bit and attach the
brackets with the screws provided.
4. Position the shade so that the bottom-front of each bracket
goes through the holes cut in the fabric at the back of the
head rail. A second set of hands is useful, but it can be done
by one person.
Slide the head rail fully into the brackets.
5. Attach the shade to the brackets using the ½” screws
provided.
Inside Mount – lift the front of the shade to attach the set-screws.
Outside Mount – lift the front valance to attach the set-screws.
Attach the Chain Tension Device
The Tension Device must be attached per these instructions in order
for your shade to function properly.
While holding the tension device in one hand, pull the plunger away
View from
the top
bracket goes through hole cut
in the fabric at the back of rail
Tension Device & Bracket
for Outside Mount
Chain
Tension
Device
Bracket for
Outside Mount

Installation Instructions for
CUSTOM ROMAN SHADE with CORD CONTROL
To Obtain Service:
If you suspect this product has a manufacturing defect in materials or
workmanship:
• Locate the sales receipt
• Call place of purchase
Any unauthorized returns will not be accepted.
Warranty Remedy:
This shall be your sole remedy under this limited warranty.
If this product is found to have a manufacturing defect in materials or
workmanship, we
will, at our discretion, do one of the following:
• Repair the product
• Replace the product
• Refund the cost of the product
Colors may vary from lot to lot and may not exactly match sample
swatches or previous purchases.
Discontinued items or color selections will be replaced with the
closest equivalent current product.
Your rights under state law: This lifetime limited warranty gives you
specific legal rights, and you may have other rights which vary from
state to state. Some states do not allow limitations on how long a
warranty lasts, so the above limitations may not apply to you. No
agent, representative, dealer or unauthorized employee has the
authority to increase or alter the obligation of this warranty. This
lifetime limited warranty supersedes any previous versions.
setting to remove stubborn wrinkles. 100% Polyester fabrics
release wrinkles easily. Steam or iron on the Polyester /
Synthetic Fabrics setting (Low), but be aware that Polyester will
melt if the iron is too hot.
Cotton/Poly blends:
• If necessary, gently iron on a Blended Fabric (Medium) setting to
remove stubborn wrinkles.
100% Cotton and 100% Linen:
• If necessary, gently iron on a Cotton (High) setting to remove
stubborn wrinkles.
General Cleaning Guidance:
• Dry Cleaning is the best method to clean soiled soft window
treatments.
• However, on 100% Polyester, Cotton/Poly blends and 100%
Cotton or 100% Linen you may: Spot clean with warm soapy
water using mild detergent and a clean sponge. Air-dry and then
steam or iron as guided above.
LIMITED LIFETIME WARRANTY
The enclosed product is warranted to the original residential retail
purchaser as long as the product remains in the original window.
Covered
Lifetime: Entire product against manufacturing defects (i.e. a flaw in the
product design, materials, or workmanship that causes the product to no
longer function.
3 Years: Cords, including internal cords such as those found in cordless
blinds or shades.
5 Years: All fabric
Not Covered
1. Normal wear and Tear
2. Any product that fails due to:
• Abuse • Alterations
• Exposure to salt air • Improper cleaning
• Improper installation • Misapplication
• Accident • Damage from pests/insects/pets
• Extraordinary use • Improper handling
• Improper operation • Misuse
3. Natural Wood Products that have:
• Loss of color intensity
• Variations in color, grain or texture
• Warping of wood slats in high humidity areas
4. Costs associated with:
• Product removal • Transportation to and from the retailer
• Brand label removal • Product re-measure
• Product reinstallation • Shipping
• Incidental or consequential damages
In the event there are multiple blinds/shades in the same room, only the
defective blind/shade will be replaced
To Report Shipping Damage:
If damage occurred during shipping, call the place of purchase and report
within 7 calendar days, or you may be denied credit for your damaged
product.
WARNING
ADVERTENCIA
Young children can STRANGLE in cord and bead
chain loops. They can also wrap cords around
their necks and STRANGLE.
•Always keep cords and bead chains out of
children’s reach.
•Move cribs, playpens, and other furniture
away from cords and bead chains. Children
can climb furniture to get to cords.
•Attach tension device to wall or oor. This
can prevent children from pulling cords and
bead chains around their necks. Fasteners
provided with the tension device may not be
appropriate for all mounting surfaces. Use
appropriate anchors for the mounting
surface conditions.
Los niños pequeños corren el riesgo de
ESTRANGULARSE en los lazos de las cuerdas y
cadenas. También se pueden envolver las cuerdas
alrededor del cuello y ESTRANGULARSE.
•Mantenga siempre las cuerdas y cadenas fuera
del alcance de los niños.
•Mueva las cunas, los corrales y otros muebles
lejos de las cuerdas y cadenas. Los niños
pueden subirse a los muebles para llegar a las
cuerdas.
•Coloque el dispositivo tensor en la pared o en
el piso. Ello puede evitar que los niños estiren
las cuerdas y cadenas, colocándoselas
alrededor del cuello. Los taquetes
proporcionados con el dispositivo tensor
pueden ser inapropiados para todas las
supercies de montaje. Utilice anclas
apropiados para las condiciones de la
supercie de montaje.
Other phase II+ Indoor Furnishing manuals


Popular Indoor Furnishing manuals by other brands

Furniture of America
Furniture of America Francesca CM7911 Assembly instructions

CLUB RATTAN
CLUB RATTAN Harmony manual

Sauder
Sauder Bookcase 414726 manual

Neo Chair
Neo Chair CHAIRMAN Assembly instruction

Rauch
Rauch MD025 Assembly instructions

Electrotherm
Electrotherm Demister Installation Guide and Product Care


