manuals.online logo
Brands
  1. Home
  2. •
  3. Brands
  4. •
  5. Phileas
  6. •
  7. Boat
  8. •
  9. Phileas OPEN 5.00 User manual

Phileas OPEN 5.00 User manual

Popular Boat manuals by other brands

Windworks 38' Catalina Reference notes

Windworks

Windworks 38' Catalina Reference notes

J 105 owner's manual

J

J 105 owner's manual

GELEX G500 light user manual

GELEX

GELEX G500 light user manual

Monterey Boats Sport Yacht 330 owner's manual

Monterey Boats

Monterey Boats Sport Yacht 330 owner's manual

PURSUIT OS 335 owner's manual

PURSUIT

PURSUIT OS 335 owner's manual

Boston Whaler CONQUEST 345 owner's manual

Boston Whaler

Boston Whaler CONQUEST 345 owner's manual

Jeanneau SUN ODYSSEY 41 DS owner's manual

Jeanneau

Jeanneau SUN ODYSSEY 41 DS owner's manual

Meridian 490 Pilothouse owner's manual

Meridian

Meridian 490 Pilothouse owner's manual

Advanced Elements AdvancedFrame Expedition AE1009 owner's manual

Advanced Elements

Advanced Elements AdvancedFrame Expedition AE1009 owner's manual

Robo Marine Indonesia GEOMAR user manual

Robo Marine Indonesia

Robo Marine Indonesia GEOMAR user manual

Swallow Boats BayRaider owner's manual

Swallow Boats

Swallow Boats BayRaider owner's manual

X SHORE EELEX 8000 owner's manual

X SHORE

X SHORE EELEX 8000 owner's manual

Crivit DINGHY Instructions for use

Crivit

Crivit DINGHY Instructions for use

Mercury Sport 220/240 manual

Mercury

Mercury Sport 220/240 manual

Marquis 720 FLY owner's guide

Marquis

Marquis 720 FLY owner's guide

Sportime Seestürmer user manual

Sportime

Sportime Seestürmer user manual

Sportime Seestürmer user manual

Sportime

Sportime Seestürmer user manual

Raymarine ST70 Instrument User reference handbook

Raymarine

Raymarine ST70 Instrument User reference handbook

manuals.online logo
manuals.online logoBrands
  • About & Mission
  • Contact us
  • Privacy Policy
  • Terms and Conditions

Copyright 2025 Manuals.Online. All Rights Reserved.

VOILIER MONOTYPE
Photo : Ronny Kiaulhen
Torbole , Italy– Sept 2007
OWNER’S MANUAL
INDEX
1. Introduction
2. EEC Documents
Conformity Declaration
3. Description
Hull identification
Technical Data
Maximum load
Maximum power
4. Assembly Manual
5. Navigation
a) Manoeuvres
b) Man overboard
c) Towing, mooring
6. Security
7. Maintenance
Dernier enregistrement 16/06/2008- 9:36
1
1. Introduction
You have just acquired an OPEN 5.00 monotype sailing boat from the manufacturer Phileas.
This handbook is to help ensure your pleasure and safety in navigation. It contains technical
information, descriptions for assembly, manoeuvres and maintenance tips.
If this is your first sailing boat, or a new kind of sailing boat for you, first of all familiarize yourself
with it under lenient navigating conditions of.
Get in touch with local qualified clubs and schools in order to obtain the advice necessary for
possible training.
PLEASE KEEP THIS HANDBOOK AND IF YOU SELL YOUR BOAT . PLEASE GIVE IT TO THE
NEW OWNER
2. Documentation CE
EEC Documents
Declaration of Conformity : 2 originals joined to this handbook
We certify that the boat type OPEN 500 bearing the hull number FR PHI E
is built respecting in all points of the conformity certificate herewith according to directives 94/25/CE amended
by directive 2003/44/CE.
Specifications :
- Type of boat: sailing boat
-Category of design: D/4 people - C/2 people
- Module : A
- Length of hull (m): 5.00
- Width of hull: 2.24
- Displacement (Weight) (kg): 300
- Maximum Power engine (cv): 2.2
- Maximum Number people: 4 for category D - 2 people for category C
- Maximum weight for people + luggage (kg): 175kg for category C/ - 310 kg for category D
Conception
categories Maximum
wind force Maximum
height of
waves
Possible categories of
navigation
A (haute mer)
High Sea > force 8 > 4 m 1 à 6
1 to 6
B (large)
Open Sea
force 8 4 m 2 à 6
2 to 6
C (zones côtières)
coastal zones
force 6 2 m 4 à 6
4 to 6
D (eaux abritées)
sheltered waters
force 4 0,50 m 6
6
Dernier enregistrement 16/06/2008- 9:36
2
3. Description
Standards used by the manufacturer
ISO DIS 10087 Hull number identification
Hull Identification
FR PHI E
Technical data
- Longueur HT : 5.00 m
Length
- Longueur flottaison : 5.00 m
Floating length
- Bau max. (largeur) : 2.24 m
Beam max. (width)
- Déplacement : 300 kg
Displacement (Weight)
- Surface de voile au près : 20.60 m2
Sail surface close-hauled
- Manufacturer : PHILEAS
Maximum load
- 175 kg in category C
- 310 kg in category
Maximum power
Outboard Motor max. 2.2 horsepower
Rochefort, Date
Stamp and signature
4. Assembly manual
The Main Sail Halyard
The main sail halyard is threaded in the boltrope
(see photos), up to the masthead after removing
the sheave. It is then passed in the masthead
after having been slid into the sheave. It comes
down again and passes into the flying pulley
(#224) equipped with a shackle (# 27.04), which
will be used for fixing the head of the main sail. It
then goes back up then up to the masthead
where it is fixed by a simple knot. The reefing of
the main sail halyard is accomplished
The Spinacker Halyard
First of all install the spinnaker hound pulley
(#098) using the small end of the shackle
#RF634, then install the #’retenue de spi’ to
the becket, 40cm above.
Be careful to leave the shackle turned
towards the outside in order no to damage
the mast(see photos).
The halyard is simply passed into the hound
pulley and comes down along the mast.
It is possible to use a Rilsan attach or an
elastic at the level of spreader to prevent
the spinnaker halyard from getting stuck
behind spreader.
Shrouding (haubannage)
The shrouds are fixed to the mast by a
shackle # HR08.
The forestay is fixed thanks to the swivel
attached to the HR08 fixed on the hound
shackle.
Nylon plastic washers have to be located
correctly, as shown in the photograph.
Tighten the shackles with pliers to make
sure that they are well fastened and if
possible assure the fixture with adhesive
tape or a small piece of rope.
Jib Halyard (drisse de foc)
The jib halyard goes simply into the swivel
hook (see photo).
Spreaders
It is imperative to assemble in the following
order:
1- Release the adjuster then fix to the mast.
2- Fix the diamond cable to the adjuster by
the central fixing.
3- Fix the diamond cables to the top fluke
making sure that they stay clear (without
turning).
4- Slip the spreaders into the mast.
5-Position the tips of the spreaders on the
cables, and then fit into the spreaders. The
washers must be positioned above the
spreaders.
6-Tighten the adjuster so that the mast has
a longitudinal spread (a tension of 180kg is
recommended).
Once the diamond is correctly tightened,
make sure that spreaders are
perpendicular to the mast.
The cord drum for the snuffer
The Open 500 has a jib snuffer as standard
equipment. The cord drum should be fixed
to the chain plate situated at the mouth of
the trumpet. It is imperative to put the split
ring behind the snuffer.
The snuffer control rope should be fixed to
the snuffer cord drum by making an
overhand knot. It passes under the roof by
the thro-hull then under the mast foot (port
side light) and is fixed in the aluminium clam
(see photos).
The aluminium clam is fixed to the snuffer
cord drum with the surplus of the blue string
from the jib pulleys #2661.
Stepping the Mast
It is best to leave the trailer hitched on the car
while raising the mast, to assure the stability of
the boat and the trailer. Otherwise you need to
block the back of the trailer so that it cannot
move or tip up.
It is advisable to start by arranging the mast on
the boat, with the mast foot close to the
rotation ball.
Fix the forestay to the hull plate (second hole
from the front).
The adjuster plates should just have an
average adjustment
Remove the pin and arrange with a flat profile
(spreaders vertical) engage the mast onto the
rotation ball and put the pin back in place.
It is imperative to keep the profile flat until
the mast is vertical.
The same thing goes when bringing the mast
down. This is why we advise not to help by
pulling on the forestay, (it is better to use the
spinnaker halyard).
A
crew member gets into the boat and raises
the mast until the shrouds are stretched. The
j
ib halyard is then fixed to the winch of the
trailer by 2 fingertip bowline knots which will
be used for tightening the rigging while you fix
the forestay.
Once the forestay is fixed to the adjuster plate
of the drum, the winch is loosened.
Your mast is in place.
It is imperative when bringing the mast
down to also respect the flat profile
position of the mast (spreaders vertical)
and to avoid lowering by the forestay or
the jib halyard. If the pin of the mast foot
has been taken out during navigation it
must be put back into place before
lowering the mast.
The jib
The jib is hoisted around the forestay, (both
extremities of the halyard being fixed to the
point of the jib halyard so that the halyard is
uninterrupted) by closing the zip around the
forestay and both parts of the halyard.
The tack point of the jib is fixed to the adjuster
plate on the top of the drum (1st hole from the
bottom).
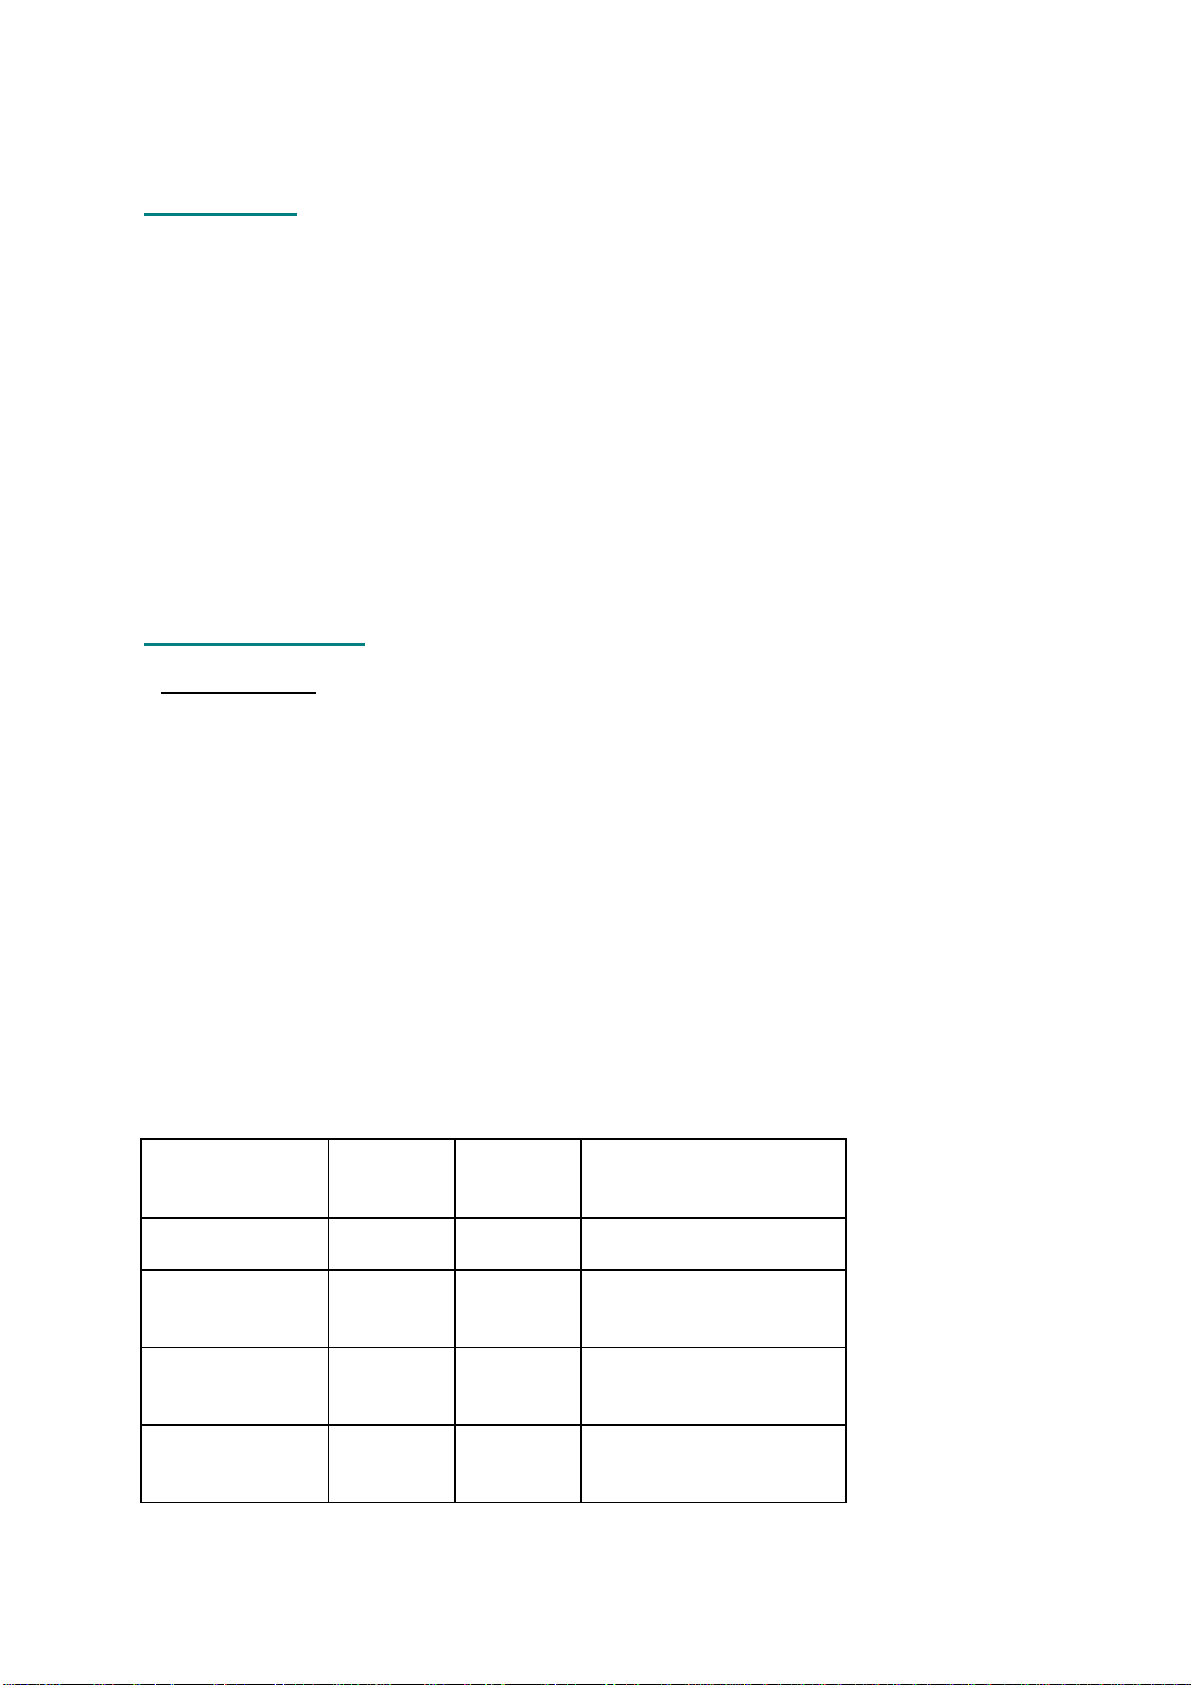
Once the jib is hoisted, a loop is made in the
downward part of the halyard (see photo) and
the end fixed to the aluminium clam #CL230,
passed through the loop before returning to the
clam (see photos).
The right tension of jib halyard is the least
possible which allows the removal or the
reduction of the horizontal folds on the luff once
the sail is hoisted. To protect it, avoid leaving the
jib rolled up with a strong tension of the halyard
rope.
Some people prefer using a halyard in 2 parts, a
halyard and a messenger that needs to be
removed once that the jib has been hoisted, and
then put back before lowering the sail.
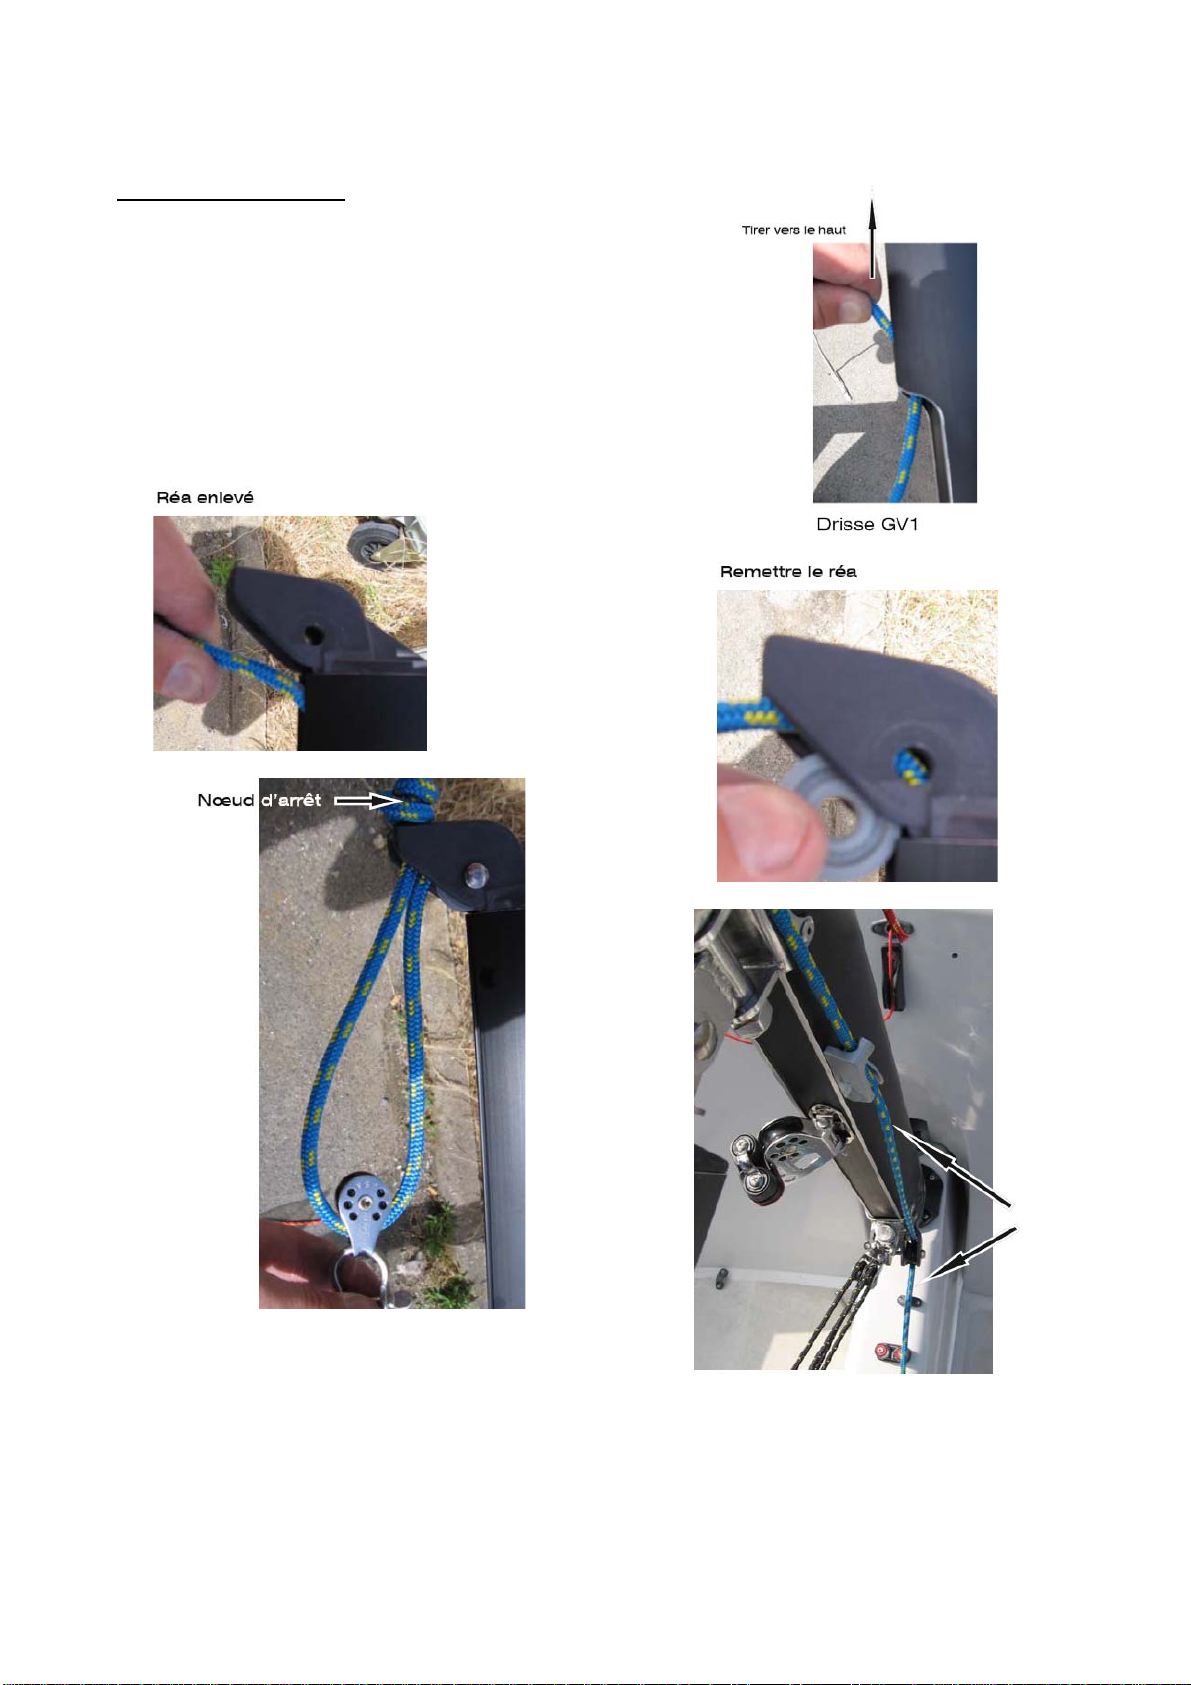
Jib sheet
The jib reefing pulleys #2651 are fixed to the
shackle #2704 by the pieces of string enclosed
in the supplied pulley bag (see instructions
inside the pulley bag).
The jib should be rolled anticlockwise by hand
before fixing the sheet, the snuffer drum empty
(the working part of the snuffer having been
pulled out and put on the cleat).
Respecting this safeguards the cables.
We can now fix the pulleys# 2616 on the #
2750 traveller and insert the plastic springs
#369 on the shackle .
Now pass jib sheet as in the photograph,
without interruption in to the cockpit.
To unroll the jib, release the end of the
snuffer and pull on the sheet.
To roll up the jib, take care that the shettes
are clear and draw on the end to wedge it
on the clam.
The elastic of the sheet guard fixes in the
hood on both sides of the bulkhead (see
photo). It ends with a fingertip bowline knot
which fixes on the plastic hook after having
passed around the mast.
The boom is fixed on the gooseneck.