Philex i-Star IS-AC01 User manual

www.philex.com
user guide
PROJECTION ALARM CLOCK RADIO
PROJEKTIONS-WECKRADIO
ALARMA PROYECTOR RADIO DESPERTADOR
RADIO REVEIL PROJECTEUR
SVEGLIA CON PROIETTORE RADIOSVEGLIA
PROJECTIE-WEKKERRADIO
IS-ACO1

2PROJECTION ALARM CLOCK RADIO - User Guide
www.philex.com
Contents...........................................................................Page
Warnings ............................................................................................. 2
Features and Controls ....................................................................... 3
Box contents ....................................................................................... 4
Introduction ........................................................................................ 4
Powering your alarm clock radio ..................................................... 4
Setting the clock ................................................................................. 5
Listening to FM radio ......................................................................... 5
Alarm functions .................................................................................6-7
Adjusting display and projector ........................................................ 7
Charging an external device.............................................................. 7
Specications ...................................................................................... 8
Warnings and advice
This product uses a Lithium coin cell (not supplied) for backup, keep
the battery away from children. The battery could be harmful if
swallowed. Seek immediate medical advice if you believe a battery
has been swallowed. Do not dispose of batteries in a re as this could
cause an explosion.
The unit should not be exposed to direct sunlight, very high or low
temperatures, moisture, strong magnetic elds, high frequencies
and dusty environments.
Do not use abrasives, benzene, thinner or other solvents to clean
the surface of the unit. To clean, wipe with a clean soft cloth it and a
mild detergent solution.
Never attempt to insert wires, pins or other such objects into the
vents or openings of the unit.
Make sure the vents are not covered with newspaper, table-cloths,
curtains or similar items. Leave a distance of 5 cm around the unit
to allow for adequate ventilation.
Do not disassemble or modify the
unit
, there are no user serviceable
parts.
If the unit is damaged or malfunctions do not use. Consult a
qualied service engineer.
All electrical and electronic products containing Lithium
batteries should be disposed of separately from
household waste at an appropriate recycling point/
centre. For more detailed information about disposal
of your old appliance, please contact your local authority.
Box Contents
1x Projection alarm clock, 1x 5VDC Power adaptor, 1x User guide
PROJECTION ALARM CLOCK RADIO
EN

3
PROJECTION ALARM CLOCK RADIO - User Guide
www.philex.com
1. Projector FOCUS dial
2. Projector lens
3. SNOOZE button/SLEEP
button/DIMMER button
4. Display
5. Alarm 1 indicator (alarm)
6. Alarm 1 indicator (radio)
7. Alarm 2 indicator (alarm)
8. Alarm 2 indicator (radio)
9. PROJECTOR ON/OFF button/
180° FLIP button
10.MEM/M+ button/SET button/
DATE button
11. < BACKWARDS button
12. > FORWARD button
13. ALARM 1 button/
VOL DOWN button
14. ALARM 2 button/
VOL UP button
15. POWER button/
ALARM OFF button
16. Speaker
17. USB charging port
18. Antenna
19. Battery compartment
20. DC IN socket
Features and controls
DC 5V 1.2A
21 3
8
7
6
5
18 19
16
109 11 1312 14 15
4
17
20

4PROJECTION ALARM CLOCK RADIO - User Guide
www.philex.com
Introduction
Your IS-AC01 Projection Alarm Clock Radio projects the time in red
digits onto the ceiling allowing you to see the time at a glance.
Features & Benets
• 1.2” LED display with dimmer
• 180° image rotation projection with focus adjustment
• FM radio with preset radio station
• Dual alarm settings and choice of wake up by radio or beep
• Snooze/sleep function
• USB charging port
Powering your alarm clock radio
Plug the power adaptor into a mains socket and connect the DC
jack plug to the DC power socket (20) on the back of the unit.
Switch the mains socket power on, the LED screen will light up and
the radio will enter standby mode
• The radio is also equipped with a backup system powered by a
3V lithium CR2032 coin cell (not supplied). If the power is
interupted, the radio automatically switches to the battery power
supply which powers the clock and ensures the timer settings are
not lost. The battery compartment (19) is located on the
underside of the IS-AC01.
1. Use a Phillips screwdriver to remove the screw holding the
compartment door closed and remove the door.
2. Insert the battery into the compartment making sure the positive
and negative (+ or -) sides of the battery are in contact with the
corresponding terminals in the battery compartment.
3. Ret the battery compartment door and replace the screw
Please Note: When replacing the battery, leave the power adaptor
connected. Otherwise, all clock and alarm settings will be lost
Setting the clock
1. In standby mode, press and hold the SET button for 2 seconds
(10) to enter the clock setting mode.
2. Press the SET button (10) repeatedly to cycle through the
setting options: Year > Month/Day > Time
3 Setting the year: Press the BACKWARD button <(11) or
FORWARD
> (12) button to change the year, press SET (10) to
conrm.
4 Setting month/day: Press the BACKWARD button <(11) to set the
month and FORWARD button > (12) to set the day, press SET
(10) to conrm.

5
PROJECTION ALARM CLOCK RADIO - User Guide
www.philex.com
5 Setting the time: Press the BACKWARD <(11) to set the hour and
FORWARD button > (12) to set the minute, press SET (10) to
conrm.
Listening to the FM radio
Before switching on the radio make sure the antenna (18) is unrolled
and fully extended.
1. Press the POWER button (15) to turn on the radio.
2. Press the BACKWARD <(11) or FORWARD button > (12) to adjust
the frequency.
3. Press and hold the BACKWARD <(11) or FORWARD button > (12)
to automatically tune to the next available FM station.
4. Press the Volume + button (14) to increase the volume, press
the Volume - button (13) to reduce the volume.
5. Press the POWER button (15) to turn o the radio.
Setting preset stations
You can store up to 10 preset stations.
1. First tune to a station.
2. Press and hold the MEM/M+ button (10) until “P01” (or the next
available preset slot) shows on the display.
3. Press the BACKWARD <(11) or FORWARD button > (12) to select
a preset number (P01-P10).
4. Press the MEM/M+ button (10) button to conrm. The preset
station has been set up.
5. Press the MEM/M+ button (10) repeatedly while listening to
the radio to select a preset station. Alternatively, press the MEM/
M+ button (10) once and then press the BACKWARD <(11) or
FORWARD button > (12) to select a preset station.
Using the alarm function
Setting alarms
You can have two alarms set at any one time. To set the alarms:
1. In standby mode, press and hold (for 2 seconds) the ALARM 1
(13) or ALARM 2 (14) button to enter the alarm setting mode.
2. Then press the ALARM 1 (13) or ALARM 2 (14) button
repeatedly to cycle through the setting options:
Alarm time > Alarm sound source > Alarm frequency
3. To set alarm time: Press the BACKWARD <(11) to set the hour
and FORWARD button > (12) to set the minute. Then press the

6PROJECTION ALARM CLOCK RADIO - User Guide
www.philex.com
relevant Alarm button (13) or (14) to conrm the time and to go
to sound source setting.
4. To set the alarm sound source: Press the BACKWARD <(11) or
FORWARD button > (12) to select the alarm or radio as the
alarm sound source. A red LED indicator will appear beside the
corresponding symbol alarm (5 or 7) or radio (6 or 8) to show
your selection (it will appear on the left side of the screen for
Alarm 1 and on the right side for Alarm 2) . Then press the
relevant Alarm button (13) or (14) to conrm the time and to go
to the alarm frequency setting.
5. To set alarm frequency: Press the BACKWARD <(11) or
FORWARD button > (12) to select the alarm frequency:
1-1 = on a selected day only*, 1-5 = Monday to Friday,
1-7 = Everyday, 6-7 = Weekend only
*Press the relevant Alarm button (12) or (13) when this option is
selected. Then press BACKWARD <(11) or FORWARD button > (12)
to select a specic day for the alarm activation (e.g. 1= Monday,
2= Tuesday).
Once an alarm is set, the alarm will activate automatically with the
the sound as indicated, alarm or radio, as indicated on the left side
of the clock screen for Alarm 1 and on the right side for Alarm 2.
Turning the alarms on or o (make sure the unit is in
STANDBY mode) : When the clock time is displayed, press the
ALARM 1 (13) or ALARM 2 (14) button to enable or disable the
respective alarm. The Alarm 1 or Alarm 2 indicator (alarm or radio)
will switch on when the alarm is enabled.
Switching o a sounding alarm
• Press AL OFF button (15) to switch o a sounding alarm.
• When the alarm sounds, the corresponding Alarm 1 or Alarm 2
indicator, alarm or radio , will ash on the clock screen.
Snooze function
To temporarily silence a sounding alarm, press the SNOOZE
button (3). The alarm (radio or beep) will restart again when the
snooze period of 9 minutes is over.
The corresponding Alarm 1 or Alarm 2 indicator, alarm or radio ,
will ash on the display during the snooze period.
To cancel the snooze period and the alarm, press the ALARM OFF
button (15).

7
PROJECTION ALARM CLOCK RADIO - User Guide
www.philex.com
Sleep function
The sleep function allows you to set a time delay in minutes after
which period the radio will switch o automatically.
1. With the radio playing, press the SLEEP button (3) repeatedly to
select a sleep period (Options: O, 10,20,30,40,50,60,70,80,
90,100,110 and 120 minutes).
2.
The radio will automatically switch o when the sleep period is over.
3. Press the SLEEP button (3) to display the remaining time before
the radio is due to switch o.
4. Press the POWER button (15) to cancel this function.
Display information
In standby mode, short press the SET button (10) to display the
day of the week, (d1 corresponds to Monday, d2 = Tuesday,
d3 = Wednesday, d4 = Thursday, d5 = Friday, d6 = Saturday and d7
= Sunday), press again for year, again for month and date and again
for time.
• In radio mode, press the BACKWARD <(11) or FORWARD button
> (12) once to briey change the display from the clock time to
the current radio frequency playing.
Projector
1. Press the button (9) to project the time onto a nearby
wall or the ceiling of your bedroom.
2. Press and hold the FLIP button
(9)
to ip the projected image.
3. Turn the FOCUS dial
(1)
to adjust the image sharpness.
Please Note: The projector is designed for use in dark rooms only
and will not be visible if there are any lights on.
Charging an external device
Connect an external device (e.g. smartphone, tablet or camera etc.)
via a USB cable (not supplied) to the USB port (17) for charging.
The USB port is for charging only and is not suitable for exchange
of data.
Display brightness
In standby mode, press the DIMMER button to change the
brightness level of the clock display options are low / high or o.
This seeting will not aect the brightness of the projector beam.
The low setting is the default (energy saving) setting.

8PROJECTION ALARM CLOCK RADIO - User Guide
www.philex.com
Specications
Power Adaptor Input 100-240~50/60Hz
Power Adaptor Output 5.0V𝌂1.2A
Backup Battery Lithium 3V CR2032 coin cell
FM Presets 10x
FM Frequency Range 87.5 – 108 MHz
Dimensions: 158 x 85 x 80mm (L x H x D)
Power Supply: ErP/EuP directive No. (EU) 2019 (1782)
Manufacturer
Trademark
Address
Philex Electronic Ltd. London Road,
Bedford, MK42 0NX, UK.
Registration No. 339123
Model identier OBL-0501200E / OBL-0501200B
Input AC frequency 50/60Hz
Input voltage 100-240VAC
Output voltage 5.0VDC
Output current 1.2A
Output power 6.0W
Average active eciency 79.97%
Eciency at low load (10 %) N/A
No-load power consumption 0.053W
Declaration of Conformity
Hereby, Philex Electronic Ltd. declares that the radio equipment:
i-Star Projection Alarm Clock Radio for radio broadcast reception
in domestic premises is in compliance with the Radio Equipment
Directive 2014/53/EU. The full text of the EU declaration of
conformity is available at the following internet address:
www.philex.com/doc
Technical Support
For further advice please visit our technical website at
www.philex.com/products/technical-support

9
PROJECTION ALARM CLOCK RADIO - User Guide
www.philex.com
Inhalt ................................................................................Seite
Warnhinweise ..................................................................................... 9
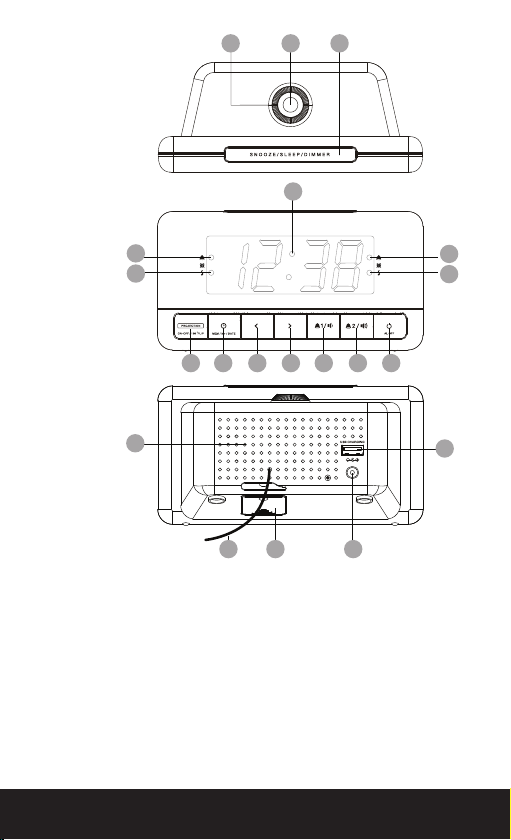
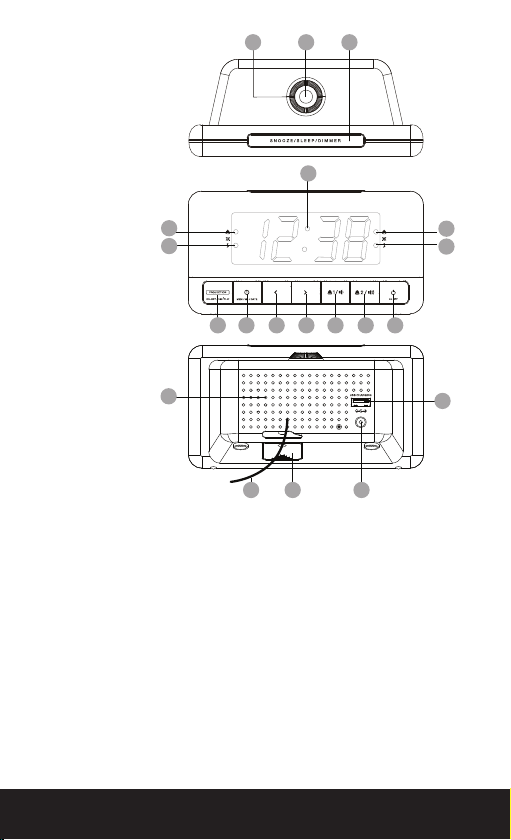
Funktionen und Bedienelemente ................................................... 10
Packungsinhalt................................................................................... 11
Einführung .......................................................................................... 11
Stromversorgung des Weckradios .................................................. 11
Einstellen der Alarme ........................................................................ 12
FM-Radio hören.................................................................................. 12
Weckfunktionen................................................................................. 13
Einstellen des Displays und Projektors........................................... 14
Auaden eines externen Geräts ...................................................... 14
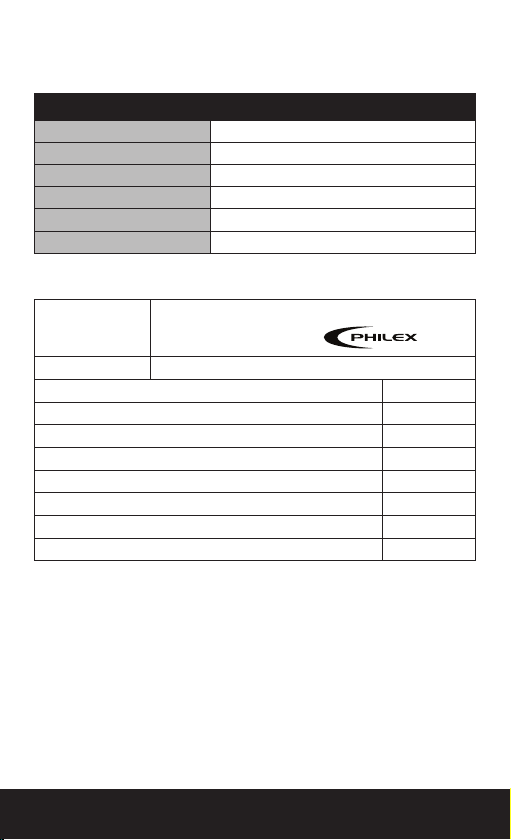
Technische Daten .............................................................................. 15
Warnhinweise und Empfehlungen
Kontakt mit tropfenden oder verspritzten Flüssigkeiten vermeiden. Mit
Flüssigkeiten gefüllte Gegenstände wie etwa Vasen dürfen nicht in der
Nähe des Lautsprechers platziert werden.
Das Gerät sollte vor direktem Sonnenlicht, sehr hohen oder niedrigen
Temperaturen, Feuchtigkeit, Vibrationen, starken Magnetfeldern,
hohen Frequenzen und staubigen Umgebungen geschützt werden.
Das Produkt nicht in geschlossenen Bücherregalen oder Gestellen
ohne ausreichende Belüftung platzieren. Die Belüftung darf
nicht dadurch behindert werden, dass die Belüftungsönungen
mit Gegenständen wie Zeitungen, Tischdecken, Vorhängen usw.
abgedeckt werden.
Versuchen Sie niemals, Drähte, Stifte oder ähnliche Gegenstände in
die Lüftungsschlitze oder Önungen des Geräts einzuführen.
Zerlegen und modizieren Sie den Wecker nicht. Es gibt keine vom
Benutzer zu wartenden Teile.
Wenn der Wecker beschädigt ist oder Funktionsstörungen auftreten,
benutzen Sie ihn nicht. Wenden Sie sich an einen qualizierten
Servicetechniker.
Verwenden Sie keine Scheuermittel, Benzin, Verdünner oder
andere Lösungsmittel, um die Oberäche des Geräts zu reinigen.
Zur Reinigung mit einem sauberen weichen Tuch und einer milden
Reinigungslösung abwischen.
Dieses Produkt verwendet Batterien und sowohl das Produkt als
auch die Batterien müssen ordnungsgemäß entsorgt werden. Werfen
Sie sie am Ende ihres Lebenszyklus nicht in den Hausmüll. Bringen
Sie sie zu einem Sammelzentrum für das Recycling von elektrischen,
elektronischen Geräten und Batterien. Wenden Sie sich an Ihren
Gemeinderat, um Ratschläge zum
Recycling zu erhalten.
PROJEKTIONS-WECKRADIO
DE

10 PROJECTION ALARM CLOCK RADIO - User Guide
www.philex.com
1. Bildschärferegler (FOCUS) für
Projektorfunktion
2. Projektorlinse
3. SCHLUMMER-/SCHLAF-/
DIMMER-Taste (SNOOZE/
SLEEP/DIMMER)
4. Display
5. Alarmanzeige 1 (Alarm)
6. Alarmanzeige 1 (Radio)
7. Alarmanzeige 2 (Alarm)
8. Alarmanzeige 2 (Radio)
9. PROJEKTOR EIN-/AUS-Taste/
180°-Rotationstaste
(PROJECTOR ON/OFF / FLIP)
10. SPEICHER-/SPEICHER+-/
EINSTELL-/ DATUM-Taste
(MEM/M+/SET/DATE)
11. < RÜCKLAUF-Taste (BACK)
12. > VORLAUF-Taste
(FORWARD)
13. ALARM 1-Taste /
LAUTSTÄRKE
- -Taste (VOL DOWN)
14. ALARM 2-Taste /
LAUTSTÄRKE
+-Taste (VOL UP)
15.
EIN-/AUS-Taste / ALARM
AUS- Taste (POWER/ALARM OFF)
16. Lautsprecher
17. USB-Ladeanschluss
18. Antenne
19. Batteriefach
20. Gleichstrom-
Anschlussbuchse
Funktionen und
Bedienelemente
DC 5V 1.2A
21 3
8
7
6
5
18 19
16
109 11 1312 14 15
4
17
20

11
PROJECTION ALARM CLOCK RADIO - User Guide
www.philex.com
Packungsinhalt
1x Projektionsweckradio
1x 5 V Gleichstrom-Netzteil
1x Bedienungsanleitung
Einführung
Ihr IS-AC01 Projektionsweckradio projeziert die Uhrzeit in roten Ziern
an die Zimmerdecke, sodass Sie die Uhrzeit auf einen Blick sehen.
Funktionen und Vorteile
• 1,2-Zoll-LED-Display mit Dimmer
• 180°-Bildrotationsprojektion mit Bildschärferegelung
• FM-Radio mit voreingestelltem Radiosender
• Duale Weckfunktion durch Radio/Piepton
• Schlummer-/Schlaunktion
• USB-Ladeanschluss
Stromversorgung des Weckradios
Das Netzteil an eine Netzsteckdose anschließen und die
Gleichstrombuchse an die Gleichstrom-Anschlussbuchse (20) an
der Rückseite des Geräts anschließen. Die Steckdose einschalten
(nur bei britischen Steckdosen); dann leuchtet das LED-Display auf
und das Radio geht in den Standby-Modus
• Das Radio ist auch mit einem Notstromversorgungssystem
ausgerüstet, das durch eine 3 V-Lithium-Knopfzelle des Typs CR2032
betrieben wird (nicht mitgeliefert). Im Falle eines Stromausfalls wird
die Stromversorgung weiter durch die Batterie gewährleistet, sodass
die Einstellung der Uhrzeit und etwaige Alarmeinstellungen
erhalten bleiben (Bitte beachten Sie: Die Uhr oder das Radio
werden nicht von der Batterie betrieben). Das Batteriefach (19)
bendet sich an der Unterseite des IS-AC01.
1. Die Schraube der Batteriefachabdeckung mit einem Phillips-
Schraubenzieher entfernen und die Abdeckung entfernen.
2. Die Batterie in das Batteriefach einlegen; darauf achten, dass
der positive und der negative Pol (+ oder -) der Batterie mit der
richtigen Anschlussklemme im Batteriefach in Kontakt ist.
3. Die Batteriefachabdeckung wieder aufsetzen und festschrauben.
Bitte beachten Sie: Das Netzteil sollte beim Auswechseln
der Batterie angeschlossen bleiben. Sonst gehen die Uhr- und
Weckeinstellungen verloren.
Einstellen der Uhr
1. Im Standby-Modus die EINSTELL-Taste (10) gedrückt halten,
um in den Modus zum Einstellen der Uhrzeit zu gehen.
2. Die EINSTELL-Taste (10) wiederholt drücken, um die Einstel
loptionen durchzublättern: Jahr > Monat/Datum > Uhrzeit
3 Einstellen des Jahres: Die RÜCKLAUF-Taste < (11) oder die
VORLAUF-Taste > (12) drücken, um das Jahr zu ändern.

12 PROJECTION ALARM CLOCK RADIO - User Guide
www.philex.com
4 Einstellen des Monats/Datums: Die RÜCKLAUF-Taste < (11) drück
en, um den Monat einzustellen, und die VORLAUF-Taste > (12), um das
Datum einzustellen.
5 Einstellen der Uhrzeit: Die RÜCKLAUF-Taste < (11) drücken, um die
Stunde einzustellen, und die VORLAUF-Taste > (12), um die Minute
einzustellen.
Die EINSTELL-Taste (10) drücken, um jede Einstelloption zu bestätigen.
FM-Radio hören
Vor dem Einschalten des Radios sicherstellen, dass die Antenne (18)
ausgerollt und voll ausgezogen ist.
1.
Die EIN-/AUS-Taste (15) drücken, um das Radio einzuschalten.
2. Die RÜCKLAUF-Taste < (11) oder die VORLAUF-Taste > (12)
drücken, um die Frequenz einzustellen.
3. Die RÜCKLAUF-Taste < (11) oder die VORLAUF-Taste > (12) drücken,
um automatisch den nächsten verfügbaren FM-Sender einzustellen.
4. Die Lautstärke +-Taste [ ] (14) drücken, um die Lautstärke zu
erhöhen; die Lautstärke - -Taste [ ] (13) drücken, um die Lautstärke
zu verringern.
5. Die EIN-/AUS-Taste (15) drücken, um das Radio auszuschalten.
Einstellen voreingestellter Sender
Das Gerät ermöglicht die Speicherung von bis zu 10 voreingestellten
Sendern.
1. Zunächst einen Sender einstellen.
2. Die MEM-/M+-Taste (10) so lange gedrückt halten bis „P01” (oder die
nächste verfügbare Voreinstellungsposition) auf dem Display
erscheint.
3. Die RÜCKLAUF-Taste < (11) oder die VORLAUF-Taste > (12) drücken,
um eine Voreinstellungsposition (P01-P10) zu wählen.
4. Die MEM-/M+-Taste (10) drücken zum Bestätigen. Jetzt ist der
voreingestellte Sender eingerichtet.
5. Die MEM-/M+-Taste (10) wiederholt drücken, während Sie Radio
hören, um einen voreingestellten Sender auszuwählen. Ansonsten die
MEM-/M+-Taste (10) einmal drücken, und dann die RÜCKLAUF-Taste
< (11) oder die VORLAUF-Taste > (12) drücken, um einen
voreingestellten Sender auszuwählen.
Verwendung der Alarmfunktion
Einstellen der Alarme
Sie können jederzeit zwei Alarme eingestellt haben. Einstellen der Alarme:
1. Im Standby-Modus die ALARM 1-Taste (13) oder die ALARM 2-Taste
(14) gedrückt halten, um in den Alarmeinstellungsmodus zu gehen.
2. Dann die ALARM 1-Taste (13) oder die ALARM 2-Taste [ALARM]
(14) wiederholt drücken, um die Einstelloptionen durchzublättern:
Weckzeit > Alarmtonquelle > Alarmhäugkeit

13
PROJECTION ALARM CLOCK RADIO - User Guide
www.philex.com
3. Zum Einstellen der Weckzeit: Die RÜCKLAUF-Taste < (11) drücken, um
die Stunde einzustellen, und die VORLAUF-Taste > (12), um die Minute
einzustellen. Dann die gewünschte Alarmtaste (13) oder (14) drücken,
um die Weckzeit zu bestätigen und um zur Einstellung der Tonquelle
zu gehen.
4. Zum Einstellen der Alarmtonquelle: Die RÜCKLAUF-Taste < (11) oder
VORLAUF-Taste > (12) drücken, um den Weckton oder das
Radio als Alarmtonquelle auszuwählen. Dann erscheint eine rote
LED-Anzeige neben dem entsprechenden Symbol für Weckton
(5 oder 7) oder Radio (6 oder 8), um Ihre Auswahl anzuzeigen (sie
erscheint auf der linken Seite des Displays für Alarm 1, und auf der
rechten Seite für Alarm 2) . Dann die gewünschte Alarmtaste (13) oder
(14) drücken, um die Weckzeit zu bestätigen und um zur Einstellung
der Alarmhäugkeit zu gehen.
5. Zum Einstellen der Alarmhäugkeit: Die RÜCKLAUF-Taste < (11) oder
VORLAUF-Taste > (12) drücken, um die Alarmhäugkeit auszuwählen:
1-1 = nur an einem ausgewählten Tag*, 1-5 = Montag bis Freitag,
1-7 = täglich, 6-7 = nur am Wochenende
*Die gewünschte Alarmtaste (12) oder (13) drücken, wenn diese Option
ausgewählt ist. Dann die RÜCKLAUF-Taste < (11) oder VORLAUF-Taste >
(12) drücken, um einen spezischen Wochentag für die Alarmaktivierung
auszuwählen (z. B. 1 = Montag, 2 = Dienstag). Wenn ein Alarm eingestellt
ist, wird der Alarm automatisch mit dem Ton, wie angezeigt (Weckton
oder Radio), aktiviert; dies wird für den Alarm 1 auf der linken Seite des
Displays, und für den Alarm 2 auf der rechten Seite angezeigt.
Aktivieren oder Deaktivieren der Alarme
Wenn die Uhrzeit angezeigt wird, die ALARM 1-Taste (13) oder
die ALARM 2-Taste (14) drücken, um den entsprechenden Alarm
zu aktivieren oder zu deaktivieren. Dann schaltet sich der Alarm
1- oder der Alarm 2-Anzeiger (Weckton oder Radio) ein, wenn der
Alarm aktiviert ist.
Ausschalten eines ertönenden Alarms
• Die ALARM AUS-Taste (AL OFF) (15) drücken, um einen
ertönenden Alarm auszuschalten.
• Wenn der Alarm ertönt, blinkt der entsprechende Alarm 1- oder
Alarm 2-Anzeiger, Weckton oder Radio , auf dem Display.
Schlummerfunktion
Um einen ertönenden Alarm vorübergehend zu deaktivieren, die
SCHLUMMER-Taste [SNOOZE] (3) drücken. Dann ertönt der Alarm
wieder, wenn die Schlummerperiode von 9 Minuten abgelaufen ist.
Während der Schlummerperiode blinkt der entsprechende Alarm 1-
oder Alarm 2-Anzeiger, Weckton oder Radio , auf dem Display.
Zum Deaktivieren der Schlummerperiode und des Alarms die
ALARM AUS-Taste (ALARM OFF) (15) drücken.

14 PROJECTION ALARM CLOCK RADIO - User Guide
www.philex.com
Schlaunktion
Die Schlaunktion ermöglicht die Einstellung einer Zeitperiode in
Minuten, nach der sich das Radio automatisch abschalten wird.
1. Während das Radio läuft, die SCHLAF-Taste [SLEEP] (3) wiederholt
drücken, um eine Schlafperiode auszuwählen (Optionen: Aus, 10,
20, 30, 40, 50, 60, 70, 80, 90, 100, 110 und 120 Minuten).
2. Das Radio schaltet sich nach Ablauf der Schlafperiode
automatisch ab.
3. Die SCHLAF-Taste [SLEEP] (3) drücken, um die Restzeit vor dem
automatischen Abschalten des Radios anzuzeigen.
4. Die EIN-/AUS-Taste [POWER] (15) drücken, um diese Funktion zu
deaktivieren
Display-Informationen
Im Standby-Modus die EINSTELL-Taste (10) drücken, um den
Wochentag anzuzeigen, (d1 entspricht Montag, d2 = Dienstag,
d3 = Mittwoch, d4 = Donnerstag, d5 = Freitag, d6 = Samstag, und d7
= Sonntag); nochmal drücken für das Jahr, nochmal für Monat und
Datum, und nochmal für die Uhrzeit.
• In radio mode, press the BACKWARD <(11) or FORWARD button
> (12) once to briey change the display from the clock time to the
current radio frequency playing.
Projektor
1. Die PROJEKTOR-Taste (9) drücken, um die Uhrzeit
auf eine nahe Wand oder an die Decke des Schlafzimmers zu
projezieren.
2. Die Rotationstaste [FLIP] (9) gedrückt halten, um das projezierte
Bild zu drehen.
3. Den Bildschärferegler [FOCUS] (1) drehen, um die Bildschärfe
einzustellen.
Bitte beachten Sie: Der Projektor ist nur zur Verwendung in dunklen
Räumen konzipiert. Die Projektion ist bei eingeschaltetem Licht
nicht sichtbar.
Auaden eines externen Geräts
Externe Geräte (z. B. Smartphone, Tablet oder Kamera usw.)
können über ein USB-Kabel (nicht mitgeliefert) an die USB-
Anschlussbuchse (17) zum Auaden angeschlossen werden.
Die USB-Anschlussbuchse ist nur zum Auaden bestimmt und nicht
für den Datenaustausch geeignet.
Display-Helligkeit
Im Standby-Modus die DIMMER-Taste drücken, um die
Helligkeitsstufe des Displays zu ändern. Die verfügbaren Optionen
sind: niedrig / hoch / oder Aus. Diese Einstellung hat keinen Einuss
auf die Helligkeit des Projektorstrahls.
Das Display ist standardmäßig auf die niedrige Stufe
(Energiesparstufe) eingestellt.

15
PROJECTION ALARM CLOCK RADIO - User Guide
www.philex.com
Technische Daten
Netzteileingangsspannung: 100-240~50/60Hz
Netzteilausgangsspannung: 5.0V𝌂1.2A
Reservebatterienanforderungen Lithium 3V CR2032
Voreinstellungen: 10 FM
FM-Frequenzbereich: 87.5 – 108 MHz
Abmessungen 158 x 85 x 80mm (B x H x T)
Power Supply: ErP/EuP directive No. (EU) 2019 (1782)
Hersteller
Address
Philex Electronic Ltd. London Road,
Bedford, MK42 0NX, UK.
Registration No. 339123
Modellkennung OBL-0501200E / OBL-0501200B
Eingangsspannung 50/60Hz
Eingangs AC frequenz 100-240VAC
Ausgangsspannung 5.0VDC
Strom 1.2A
Leistung 6.0W
Durchschnittlich Netzteilezienz 79.97%
Ezienz bei geringer Last (10 %) N/A
Standby-Leistung 0.053W
Konformitätserklärung
Philex Electronic Ltd. erklärt hiermit, dass der
Projektionsweckradio
für den Funkempfang in Wohngebäuden der Funkgeräterichtlinie
2014/53/EU entspricht.
Der vollständige Text der EU-Konformitätserklärung ist unter
folgender Internetadresse abrufbar: www.philex.com/doc
Technischer Support
Weitere Hilfen, Ratschläge, Informationen und einen
Livechat nden Sie auf www.philex.com/support

16 PROJECTION ALARM CLOCK RADIO - User Guide
www.philex.com
Indice..............................................................................................................Pagina
Advertencias................................................................................................16
Funciones y controles ................................................................................17
Contenido de la caja...................................................................................18
Introducción .............................................................................................18
Encender su radio despertador ................................................................18
Congurar el despertador ...................................................................... 18-19
Escuchar la radio FM ..................................................................................19
Funciones de alarma ..................................................................................20
Ajustar la pantalla y el proyector ..............................................................21
Cargar un dispositivo externo...................................................................21
Especicaciones ..........................................................................................22
Advertencias y consejos
Este producto contiene una pila de botón de litio. Manténgalo fuera
del alcance de los niños. La pila puede ser perjudicial si se ingiere.
Consulte inmediatamente con un médico si cree que alguien se
ha tragado la pila. No arroje las baterías al fuego ya que podrían
provocar una explosión.
Manténgalo alejado de llamas directas como velas encendidas.
No lo exponga a goteos ni salpicaduras.
La unidad no debe exponerse a la luz directa del sol ni a
temperaturas extremas, humedad, vibraciones, campos
magnéticos intensos, altas frecuencias ni entornos polvorientos.
No obstruya las aberturas de ventilación con objetos como
periódicos, tapetes, cortinas, etc.
No introduzca cables, agujas ni ningún otro objeto similar en
ninguna abertura de la unidad.
No desmonte ni modique el despertador, ya que no contiene
piezas manipulables por el usuario. Si el despertador presenta
daños o algún mal funcionamiento, no lo utilice. Póngase en
contacto con un ingeniero de asistencia cualicado.
No utilice productos abrasivos, benceno, diluyente ni ningún otro
solvente para limpiar la supercie de la unidad. Para proceder
a su limpieza, pase un trapo suave y limpio con una solución
jabonosa suave.
Este producto utiliza baterías y tanto el producto como las
baterías deben desecharse correctamente. No los arroje a la
basura doméstica al nal de su ciclo de vida; llévelos a un centro
de acopio para el reciclaje de equipos eléctricos, electrónicos y
baterías. Póngase en contacto con su consejo
local para obtener consejos sobre reciclaje.
ALARMA PROYECTOR RADIO DESPERTADOR
ES

17
PROJECTION ALARM CLOCK RADIO - User Guide
www.philex.com
ALARMA PROYECTOR RADIO DESPERTADOR
1. Dial FOCUS (ENFOQUE) del
proyector
2. Lente del proyector
3. Botón SNOOZE (APLAZAR)/
botón SLEEP (SUEÑO)/botón
DIMMER (ATENUADOR)
4. Pantalla
5. Indicador de alarma 1 (alarma)
6. Indicador de alarma 1 (radio)
7. Indicador de alarma 2 (alarma)
8. Indicador de alarma 2 (radio)
9. Botón PROJECTOR ON/OFF
(ENCEDIDO/APAGADO DEL
PROYECTOR)/botón 180° FLIP
(GIRAR 180º)
10. Botón MEM/M+/Botón SET
(CONFIGURAR)/Botón DATE
(FECHA)
Funciones y controles
DC 5V 1.2A
21 3
8
7
6
5
18 19
16
109 11 1312 14 15
4
17
20
11. Botón BACK (ATRÁS) <
12. Botón FORWARD (ADELANTE) >
13. Botón ALARMA 1/Botón VOL
DOWN (BAJAR VOLUMEN)
14. Botón ALARMA 2/Botón VOL UP
(SUBIR VOLUMEN)
15. Botón POWER (ENCENDIDO)/
Botón ALARM OFF (APAGAR
ALARMA
16. Altavoz
17. Puerto de carga USB
18. Antena
19. Compartimento para las pilas
20. Toma de corriente de
entrada de DC

18 PROJECTION ALARM CLOCK RADIO - User Guide
www.philex.com
Contenido de la caja
1 reloj despertador con proyector
1 adaptador de alimentación de 5 V CC
1x Guía del usuario
Introducción
Su radio despertador con proyector IS-AC01 proyecta la hora en
dígitos rojos en el techo, por lo que podrá ver la hora rápidamente.
Características y benecios
• Pantalla LED de 1,2” con atenuador
• Proyección de imagen de 180° con ajuste de enfoque
• Radio FM con emisoras de radio guardadas en preajustes
• Despertador con alarma dual por radio/sonido
• Función de aplazamiento/sueño
• Puerto de carga USB
Encender su radio despertador
Enchufe el adaptador a una toma de corriente y conecte el enchufe
de corriente continua a la toma de corriente continua (20) en la parte
posterior de la unidad. Encienda la toma de corriente, la pantalla LED
se iluminará y la radio entrará en modo de espera. El compartimento
de la pila (19) está ubicado en la parte inferior del IS-AC01.
• La radio también cuenta con un sistema de reserva alimentado
por una pila de botón de litio CR2032 de 3 V (no incluida). Si
se interrumpe la alimentación, la pila proporcionará energía
para guardar la hora y cualquier ajuste de la alarma que haya
realizado. Nota: La pila no alimentará el reloj ni la radio.
1. Utilice un destornillador Phillips para retirar el tornillo que
mantiene la puerta del compartimento cerrada y retire la puerta.
2. Inserte la pila en el compartimento asegurándose de que los
lados positivo y negativo (+ o -) de la pila estén en contacto con
los terminales correspondientes del compartimento de la pila.
3. Vuelva a colocar la tapa del compartimento de la pila y vuelva a
colocar el tornillo.
Nota: Cuando reemplace la pila, deje el adaptador de energía conectado.
De lo contrario, todos los ajustes del reloj y la alarma se perderán.
Congurar el despertador
1. En el modo de espera, mantenga pulsado el botón SET (10)
para entrar en el modo de ajuste del reloj.
2. Presione el botón SET (10) repetidamente para recorrer las
opciones de ajuste: Year (Año) > Month/Day (Mes/Día) > Time (Hora)
3. Congurar el año: Presione el botón BACK (ATRÁS) < (11) o
FORWARD (ADELANTE) > (12) para cambiar el año.

19
PROJECTION ALARM CLOCK RADIO - User Guide
www.philex.com
4. Congurar el mes/día: Presione el botón BACK (ATRÁS) < (11)
para ajustar el mes y el botón FORWARD (ADELANTE) > (12) para
congurar el día.
5. Congurar la hora: Presione el botón BACK (ATRÁS) < (11) para
ajustar la hora y el botón FORWARD (ADELANTE) > (12) para
ajustar los minutos.
Presione el botón SET (10) para conrmar cada opción de
conguración.
Escuchar la radio FM
Antes de encender la radio, asegúrese de que la antena (18) esté
desenrollada y completamente extendida.
1. Presione el botón POWER (ENCENDIDO) (15) para encender la
radio.
2. Presione el botón BACK (ATRÁS) < (11) o FORWARD (ADELANTE) >
(12) para ajustar la frecuencia.
3. Mantenga presionado el botón BACK (ATRÁS) < (11) o FORWARD
(ADELANTE) > (12) para sintonizar automáticamente la siguiente
emisora FM disponible.
4. Presione el botón Volume + (14) para aumentar el volumen,
pulse el botón Volume - (13) para bajar el volumen.
5. Presione el botón POWER (ENCENDIDO) [POWER] (15) para apagar
la radio.
Congurar las emisoras guardadas en preajustes
Puede guardar hasta 10 emisoras guardadas en preajustes.
1. En primer lugar, sintonice una emisora.
2. Mantenga presionado el botón MEM/M+ (10) hasta que aparezca
«P01» (o el siguiente preajuste disponible) en la pantalla.
3. Presione el botón BACK (ATRÁS) < (11) o FORWARD (ADELANTE) > (12)
para seleccionar un número de preajuste (P01-P10).
4. Presione el botón MEM/M+ (10) para conrmar. Se ha congurado la
emisora guardada en preajustes.
5. Presione el botón MEM/M+ (10) repetidamente mientras escucha
la radio para seleccionar una emisora guardada en preajustes.
Alternativamente, presione el botón MEM/M+ (10) una vez y luego
pulse el botón BACK (ATRÁS) < (11) o FORWARD (ADELANTE) > (12)
para seleccionar una emisora guardada en preajustes.
Uso de la función de alarma
Conguración de las alarmas
1. En el modo de espera, mantenga presionado el botón ALARM 1 (13)
o ALARM 2 (14) para acceder al modo de conguración de la alarma.
2. A continuación, presione repetidamente el botón ALARM 1 (13) o
ALARM 2 (14) para recorrer las opciones de conguración:
Hora de la alarma > Fuente de sonido de la alarma > Frecuencia de
la alarma

20 PROJECTION ALARM CLOCK RADIO - User Guide
www.philex.com
3. Para congurar la hora de la alarma: Presione el botón BACK (ATRÁS)
< (11) para ajustar la hora y el botón FORWARD (ADELANTE) > (12)
para ajustar los minutos. A continuación, presione el botón de
alarma correspondiente (13) o (14) para conrmar la hora e ir a la
conguración de la fuente de sonido.
4. Para congurar la fuente de sonido de la alarma: Presione el botón
BACK (ATRÁS) <(11) o FORWARD (ADELANTE) > (12) para seleccionar
la alarma o la radio como fuente de sonido de la alarma. Un
indicador LED de color rojo aparecerá junto al símbolo de la alarma
correspondiente (5 o 7) o radio (6 o 8) para mostrar su selección
(aparecerá en el lado izquierdo de la pantalla para la Alarma 1 y en
el lado derecho para la Alarma 2). A continuación, presione el botón
de alarma correspondiente (13) o (14) para conrmar la hora e ir a la
conguración de la frecuencia de la alarma.
5. Para congurar la frecuencia de la alarma: Presione el botón BACK
(ATRÁS) < (11) o FORWARD (ADELANTE)> (12) para seleccionar la
frecuencia de la alarma: 1-1 = solo un día seleccionado*, 1-5 = de
lunes a viernes, 1-7 = todos los días, 6-7 = solo los nes de semana
*Presione el botón Alarm (Alarma) (12) o (13) cuando esté seleccionada
esta opción. A continuación, presione el botón BACK (ATRÁS) < (11) o
FORWARD (ADELANTE) > (12) para seleccionar un día especíco para
la activación de la alarma (por ejemplo, 1 = lunes, 2 = martes). Una vez
congurada la alarma, esta se activará automáticamente con el sonido
que se indique, alarma o radio, como se indica en el lado izquierdo de la
pantalla del reloj para la Alarma 1 y en el lado derecho para la Alarma 2.
Encender o apagar las alarmas
Cuando se muestre la hora del reloj, pulse el botón (13) o ALARM
2 (14) para activar o desactivar la alarma correspondiente. El
indicador de Alarma 1 o Alarma 2 (alarma o radio) se encenderá
cuando la alarma esté activada.
Desactivación de una alarma sonora
• Presione el botón AL OFF (15) para apagar una alarma sonora.
• Cuando suene la alarma, el indicador correspondiente de la
Alarma 1 o Alarma 2, la alarma o la radio parpadearán en la
pantalla del reloj.
Función de aplazar alarma
Para silenciar temporalmente una alarma sonora, presione el botón
SNOOZE (APLAZAR) (3). La alarma volverá a sonar cuando hayan
pasado los 9 minutos en los que aplazó la alarma. El indicador
correspondiente de la Alarma 1 o Alarma 2, la alarma o la radio
parpadearán en la pantalla durante el periodo de aplazamiento
de la alarma.
Para cancelar el periodo de aplazamiento y la alarma, presione el
botón ALARM OFF (ALARMA APAGADA) (15).
Table of contents
Languages: