manuals.online logo
Brands
  1. Home
  2. •
  3. Brands
  4. •
  5. Philips
  6. •
  7. LCD TV
  8. •
  9. Philips 32TA1600 User manual

Philips 32TA1600 User manual

PHITIPS
QuickStort Guide
INSTALLTNGLCD TV or Tx: Weu .. I
TV CxrNrrl ltsnli-arrcr........2
PnsrNrrlroN oF
rH: LCD TV... . . . 2
AccEssoRrEs. ..........3
BerrenyNsrernol.....,......3
.
RemoruCot.rnorOerrrrrolr.....,3
ANTENN^TV. .....,,.4
BrrCrarTVCo.lsnolr........ 4
TuNrnMooe
Corurnor...........5
ALrroPRoGRAll
(Serrrr.rc
Ur
Csnruners. ...........5
Crglr Box (wrrHRFlN/Ourpurs). .6
CngreBox (wrrH
Auoro/Vroeo
Oureurs)
. .....
......6
VCR, DVD Prnven,
on orxen Devces
wrx RCAColrrecroRs.........
7
DVD PLAYER
oRorHrnVroro Dgvrces
wtttt CovporueNt
Vroeo
CoruNecrons .........7
DrcrrALTV REcEtvER,
onI Drcrer
SnteLLrrRecsrvenwru HD (Hrcx
DrrrrrloN)
Ourpur,...
..,... ...8
PC(Moruron)
ColrrecroNs.....8
Dtcrm SerrLure
REcETvERwrH DVI
Cotlrurcrot. ........ .9
AV
Ourpur. .........10
IMPORTANT
NOTE:This
quick
setup
guide
isusedwith
several
differentLCDTV
models.Not
allfeatures
(and
drawings)
discussedin
thismanualwillnecessarily
match
those
foundwithyour
LCDTV
set.Thisisnormal
anddoesnot
require
that
you
contact
your
dealer
or
request
service.
WARNING:TO
PREVENT
FIREORSHOCK
HAZARD
DONOTEXPOSETHIS
UNITTO
RAINOREXCESSIVE.
Beforeyou
can
install
your LCDTV onthewall,
youmustfirst remove
the
I Place
theset
facingdownon aflatsurfacewith a )
' protective
sheetor cloth beneaththeTV. ta
baseusing
thestepsbelow:
Remoye
3screwsfrom base.
Graspthe base
and
pullit out.
Attachthe suppliedbase
cover.YourLCDTV is
now ready
for wdl mounting.
\
4
3w
When installing
the LCDTV onthewall,please
consulta professional
technicianfor proper
installing.
Themanufacture
acceptsno liabilityfor installations
not performed
by
professional
technician.
26" E
32'
Remove
the 2 metal
pins.
3t38 t552423|
PHITIPS
1
2
3
4
5
Pleasefollow
these
stePsto installTV channels:
Select
aTVsource
viaAVbutton
onyourremotecontrol.
PresstheCURSOR
RIGHTbutton
to confirm.
Press
MENUbutton
on
your
remolecontrolto
oPenthe
onscreenmenu.
Press
CURSOR
DOWNto moveto INSTALL,
press
CURSORRIGHT
on
your
remote
controlto enterINSTALL.
PressCURSOR
DOWN to moveto AUTO PROGRAM
PressCURSOR
RIGHT!ostartau!o
installtheTVChannels.
For more detailed explanation ofAUTO PROGRAM' Please
referto
AUTO PROGRAM section on Page
5.
t4att0lll80!l
Plollft nflcuatt
A|jDIO
' IUI|,PNOdBII
Itoltlt$' . MAnUAItloil
", : -lttittt ] (HAI
tLtfll
- IAfi0flltlsll
cuI051081
tlit5r!nlI
t80f.m|l|l0
fftou$fl 0
t'1tiz
,.,
* .O-
oo
oo
qg*@9
o@@
o@
@@
@@
@@
1
2
3
4
TelevisionKeys
. VOLUME
+
/ -: Toadiustsound
level.
. CHANNEL
+
/ -: Toselect
programs.
. MENU:Toaccess
orcioseonscreen
menu.
Power button, LED light and infrared
sensor
. @: Toswitchthe
TVonor off.
. Aimremotecontrolatinfraredsensors
to activate
TVcontrols.
Rearconnectors
Remove
thecablecoverto accessthe
connectors
attherearoftheLCD
TV
Bottom connectors
Located
atthebottom
oftheset.
fil
t !l
l:---E--r"-;-:---E-:l
U
aaa/^
6il6
6.)il6
-t-
@rc
GJG
i6(e
(Et
tr
L;E tr;3 F;-FF--]
Whenyouunpackthis
unit,
make
sure
it includesthe
following:
ffi%"BS
|@ rG,Gr
@
1
2
Removethe battery compartment lid on
the b,ottomof the remote control.
Placetwo AAA batteries in the remote.
Besurethe (+)
and
(-)
ends
ofthe
batierieslineupasmarkedinside
the
battery comPartment.
'l Reattach
the bactery
5 compartment
lid.
A/CH button
Pressto go to previouslyselectedchannel.
Sleep button
Press
to set the LCD TV to turn itselfoff
within
acertainrime.
@ O €B retetext keys
Pressto activate onscreen menu, backto
previous levelinside
the onscreen menu!
or press
to exitthe onscreenmenu,
Smart Sound button
Pressrepeatedl/ to select amongthe
4 settinSs;Personal,
Voice, Music,or
Theatre.
Menu button
CursorButtons
(Left, Ritht, Up, Down).
Press
these buttons to hithlithr, select,
andadiust items on the TV's on screen
Press
to increase
or decreasethe sound
Press
to seethecurrent
channel
number
l{ute button
Press
to eliminateor restore the LCD TV
tound. l''lutewill appearon the screen
when
the
soundismuted-
Information button
Unused key
Piature Format button
PrelstheFORMATbuttonrepeatedlyto
tottle amontthesixscreen
format
sizes;
WIDESCREEN,4:3,ZOOM14:9,
ZOOI'4
'16:9,
SUBTITLE
zOoM or
SUPERWIDE.
Power button
l-ll button/ Soundmode
Pressrepeatedlyto selectl'1ono,
Stereo,Duall,Dualll, Nicaml,1ono,
NicamStereo,NicamDuall,NicamDual
.
Smart Picture button
Pressrepeatedl/to selecteither'
Personal,Rich,Natural,Soft,or
Multimedia
picture
settinS.
Virtual Surround button
Adds
greater
depth
and
dimensionto TV
Select
fromVirtual
Surroundor OFF.
Channel button
Presstoadjustthechannelupordown.
Number buttons
Pressthenumberbuttonsfor direct
accessto theTV channels.Fora2 digit
channel,enterthe2nddigitafterent€r
lst digit.
AV button
Press
to selectthevideoinputsource:
PC,DVl,TV AVl,AV2,AV3,S-Videol,
S-Video2,Component,HD.
A combination
antennareceivesnormal
broadcastchannels
(VHF
2-13andUHF
l4-69).Yourconnection
iseasybecausethere
ison
one
75O (ohm)
antenna
jack
ontheside
ofyourTV andthat's
wheretheantenna
goes.
1
2
3
4
lfyour antennahasa round cable(75 ohm) on the end,then
you'ie readyto connect it to the LCD TV. lf your antenna
hasflat, twin-lead wire (300 ohm), you first needto attach
the antenna
wires to the screwson a 300- to 75-ohm
adapter(not supplied).
Connect the antenna(or adapter)to one end of the
supplied
L-Adapter asshown,andconnectthe other end of
the L-Adapterto the TV jack on the sideofthe LCD TV
Plugthe power cable
into AC inlet on LCD TV set. Plugthe
oower cableinto anoutlet andswitch TV set on.
Runthe AUTO PROGRAMfunction to set uDthe TV for the
broadcastor cablechannelsavailable
in your area.lf you do
not run the auto program function to set uPthe channels
,
your televisionmaynot operate properly.
. Remember,an
antennaor cableTVsignalmust
firstbeconnectedto
yourLCDTV
. Please
makesurerhatyouhaveselected
theTV modewith AVkey
on
your
remotecontrol,
beforeinstallinsTVchannels.
Outdoor oaIndoorAntenna
(Combination
vHF JHD to 300-75Qadl
YourCable
TV inputintoyourhomemaybeasingle
(75
ohm)cable
or useacableboxdecod€r.Ineithercase
theconnectionisver)
simple.Followthe
stepsbelowto connect
your
cablesignaltoyour
newtelevision.
1
2
3TheCabb ry sint
fro.n CableComp
75O coaxialcabl€
Direct cable
connections:
ConnecttheCableTVsiSnalto oneendofthesupplied
L-AdaDterasshown.
andconnecttheotherendofthe
adapterto theTVlack
onthe LCDTV
Plugthepower
cable
intoAC inletonLCDTVset.
Plugthe
power
cable
intoanoutletandswitch
TVset
on.
RuntheAUTOPROGRAMfunctionto setuDtheTVfor the
broadcastor cablechannels
availablein
your
area.lfyou
do
notruntheauto
programfuncdonto setupthechannels
,
your
televisionmaynotoperate
properly.
. Remember,anantennaor cable
TV signal
mustfirst beconnectedto
your LCD TV
. Pleasemake sure that you haveselected the TV mode with AV key
on your remote control, beforeinstallingTV channels.
Rear
Jack
panel
ofTelevision
Yo,,.
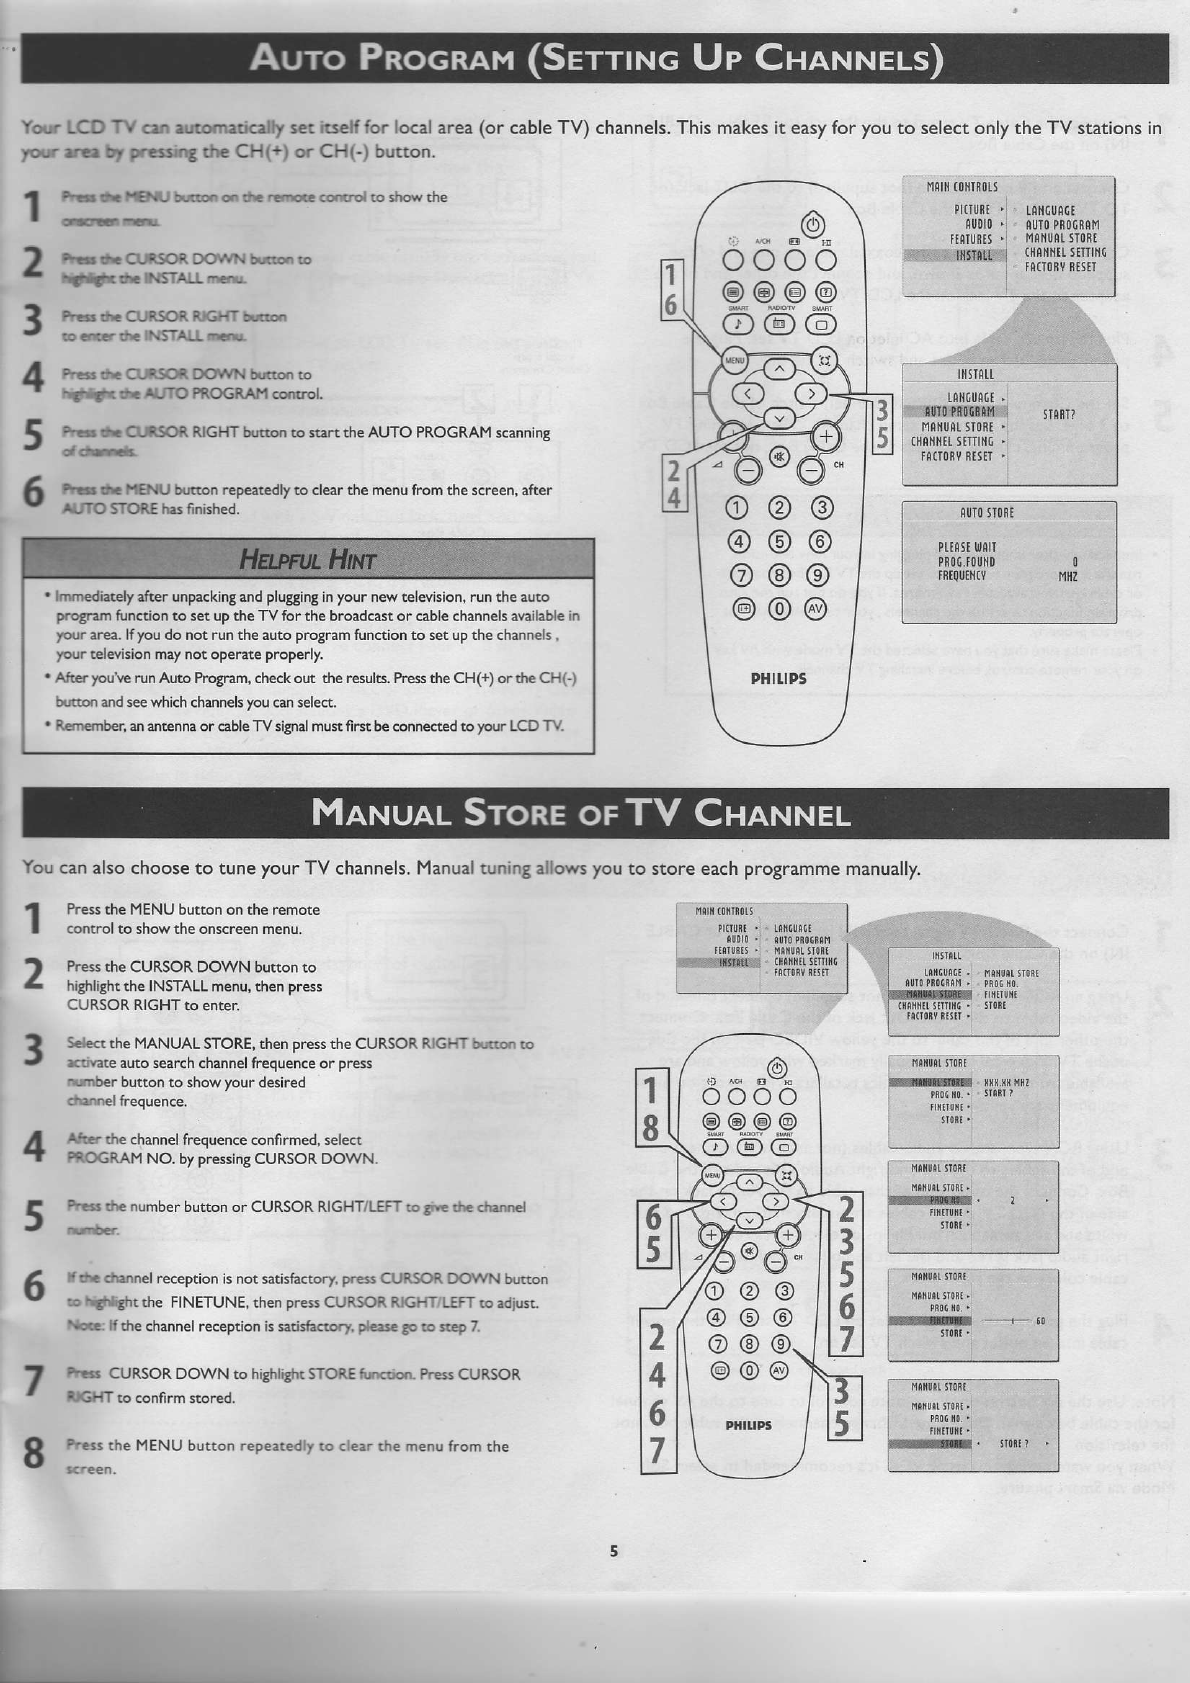
L€D TY cln aulomaocallyset
irselffor local
area
(or cable
TV) channels.Thismakesit easyfor you
to selectonlytheTV stationsin
Ic."r rr!: t D.essrng
theCHI+l or CH(-) butlon.
1
2
31'J tr "E\u 5-=3. cr_:! -r,\o{. ..{_:-oL ro show rhe
*rs * CURSOR )Ow.i i,-!:o,. rc
rltr< .€ InaSTAj-L
--..-.-
tslrs ..r cuRsoR R,G-- rj::or"
.. c-L- 1.. \S-A.. ,-rartl
t-er,r ::{ 3-qj'}. DO\ /N hfton ro
-,€'',t-. t€ A--rO PROGRAH control.
*?r' :r C,ffOR RIGHT button to start e AUTO PROGRAMscanning
*tis tE l'tENU b!fton repeatedly
to clearthe menufrom the screen,after
&TO STOREh:5finished.
fl0[it0|lT[015
PttlllBt
'
nu0l0
'
IICIUII5 '
lflSlAl.l l
IAI]6UACf
aul(lPn0cB$'1
llalluatsT0Bt
Ill0ltltIt 5tTTIll(
tao081l[tstT
3
4
5
6
ta|lIu06t,
tUT0Pn06llM STABI?
l,1ali
|lar slo8t '
ftflll tt stli l! '
IAfi0B\,BtStr
'
A|ll0sroRt
PIIASIIlJAT
PB0C.f0uD 0
fRtQufll(v t4hz
.,
.o.
oooo
e@_"-gg
o@@
o@@
@@@
@@@
@@@
pH.tps
' lmmediarely
afrerunpackinSand
pluSSing
inyour newt€levision,run th€ auto
pr ram functionto setuptheTVfor the broadcastor cablechannelsavailable
in
your area-lfyou do not run the auto program
functionto setupthe channels.
your televisionmay
notoperate properly.
' After youve run Auto Program,checkout the results.Pressthe CH(+) or rhe CH{-)
h^ton andseewhichchannels
you
canselect.
' Reftember, anantennaor cablery signalmust frrst beconnected to your LCD Tvl
You
canalsochooseto tuneyourTV channels.
Manualtuningallowsyou
to storeeachprogrammemanually.
1
2
Press
the MENU button on the remote
control to showthe onscreenmenu.
Press
the CURSORDOWN button to
higfilight
the INSTALLmenu,then press
CURSOR
RlGHTto enter.
Select
the MANUAL STORE,then press
th€ CURSORRIGFi >-::c- :c
r-Jvate auto search
channelfrequenceor press
_--ber button to showyour desired
^ie'!he channel
frequenceconfirmed.selecr
EqOGRAM NO. bypressinS
CURSORDOWN.
>er 1.erumber
buttonor CURSORRI6HT LEFT:: ;.e '--e
c:rnne
':. : rannel
reception
isnot satisfactory
prett CURSORDOwN bufton
:: 'rf iittlt the FINETUNE,then press
CURSORRlcF- LEFTrc adjust.
\:q. lftl.e channelreceptionissarishcrory.
; e25e
Bc:: sleo7.
*'!{ CURSORDOWN to highligh!STORE
aJ..-Jc. Prers
CURSOR
a<HT ro confirm stored.
t-e55the l'4ENU
button repealed.y
ro.,€a. the menulrom rh€
rill[1llIr, rn]!tLn0flr
!!6stutrc
3
4
5
6
7
I
rd
oooo
ee".9.9
o@@
2
3
5
6
7s6{*sr + 6t
rl ConnecttheCableTV signal
to the lN iack
(or RFlN or CABLE
. lN) onthe CableBox.
) ConnectanRF
coaxialcable
(nor
supplied)
to theOUT jack
(or
t TO TV or RFOUT) ofthe CableBox.
2 Connecrthe other endof thecoaxialcableto oneendof the
J suppliedL-Adapterasshown,and
connecttheotherendof the
adapterto the TV iackon the LCD TV.
4
5
Plug
the power cableinro AC inlet on LCD TV set. Plugthe
power cableinto anoutlet andswitch TV set on.
Setthe Channel3/4 (or Output channel)switch of the Cable Box
to 3 or 4. Setthe TV to lhe samechannel.
When watchingTV
programming,
changechannelsat the CableBox, not the LCD TV
. lmmediatelya_fter
unpackingand
plugging
in
your
newtelevision,
run
theauto
proSram
functionto setup
theTVforthe broadcast
orcablechannels
availablein
your
area,lfyoti
donotruntheauto
program
functionto set
upthechannels,
yourtelevision
maynot
operate
properly.
. Pleasemakesurethatyou
haveselectedtheTVmode
withAVkey
onyour
remotecontrol,beforeinstalling
TVchannels.
Cablc Box
1
2
Thisconnection
will supplystereo
soundto the LCD TV.
ConnecttheCableTV signal!o the lN iack
(or RFlN or CABLE
lN) on theCableBox.
Usingan RCA-type video cable(not supplied)
connect one end of
the video cableto the Video Out iack ofthe Cable Box. Connect
theother endofthe cableto theyellow
VIDEO
jack
onthe side
ofthe TV Video cables
are usuallymarkedwith yellow andare
availablefrom Philips
or electronics retailers.Video iackson most
equipmentareyellow.
UsingRCA-type, stereo audio cables(not supplied),
connecrone
end of the cables
to the left andright Audio Out iacks
of the Cable
Box. Connect the other end of that cableto the Audio iackon the
sideof the LCD TV Audio cables
are usuallymarkedwith red and
white andare availablefrom Philips
or elecrronicsretailers.The
right audioiack isred andthe left audiojackiswhite. Match the
cablecolors
to the iack
colors.
Plug
the power cableinto AC inlet on LCD TV set. Plugthe power
cableinto anoutlet andswitch TV set on.
Note: Usethe AV button on the remote control to rune to the AV channel
for the cablebox signal.Once tuned, change
channelsatthe cablebox, not
thetelevision,
When you watch programsusing
VCR, it's recommendedto selectSoft
Mode viaSmart Dicture.
3
46\ A) #,
\v \y '.-
The AV lN iacks
on the rear of the LCD TV enable
quick
connections of other equipment. Connecr a DVD player,
VCR
Video Game, Camcorder, etc.,to these iacks.
To view the
material playing
on the other equipment, set the LCD TV to its
AV mode.
1 UsinganRCA-rypeVideo
andAudrocable(usually
markedyellow,
red,
I andwhite).
connecrche
VCR
s
Video
and
AudioOut iacks
ro rheTV s
VideoandAudioIn
jacks.
1 Plugthepowe' cable
inro
AC inleton LCD TV set.Plug
the power
4 cablerntoanoulle!andswitchTV se!
on.
2 UseAV butlon on rheremoteconrrol
to selectAV | (or AV2.AV3,
J S-Video|
.or S-Video2ifyouusethedifferent
jacks
for thishookup)ro
watchVCR.
Note:
l. lfyourVCR
equipped
with aS-VideoOut iack,
usesS-Video
connection
for betterpicture
deta,land
clarity.UsetheS-Videocable
to connect
theVCR'sS-Video
Our lacks
to theTV'sS-VideoIn
iacks.
2.When you watch programs using
VCR, it's recommendedro selecr
SOFTMode
viaAuto picture.
3.Youcanalsouse
theVideoandAudio
iacks
inAV lN 2 andAV lN
3 locatedon the rear
oftheTV to connecr
your
VCR
or other
Video
Devices.
4. lfyour DVD Player
isequippedwith Component
(Y,
Pb,Pr)
Ourpur
Jacks,
please
refer
to "Connecting
aDVD Player
or olherVideo
Equipments
with Component
Video
Connectors"section
for \rse
ofComponentVideo
Connectionfor highes!
colorand
pictrre
resolution in video playback.
AV Playerwith4,ryconnectors
Component Video Input (Y Pb,Pr) provide the highesr
possible
color and picture resolution in the playback
of digitalsitnal source
material,suchas
with DVD player.
I Using
aComponentVideo
cable
(not
suppliedt,conne<
iie DVD
I player's Y. Pb.Priacks
ro the Y. Pb,Prjacks
on r.e r-v Usethe AV lN
3connecdons.
Note:
TheComponent
(Y,
Pb,Pr)VideoInput nAV lN I connecdons
can
display
SD(480i/576i)
image
only.lf your DVD player
canouqrut
Progressive
scanned
or HD (HighDeflnition) iraS€. pte2se
refer !o
''DigitalTV Receiver,
or a DigitalSatelliteRecewe.wrth HD (High
Definition) Output" in next secrion.
? Us,n8
anAUDIO cable,
connecttheDVD p
aye.
s
AUDTO
OUT lacks
r to theTVsAUDIO lN iacks
in
AV lN 3cor"e<-rons
3
4
PluS
the power cableinto AC inleton LCD TV se! Plug
the power
cableinto anoutlet andswitchTV seton
UseAV button on rhe remore control to select
COMPONENT ro
watch DVD.
Nore:l. TheY,Pb,Pr
iacks
do nor
provide
audio,
soaudio
cables
must
beconnecled
to provide
sound.
R9
o@
@@
@o
@o
@@
@@
Ac.esorl deviceeqlippedwith
componentvideoouipuis
A DigitalTV Receiveror a DigitalSatelliteReceiver
isableto
produces
HD (High
Definition)video
signalwith 480p,576p,720p,
and 1080iformats.A Component
(Y Pb,Pr)Connectionisrequired
for this
kind
ofsetup. Note:Thissetupalsosupport480i/576i.
Usinga Component Video cable,connectthe DigitalTV Receiver's
Y Pb,Prjacks
to the Y, Pb,Pr iacks
on the TV Usethe HD lN
connections.
Note:ComponentVideo(Y,Pb,Pr)
connectionsin HD lN connections
is necessaryto view 480p, 576p,720p,and 1080iformats. Note that
theComponentVideoInputin SideConnectionscanonly
support
480i /576iformat.
UsinganAudio cable,connect the DigitalTV Receiver's
AUDIO OUT
iacks
to theTV'sAUDIO lN jacks
in HD IN connections.
Plug
the power cableinto AC inlet on LCD TV set. Plugthe power
cableinto anoudet andswitch TV set on.
UseAV button on the remote control to selectHD to watch DVD.
Note: The Y, Pb,P. jacksdo not provide audio,
so audiocables
must be connectedto orovide sound.
tr;3 ll;-F-r*-_f
o @o --l 4 | Digirnl
Satellit€Receiverwith HD output
1
2
3
4
Hl ;r"-
F fs>
- t,!ll T=
q4Fql q
o@o
oo@
This LCD TV can be usedasa PC monitor. Your comguter will
have to equipped with a VGA type video output and VGA cable.
I UsingaVGAcable
(not
supplied).
connectPC's
VGA OUT connector
r to the VGA connector on rhe TV. Usethe PClN connecdons.
t UsingaMIN|-JACK
rypeAUDIO cable
(not
supplied).
connecrthe
rC PC'sAUDIO OUT conneclor to the AUDIO connecror on the TV.
Usethe PC lN connections.
? Plug
thepower
cableintoAC inleton LCDTV set.Plug
thepower
t cableinto
anoutletandswitchTV seton.
A UseAV butron on cheremote control to selectPCto useyour LCD
T TV asa PCmonitor.
Note: Pleaserefer to "Setting
Up the PCMode" sectionfor allthe
supportedPCdisplaymodes.
lf possible,
usethe 1280
x 720@50H2
video mode to obtainthe bestPCimage
quality.
|;r;j@
|| ' .t..l
FEI
H ""-"lN
Rt
@N-
GD
&
Computer
1
2
3
Your LCD TV offers DigitalVideo Interface
(DVl) with High Definition Copy Protection
(HDCP)
connections.This
featureallows
a
d,g'ital
connection between set-top boxesand
dE LCD ry creatinga more vibrant image.
Elt/l HDCP technologyallowscontent provid-
G.t dE abilityto utilizethe full bandwidthof
ligh definition signals.
Itbco.lr€<t allpower
sourcesbeforemaking
any
Connectthe diSitalDVloutput ofyour HD
d€vke (e.g.DvD player,SetTop Box..) to the DVI
csnector ofthe DVI lN connection.
C-oon€€rthe AUDIO cable
(ifaudio is
present)
to
dE Audio outputs of your HD deviceandto the
AUDIO R(ri8ht)
andL (left) inputsofthe DVI lN
Use
AV burton on the remote controlto selectDVI
to watchthe ProSrams.
Note:
l- Properworking isonlySuaranteed
with DVI compliantconsumer
Droducts.
2. Digitaldevicesfrom dif{erentmanufactureshavethe possibility
ofdiffering outputstandardswhich maycause
difflcultiesfor the
t€levisionto properly display.
3- t isnot recommendedto connectvoor PCto LcD TV viaDvl
connection,sincethe LCD TV ma),,not supportthe PCdisPlay
modeyouare usrn&
DVI isasp€cificdigitalinputallowint encrypted
transmission
of
uncompressedHD content.DVI includesHDCP (Hith-Bandwidth OiSit2l
Conteft Protection),
which issupportedbyHollywood, satellite
Pro..id€r5.
ard mostofthe consumerelectronicsindustry.
DVI is
Saining
morurn€io-rn
arld
quickly
becominSanindustry
standardforthe consum€r
to v*w llth
definition materialwhile keepingcontent protected.
C; ^ --r;---)
| @El
t*l
-=r**
rwl
oo@
@@@
o@@
@@@
@@
@@@
,-"-@@-@l
Dipita!SatelliteReceiverwirh DVI connector
T he AV (Audio/Video) out jacks are great for
recording with aVCR or usedto connect an
external audiosystemfor better audio.
Disconneat
all powersources
before
makinS
anyconnections.
ForVCRConnection/Recorder:
Connectone endofthe yellowVideoCableto the
VIDEO iackof AV OUT connection.
Connecrthe
other end
io theVIDEO lN jack
on the VCR.
Connectone endofthe red andwhire Audio
Cablefrom the LandRAUDIO jackofAV OUT
connection
to the AUDIO lN iackon the VCR.
Turnthe VCRon, inserra blankVHStapeandit!
readyto record what's
beingviewed
on the TV
Note: The Program
recording
isonly possible
when
the ;npur
siSndisry, AVl, AV2,AV3.
@
@
?@
o
1
2
3
@
o@
oo
@@
o@
@@
@@
AU0t0FluDro
LvtDEo
svroEo
^,,- reil
^
o@@
@;;16l
t0

Other manuals for 32TA1600

1

This manual suits for next models

1

Other Philips LCD TV manuals

Philips 24PW6322 User manual

Philips

Philips 24PW6322 User manual

Philips 32PFL3403 User manual

Philips

Philips 32PFL3403 User manual

Philips 32HFL5460S User manual

Philips

Philips 32HFL5460S User manual

Philips EasySuite 22HFL3233D/10 User manual

Philips

Philips EasySuite 22HFL3233D/10 User manual

Philips 40PFL5606H User manual

Philips

Philips 40PFL5606H User manual

Philips 42PFL7423H User manual

Philips

Philips 42PFL7423H User manual

Philips 14RF50S99 Manual

Philips

Philips 14RF50S99 Manual

Philips Cineos 47PFL9532D/10 User manual

Philips

Philips Cineos 47PFL9532D/10 User manual

Philips 42PF7520D/79 User manual

Philips

Philips 42PF7520D/79 User manual

Philips 20PFL4122/93 User manual

Philips

Philips 20PFL4122/93 User manual

Philips 55OLED707/43 User manual

Philips

Philips 55OLED707/43 User manual

Philips 32PF7520D/10 User manual

Philips

Philips 32PF7520D/10 User manual

Philips Healthcare 22HFL5531H User manual

Philips

Philips Healthcare 22HFL5531H User manual

Philips 42PES0001D User manual

Philips

Philips 42PES0001D User manual

Philips 42PFL7409/98 User manual

Philips

Philips 42PFL7409/98 User manual

Philips PUS8807 User manual

Philips

Philips PUS8807 User manual

Philips 32PFL3606H User manual

Philips

Philips 32PFL3606H User manual

Philips 26HFL3350D User manual

Philips

Philips 26HFL3350D User manual

Philips 42PFL7603D - annexe 1 Quick start guide

Philips

Philips 42PFL7603D - annexe 1 Quick start guide

Philips 19PFL3505D User manual

Philips

Philips 19PFL3505D User manual

Philips 47PFL9603D User manual

Philips

Philips 47PFL9603D User manual

Philips 50PFL3708/F7 User manual

Philips

Philips 50PFL3708/F7 User manual

Philips 17PF8946/78 User manual

Philips

Philips 17PF8946/78 User manual

Philips 37PFL5604H User manual

Philips

Philips 37PFL5604H User manual

Popular LCD TV manuals by other brands

Hisense M3300 user manual

Hisense

Hisense M3300 user manual

Sharp LC-32GA8 Service manual

Sharp

Sharp LC-32GA8 Service manual

Panasonic Viera TX-37LZD800F operating instructions

Panasonic

Panasonic Viera TX-37LZD800F operating instructions

LG DM2352D owner's manual

LG

LG DM2352D owner's manual

Sanyo LCD-22XR9DKH Service manual

Sanyo

Sanyo LCD-22XR9DKH Service manual

LG 22LE5300-CA Service manual

LG

LG 22LE5300-CA Service manual

JVC 1016MTH-VT-VT instructions

JVC

JVC 1016MTH-VT-VT instructions

Sony BRAVIA KDL-40EX640 Quick setup guide

Sony

Sony BRAVIA KDL-40EX640 Quick setup guide

RCA L42FHD2X48 user guide

RCA

RCA L42FHD2X48 user guide

Insignia NS-40L240A13 user guide

Insignia

Insignia NS-40L240A13 user guide

GVA GVALED15J instruction manual

GVA

GVA GVALED15J instruction manual

Sony WEGA KLV-15SR3E operating instructions

Sony

Sony WEGA KLV-15SR3E operating instructions

Sony BRAVIA KDL-26S2000 Service manual

Sony

Sony BRAVIA KDL-26S2000 Service manual

TCL L26HDF12TA user guide

TCL

TCL L26HDF12TA user guide

Grundig 49 GUB 9773 User instructions

Grundig

Grundig 49 GUB 9773 User instructions

Samsung UA40J5100 user manual

Samsung

Samsung UA40J5100 user manual

Currys Essentials C16LDVB11 instruction manual

Currys Essentials

Currys Essentials C16LDVB11 instruction manual

Samsung LE37M87BDX Service manual

Samsung

Samsung LE37M87BDX Service manual

manuals.online logo
manuals.online logoBrands
  • About & Mission
  • Contact us
  • Privacy Policy
  • Terms and Conditions

Copyright 2025 Manuals.Online. All Rights Reserved.