Phoenix Gold FreeFlight User manual

1
Gebrauchsanleitung........................................................................ 05
Instructions for Use......................................................................... 10
Mode d’emploi................................................................................. 15
Manuale di utilizzazione.................................................................. 20
Gebruiksaanwijzing ........................................................................ 25
Használati utasítás.......................................................................... 30
Návod k použití................................................................................ 35
Návod na použitie............................................................................ 40
Instrucţiuni de utilizare ................................................................... 45
Instrukcja obsługi............................................................................ 50
c
o
t
t
o
n
/
l
i
n
e
n
s
i
l
k
/
w
o
o
l
s
y
n
t
h
e
t
i
c
s
M
I
N
M24677_M24678_PhoenixGoldFreeFlight_Manual_A5_20200909_BH_REP.indd 1M24677_M24678_PhoenixGoldFreeFlight_Manual_A5_20200909_BH_REP.indd 1 09.09.20 16:0609.09.20 16:06

2
3
150
200 ml
100
50
MAX
A
N
T
I
-
C
A
L
C
V
E
R
T
I
C
A
L
S
T
E
A
M
I
N
G
A
N
T
I
-
D
R
I
P
A
U
T
O
S
H
U
T
-
O
F
F
N
O
N
-
S
T
I
C
K
C
E
R
A
M
I
C
(A)
(B)
(C)
(D)
(O)
(N)
(J)
(I)
(K)
(H)
(L)
(P)
Abbildung | Figure | Illustration | figura | afbeelding | ábra | obr. | obr. | figura | rysunek 1
(M)
(E)
(F)
(G)
M24677_M24678_PhoenixGoldFreeFlight_Manual_A5_20200909_BH_REP.indd 2M24677_M24678_PhoenixGoldFreeFlight_Manual_A5_20200909_BH_REP.indd 2 09.09.20 16:0609.09.20 16:06

2
3
DE
Lieferumfang und Bezeichnung der Teile
(Abbildung 1)
Keramikplatte (A)
Sprühdüse (B)
Wassertankdeckel (C)
Dampfwählschalter (D)
Sprühtaste (E)
Dampfstoßauslöser (F)
Temperaturregler (G)
Temperaturanzeige-Licht (H)
Ladestation (I)
Verriegelungs-Hebel (J)
Abschaltautomatik-Licht (K)
Verriegelungsschalter der Station (L)
Biegsames Stromkabel (M)
Selbstreinigungstaste (N)
Maximaler Füllstand (O)
Messbecher (P)
EN
Delivery contents and names of parts
(Figure 1)
Ceramic plate (A)
Spray nozzle (B)
Water tank cover (C)
Steam selector switch (D)
Spray button (E)
Steam burst trigger (F)
Temperature control (G)
Temperature display light (H)
Charging station (I)
Lock lever (J)
Automatic switch-off light (K)
Station lock switch (L)
Flexible power cable (M)
Self-cleaning button (N)
Maximum fill level (O)
Measuring cup (P)
FR
Contenu et désignation des pièces
(Illustration 1)
Plaque en céramique (A)
Buse de pulvérisation (B)
Couvercle du réservoir d‘eau (C)
Sélecteur vapeur (D)
Bouton de pulvérisation (E)
Gâchette de vapeur (F)
Régulateur de température (G)
Voyant d‘affichage de la température (H)
Station de charge (I)
Levier de verrouillage (J)
Voyant d‘extinction automatique (K)
Interrupteur de verrouillage de la station
(L)
Câble d‘alimentation flexible (M)
Bouton d‘auto-nettoyage (N)
Niveau maximum (O)
Messbecher (P)
IT
Materiale in dotazione e denominazione
dei pezzi (figura 1)
Piastra in ceramica (A)
Ugello spray (B)
Coperchio del serbatoio dell‘acqua (C)
Selettore del vapore (D)
Tasto spray (E)
Tasto vapore a getto (F)
Regolatore di temperatura (G)
Spia della temperatura (H)
Stazione di ricarica (I)
Leva di bloccaggio (J)
Luce di spegnimento automatico (K)
Interruttore di bloccaggio della stazione (L)
Cavo di alimentazione flessibile (M)
Tasto di autopulizia (N)
Livello di riempimento massimo (O)
Misurino (P)
NL
Leveringsomvang en beschrijving van de
delen (afbeelding 1)
Keramische plaat (A)
Sproeier (B)
Deksel watertank (C)
Stoomkeuzeschakelaar (D)
Sprayknop (E)
Stoomdrukknop (F)
Temperatuurregelaar (G)
Temperatuurindicator-lamp (H)
Oplaadstation (I)
Vergrendel-hendel (J)
Uitschakelautomaat-lamp (K)
Vergrendelschakelaar van het station (L)
Buigzame stroomsnoer (M)
Zelfreinigingsschakelaar (N)
Maximale vulhoeveelheid (O)
Maatbeker (P)
HU
A csomag tartalma és a részegységek
leírása (1. ábra)
Kerámialap (A)
Szórófej (B)
Víztartály sapkája (C)
Gőzválasztó (D)
Permetadagoló gomb (E)
Gőzfúváskapcsoló (F)
Hőfokszabályozó tárcsa (G)
Hőmérsékletjelző fény (H)
Alap (I)
Zár rögzítő kar (J)
Automatikus kikapcsolásjelző fény (K)
Alapzáró kapcsoló (L)
Flexi kábel (M)
Öntisztító gomb (N)
Maximális töltöttségi szint (O)
Vizeskancsó (P)
CZ
Obsah balení a názvy součástí (obr. 1)
Keramická deska (A)
Rozprašovací tryska (B)
Víko nádržky na vodu (C)
Přepínač páry (D)
Tlačítko rozprašování (E)
Spouštěč proudu páry (F)
Regulátor teploty (G)
Kontrolka teploty (H)
Nabíjecí stanice (I)
Blokovací páka (J)
Kontrolka automatického vypínání (K)
Spínač uzamykání stanice (L)
Ohebný napájecí kabel (M)
Tlačítko samočištění (N)
Maximální hladina naplnění (O)
Odměrka (P)
SK
Obsah balenia a názvy súčastí (obr. 1)
Keramická doska (A)
Rozprašovacia dýza (B)
Veko nádržky na vodu (C)
Prepínač pary (D)
Tlačidlo rozprašovania (E)
Spúšťač prúdu pary (F)
Regulátor teploty (G)
Kontrolka teploty (H)
Nabíjacia stanica (I)
Blokovacia páka (J)
Kontrolka automatického vypínania (K)
Spínač uzamykania stanice (L)
Ohybný napájací kábel (M)
Tlačidlo samočistenia (N)
Maximálna hladina naplnenia (O)
Odmerka (P)
RO
Pachetul de livrare şi denumirea
componentelor (figura 1)
Placă ceramică (A)
Duză de pulverizare (B)
Capac rezervor apă (C)
Comutator selector al aburului (D)
Tasta de pulverizare (E)
Declanşator de evacuare abur (F)
Regulator de temperatură (G)
Indicator de temperatură-luminos (H)
Staţie de încărcare (I)
Pârghie de blocare (J)
Sistem automat de deconectare-luminos
(K)
Întrerupătorul de blocare al staţiei (L)
Cablu electric flexibil (M)
Tasta de autocurăţare (N)
Nivel maxim de umplere (O)
Ceașcă de măsurare (P)
PL
Zakres dostawy i oznaczenia części
(rysunek 1)
Stopa ceramiczna (A)
Dysza (B)
Pokrywa zbiornika na wodę (C)
Przełącznik pary (D)
Przycisk spryskiwania (E)
Przycisk uderzenia pary (F)
Regulator temperatury (G)
Lampka wskaźnika temperatury (H)
Stacja ładująca (I)
Dźwignia blokująca (J)
Lampka automatycznego wyłączenia (K)
Przełącznik blokujący stacji (L)
Elastyczny przewód zasilający (M)
Przycisk samoczynnego czyszczenia (N)
Maksymalny poziom wody (O)
Miarka (P)
M24677_M24678_PhoenixGoldFreeFlight_Manual_A5_20200909_BH_REP.indd 3M24677_M24678_PhoenixGoldFreeFlight_Manual_A5_20200909_BH_REP.indd 3 09.09.20 16:0609.09.20 16:06

4
5
c
o
t
t
o
n
/
l
i
n
e
n
s
i
l
k
/
w
o
o
l
s
y
n
t
h
e
t
i
c
s
M
I
N
c
o
t
t
o
n
/
l
i
n
e
n
s
i
l
k
/
w
o
o
l
s
y
n
t
h
e
t
i
c
s
M
I
N
1
c
o
t
t
o
n
/
l
i
n
e
n
s
i
l
k
/
w
o
o
l
s
y
n
t
h
e
t
i
c
s
M
I
N
D
C
c
o
t
t
o
n
/
l
i
n
e
n
s
i
l
k
/
w
o
o
l
s
y
n
t
h
e
t
i
c
s
M
I
N
c
o
t
t
o
n
/
l
i
n
e
n
s
i
l
k
/
w
o
o
l
s
y
n
t
h
e
t
i
c
s
M
I
N
L
c
o
t
t
o
n
/
l
i
n
e
n
s
i
l
k
/
w
o
o
l
s
y
n
t
h
e
t
i
c
s
M
I
N
F
c
o
t
t
o
n
/
l
i
n
e
n
s
i
l
k
/
w
o
o
l
s
y
n
t
h
e
t
i
c
s
M
I
N
H
2
3 4
5
7
9
6
8
c
o
t
t
o
n
/
l
i
n
e
n
s
i
l
k
/
w
o
o
l
s
y
n
t
h
e
t
i
c
s
M
I
N
c
o
t
t
o
n
/
l
i
n
e
n
s
i
l
k
/
w
o
o
l
s
y
n
t
h
e
t
i
c
s
M
I
N
c
o
t
t
o
n
/
l
i
n
e
n
s
i
l
k
/
w
o
o
l
s
y
n
t
h
e
t
i
c
s
M
I
N
10
M24677_M24678_PhoenixGoldFreeFlight_Manual_A5_20200909_BH_REP.indd 4M24677_M24678_PhoenixGoldFreeFlight_Manual_A5_20200909_BH_REP.indd 4 09.09.20 16:0609.09.20 16:06

4
5
DE
Um die besten knitter- und faltenfreien Ergebnisse mit diesem Bügeleisen zu erzielen, lesen Sie diese
Gebrauchsanweisung bitte sorgfältig und bewahren Sie sie gut auf.
SICHERHEITSHINWEISE & TIPPS
1. Dieses Gerät kann von Kindern ab 8 Jahren sowie von Personen mit reduzierten physischen,
sensorischen oder mentalen Fähigkeiten oder Mangel an Erfahrung und/oder Wissen benutzt
werden, wenn sie beaufsichtigt oder bezüglich des sicheren Gebrauchs des Gerätes unterwiesen
wurden und die daraus resultierenden Gefahren verstanden haben. Kinder dürfen nicht mit dem
Gerät spielen. Reinigung und Benutzer-Wartung dürfen nicht durch Kinder durchgeführt werden,
es sei denn, sie sind älter als 8 Jahre und beaufsichtigt. Kinder jünger als 8 Jahre sind vom Gerät
und der Anschlussleitung fernzuhalten.
2. Verwenden Sie Ihr Phoenix Gold® FreeFlight ausschließlich für den dafür vorgesehenen Zweck.
3. Stellen Sie sicher, dass sich Ihr Phoenix Gold® FreeFlight mitsamt dem Kabel stets außer
Reichweite von Kindern befindet.
4. Das Berühren erhitzter Teile, heißen Wassers oder Dampfes kann zu Verbrennungen führen.
Die Keramik-Bügelsohle wird während des Gebrauches extrem heiß. Berühren Sie NIEMALS die
Keramik-Bügelsohle während oder kurz nach dem Gebrauch!
5. Richten Sie niemals den Dampfstrahl auf Personen oder Tiere! Geben Sie gut Acht, dass der
Dampfstrahl nicht in Kontakt mit Ihrer Haut gerät.
6. Um das Auslaufen heißen Wassers und mögliches Verbrühen zu vermeiden, verwenden Sie Ihr
Phoenix Gold® FreeFlight NIEMALS in einer Kopfüber-Position.
7. Das Gerät ist ausschließlich für den Hausgebrauch und nicht für industriellen oder
kommerziellen Gebrauch bestimmt.
8. Verwenden Sie das Gerät NICHT auf einer Oberfläche, die von Hitze oder Dampf Schaden nehmen
könnte, wie etwa auf einer Arbeitsfläche oder auf poliertem Holz.
9. Verwenden Sie KEIN Zubehör, das nicht ausdrücklich für den Gebrauch mit diesem Bügeleisen
vorgesehen ist.
10. Lassen Sie das Gerät NIEMALS alleine, solange es mit dem Strom verbunden ist.
11. Trennen Sie Ihr Phoenix Gold® FreeFlight umgehend nach jedem Gebrauch vom Strom.
12. Verwenden Sie NIEMALS Ihr Phoenix Gold® FreeFlight sofern einer der Teile beschädigt ist.
13. Verwenden Sie niemals Ihr Phoenix Gold® FreeFlight wenn das Kabel oder der Stecker beschädigt
sind, sofern es nicht einwandfrei funktioniert, es zu Boden gefallen, kaputt oder in Wasser
gefallen ist.
14. Versuchen Sie NICHT, Ihr Phoenix Gold® FreeFlight, das Stromkabel oder den Stecker selbst zu
reparieren, wenn diese beschädigt sind. Reparaturen dürfen ausschließlich von qualifizierten
Fachpersonal durchgeführt werden.
15. TrennenSie das Phoenix Gold® FreeFlight immervom Strom, bevorSie denWasserbehälter befüllen.
M24677_M24678_PhoenixGoldFreeFlight_Manual_A5_20200909_BH_REP.indd 5M24677_M24678_PhoenixGoldFreeFlight_Manual_A5_20200909_BH_REP.indd 5 09.09.20 16:0609.09.20 16:06

6
7
16. Füllen Sie den Wasserbehälter mit destilliertem oder abgekochtem Wasser, um Verkalkung zu
vermeiden.
17. Das Stromkabel darf während und kurz nach dem Gebrauch die Keramik-Bügelsohle nicht
berühren.
18. Stellen Sie sicher, dass die Verschlusskappe des Wassertanks gut eingerastet ist, bevor Sie das
Gerät in Gebrauch nehmen.
19. VERMEIDEN Sie, dass der Wassertank während des Gebrauchs gänzlich geleert ist.
20. Verwenden Sie das Bügeleisen ausschließlich auf einer stabilen, flachen Bügelfläche.
21. Lassen Sie die Keramik-Bügelsohle des Gerätes vor der Reinigung gänzlich abkühlen.
22. Bitte nehmen Sie das Bügeleisen zum Nachfüllen von der Station herunter, um zu vermeiden,
dass Wasser auf die Anschlüsse tropft, und drehen Sie die Dampffunktion auf „AUS“, damit kein
Wasser aus der Bügelsohle heraus spritzt.
23. Achten Sie beim vertikalen Bedampfen darauf, zu vermeiden, dass der Dampf mit der Haut in
Berührung kommt, indem Sie die Richtung des Dampfflusses beachten.
24. Lesen Sie bitte die technischen Daten von der Gerätplakette durch, die am Ende dieses
Dokumentes angegeben sind.
25. Beim Nachfüllen von Wasser sollte die Dampffunktion auf „AUS“ geschaltet sein, wenn sie auf
„AN“ ist, kann Wasser aus den Öffnungen der Bügelsohle ausfließen.
26. Um Verfärbung und Flecken von Stofffarben zu vermeiden, empfehlen wir, bunte oder stark
gefärbte Kleidungsstücke durch ein untergelegtes schützendes Stofftuch zu bügeln.
27. Bitte stellen Sie sicher, dass das Bügeleisen beim Aufladen Ihres Phoenix Gold® FreeFlight
richtig in die Station eingesetzt ist.
Etikett des Kleidungsstücks Stoffart Thermostateinstellung
nSynthetik Niedrige Temperatur
bSeide – Wolle Mittlere Temperatur
vBaumwolle – Leinen Hohe Temperatur
mStoff, der nicht gebügelt werden darf
BENUTZUNG DES PHOENIX GOLD® FREE FLIGHT
Erste Benutzung des Phoenix Gold® FreeFlight
Bevor Sie Ihre Kleidungsstücke oder Stoffe zum ersten Mal bügeln, ist es empfehlenswert, das Phoenix
Gold® FreeFlight zuerst ein paar Minuten auf einem feuchten Stoffstück zu benutzen. Dadurch wird
sichergestellt, dass etwaige Rückstände vom Herstellungsprozess von der Keramikplatte abgebrannt
werden und nicht auf Ihre Kleidungsstücke gelangen. Dabei können Sie möglicherweise einen leichten
Geruch und etwas Rauch wahrnehmen, aber das ist ganz normal und sollte rasch verschwinden.
In Gebieten mit hartem Wasser empfehlen wir eine Mischung von 50% Leitungswasser und 50%
destilliertem oder „entmineralisiertem“ Wasser. Verwenden Sie nur sauberes, reines Wasser, das keine
Verschmutzungen oder zusätzliche Chemikalien enthält.
WICHTIG: Jedes Bügeleisen wird werkseitig geprüft, daher kann sich noch etwas Wasser im Tank befinden.
M24677_M24678_PhoenixGoldFreeFlight_Manual_A5_20200909_BH_REP.indd 6M24677_M24678_PhoenixGoldFreeFlight_Manual_A5_20200909_BH_REP.indd 6 09.09.20 16:0609.09.20 16:06

6
7
Bitte spülen Sie das System durch, indem Sie den Tank füllen und das Bügeleisen auf die höchste
Temperatur einstellen und dann den Dampfauslöser drücken, um Dampf abzulassen. Tun Sie das vor dem
ersten Gebrauch mindestens einmal und ebenso, wenn Sie Ihr Phoenix Gold® FreeFlight längere Zeit nicht
benutzt haben.
Wichtige Anweisungen
1. Heben Sie den Wassertankdeckel (C) an und füllen Sie den Tank mit Wasser. Wenn Sie den leeren
Tank füllen, halten Sie ihn fast senkrecht und füllen Sie ihn mit der mitgelieferten Messbecher bis zur
Markierung „MAX“ des Phoenix Gold® FreeFlight. Zum Auffüllen nehmen Sie das Bügeleisen von der
Station, öffnen den Wassertankdeckel und kippen das Bügeleisen nach oben. Füllen Sie es langsam
bis unter die Markierung „MAX“ und schließen Sie den Deckel wieder. HINWEIS: Im Deckel kann sich
etwas Wasser verfangen und aus der kleinen Entlüftungsöffnung entweichen, wenn das Bügeleisen
waagrecht gehalten wird. Das ist keine Leckstelle, öffnen Sie einfach den Deckel und leeren Sie aus
ihm alles Restwasser aus. Manchmal kommt es auch vor, dass ein Geräusch durch die Luft entsteht, die
durch die Entlüftungsöffnung im Deckel entweicht. Wenn das passiert, öffnen Sie einfach den Deckel,
um das zu stoppen.
2. Stecken Sie das Phoenix Gold® FreeFlight an der Steckdose ein und schalten Sie es ein. Vergewissern
Sie sich, dass der Dampf auf „AUS“ geschaltet ist, während das Bügeleisen aufheizt (das wird durch
das Thermostatlicht am Bügeleisen angezeigt). Wenn das System mit dem Netzkabel benutzt wird,
schaltet sich das Licht ein und aus, während die Temperatur geregelt wird. Wenn das Bügeleisen
schnurlos verwendet wird, sollte es auf die Station zurück gestellt werden, damit es die Hitze hält.
Wenn das Thermostatlicht aus ist, ist das Bügeleisen bereit.
BITTE ACHTEN SIE DARAUF, DASS DER DAMPFWÄHLSCHALTER GESCHLOSSEN IST, WENN SIE
DEN DAMPFAUSLÖSER RASCH HINTEREINANDER BENUTZEN, UM EIN SPRITZEN VON WASSER ZU
VERMEIDEN.
Öffnen Sie den Wählschalter nicht unmittelbar nach dem Benutzen des Dampfstoßes, da der Druck
verursachen kann, dass aus der Bügelsohle Wasser austritt. Sehen Sie immer nach, um sicherzugehen,
dass die Funktion „Automatische Abschaltung“ nicht aktiviert ist, wenn Sie den Dampfstoß benutzen,
da dadurch das Bügeleisen rasch abkühlen und Wasser aus der Bügelsohle spritzen kann.
Kalkschutzsystem
Ein spezieller Harzfilter im Wassertank verhindert, dass sich in der Platte eine Kalkschicht anlegt. Der
Harzfilter ist permanent und braucht nicht ausgetauscht zu werden. Verwenden Sie keine chemischen
Zusätze, Duftstoffe oder Entkalker.
Tropfschutzsystem
Mit dem Tropfschutzsystem können Sie selbst die empfindlichsten Stoffe bügeln. Bügeln Sie diese
Stoffe immer mit niedrigen Temperaturen. Die Platte kann so weit abkühlen, dass kein Dampf mehr
heraus kommt, sondern bloß Tropfen von kochendem Wasser, die Ränder oder Flecken hinterlassen
können. Drehen Sie den Dampfwählschalter auf „AUS“, damit sich der Tropfschutz aktiviert, um eine
Dampferzeugung zu verhindern, wodurch das Risiko einer Fleckenbildung vermieden wird.
Automatische Abschaltung
Wenn das (mit der eingeschalteten Station verbundene) Bügeleisen länger als (ca.) 30 Sekunden
in Gebrauch ist, wird eine Sicherheitsvorrichtung aktiviert und die Heizung schaltet sich ab. Wenn
das geschieht, beginnt das Anzeigelicht für automatische Abschaltung (K) zu blinken. Heben Sie das
Bügeleisen waagrechte und zurück in senkrechte Stellung, um diese Sicherheitsfunktion zu deaktivieren,
(das wird durch ein konstantes blaues Licht angezeigt) und lassen Sie das Bügeleisen wieder auf die
erforderliche Temperatur aufheizen, bevor Sie wieder zu bügeln beginnen.
Vorbereitung
Sortieren Sie die Wäsche, die gebügelt werden soll, nach den internationalen Symbolen auf dem Etikett
der Kleidungsstücke, oder wenn dieses fehlt, nach der Art des Stoffes. Beginnen Sie mit dem Bügeln der
Kleidungsstücke, die eine niedrige Temperatur brauchen. Das verkürzt die Wartezeiten (das Bügeleisen
braucht weniger Zeit zum Aufheizen als zum Abkühlen) und eliminiert das Risiko, den Stoff zu versengen.
M24677_M24678_PhoenixGoldFreeFlight_Manual_A5_20200909_BH_REP.indd 7M24677_M24678_PhoenixGoldFreeFlight_Manual_A5_20200909_BH_REP.indd 7 09.09.20 16:0609.09.20 16:06

8
9
DAMPFBÜGELN
Füllen des Tanks
1. Prüfen Sie, ob der Stecker aus der Steckdose gezogen ist.
2. Nehmen Sie das Bügeleisen aus der Station und stellen Sie es vor dem Füllen entfernt davon ab.
3. Drehen Sie den Dampfwählschalter (D) auf. [Abb. 1]
4. Öffnen Sie den Wassertankdeckel (C).
5. Heben Sie die Spitze des Bügeleisens an, damit das Wasser leichter in die Öffnung fließt, ohne
überzulaufen.
6. Gießen Sie mit der (mitgelieferten) Messbecher langsam Wasser in den Tank und achten Sie darauf,
den maximalen Füllstand (etwa 370 ml) nicht zu überschreiten, der durch „MAX“ am Tank (O)
angegeben ist. [Abb. 2]
7. Schließen Sie den Wassertankdeckel (C).
Auswahl des Dampfs
1. Benutzen Sie die höheren Temperatureinstellungen von zwei Punkten bis zu drei Punkten zum
Erzeugen eines gleichmäßigen Dampfflusses und um ein mögliches Ausspritzen von Wasser zu
vermeiden.
2. Um sich zu vergewissern, dass genügend Wasser im Wassertank ist, das Bügeleisen in senkrechte
Stellung bringen. Wischen Sie alles Wasser ab, das sich rund um den Deckel befinden kann.
3. Wählen Sie auf der Temperaturregelscheibe (G) die erforderliche Temperatur (diese muss im
Dampfbereich wie auf der Scheibe gezeigt liegen). [Abb. 3]
4. Setzen Sie das Bügeleisen in die Station ein und stecken Sie den Stecker in die Steckdose:
• Wenn Sie das Bügeleisen mit seiner Station verbunden benutzen [Abb. 4], vergewissern Sie sich,
dass der Verriegelungsschalter der Station (L) in verriegelter Stellung ist.
• Wenn Sie das Bügeleisen getrennt von der Station verwenden [Abb. 5], stellen Sie das Bügeleisen
senkrecht auf die Station und warten Sie, bis es die richtige Temperatur für die beste Leistung erreicht
hat.
5. Wenn das Temperaturanzeigelicht (H) erlischt, können Sie mit dem Bügeln beginnen.
• Wenn das Bügeleisen mit der Station verbunden ist, können Sie mit dem Bügeln fortfahren.
• Wird das Bügeleisen separat benutzt, können Sie es noch etwa 30 Sekunden lang benutzen,
nachdem das Temperaturanzeigelicht (H) erloschen ist (das variiert je nach verschiedenen Faktoren),
dann müssen Sie das Bügeleisen wieder auf die Station stellen. Sie können es wieder benutzen,
nachdem das Temperaturanzeigelicht (H) wieder erlischt.
6. Stellen Sie den Dampfwählschalter (D) auf eine gewünschte Stellung. [Abb. 1]
Benutzen Sie den Dampfstoßauslöser (F) und geben Sie beim senkrechten Bügeln Dampf ab.
WICHTIG: Stellen Sie den Dampfwählschalter auf GESCHLOSSEN, um den Druck für Dampfstoßfunktion
aufrecht zu erhalten und um zu vermeiden, dass Wasser heraus spritzt, wenn der Dampfauslöser gedrückt wird.
Sobald das Bügeleisen ganz aufgeheizt ist, drücken Sie den Dampfstoßauslöser (F), um einen
kraftvollen Dampfstoß zu erzeugen, der Stoffe durchdringen und schwierige Falten glätten kann.
Warten Sie mindestens 2 Sekunden, bevor Sie den Auslöser erneut betätigen. [Abb. 6] Durch Drücken
des Dampfstoßauslösers (F) in Abständen können Sie auch senkrecht bügeln (Vorhänge, aufgehängte
Kleidungsstücke usw.). [Abb. 7]
Warnung: Die Funktion Dampfstoßauslöser (F) kann nur bei hohen Temperaturen verwendet werden.
Denken Sie daran, das Bügeleisen auf die Station zurück zu stellen, wenn Sie es schnurlos verwenden.
Sobald das Temperaturanzeigelicht erloschen ist, nehmen Sie das Bügeleisen von der Station und fahren
mit dem Dampfen fort. Lesen Sie immer das Etikett mit der Pflegeanleitung.
TROCKEN BÜGELN
Zum Bügeln ohne Dampf drehen Sie den Dampfwählschalter (D) einfach auf „AUS“.
Sprühfunktion
Vergewissern Sie sich, dass Wasser im Tank ist. Drücken Sie die Sprühtaste (E) langsam (für einen dichten
Sprühstrahl) oder rasch (für einen Sprühnebel). [Abb. 8]
WARNUNG: Für empfindliche Gewebe empfehlen wir, den Stoff vorher mit der Sprühtaste (E) zu
befeuchten, oder ein feuchtes Tuch zwischen das Bügeleisen und den Stoff zu legen. Damit sich keine
M24677_M24678_PhoenixGoldFreeFlight_Manual_A5_20200909_BH_REP.indd 8M24677_M24678_PhoenixGoldFreeFlight_Manual_A5_20200909_BH_REP.indd 8 09.09.20 16:0609.09.20 16:06

8
9
Flecken bilden, nicht auf Seide oder Synthetikstoffe sprühen.
REINIGUNG
HINWEIS: Vor dem Reinigen des Bügeleisens immer darauf achten, dass es nicht an die Netzsteckdose
angesteckt ist.
Alle auf der Platte gebliebenen Ablagerungen können mit einem feuchten Tuch oder mit einem nicht
scheuernden flüssigen Reinigungsmittel entfernt werden. Vermeiden Sie, die Platte mit Stahlwolle oder
Metallgegenständen zu zerkratzen. Die Kunststoffteile mit einem feuchten Tuch reinigen und dann mit
einem trockenen Tuch abwischen.
SELBSTREINIGUNG
Die Selbstreinigungsfunktion (N) reinigt im Inneren der Platte und entfernt Unreinheiten. Wir empfehlen,
sie alle 10-15 Tage zu benutzen.
Anweisungen:
1. Füllen Sie den Tank bis zum Maximalen Füllstand (O)und drehen Sie den Dampfwählschalter (D) auf „AUS“.
2. Stellen Sie das Bügeleisen in senkrechte Stellung.
3. Drehen Sie den Temperaturregler (G) auf die Stellung „MAX“.
4. Stecken Sie das Bügeleisen an die Netzsteckdose an und lassen Sie es 2 Minuten lang aufheizen.
5. Ziehen Sie den Netzstecker, nehmen Sie das Bügeleisen von der Station und halten Sie es waagrecht
über eine Spüle oder ein Becken.
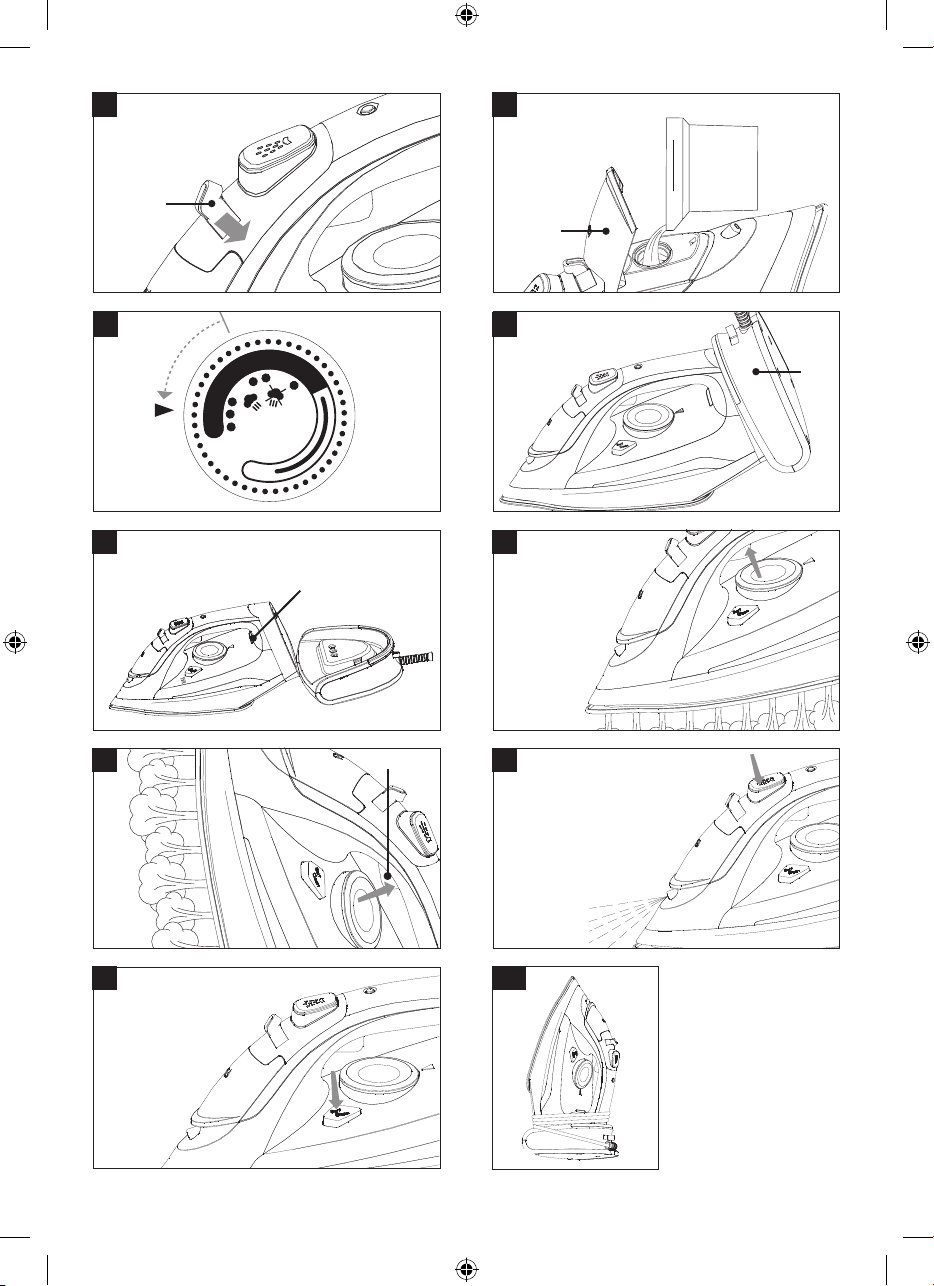
6. Drücken Sie die Selbstreinigungstaste (N) etwa eine Minute lang wiederholt, um die
Reinigungsfunktion zu aktivieren. Dadurch werden durch die Bügelsohle Dampf und Wasser
abgegeben, um alle Ablagerungen zu entfernen. Wiederholen Sie die obigen Schritte bei Bedarf,
insbesondere in Gebieten mit hartem Wasser. [Abb. 9] VORSICHT: Bei der Benutzung der
Selbstreinigungsfunktion strömen aus der Bügelsohle heißes Wasser und Dampf.
7. Stellen Sie das Bügeleisen in senkrechte Stellung und lassen Sie es abkühlen. Dadurch kann allfälliges
Restwasser trocknen.
8. Nach Ende des Selbstreinigungszyklus schließen Sie das Bügeleisen wieder an die Netzsteckdose
an und lassen es zwei Minuten lang aufheizen, damit allfälliges Restwasser in der Dampfkammer
trocknen kann.
9. Führen Sie die Bügelsohle über ein altes Stoffstück, um sie von Unreinheiten zu säubern.
10.Wenn die Bügelsohle abgekühlt ist, können Sie sie mit einem feuchtem Tuch reinigen. Wenn
Sie das Bügeleisen wieder benutzen, lassen Sie es voll aufheizen und aktivieren Sie wieder die
Dampfeinstellung, dann bügeln Sie ein altes Stoffstück, um etwaige verbliebene Unreinheiten zu
entfernen, die sich möglicherweise rund um die Dampföffnungen angelegt haben.
VERSTAUEN DES BÜGELEISENS
1. Ziehen den Stecker des Bügeleisens aus der Steckdose.
2. Leeren Sie den Tank, indem Sie das Bügeleisen auf den Kopf umdrehen und leicht schütteln.
3. Lassen Sie das Bügeleisen vollkommen auskühlen.
4. Wickeln Sie das Stromkabel um die Station. Ziehen Sie nicht zu stark am Stromkabel, da dadurch seine
Verankerung geschwächt werden könnte. [Abb. 10]
5. Stellen Sie das Bügeleisen immer in senkrechte Stellung.
Wir empfehlen, bei Stoffen, die ungewöhnliche Ausführungen haben (Pailletten, Stickerei, Abziehbilder,
usw.), die niedrigsten Temperatureinstellungen zu verwenden. Wenn der Stoff gemischt ist (z.B. 40 %
Baumwolle, 60 % Synthetik), stellen Sie den Thermostat auf die Temperatur auf die Faser ein, welche die
niedrigere Temperatur braucht. Sollten Sie die Zusammensetzung des Stoffes nicht kennen, stellen Sie
die richtige Temperatur fest, indem Sie die Temperatur an einer verborgenen Ecke des Kleidungsstücks
testen. Beginnen Sie mit einer niedrigen Temperatur und erhöhen Sie sie stufenweise, bis die ideale
Temperatur erreicht ist. Bügeln Sie nie Stellen mit Schweißspuren oder anderen Flecken: die Hitze der
Bügelsohle fixiert die Flecken auf dem Stoff, sodass sie nicht mehr entfernt werden können.
Um zu vermeiden, dass Seide, Woll- oder Synthetikstoffe zu glänzen beginnen, bügeln Sie sie verkehrt
(Innenseite nach außen). Um zu vermeiden, dass Kleidungsstücke aus Samt zu glänzen beginnen, bügeln
Sie in eine Richtung (in Faserrichtung) und üben keinen Druck auf das Bügeleisen aus.
Je schwerer die Waschmaschine beladen ist, desto mehr Kleidungsstücke kommen mit Falten heraus.
Das geschieht auch, wenn der Schleudergang eine sehr hohe Umdrehungszahl hat. Viele Stoffe lassen
M24677_M24678_PhoenixGoldFreeFlight_Manual_A5_20200909_BH_REP.indd 9M24677_M24678_PhoenixGoldFreeFlight_Manual_A5_20200909_BH_REP.indd 9 09.09.20 16:0609.09.20 16:06

10
11
sich leichter bügeln, wenn sie noch nicht vollständig trocken sind. Seide sollte beispielsweise immer
feucht gebügelt werden.
ALLGEMEINE PFLEGE
Vor dem Reinigen sicherstellen, dass das Phoenix Gold® FreeFlight ausgesteckt und vollständig abgekühlt
ist. Reinigen Sie die Keramikplatte und den Körper des Bügeleisens mit einem leicht angefeuchteten Tuch.
Verwenden Sie zum Reinigen irgendeines Teils des Bügeleisens keine Scheuerkissen oder Bürsten.
Sollten irgendwelche Kunstfasern an der Bügelsohle anschmelzen, stellen Sie das Bügeleisen auf „MAX“
und führen Sie es über ein sauberes Stück Baumwollstoff, um die Ablagerungen von der Oberfläche
abzuziehen. Für die Außenreinigung lassen Sie das Gerät abkühlen und wischen Sie es mit einem feuchten
Tuch und einem milden Reinigungsmittel ab, dann wischen Sie es trocken.
TECHNISCHE SPEZIFIKATIONEN
Länge des Stromkabels: ca. 1,9 m
Tankvolumen: ca. 370 ml
Stromverbrauch: 2000-2400 W | CH: 1830-2180W
Stromversorgung: 220-240 V ~ 50/60 Hz
Modell: ES2416S_02
ENTSORGUNG
Entsorgen Sie das Produkt am Ende seiner Lebensdauer deshalb nicht mit dem normalen Hausmüll. Bringen Sie es
zu einer Sammelstelle zum Recycling von elektrischen und elektronischen Geräten. Dies wird durch dieses Symbol
auf dem Produkt, in der Bedienungsanleitung und auf der Verpackung angegeben. Informieren Sie sich über
Sammelstellen, die von Ihrem Händler oder der lokalen Behörde betrieben werden. Die Wiederverwertung und das
Recycling von Altgeräten ist ein wichtiger Beitrag zum Schutz unserer Umwelt.
Hergestellt in China
EN
In order to achieve the best crease- and fold-free results with this iron, please read these user
instructions carefully, and retain them in a safe place.
SAFETY NOTICES & TIPS
1. This device may only be used by children from 8 years of age, or by persons with reduced
physical, sensory or mental capabilities or lack of experience and/or knowledge, if they are
supervised or have been instructed in the safe use of the device and have understood the
hazards arising therefrom. Children must never be allowed to play with the unit. Cleaning and
user maintenance should not be performed by children unless they above 8 years of age and
supervised. Children younger than 8 years of age must be kept away from the unit and the
connecting cable.
2. Use your Phoenix Gold® FreeFlight only the purpose for which it is intended.
3. Makesure that your Phoenix Gold® FreeFlight and its cablearealways out of thereach of children.
4. Touching heated parts, hot water or steam can cause burns. The ceramic baseplate becomes
extremely hot during use. NEVER touch the ceramic baseplate during or shortly after use!
5. Never direct the steam jet in the direction of people or animals! Ensure that the steam jet does
not come into contact with your skin.
6. To avoid hot water leakage and possible scalding, NEVER use your Phoenix Gold® FreeFlight in
an upside-down position.
M24677_M24678_PhoenixGoldFreeFlight_Manual_A5_20200909_BH_REP.indd 10M24677_M24678_PhoenixGoldFreeFlight_Manual_A5_20200909_BH_REP.indd 10 09.09.20 16:0609.09.20 16:06

10
11
7. The device is intended for domestic use only, and not for industrial or commercial use.
8. DO NOT use the appliance on a surface that could be damaged by heat or steam, such as a
countertop or polished wood.
9. DO NOT use accessories that are not expressly intended for use with this iron.
10. NEVER leave the device unattended while it is connected to the power supply.
11. Unplug your Phoenix Gold® FreeFlight immediately after each use.
12. NEVER use your Phoenix Gold® FreeFlight if any part of it is damaged.
13. Never use your Phoenix Gold® FreeFlight if the cord or plug is damaged, if it is not working
properly, if it has been dropped, broken or immersed in water.
14. DO NOT attempt to repair your Phoenix Gold® FreeFlight, ir its power cord or plug yourself if they
are damaged. Repairs may only be carried out by qualified personnel.
15. Alwaysdisconnect the Phoenix Gold® FreeFlightfromthe power supplybefore fillingthewatertank.
16. Fill the water tank with distilled or boiled water to avoid limescale.
17. The power cord must not touch the ceramic baseplate during or shortly after use.
18. Make sure that the cap of the water tank is properly locked in place before using the device.
19. AVOID emptying the water tank completely during use.
20. Only use the iron on a stable and flat ironing surface.
21. Allow the appliance‘s ceramic plate to cool down completely before cleaning.
22. Please remove the iron from the station to refill, in order to avoid dripping water on the
connections, and turn the steam function to „OFF“ so that water does not splash out of the plate.
23. When steaming vertically, be careful to avoid the steam coming into contact with the skin by
paying attention to the direction of the steam flow.
24. Please refer to the technical data on the device label at the end of this document.
25. When topping up water, the steam function should be switched to „OFF“, as when it is „ON“, water
can flow out of the openings in the plate.
26. To avoid discolouration and staining of fabric colours, we recommend ironing brightly coloured
or strongly coloured items of clothing with a protective cloth placed below.
27. Please ensure that the iron is correctly inserted in the station when charging your Phoenix Gold®
FreeFlight.
Garment label Fabric type Thermostat setting
nSynthetics Low temperature
bSilk – Wool Medium temperature
vCotton – Linen High temperature
mFabrics that cannot be ironed
M24677_M24678_PhoenixGoldFreeFlight_Manual_A5_20200909_BH_REP.indd 11M24677_M24678_PhoenixGoldFreeFlight_Manual_A5_20200909_BH_REP.indd 11 09.09.20 16:0609.09.20 16:06

12
13
USING THE PHOENIX GOLD® FREEFLIGHT
First use of the Phoenix Gold® FreeFlight
Before ironing your clothes or fabrics for the first time, we advise that you use the Phoenix Gold®
FreeFlight on a damp piece of fabric for a few minutes. This ensures that any residues from the
manufacturing process are burned off the ceramic plate, and do not get on to your clothing. You may
notice a slight odour and smoke, but this is normal and should go away quickly. In areas with hard water,
we recommend a mixture of 50% tap water and 50% distilled or demineralized water. Use only clean, pure
water that does not contain contaminants or additional chemicals.
IMPORTANT: Every iron is tested at the factory, so there may still be some water in the tank.
Please flush the system by filling the tank and setting the iron to the highest temperature, before pressing
the steam trigger to release steam. Do this at least once before first use, and also when you have not used
your Phoenix Gold® FreeFlight for an extended period of time.
Important instructions
1. Lift the water tank lid (C) and fill the tank with water. When you fill the empty tank, hold it near-
vertical, and fill it up to the „MAX“ mark on the Phoenix Gold® FreeFlight using the measuring cup
provided. To fill, take the iron from the station, open the water tank lid, and tilt the iron upwards. Slowly
fill it to below the „MAX“ mark and close the lid again. NOTE: Some water can get caught in the lid and
escape from the small ventilation opening if the iron is held horizontally. This is not a leak, just open
the lid and empty out any remaining water. Sometimes a noise is made by the air escaping through the
vent in the lid. When this happens, opening the lid will stop it.
2. Plug the Phoenix Gold® FreeFlight into the socket and switch it on. Make sure that the steam is
switched to “OFF” while the iron is heating up (this is indicated by the thermostat light on the iron).
When the system is used with the power cord, the light will turn on and off while the temperature is
controlled. If the iron is being used cordlessly, it should be put back on the station to retain the heat.
When the thermostat light turns off, the iron is ready.
PLEASE MAKE SURE THE STEAM SELECTOR SWITCH IS CLOSED WHEN USING THE RAPID STEAM
TRIGGER, TO AVOID SPLASHING OF THE WATER.
Do not open the selector switch immediately after using the steam burst, as the pressure can cause
water to leak out of the baseplate. Always check to make sure that the automatic switch-off function is
not activated when you use the steam burst, as it can cool the iron quickly and splash water from the
baseplate.
Limescale protection system
A special resin filter in the water tank prevents a layer of limescale from building up on the plate. The
resin filter is permanent, and does not need to be replaced. Do not use chemical additives, fragrances or a
descaler.
Anti-drip system
With the anti-drip system, you can iron even the most delicate fabrics. Always iron these fabrics at low
temperatures. The plate could cool down to such an extent that no more steam comes out, just drops
of boiling water that can leave edges or stains. Turn the steam selector to off to activate the anti-drip
protection, which will prevent steam from being generated, thus reducing the risk of staining.
Automatic switch-off
If the iron (when connected to the switched-on station) is in use for longer than (approx.) 30 seconds,
a safety device is activated and the heating switches off. When this happens, the Auto Power Off
indicator light (K) will start flashing. Raise the iron back up to the horizontal position to deactivate this
safety feature (this is indicated by a constant blue light), and allow the iron to heat up to the required
temperature again before you re-start ironing.
Preparation
Sort the laundry that is to be ironed according to the international symbols on the clothing label or, if there
isn‘t one, according to the type of fabric. Start by ironing garments that require a low temperature.
This shortens waiting times (the iron takes less time to heat up than to cool down), and eliminates the risk
of scorching the fabric.
M24677_M24678_PhoenixGoldFreeFlight_Manual_A5_20200909_BH_REP.indd 12M24677_M24678_PhoenixGoldFreeFlight_Manual_A5_20200909_BH_REP.indd 12 09.09.20 16:0609.09.20 16:06

12
13
STEAM IRONING
Filling the tank
1. Check that the plug has been removed from the socket.
2. Remove the iron from the station and place it at a safe distance before filling.
3. Turn the steam selector switch (D) to [Fig. 1].
4. Open the water tank cover (C).
5. Lift the tip of the iron to make it easier for the water to flow into the opening without overflowing.
6. Using the measuring cup (supplied), slowly pour water into the tank, taking care not to exceed the
maximum level (about 370 ml) indicated by “MAX” on the tank (O). [Fig. 2]
7. Close the water tank cover (C).
Choice of steam
1. Use the higher temperature settings - from two points to three points - to create an even flow of steam
and avoid the possibility of water splashing out.
2. To make sure there is enough water in the water tank, turn the iron upright. Wipe off any water that may
be around the lid.
3. Select the required temperature on the temperature control disc (G) (this must be in the steam range
as shown on the disc). [Fig. 3]
4. Place the iron in the station and insert the plug into the socket:
• If you use the iron connected to its station [Fig. 4], make sure the station lock switch (L) is in the
locked position.
• If you use the iron separately from the station [Fig. 5], place the iron upright on the station and wait
for it to reach the right temperature for best performance.
5. When the temperature indicator light (H) goes out, you can start ironing.
• When the iron is connected to the station, you can continue ironing.
• If the iron is used separately, you can use it for about 30 seconds after the temperature indicator
light (H) has gone out (this will vary depending on several factors), and then you will need to return it
to the station. You can use it again after the temperature indicator light (H) goes out again.
6. Set the steam selector switch (D) to the desired position. [Fig. 1]
Use the steam burst trigger (F) to release steam when ironing vertically.
IMPORTANT: Set the steam selector to the CLOSED position to maintain pressure for the steam burst
function and to avoid water splashing out when the steam trigger is pressed.
Once the iron is fully heated, press the steam burst trigger (F) to create a powerful burst of steam that can
penetrate fabrics and smooth out difficult wrinkles. Wait at least 2 seconds before pressing the release
button again. [Fig. 6] You can also iron vertically by pressing the steam burst trigger (F) at intervals (for
curtains, hanging clothes, etc.). [Fig. 7]
WARNING: The steam burst trigger function (F) can only be used at high temperatures. Remember to put
the iron back on the station when using it cordlessly. Once the temperature indicator light has gone out,
remove the iron from the station and continue with the steaming process. Always read the label with the
care instructions.
DRY IRONING
To iron without steam, simply turn the steam selector switch (D) to „OFF“.
Spray function
Make sure that there is water in the tank. Press the spray button (E) slowly (for a thick spray jet) or quickly
(for a spray mist). [Fig. 8]
Warning: for delicate fabrics, we recommend moistening the fabric beforehand with the spray button (E)
or placing a damp cloth between the iron and the fabric. To prevent stains from forming, avoid spraying on
silk or synthetic fabrics.
CLEANING
NOTE: Before cleaning the iron, always ensure that it is not plugged into the mains socket.
Any debris left on the plate can be removed with a damp cloth or a non-abrasive liquid detergent.
Avoid scratching the plate with steel wool or metal objects. Clean the plastic parts with a damp cloth
M24677_M24678_PhoenixGoldFreeFlight_Manual_A5_20200909_BH_REP.indd 13M24677_M24678_PhoenixGoldFreeFlight_Manual_A5_20200909_BH_REP.indd 13 09.09.20 16:0609.09.20 16:06

14
15
before wiping with a dry cloth.
SELF-CLEANING
The self-cleaning function (N) cleans the inside of the plate and removes impurities. We recommend
using this every 10-15 days.
Instructions:
1. Fill the tank to the maximum level (O) and turn the steam selector switch (D) to „OFF“.
2. Place the iron in an upright position.
3. Turn the temperature control (G) to the „MAX“ position.
4. Plug the iron into the socket, and allow it to heat up for 2 minutes.
5. Unplug the power cord, remove the iron from the station, and hold it horizontally over a sink or basin.
6. Press the self-cleaning button (N) repeatedly for about a minute to activate the cleaning function.
This will release steam and water through the baseplate to remove any debris. Repeat the above steps
if necessary, especially in areas with hard water. [Fig. 9] CAUTION: When using the self-cleaning
function, hot water and steam are emitted from the baseplate.
7. Place the iron in an upright position and allow it to cool down. This allows any residual water to dry out.
8. At the end of the self-cleaning cycle, connect the iron to the mains socket again and let it heat up for
two minutes so that any residual water in the steam chamber can dry out.
9. Run the baseplate over an old piece of fabric to clean off any residues.
10.When the baseplate has cooled down, you can clean it with a damp cloth. When you next use the iron,
allow it to heat up to its full capacity and turn the steam back on, then iron an old piece of fabric to
remove any remaining residues that may have built up around the steam outlets.
PUTTING THE IRON AWAY
1. Remove the plug from the socket.
2. Empty the tank by turning the iron upside down and gently shaking it.
3. Allow the iron to cool down completely.
4. Wrap the power cord around the station. Do not pull too hard on the power cord, as this could weaken
its fixing point. [Fig. 10]
5. Always place the iron in an upright position.
We recommend using the lowest temperature settings for fabrics that have unusual designs (sequins,
embroidery, decals, etc.). If the fabric is mixed (e.g. 40% cotton, 60% synthetic), set the thermostat to the
temperature for the fibre that needs the lower setting. If you do not know the composition of the fabric,
you can determine the correct temperature by testing a non-visible corner of the garment. Start with a low
temperature and gradually increase it until the ideal temperature is reached.
Never iron areas with sweat marks or other stains: the heat from the baseplate fixes the stains on the
fabric so that they can no longer be removed. To prevent silk, woollen or synthetic fabrics from gaining a
sheen, iron them inside out. To prevent velvet garments from gaining a sheen, iron in one direction (along
the grain) and do not put pressure on the iron.
The heavier the washing machine is loaded, the more creased the clothes are when they come out.
This also happens when the spin cycle has a very high number of revolutions.Many fabrics are easier to
iron if they are not completely dry. For example, silk should always be ironed with a damp cloth.
GENERAL CARE
Before cleaning, ensure that the Phoenix Gold® FreeFlight is unplugged and has completely cooled down.
Clean the ceramic plate and the body of the iron with a slightly damp cloth. Do not use an abrasive pad or
brush for cleaning any part of the iron.
If any synthetic fibres melt onto the baseplate, set the iron to “MAX“ and run it over a clean piece of cotton
cloth to pull the debris off the surface. To clean the exterior, allow the device to cool down, and wipe it with
a damp cloth and mild detergent, then wipe it dry.
TECHNICAL SPECIFICATIONS
Power cable length: approx. 1.9 m
Tank volume: approx. 370 ml
Power consumption: 2000-2400 W | CH: 1830-2180W
M24677_M24678_PhoenixGoldFreeFlight_Manual_A5_20200909_BH_REP.indd 14M24677_M24678_PhoenixGoldFreeFlight_Manual_A5_20200909_BH_REP.indd 14 09.09.20 16:0609.09.20 16:06

14
15
Power supply: 220-240 V ~ 50/60 Hz
Model: ES2416S_02
DISPOSAL
Do not dispose of the product with normal household waste at the end of its service life. Take it to a collection point
for recycling electrical equipment. This is indicated by the symbol on the product, in the operating instructions and
on the packaging. Find out about collection points operated by your dealer or the local authority. The reuse and
recycling of old devices is an important contribution to protecting our environment.
Made in China
FR
Afin d‘obtenir avec ce fer les meilleurs résultats sans froissements ni plis, veuillez lire attentivement
ces consignes d‘utilisation et les conserver dans un endroit sûr.
CONSIGNES DE SÉCURITÉ ET CONSEILS
1. Cet appareil peut être utilisé par des enfants dès 8 ans ou par des personnes ayant des capacités
physiques, sensorielles ou mentales réduites ou manquant d‘expérience et/ou de connaissances
s‘ils sont sous surveillance ou ont été informés à une utilisation sûre de l‘appareil et ont compris
les dangers qui en découlent. Les enfants ne doivent pas jouer avec l‘appareil. Le nettoyage et
la maintenance par l‘utilisateur ne doivent pas être effectués par des enfants à moins qu‘ils aient
plus de 8 ans et qu‘ils soient surveillés. L‘appareil et le câble d‘alimentation doivent être tenus
hors de portée des enfants de moins de 8 ans.
2. Utilisez votre Phoenix Gold® FreeFlight uniquement aux fins pour lesquelles il a été conçu.
3. Assurez-vous que votre Phoenix Gold® FreeFlight et son câble se trouvent toujours hors de
portée des enfants.
4. Entrer en contact avec les pièces chauffées, l‘eau ou la vapeur chaude peut entraîner des
brûlures. La plaque en céramique devient extrêmement chaude pendant l‘utilisation. NE
TOUCHEZ JAMAIS la plaque en céramique pendant ou peu de temps après l‘utilisation !
5. Ne dirigez jamais le jet de vapeur vers d‘autres personnes ou vers des animaux ! Veillez à ne pas
laisser le jet de vapeur entrer en contact avec votre peau.
6. Pour éviter les fuites d‘eau chaude et les brûlures éventuelles, n‘utilisez JAMAIS votre Phoenix
Gold® FreeFlight à l‘envers.
7. L‘appareil est destiné à un usage domestique uniquement et non à un usage industriel ou
commercial.
8. N‘utilisez PAS le produit sur une surface qui pourrait être endommagée par la chaleur ou la
vapeur, telle qu‘un plan de travail ou du bois poli.
9. N‘utilisez AUCUN accessoire qui n‘est pas expressément destiné à être utilisé avec ce fer.
10. NE LAISSEZ JAMAIS l‘appareil seul lorsqu‘il est connecté à l‘alimentation électrique.
11. Débranchez votre Phoenix Gold® FreeFlight immédiatement après chaque utilisation.
12. N‘utilisez JAMAIS votre Phoenix Gold® FreeFlight si une pièce est endommagée.
13. N‘utilisez jamais votre Phoenix Gold® FreeFlight si le câble ou la fiche sont endommagés, s‘il ne
M24677_M24678_PhoenixGoldFreeFlight_Manual_A5_20200909_BH_REP.indd 15M24677_M24678_PhoenixGoldFreeFlight_Manual_A5_20200909_BH_REP.indd 15 09.09.20 16:0609.09.20 16:06

16
17
fonctionne pas correctement, s‘il est tombé, cassé ou est tombé dans l‘eau.
14. N‘essayez PAS de réparer votre Phoenix Gold® FreeFlight, le câble d‘alimentation ou la fiche
vous-même s‘ils sont endommagés. Les réparations ne doivent être effectuées que par des
spécialistes qualifiés.
15. Coupez toujours le Phoenix Gold® FreeFlight de l‘alimentation avant de remplir le réservoir
d‘eau.
16. Remplissez le réservoir d‘eau avec de l‘eau déminéralisée ou bouillie pour éviter l‘apparition de
calcaire.
17. Le câble d‘alimentation ne doit pas toucher la plaque en céramique pendant ou peu de temps
après l‘utilisation.
18. Assurez-vous que le bouchon du réservoir d‘eau est correctement verrouillé avant d‘utiliser
l‘appareil.
19. ÉVITEZ que le réservoir d‘eau ne soit complètement vidé pendant l‘utilisation.
20. N‘utilisez le fer que sur une surface de repassage stable et plane.
21. Laissez la plaque en céramique de l‘appareil refroidir complètement avant de procéder au
nettoyage.
22. Veuillez retirer le fer de la station pour le remplir afin d‘éviter que l‘eau ne goutte sur les
connexions, et mettez la fonction vapeur sur « ARRÊT » pour éviter que de l‘eau ne gicle de la
plaque.
23. Lors de la vaporisation de vapeur verticale, veillez à éviter que la vapeur n‘entre en contact avec
votre peau en faisant attention à la direction du flux de vapeur.
24. Veuillez lire les données techniques sur l‘étiquette de l‘appareil à la fin de ce document.
25. Lors du remplissage d‘eau, la fonction vapeur doit être réglée sur « ARRÊT », lorsqu‘elle est
réglée sur « MARCHE », de l‘eau peut s‘écouler par les ouvertures de la plaque.
26. Afin d‘éviter la décoloration et les taches des couleurs sur le tissu, nous vous recommandons de
repasser les vêtements aux couleurs vives ou très colorés en plaçant un chiffon de protection
entre la plaque et le tissu.
27. Veuillez vous assurer que le fer est correctement inséré dans la station lorsque vous chargez
votre Phoenix Gold® FreeFlight.
Étiquette de vêtement Type de tissu Réglage du thermostat
nSynthétique Basse température
bSoie, laine Température moyenne
vCoton, lin Haute température
mTissu qui ne peut pas être repassé
M24677_M24678_PhoenixGoldFreeFlight_Manual_A5_20200909_BH_REP.indd 16M24677_M24678_PhoenixGoldFreeFlight_Manual_A5_20200909_BH_REP.indd 16 09.09.20 16:0609.09.20 16:06

16
17
UTILISATION DU PHOENIX GOLD® FREE FLIGHT
Première utilisation du Phoenix Gold® FreeFlight
Avant de repasser vos vêtements ou tissus pour la première fois, il est conseillé d‘utiliser le Phoenix Gold®
FreeFlight au préalable pendant quelques minutes sur un morceau de tissu humide. Cela garantit que tout
résidu provenant du processus de fabrication est brûlé sur la plaque en céramique et ne finisse pas sur vos
vêtements. Vous remarquerez peut-être une légère odeur et de la fumée, mais cela est normal et devrait
disparaître rapidement. Dans les zones à eau dure, nous recommandons un mélange de 50 % d‘eau du
robinet et 50 % d‘eau distillée ou « déminéralisée ». N‘utilisez que de l‘eau propre et pure qui ne contient
aucun contaminant ou de produits chimiques supplémentaires.
IMPORTANT : chaque fer est testé en usine, donc il se peut qu‘il y ait encore de l‘eau dans le réservoir.
Veuillez rincer le système en remplissant le réservoir et en réglant le fer sur haute température, puis en
appuyant sur la gâchette de vapeur pour libérer la vapeur. Faites-le au moins une fois avant de l‘utiliser
pour la première fois et également si vous n‘avez pas utilisé votre Phoenix Gold® FreeFlight pendant une
longue période.
Instructions importantes
1. Soulevez le couvercle du réservoir d‘eau (C) et remplissez le réservoir d‘eau. Lorsque vous remplissez
le réservoir vide, tenez-le presque verticalement et remplissez-le jusqu‘au repère « MAX » présent
sur le Phoenix Gold® FreeFlight à l‘aide du verre gradué fourni. Pour remplir le réservoir d‘eau, retirez
le fer de la station, ouvrez le couvercle du réservoir d‘eau et inclinez le fer vers le haut. Remplissez-
le lentement jusqu‘à atteindre le repère « MAX » et fermez le couvercle. REMARQUE : de l‘eau peut
rester coincée dans le couvercle et s‘échapper de la petite ouverture de ventilation si le fer est tenu
horizontalement. Il ne s‘agit pas d‘une fuite, il suffit d‘ouvrir le couvercle et de vider l‘eau restante.
Parfois, il arrive également qu‘un bruit soit produit par l‘air qui s‘échappe par l‘ouverture de ventilation
du couvercle. Lorsque cela se produit, ouvrez simplement le couvercle pour l‘arrêter.
2. Branchez le Phoenix Gold® FreeFlight dans la prise électrique et allumez-le. Assurez-vous que la
vapeur est éteinte pendant que le fer chauffe (ceci est indiqué par le voyant du thermostat sur le fer).
Lorsque le système est utilisé avec le câble d‘alimentation, le voyant s‘allume et s‘éteint pendant que
la température est contrôlée. Si le fer est utilisé sans fil, il doit être remis sur la station pour garder la
chaleur. Lorsque le voyant du thermostat est éteint, le fer est prêt.
VEUILLEZ VOUS ASSURER QUE LE SÉLECTEUR DE VAPEUR EST FERMÉ LORSQUE VOUS UTILISEZ LA
GÂCHETTE DE VAPEUR RAPIDEMENT POUR ÉVITER LES ÉCLABOUSSURES D‘EAU.
N‘ouvrez pas le sélecteur immédiatement après avoir utilisé le jet de vapeur, car la pression peut
provoquer une fuite d‘eau hors de la plaque. Assurez-vous toujours que la fonction « extinction
automatique » est désactivée lorsque vous utilisez le jet de vapeur, car il peut refroidir rapidement le
fer et éclabousser la plaque.
Système de protection anti-calcaire
Un filtre en résine spécial dans le réservoir d‘eau empêche l‘accumulation d‘une couche de calcaire de
dans la plaque. Le filtre en résine est permanent et n‘a pas besoin d‘être remplacé.
N‘utilisez aucun additif chimique, parfum ou détartrant.
Système anti-goutte
Avec le système anti-goutte, vous pouvez repasser même les tissus les plus délicats.
Repassez toujours ces tissus à basse température. La plaque peut refroidir à un point tel qu‘il n‘y a plus
de vapeur, mais des gouttes d‘eau bouillante peuvent laisser des contours ou des taches. Tournez le
sélecteur de vapeur sur arrêt pour éviter la génération de vapeur, ce qui active la protection anti-goutte,
évitant ainsi le risque de taches.
Extinction automatique
Si le fer (raccordé à la station allumée) est utilisé pendant plus de (environ) 30 secondes, un dispositif
de sécurité est activé et le chauffage s’arrête. Lorsque cela se produit, le voyant d‘extinction automatique
commencera (K) se met à clignoter. Soulevez le fer à l’horizontale puis de nouveau à la verticale pour
désactiver cette fonction de sécurité (ceci est indiqué par une lumière bleue constante) et laissez le fer
chauffer à la température requise avant de recommencer le repassage.
M24677_M24678_PhoenixGoldFreeFlight_Manual_A5_20200909_BH_REP.indd 17M24677_M24678_PhoenixGoldFreeFlight_Manual_A5_20200909_BH_REP.indd 17 09.09.20 16:0609.09.20 16:06

18
19
Préparation
Triez le linge à repasser selon les symboles internationaux présents sur l‘étiquette du vêtement ou, si elle
n‘est pas présente, selon le type de tissu. Commencez par repasser les vêtements qui nécessitent une
basse température. Cela permet de raccourcir le temps d‘attente (le fer prend moins de temps à chauffer
qu‘à refroidir) et élimine le risque de brûler le tissu.
REPASSAGE VAPEUR
Remplissage du réservoir
1. Vérifiez si la fiche est bien retirée de la prise électrique.
2. Retirez le fer de la station et éloignez-le avant de le remplir.
3. Tournez le sélecteur de vapeur (D) sur [Illustr. 1].
4. Ouvrez le couvercle du réservoir d‘eau (C).
5. Soulevez la pointe du fer pour permettre à l‘eau de s‘écouler plus facilement dans l‘ouverture sans
déborder.
6. À l‘aide du verre doseur (fourni), versez lentement de l‘eau dans le réservoir, en prenant soin de ne
pas dépasser le niveau maximum (environ 370 ml) indiqué par le repère « MAX » sur le réservoir (O).
[Illustr. 2]
7. Refermer le couvercle du réservoir d‘eau (C).
Sélection de la vapeur
1. Utilisez les réglages de température plus élevés de deux points à trois points pour créer un flux de
vapeur uniforme et éviter les éclaboussures d‘eau.
2. Pour vous assurer qu‘il y a suffisamment d‘eau dans le réservoir d‘eau, tournez le fer à la verticale.
Essuyez l‘eau qui pourrait éventuellement se trouver autour du couvercle.
3. Sélectionnez la température souhaitée sur le disque de contrôle de température (G) (celle-ci doit se
trouver dans la plage vapeur comme indiqué sur le disque). [Illustr. 3]
4. Placez le fer dans la station et insérez la fiche dans la prise :
• Si vous utilisez le fer connecté à sa station [Illustr. 4], assurez-vous que le commutateur de
verrouillage de la station (L) est en position verrouillée.
• Si vous utilisez le fer déconnecté de la station [Illustr. 5], placez le fer à la verticale sur la station et
attendez qu‘il atteigne la bonne température pour de meilleures performances.
5. Lorsque le voyant de température (H) s‘éteint, vous pouvez commencer à repasser.
• Lorsque le fer est connecté à la station, vous pouvez continuer à repasser.
• Si le fer est utilisé séparément, vous pouvez l‘utiliser pendant environ 30 secondes après que le
voyant de température (H) s‘éteigne (cela varie en fonction de divers facteurs), alors vous devez
remettre le fer sur la station. Vous pouvez continuer de l‘utiliser après que le voyant de température
(H) s‘éteigne à nouveau.
6. Réglez le sélecteur de vapeur (D) sur la position souhaitée. [Illustr. 1]
Utilisez la gâchette de vapeur (F) et libérez de la vapeur lorsque vous repassez verticalement.
IMPORTANT : réglez le sélecteur de vapeur sur FERMÉ pour maintenir la pression pour la fonction de jet
de vapeur et pour empêcher l‘eau de jaillir lorsque la gâchette de vapeur est enfoncée.
Une fois que le fer est entièrement chauffé, appuyez sur la gâchette de vapeur (F) pour créer un puissant
jet de vapeur qui peut pénétrer les tissus et lisser les plis difficiles. Attendez au moins 2 secondes avant
d‘appuyer à nouveau sur la gâchette. [Illustr. 6] Vous pouvez également repasser verticalement en
appuyant sur la gâchette de vapeur (F) à distance (rideaux, vêtements suspendus, etc.). [Illustr. 7]
AVERTISSEMENT : la fonction gâchette de vapeur (F) ne peut être utilisée qu‘à hautes températures.
N‘oubliez pas de remettre le fer sur la station lorsque vous l‘utilisez sans fil. Une fois le voyant de
température est éteint, retirez le fer de la station et continuez à utiliser la vapeur. Lisez toujours l‘étiquette
avec les instructions d‘entretien.
REPASSAGE À SEC
Pour repasser sans vapeur, tournez simplement le sélecteur de vapeur (D) sur arrêt.
M24677_M24678_PhoenixGoldFreeFlight_Manual_A5_20200909_BH_REP.indd 18M24677_M24678_PhoenixGoldFreeFlight_Manual_A5_20200909_BH_REP.indd 18 09.09.20 16:0609.09.20 16:06

18
19
Fonction de pulvérisation
Assurez-vous qu‘il y a de l‘eau dans le réservoir. Appuyez lentement sur le bouton de pulvérisation (E)
(pour un jet de pulvérisation dense) ou rapidement (pour un brouillard de pulvérisation). [Illustr. 8]
AVERTISSEMENT : pour les tissus délicats, nous vous recommandons d‘humidifier au préalable le tissu
avec le bouton de pulvérisation (E), ou de placer un chiffon humide entre le fer et le tissu. Pour éviter les
taches, ne vaporisez pas les tissus en soie ou synthétiques.
NETTOYAGE
REMARQUE : Vavant de nettoyer le fer, assurez-vous toujours qu‘il n‘est pas branché sur la prise
électrique.
Vous pouvez retirer les dépôts présents sur la plaque avec un chiffon humide ou un détergent liquide non
abrasif. Évitez de rayer la plaque avec de la laine d‘acier ou des objets métalliques. Nettoyez les pièces en
plastique avec un chiffon humide, puis essuyez-les avec un chiffon sec.
AUTO-NETTOYAGE
La fonction d‘auto-nettoyage (N) nettoie l‘intérieur de la plaque et élimine les impuretés. Nous vous
recommandons de l‘utiliser tous les 10 à 15 jours.
Instructions :
1. Remplissez le réservoir jusqu‘au niveau maximum (O) et tournez le sélecteur de vapeur (D) sur
« arrêt ».
2. Placez le fer en position verticale.
3. Tournez la commande de température (G) sur la position « MAX ».
4. Branchez le fer dans la prise électrique et laissez-le chauffer pendant 2 minutes.
5. Débranchez la fiche d‘alimentation, retirez le fer de la station et tenez-le horizontalement au-dessus
d‘un évier ou d‘un lavabo.
6. Appuyez sur le bouton d‘auto-nettoyage (N) à plusieurs reprises pendant environ une minute pour
activer la fonction de nettoyage. Cela dégagera de la vapeur et de l‘eau à travers la plaque pour
éliminer les dépôts. Répétez les étapes ci-dessus si nécessaire, en particulier dans les zones où l‘eau
est dure. [Illustr. 9] ATTENTION : lors de l‘utilisation de la fonction d‘auto-nettoyage, de l‘eau chaude
et de la vapeur s‘échappent de la plaque.
7. Placez le fer à la verticale et laissez-le refroidir. Cela permet à l‘eau résiduelle de sécher.
8. À la fin du cycle d‘auto-nettoyage, rebranchez le fer dans la prise électrique et laissez-le chauffer
pendant deux minutes afin que l‘eau résiduelle présente dans la chambre à vapeur puisse sécher.
9. Passez la plaque sur un vieux morceau de tissu pour nettoyer les impuretés.
10.Une fois la plaque refroidie, vous pouvez la nettoyer avec un chiffon humide. Lorsque vous
recommencez à utiliser le fer, laissez-le chauffer au maximum et rallumez la vapeur, puis repassez un
vieux morceau de tissu pour éliminer les impuretés restantes qui se sont formées autour des sorties de
vapeur.
RANGEMENT DU FER
1. Retirez la fiche du fer de la prise.
2. Videz le réservoir en retournant le fer et en le secouant doucement.
3. Laissez le fer refroidir complètement.
4. Enroulez le câble d‘alimentation autour de la station. Ne tirez pas trop fort sur le câble d‘alimentation,
car cela pourrait affaiblir son ancrage. [Illustr. 10]
5. Placez toujours le fer en position verticale.
Nous vous recommandons d‘utiliser les réglages de température les plus bas pour les tissus aux
finitions inhabituelles (paillettes, broderies, décalcomanies, etc.). Si le tissu est mélangé (par exemple
40 % coton, 60 % synthétique), réglez le thermostat sur la température de la fibre qui a besoin de la
température la plus basse. Si vous ne connaissez pas la composition du tissu, vous pouvez déterminer la
température correcte en testant la température sur un coin caché du vêtement. Commencez par à basse
température et augmentez-la progressivement jusqu‘à atteindre la température idéale.
Ne repassez jamais les zones avec des marques de sueur ou d‘autres taches : la chaleur de la plaque fixe
les taches sur le tissu, elles seront donc difficiles à éliminer. Pour éviter que les tissus en soie, en laine ou
synthétiques ne commencent à briller, repassez-les à l‘envers (à l‘envers). Pour éviter que les vêtements
M24677_M24678_PhoenixGoldFreeFlight_Manual_A5_20200909_BH_REP.indd 19M24677_M24678_PhoenixGoldFreeFlight_Manual_A5_20200909_BH_REP.indd 19 09.09.20 16:0609.09.20 16:06

20
21
en velours ne brillent, repassez dans un même sens (le long du fil) et n‘exercez aucune pression sur le fer.
Plus la machine à laver est chargée, plus les vêtements se froissent.
Cela se produit également lorsque le cycle d‘essorage est réglé sur un nombre de tours très élevé.
De nombreux tissus sont plus faciles à repasser s‘ils ne sont pas complètement secs. Par exemple, la soie
doit toujours être repassée avec un chiffon humide.
ENTRETIEN GÉNÉRAL
Avant le nettoyage, assurez-vous que le Phoenix Gold® FreeFlight est débranché et a complètement
refroidi. Nettoyez la plaque en céramique et le corps du fer avec un chiffon légèrement humide. N‘utilisez
pas de tampon abrasif ou de brosse pour nettoyer une partie quelconque du fer. Si des fibres synthétiques
fondent sur la plaque, réglez le fer sur « MAX » et passez-le sur un morceau de coton propre pour retirer
les dépôts de la surface. Pour nettoyer l‘extérieur, laissez l‘appareil refroidir et essuyez-le avec un chiffon
humide et un détergent doux, puis essuyez-le.
SPÉCIFICATIONS TECHNIQUES
Longueur du câble : env. 1,9 m
Réservoir : env. 370 ml
Consommation : 2000-2400 W | CH: 1830-2180W
Source de courant : 220-240 V ~ 50/60 Hz
Modèle : ES2416S_02
ÉLIMINATION
Lorsque le produit est arrivé en fin de vie, ne le jetez pas avec les ordures ménagères. Apportez-le à un point de
collecte pour le recyclage des équipements électriques et électroniques. Cela doit être indiqué par le symbole
suivant sur le produit, dans le manuel et sur l‘emballage. Renseignez-vous sur les points de collecte mis en place
par votre revendeur ou par les autorités locales. La réutilisation et le recyclage des appareils usagés sont une
contribution importante à la protection de l‘environnement.
Fabriqué en Chine
IT
Per ottenere i migliori risultati senza pieghe e senza grinze con questo ferro da stiro, leggere
attentamente queste istruzioni e conservarle in un luogo sicuro.
NOTE SULLA SICUREZZA & CONSIGLI
1. Questo dispositivo può essere utilizzato da bambini di età pari o superiore a 8 anni, o da
persone con ridotte capacità fisiche, sensoriali o mentali o che non hanno le necessarie
esperienze e / o conoscenze solo sotto supervisione o solo se istruiti sull‘uso sicuro del
dispositivo e ne hanno compreso i rischi derivanti. I bambini non devono giocare con
l‘apparecchio. La pulizia e la manutenzione non devono essere effettuate da bambini, a meno
che non abbiano più di 8 anni e siano sorvegliati. Tenere i bambini di età inferiore agli 8 anni
lontano dall‘apparecchio e dal cavo di collegamento.
2. Utilizzate il vostro Phoenix Gold® FreeFlight solo per lo scopo previsto.
3. Assicuratevi che il vostro Phoenix Gold® FreeFlight e il cavo siano sempre fuori dalla portata
dei bambini.
4. Il contatto con parti riscaldate, acqua calda o vapore può causare ustioni. La piastra in
ceramica diventa estremamente calda durante l‘uso. Non toccare MAI la piastra in ceramica
durante o subito dopo l‘uso!
M24677_M24678_PhoenixGoldFreeFlight_Manual_A5_20200909_BH_REP.indd 20M24677_M24678_PhoenixGoldFreeFlight_Manual_A5_20200909_BH_REP.indd 20 09.09.20 16:0609.09.20 16:06
This manual suits for next models
3
Table of contents
Languages:
Other Phoenix Gold Iron manuals