manuals.online logo
Brands
  1. Home
  2. •
  3. Brands
  4. •
  5. Phonocar
  6. •
  7. Marine Radio
  8. •
  9. Phonocar WATERPROOF MARINE STEREO SERIES User manual

Phonocar WATERPROOF MARINE STEREO SERIES User manual

VM065
SINTOLETTORE USB IMPERMEABILE
WATERPROOF MARINE STEREO SERIES
MANUALE ISTRUZIONI • INSTRUCTIONS MANUAL
NOTICE DE MONTAGE ET D’EMPLOI
GEBRAUCHSANWEISUNGEN • MANUAL DE INSTRUCCIONES
• Per l’installazione rivolgersi al personale tecnico qualificato. • Usare solo con impianto elettrico a 12V DC con negativo
a massa. • Scollegare il terminale negativo della batteria quando si effettuano le connessioni dell’apparecchio. • Quando si
sostituisce il fusibile, utilizzarne uno con lo stesso valore di amperaggio. • Non aprire l’unità e non tentare di ripararla, con-
sultare il proprio rivenditore o personale tecnico qualificato.
• Installation to be carried out by trained technical personnel • Make sure you have 12V DC, with negative-pole to mass
• First disconnect negative-pole of the battery, then effect radio connections • When replacing fuse, always use fuse with
same Ampere-value • Never open the unit, nor try to repair yourself. Always ask your Retailer or authorized technical staff
• Se servir du personnel technique qualifié pour l’installation. • Utiliser uniquement dans des installations électriques à 12V DC
avec négatif à masse. • Débrancher le terminal négatif de la batterie lorsqu’on fait les connexions de l’appareil. • Quand on
remplace un fusible, se servir d’un autre ayant le même ampérage. • Ne pas ouvrir l’appareil pour essayer de le réparer, con-
tacter votre revendeur ou un personnel technique qualifié
• Die Installation muss durch technische Fachkräfte vorgenommen werden • Nur bei 12V DC verwenden, mit Negativ-Pol zur
Masse • Erst den Negativ-Pol der Batterie abtrennen, dann die Anschlüsse herstellen • Beim Auswechseln, immer Sicherun-
gen derselben Ampere-Stärke verwenden • Nie versuchen, das Gerät zu öffnen oder eigenhändig zu reparieren. Immer den
Händler bzw. technische Fachkräfte zu Rate ziehen
• Para la instalación, contactar exclusivamente con empresas especializadas y personal técnicamente cualificado. • Usar solo
con alimentación de 12V DC y negativo a masa. • Desconectar el terminal negativo de la batería cuando se efectúen las co-
nexiones del aparato.• Cuando se sustituya el fusible, utilizar exclusivamente fusibles con el mismo amperaje. • Non abrir la
unidad y no intentar repararla, consultar al revendedor o personal técnico cualificado.
Precauzioni • Warnings • Précautions • Vorsicht • Precauciones
Connessioni • Connections • Connexions • Anschlüsse • Conexiones
NERO - BLACK
NOIR - SCHWARZ - NEGRO
ROSSO - RED
ROUGE - ROT - ROJO
GIALLO - YELLOW
JAUNE - GELB - AMARILLO
BIANCO - WHITE
BLANCHE - WEISS - BLANCO
BIANCO/NERO - WHITE
BLANCHE - WEISS - BLANCO
VIOLA - PURPLE
POURPRE - LILA - PÚRPURA
VIOLA/NERO - PURPLE/BLACK
POURPRE/NOIR - LILA/ SCHWARZ
PÚRPURA/NEGRO
GRIGIO - GREY
GRIS - GRAU - GRIS
VERDE - GREEN
VERTE - GRÜN - VERDE
GRIGIO/NERO - GREY/BLACK
GRIS/NOIR - GRAU/SCHWARZ
GRIS/NEGRO
VERDE/NERO - GREEN/BLACK
VERTE/NOIR - GRÜN/SCHWARZ
VERDE/NEGRO
MASSA / GROUND
MASSE / MASA
+12 V SOTTOCHIAVE - INJECTION KEY
APRÈS CONTACT - ZÜNDPLUS
BAJO LLAVE
+12 V PERMANENTE - MEMORY
POSITIF BATTERIE - BATTERIE-PLUS
POSITIVO BATERÍA
AUX-IN
ANTERIORE SX / FRONT LEFT
ANTÉRIEURE GAUCHE
FRONT LINKS
ANTERIOR IZQUIERDO
POSTERIORE SX / FRONT LEFT
POSTÉRIEURE GAUCHE
HECK LINKS
POSTERIOR IZQUIERDO
ANTERIORE SX / FRONT LEFT
ANTÉRIEURE GAUCHE
FRONT LINKS
ANTERIOR IZQUIERDO
POSTERIORE SX / FRONT LEFT
POSTÉRIEURE GAUCHE
HECK LINKS
POSTERIOR IZQUIERDO
POSTERIORE DX / REAR RIGHT
POSTÉRIEURE DROIT
HECK RECHTS
POSTERIOR DERECHO
ANTERIORE DX / FRONT RIGHT
ANTÉRIEURE DROIT
FRONT RECHTS
ANTERIOR DERECHO
POSTERIORE DX / REAR RIGHT
POSTÉRIEURE DROIT
HECK RECHTS
POSTERIOR DERECHO
ANTERIORE DX / FRONT RIGHT
ANTÉRIEURE DROIT
FRONT RECHTS
ANTERIOR DERECHO
ANTENNAUSB
Il VM065 deve essere installato su una superficie pulita, asciutta e piatta, pulire accuratamente la parte di contatto e assi-
curarsi che una volta installato il prodotto sia sigillato e stagno.
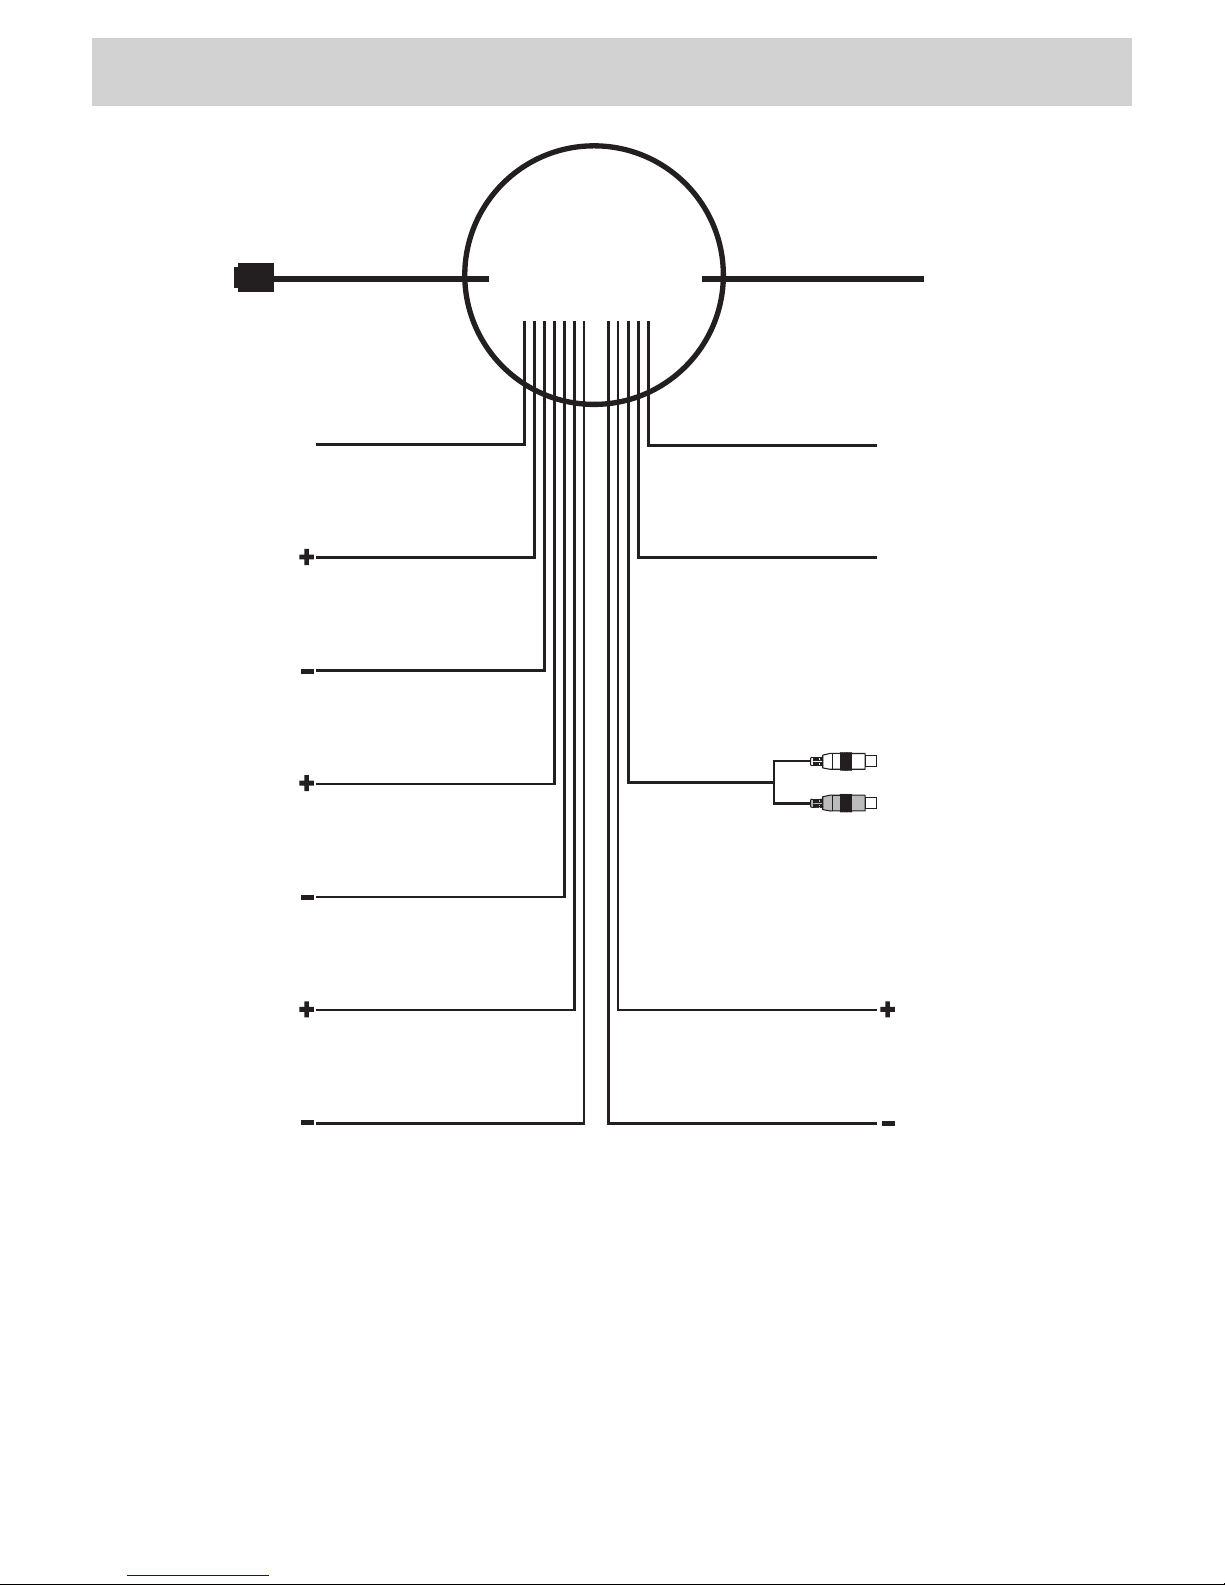
Verificare che ci sia spazio adeguato per l’installazione per evitare il danneggiamento dei cavi posteriori.
È necessario praticare un foro di 7,5 cm per una corretta installazione ed una profondità di almeno 6 cm.
Una volta inserito il VM065 nel foro, avvitare posteriormente la staffa tramite le viti in dotazione in modo che frontalmente
il prodotto sia ben sigillato.
In caso la staffa sia troppo lunga è possibile accorciarla tagliando lungo le fessure pre-segnate.
VM065 doit être installé sur une surface propre, sèche et plane. Nettoyer avec soin la partie de contact et s’assurer, après
l’installation, que le produit est bien ferme et étanche.
Vérifier qu’il y a assez d’espace pour l’installation, afin d’éviter tout endommagement des câbles arrière.
Il est nécessaire de percer un trou de 7,5 mm pour une installation correcte et il faut observer une profondeur de 6 cm.
Après avoir inséré le VM065 dans le trou, visser le support à l’arrière à travers les vis fournies dans la confection, de ma-
nière à ce que le produit soit bien fermé frontalement.
Si le support est trop long, il est possible de le raccourcir, en coupant tout au long de l’ouverture pointillée.
VM065 muss auf einer sauberen, trockenen und ebenen Oberfläche installiert werden. Den mittleren Teil sorgfältig reini-
gen.Nach der Installation sich vergewissern, dass das Produkt versiegelt und dicht ist.
Bitte überprüfen, dass es ausreichenden Platz gibt, damit Rückkabel nicht beschädigt werden.
Es ist notwendig ein Loch von 7,5 cm zu machen und eine Tiefe von mindestens 6 cm zu beachten, um eine richtige
Installation durchzuführen. Einst der VM065 in das Loch eingeführt wird, den Befestigungsbügel rückwärtig durch Schrau-
ben (im Lieferumgang) befestigen, sodass das Produkt am besten eingestellt werden kann.
Falls der Befestigungsbügel zu lang ist, kann dieser entlang der gestrichelten Öffnung geschnitten werden.
El VM065 tiene que ser instalado encima de una superficie limpia, seca y plana. Limpiar escrupulosamente la parte de con-
tacto y asegurarse que una vez instalado el producto quede hermético y estanco.
Verificar que haya espacio adecuado para la instalación para evitar dañar los cables traseros.
Es necesario practicar un orificio de 7,5 cm para una correcta instalación y una profundidad de unos 6 cm.
Una volta introducido el VM065 en el orificio, atornillar posteriormente el soporte mediante los tornillos que se suministran en
dotación, de forma que el producto quede completamente hermético con la superficie.
En el caso de que el soporte sea demasiado largo es posible acortarlo, cortando a lo largo de las ranuras previamente mar-
cadas.
The unit should be mounted to a dry, clean and flat surface to assure that the seal condition is fully watertight. Please
make sure that the location has enough space for installation. Enough mounting depth is needed to avoid cables to be da-
maged. The unit requires a 7,5 cm diameter round hole and 6 cm. deep. Cut the hole and install the unit. Ensure the rear
gasket is fully sealed to the mounting surface without distorting the unit. Use mounting bracket to fasten the back part of
the unit with the location so as to avert the unit loose. If the mounting bracket proved to be too long, cut some breakaway
segments accordingly.
Installazione • Installation
S.p.A. - Via F.lli Cervi, 167/C - 42124 Reggio Emilia (Italy) - Tel. +39 0522941621 - Fax +39 05221602093
www.phonocar.com - e-mail:info@phonocar.it
POWER • Premere brevemente per accendere e silenziare audio, tenere premuto per spegnere
• Short Pressing to switch on and muting, press and hold to switch off
• Appuyer brièvement pour allumer et couper le son, maintenir enfoncé pour éteindre
• Kurz drücken zum Ein- Stummschalten.
• Pulsar brevemente para encender y silenciar el audio, tener pulsado para apagar
VOL+ / VOL- • Aumenta e diminuisce il volume
• Increase and decrease volume
• Augmente et réduit le son
• Lautstärke erhöhen oder verringern
• Aumenta y disminuye el volumen.
• Traccia precedente-seguente
• Next-previous track
• Trace précédente-suivante
• Stück/Kapitel davor/danach
• Pista precedente-siguiente
BAND • In modalità radio passa da FM ad AM, in USB avvia-interrompe riproduzione
• Change FM / AM band in radio mode, play-pause in USB mode
• En modalité radio il passe de FM à AM, en fonction USB il lance-interrompe la reproduction
• Beim Radio-Modus wird von FM nach AM gewechselt - Beim USB-Modus wird die Wiedergabe
gestartet/unterbrochen
• En modo radio pasa de FM a AM, en USB inicia-interrumpe la reproducción
MODE • Premere brevemente per cambio sorgente, premere per 2 secondi per regolare toni audio.
• Short pressing to change source, press and hold for 2 seconds to adjust audio tones.
• Appuyer brièvement pour changer de source, appuyer pendant 2 secondes pour régler les tons
bass / trebble / balance.
• Kurz drücken um die Quelle zu wechseln, 2 Sekunden drücken um bass / trebble / balance einzustellen.
• Pulsar brevemente para cambiar de fuente, pulsar durante 2 segundos para ajustar los tonos de audio.
Funzioni • Functions •
Fonctions • Funktionen • Funciónes
POWER
VOL+ / VOL-
MODE

This manual suits for next models

1

Popular Marine Radio manuals by other brands

OTS DRS-100 Mod B user manual

OTS

OTS DRS-100 Mod B user manual

Rhotheta RT-1000 installation manual

Rhotheta

Rhotheta RT-1000 installation manual

GME GX600D instruction manual

GME

GME GX600D instruction manual

Uniden OSEANUS DSC owner's manual

Uniden

Uniden OSEANUS DSC owner's manual

Appareo Stratus ES installation instructions

Appareo

Appareo Stratus ES installation instructions

Cobra Marine MR HH600W FLT GPS BT owner's manual

Cobra Marine

Cobra Marine MR HH600W FLT GPS BT owner's manual

Raymarine Ray49 Owner's handbook

Raymarine

Raymarine Ray49 Owner's handbook

Uniden UM380 owner's manual

Uniden

Uniden UM380 owner's manual

Blue Mark DroneBeacon db120 manual

Blue Mark

Blue Mark DroneBeacon db120 manual

GME GD9520 instruction manual

GME

GME GD9520 instruction manual

Sonardyne 8300 quick start guide

Sonardyne

Sonardyne 8300 quick start guide

Sonardyne DPT6 quick start guide

Sonardyne

Sonardyne DPT6 quick start guide

COBHAM Sailor 6300 MF/HF DSC installation manual

COBHAM

COBHAM Sailor 6300 MF/HF DSC installation manual

GiBiDi DCX100 Instructions for installations

GiBiDi

GiBiDi DCX100 Instructions for installations

Icom IC-M802 Connection guide

Icom

Icom IC-M802 Connection guide

MB QUART NAUTIC Series NRA 450  NRA450 NRA450 Installation & operation manual

MB QUART

MB QUART NAUTIC Series NRA 450 NRA450 NRA450 Installation & operation manual

mcmurdo Smartfind M10 user manual

mcmurdo

mcmurdo Smartfind M10 user manual

Sonardyne 6G ROVNAV 6 quick start guide

Sonardyne

Sonardyne 6G ROVNAV 6 quick start guide

manuals.online logo
manuals.online logoBrands
  • About & Mission
  • Contact us
  • Privacy Policy
  • Terms and Conditions

Copyright 2025 Manuals.Online. All Rights Reserved.