manuals.online logo
Brands
  1. Home
  2. •
  3. Brands
  4. •
  5. PHYWE
  6. •
  7. Blood Pressure Monitor
  8. •
  9. PHYWE Cobra SMARTsense 12944-00 User manual

PHYWE Cobra SMARTsense 12944-00 User manual

1
www.phywe.com, © All rights reserved 12944-00 / 4021
Operating
instructions
Cobra SMARTsense Blood Pressure
12944-00
PHYWE Systeme GmbH & Co. KG
Robert-Bosch-Breite 10
D–37079 Göttingen
Telefon +49 (0) 551 604–0
Fax +49 (0) 551 604–107
E-mail [email protected]
Internet www.phywe.com
The unit complies
with the applicable
EC-guidelines
Fig. 1: 12944-00 Cobra SMARTsense Blood Pressure
TABLE OF CONTENTS
1SAFETY PRECAUTIONS
2PURPOSE AND CHARACTERISTICS
3FUNCTIONAL AND OPERATING ELEMENTS
4NOTES ON OPERATION
5HANDLING
6TECHNICAL DATA
7SCOPE OF DELIVERY
8ACCESSORIES
9 CONFORMITY
10 DISPOSAL
11 EXPLANATION OF THE SYMBOLS
1 SAFETY PRECAUTIONS
Carefully read these operating instructions completely
before operating this instrument. This is necessary to
avoid damage to it, as well as for user-safety.
Only use the instrument for the purpose for which it was
designed.
Only use the instrument in dry rooms in which there is no
risk of explosion.
Protect the instrument from dust, moisture and vapours.
Use a slightly moist lint-free cloth to clean the instrument.
Do not use aggressive cleaning agents or solvents.
Take care that no liquid penetrates in through the hous-
ing openings, as such penetration would result in dam-
age to Sensor.
Do not open the unit.
2 PURPOSE AND CHARACTERISTICS
The sensor is used to measure blood pressure.
The measured values are transmitted via Bluetooth or USB to
any terminal devices such as tablets, smart phones, etc.
The sensor is neither suitable nor approved for medical pur-
poses. It is intended solely for didactic purposes. This device
must not be used for defined measurements on humans in
order to diagnose an illness or disease, i.e. it is not intended
for monitoring, treating or alleviating illnesses or diseases. As
a consequence, it is not subject to the strict constraints of the
Medical Devices Act.
Caution!
2
www.phywe.com, © All rights reserved 12944-00 / 4021
3 FUNCTIONAL AND OPERATING ELEMENTS
3.1 Operating elements
The sensor has an on-button and two LEDs for indicating the
Bluetooth and battery charge status.
On-button
To switch the sensor on and off in Bluetooth mode, the power
button must be pressed for longer than 3s. If the sensor is to
be connected via USB, it is not necessary to press the power
button.
Bluetooth-LED
Flashing red every 2 seconds
Not connected
Flashing green every 2 seconds
Connected to the ter-
minal device
Flashing green every 4 seconds
Running measurement
Battery charge LED
Flashing red every 2 seconds
Low battery
Illuminated red
Active charging process
Illuminated red
Charging process
completed
3.2 Function elements
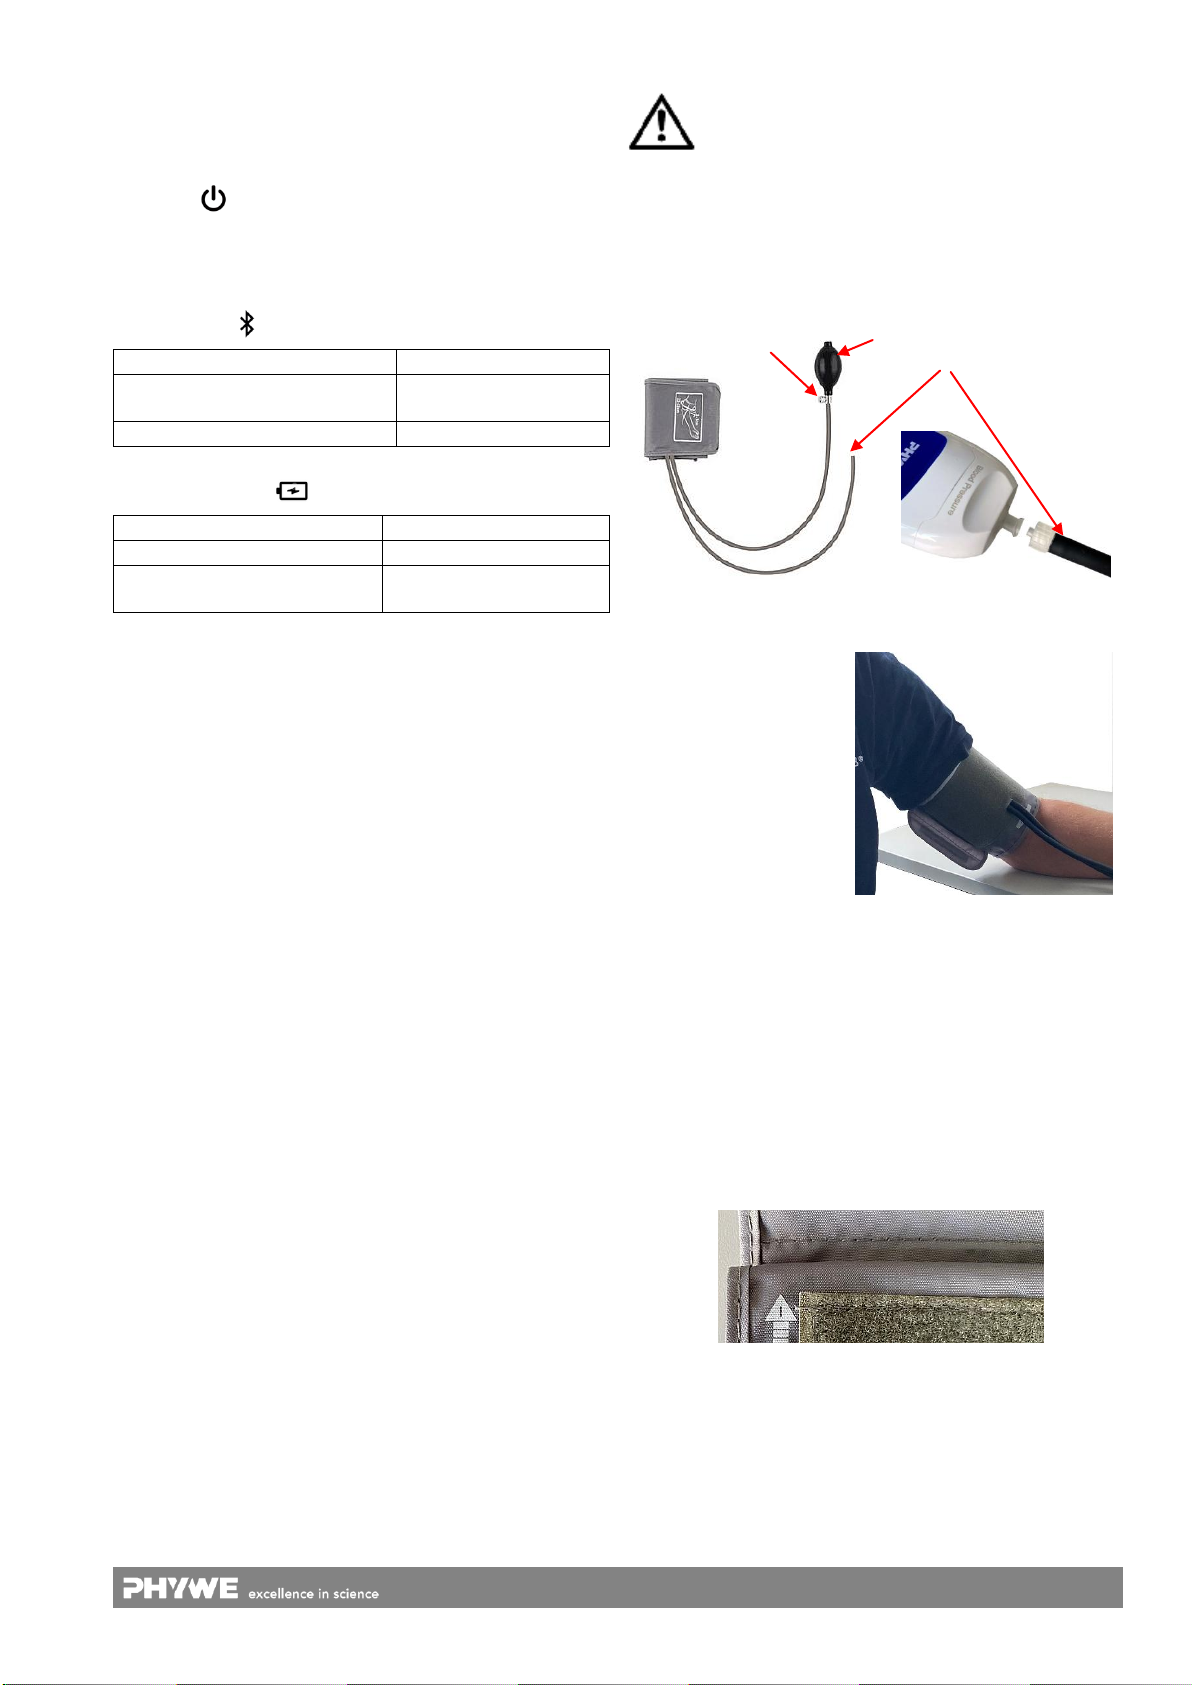
There is a Luer-Lock connector on the front of the sensor, to
which the supplied cuff must be connected.
3.3 USB port
The battery, which is permanently installed in the sensor, is
charged via the type C USB port. Furthermore, communica-
tion with a computer takes place via this interface.
4 NOTES ON OPERATION
This device fulfils all of the technical requirements that are
compiled in current EC guidelines. The characteristics of this
product qualify it for the CE mark.
This instrument is only to be put into operation under special-
ist supervision in a controlled electromagnetic environment in
research, educational and training facilities (schools, universi-
ties, institutes and laboratories).
The individual connecting leads are each not to be longer
than 2 m.
The instrument can be so influenced by electrostatic charges
and other electromagnetic phenomena (HF, bursts, indirect
lightning discharges) that it no longer works within the given
specifications. Carry out the following measures to reduce or
eliminate the effect of such disturbance: Ensure potential
equalization at the PC (especially with Laptops). Use screen-
ing. When a total failure of the instrument occurs, unplug it
and plug it back in again for a reset.
5 HANDLING
This section describes the start-up of the sensor and the re-
cording of measurement data. Please read this section thor-
oughly in order to avoid failures or operating errors.
5.1 Charging process
Use a USB-C cable to connect the sensor to a computer or
USB charger (not included).
During the charging process, the battery charge LED lights
up red. When the charging process is complete, the battery
charge LED lights up green. The charging time for a com-
pletely discharged battery is 3 hours maximum.
Disconnect the charger at the latest four hours af-
ter the completion of the charging process. Other-
wise, the service life of the battery may be nega-
tively affected.
5.2 Putting on the blood pressure cuff
The enclosed blood pressure cuff must be connected to the
sensor unit with the open hose end (1)
.
Fig. 2 Fig. 3
Slide the cuff over the
upper arm until the lower
edge of the cuff is 2-3
cm above the crook of
the arm.
When used on the left
arm, the air hose runs to
the device in the middle
of the crook of the arm.
This automatically marks
the 4 cm long artery is placed Fig. 4
icentrally above the pulse point.
When using the device on the right arm, the cuff must be
turned to the left until the artery marking is positioned on the
pulse point. The air hose then runs along the inside of the
upper arm.
The cuff should be tight enough to allow 2 fingers to fit be-
tween the arm and the cuff. Now pull the free end of the cuff
tight and close the Velcro fastener.
Check that the measuring arrow on the cuff is within the "arm
circumference mark" on the edge of the cuff.
Fig. 5
Place the arm with the cuff loosely stretched out on a table
surface and keep it still during the measurement. The palm of
the hand points upwards.
1
2
3
3
www.phywe.com, © All rights reserved 12944-00 / 4021
5.3 Start-up
Switch the sensor on by pressing the on-button for more than
3 seconds. The Bluetooth LED lights up red. Start the soft-
ware and select the sensor.
A 9-digit code is
printed on the back of
the sensor (Fig.6).
The last 4 digits of the
code are displayed as
sensor designation in
the software (Fig.7).
This enables an exact
assignment of the
sensors with the
software.
Fig. 6
Fig. 7
Selection of the sensor via the Bluetooth interface
Make sure that the Bluetooth interface is activated on the
terminal device (PC/Tablet/Smartphone) and that the soft-
ware is allowed to access the interface.
After the sensor has been selected in the software, the LED
flashes green to indicate that the connection has been estab-
lished correctly. After the sensor has been coupled with the
software, the sensor is no longer visible to other users in the
software, and therefore can no longer be selected.
If the sensor is switched on and not connected, it switches off
automatically after 5 minutes.
Selection of the sensor via the USB interface
For this purpose the sensor must be plugged into the USB
port of the end device. It is not necessary to switch on the
sensor. The sensor is automatically recognized and dis-
played. It can be selected and connected directly.
5.4 Recording of measurement data
Press the bellows (fig.2 no.2) quickly and repeatedly until a
pressure of 150-170 mmHg is reached. Start the measure-
ment in the software and now slowly open the release valve
(fig.2 no.3) until the pressure is continuously reduced slightly.
If the pressure has fallen below 50 mmHg stop the meas-
urement and open the release valve completely
.
Fig. 8
The pulse pressure signal (∆p) superimposed on the falling
pressure is normalised to 1.0 at its maximum amplitude
(MAP).
The systolic pressure (SAP) is on the falling pressure curve
at the point where ∆p has an amplitude of 0.5 (before MAP).
Diastolic pressure (DAP) is normalised to 0.85 (after MAP) on
the falling pressure curve at the point where ∆p has fallen to
the amplitude of 0.85 (after MAP).
6 TECHNICAL DATA
Operating temperature range: 5 - 40°C
Rel. humidity < 80%
Measuring range
Resolution
Accuracy
0… 375 mmHg
0.05 mmHg
± 3 mmHg
Max. date rate
Battery capacitiy
Max. wireless range (open field)
500 Hz
250 mAh
30 m
Dimensions (length x width x height)
190 x 55 x 24 mm
Weight
205 g
7 SCOPE OF DELIVERY
The extent of delivery is as follows
Cobra SMARTsense Blood Pressure 12944-00
USB cable type C 07935-00
Blood pressure cuff with double tube system
and bellows
Operating instructions
8 ACCESSORIES
The following accessories are available:
Cobra SMARTlink 12999-99
USB-charger 07934-99
USB cable type C 07935-00
USB-Bluetooth-Adapter 07936-00
Software measureLAB 14580-61
Free measureApp available from supplier portals
iOS
Android
Windows
9 CONFORMITY
Black
PHYWE Systeme GmbH & Co.KG hereby
declares that the radio system type 12944-
00 complies with the 2014/53/EU directive.
The complete text of the EC Declaration of
Conformity is available at the following In-
ternet address:
www.phywe.com/en/ec-declaration
MAP
SAP
DAP
4
www.phywe.com, © All rights reserved 12944-00 / 4021
10 DISPOSAL
The packaging mainly consists of environmentally-friendly
materials that should be returned to the local recycling sta-
tions.
PHYWE Systeme GmbH & Co. KG
Abteilung Kundendienst
Robert-Bosch-Breite 10
D–37079 Göttingen
Telefon +49 (0) 551 604-274
Fax +49 (0) 551 604-246
11 EXPLANATION OF THE SYMBOLS
Attention!
Potentially damaging situation (damage
to property)
General danger area
Observe operating instructions
Note
Important information about the device
Observe operating instructions
Do not dispose of this product with normal
household waste. If this unit needs to be
disposed of, please return it to the address
that is stated below for proper disposal

Popular Blood Pressure Monitor manuals by other brands

Braun ActivScan 9 quick start guide

Braun

Braun ActivScan 9 quick start guide

AEG BMG 4922 user guide

AEG

AEG BMG 4922 user guide

AND UM-212BLE instruction manual

AND

AND UM-212BLE instruction manual

PiC indolor ONE CHECK instruction manual

PiC indolor

PiC indolor ONE CHECK instruction manual

Soehnle SYSTO MONITOR 200 Instructions for use

Soehnle

Soehnle SYSTO MONITOR 200 Instructions for use

Optimum Medical TMB-1872-A user manual

Optimum Medical

Optimum Medical TMB-1872-A user manual

boso ABI-system 100 User instructions

boso

boso ABI-system 100 User instructions

HoMedics THERA P BPW-051DDM manual

HoMedics

HoMedics THERA P BPW-051DDM manual

OSIM uCheck Smart Operation manual

OSIM

OSIM uCheck Smart Operation manual

smartheart 01-553 quick start guide

smartheart

smartheart 01-553 quick start guide

CVS CVSBPW-610 quick start guide

CVS

CVS CVSBPW-610 quick start guide

Aktiia INIT I1 user manual

Aktiia

Aktiia INIT I1 user manual

Beurer BM 58 Instructions for use

Beurer

Beurer BM 58 Instructions for use

Beurer BC 85 Instructions for use

Beurer

Beurer BC 85 Instructions for use

Obbo MM-4750 manual

Obbo

Obbo MM-4750 manual

Microlife BP A2 Classic manual

Microlife

Microlife BP A2 Classic manual

A&D UA-851 specification

A&D

A&D UA-851 specification

Topcom BPM Wrist 1480 user guide

Topcom

Topcom BPM Wrist 1480 user guide

manuals.online logo
manuals.online logoBrands
  • About & Mission
  • Contact us
  • Privacy Policy
  • Terms and Conditions

Copyright 2025 Manuals.Online. All Rights Reserved.