Pic Solution GoClic User manual

Part no. 311-0000-000-048
Product name 機器說明書/ NO LOGO GoGlic-4218A
(Pikdare) /英文
Spec L148*W105mm/模造紙80P/黑/共
頁/騎馬釘
Writer Lesley
Color BLU PANTONE 281C


Blood Glucose Monitoring System
Owner’s Manual
TD - 4218


Dear GoGlic System Owner:
Thank you for purchasing the GoGlic TD-4218 Blood Glucose Monitoring System. This manual provides
important information to help you to use the system properly. Before using this product, please read the following
contents thoroughly and carefully.
Regular monitoring of your blood glucose levels can help you and your doctor gain better control of your
diabetes. Due to its compact size and easy operation, you can use the GoGlic Blood Glucose Monitoring System
to easily monitor your blood glucose by yourself anywhere, any time.
If you have other questions regarding this product, please contact the customers’toll-free number for Italy 800 900
080 and for France 01.55.93.26.48.
Intended Use
This system is intended for use outside the body (
in vitro
diagnostic use) by people with diabetes at home and
by health care professionals in clinical settings as an aid to monitoring the effectiveness of diabetes control. It is
intended to be used for the quantitative measurement of glucose (sugar) in fresh capillary whole blood samples
from the fingertips and palm, and from venous, arterial and neonatal blood sample. It should not be used for the
diagnosis of or screening for diabetes mellitus.
Professionals may test with capillary, venous, arterial and neonatal blood sample; home use is limited to capillary
whole blood testing.
Test Principle
Your system measures the amount of sugar (glucose) in whole blood. The glucose testing is based on the
measurement of electrical current generated by the reaction of glucose with the reagent of the strip. The meter
measures the current, calculates the glucose level, and displays the result. The strength of the current produced by
the reaction depends on the amount of glucose in the blood sample.

IMPORTANT SAFETY PRECAUTIONS
READ BEFORE USE
1. Use this device ONLY for the intended use described in this manual.
2. Do NOT use accessories which are not supplied or recommended by the manufacturer. Other accessories
may negatively affect EMC performance.
3. Do NOT use the device if it is not working properly or if it is damaged.
4. This device does NOT serve as a cure for any symptoms or diseases. The data measured is for reference only.
Always consult your doctor to have the results interpreted.
5. Before using this device to test blood glucose, read all instructions thoroughly and practice the test. Carry out
all the quality control checks as directed.
6. Keep the device and testing equipment away from young children. Small items such as the battery cover,
batteries, test strips, lancets and vial caps are choking hazards.
7. Use of this instrument in a dry environment, especially if synthetic materials are present (synthetic clothing,
and carpets etc.) may cause damaging static discharges that may cause erroneous results.
8. Do NOT use this instrument in close proximity to sources of strong electromagnetic radiation, as these may
interfere with the accurate operation and inaccurate results could arise.
9. Proper maintenance and periodically control solution test are essential to the longevity of your device. If you
are concerned about your accuracy of measurement, please contact the customers’toll-free number for Italy
800 900 080 and for France 01.55.93.26.48.
10. For the reason of maintain basic safety and essential performance in regards to EMC, please contact the
manufacturer or the manufacturer’s representative to report unexpected operation or event. Do not try to
fix it by yourself.
11. When using the device, stay away from electromagnetic radiation, such as the mobile in use.
12. If used in close proximity to other electronic devices, EMC must be tested and verified.
13. Do not use accessories which are not supplied or recommended by the manufacturer. Other cables and
accessories may negatively affect EMC performance.
14. The accessible materials used in the device will not cause the potential allergic reactions to skin.
KEEP THESE INSTRUCTIONS IN A SAFE PLACE

TABLE OF CONTENTS
BEFORE YOU BEGIN ............................................................................................................................. 1
Important Information............................................................................................................................................................................... 1
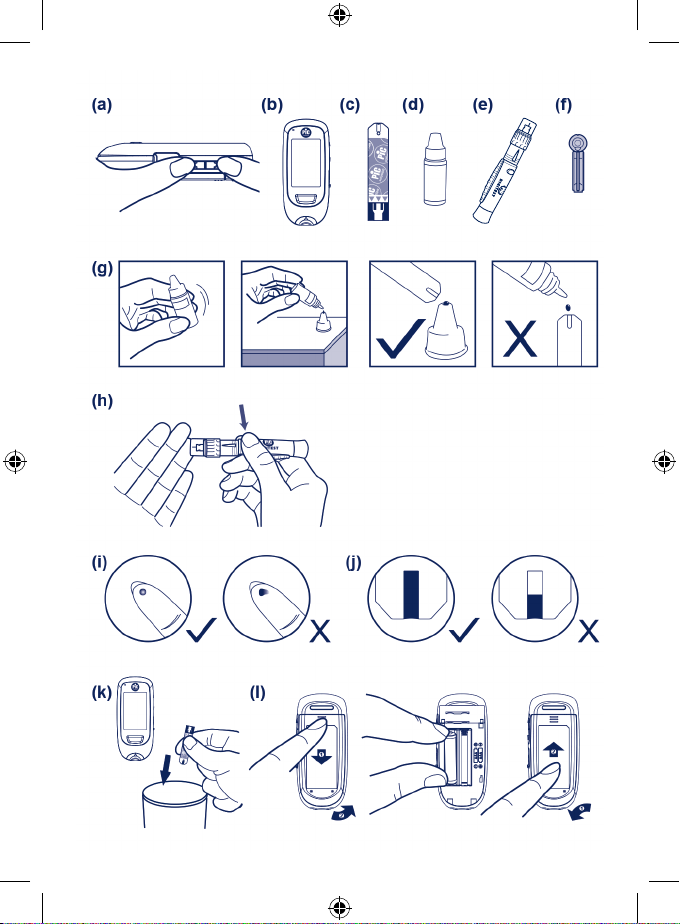
Contents of System...................................................................................................................................................................................... 2
Meter Overview..............................................................................................................................................................................................3
Display Screen .................................................................................................................................................................................................4
Test Strip..............................................................................................................................................................................................................4
SETTING THE METER............................................................................................................................ 5
HOW TO SWITCH THE BLOOD GLUCOSE METER ON AND OFF.......................................................... 6
THE FOUR MEASURING MODES.......................................................................................................... 6
QUALITY CONTROL TESTING .............................................................................................................. 6
When Should the Control Solution Test be Performed?.......................................................................................................6
Performing a Control Solution Test....................................................................................................................................................6
TESTING WITH BLOOD SAMPLE.......................................................................................................... 7
Preparing the Puncture Site ................................................................................................................................................................... 7
Getting a drop of blood (h)..................................................................................................................................................................... 8
Performing a Blood Glucose Test.........................................................................................................................................................8
Alternative Site Testing...............................................................................................................................................................................10
METER MEMORY .................................................................................................................................. 10
Reviewing Test Results ............................................................................................................................................................................... 10
Reviewing Blood Glucose Day Average Results.........................................................................................................................11
DOWNLOADING RESULTS ONTO A COMPUTER................................................................................. 11
Data Transmission via Cable....................................................................................................................................................................11
BLUETOOTH PAIRING .......................................................................................................................... 11
Data Transmission via Bluetooth..........................................................................................................................................................11
MAINTENANCE..................................................................................................................................... 12
Battery...................................................................................................................................................................................................................12
Replacing the Battery..................................................................................................................................................................................13
Caring for Your Meter..................................................................................................................................................................................13
Caring for Your Test Strips......................................................................................................................................................................... 14
Caring for Your Lancing Device ............................................................................................................................................................ 14
Important Control Solution Information ........................................................................................................................................14
MEASUREMENT RESULT READINGS ................................................................................................... 15
Result Readings...............................................................................................................................................................................................15
Reference Values ............................................................................................................................................................................................16
SYSTEM TROUBLESHOOTING ............................................................................................................. 16
Error Messages ................................................................................................................................................................................................ 16
Troubleshooting.............................................................................................................................................................................................17
SPECIFICATIONS .................................................................................................................................. 18
SYMBOL INFORMATION ...................................................................................................................... 19


1
BEFORE YOU BEGIN
Important Information
•Severe dehydration and excessive water loss may cause readings which are lower than actual values. If you
believe you are suffering from severe dehydration, consult a healthcare professional immediately.
•If your blood glucose results are lower or higher than usual, and you do not have any symptoms of illness, first
repeat the test. If you have symptoms or continue to get results which are higher or lower than usual, follow
the treatment advice of your healthcare professional.
•Use only fresh whole blood samples to test your blood glucose. Using other substances will lead to incorrect
results.
•If you are experiencing symptoms that are inconsistent with your blood glucose test results and you have
followed all the instructions given in this owner’s manual, contact your healthcare professional.
•We do not recommend using this product on severely hypotensive individuals or patients in shock. Please
consult the healthcare professional before use.

2
Contents of System
Your new GoGlic system kit includes:
(1) Meter
(2) 10 Test Strips (for full kit)
(3) Owner’s Manual
(4) Quick Guide
(5) Strip Manual
(6) Daily Log Book
(7) 10 Sterile Lancets (5 lancets 30G and 5 lancets 32G)
(8) Lancing Device (for full kit)
(9) Carry Bag
(10) Two AAA Batteries
NOTE:
If any items are missing from your kit or opened prior to use, please contact the customers’toll-free number for
Italy 800 900 080 and for France 01.55.93.26.48.

3
Meter Overview
1Bluetooth Indication Light
2Display Screen
3Central Button (C)
Enter the meter memory and silence a reminder alarm.
4Strip Indication Light
The indicator lights up when results appear.
INDICATOR MEANING
Green while the strip is inserted or result in range
Red result below the range
Orange result above the range or ketone warning
5Test Strip Slot
Insert test strip here to turn the meter on for testing.
6Up Scroll Button (▲)
Adjust value increment.
7Down Scroll Button (▼)
Activate the Bluetooth function and adjust value decrement.
8Data port
Download test results with a cable connection.
9Battery Compartment

4
Display Screen
1QC Mode
QC- control solution test
2Test Results
3Alarm Symbol
4Day Average
5Date / Time
6Memory Mode
7Measurement Unit
8Alarm Reminder
9Blood Drop Symbol
10 Error Message/Ketone Warning
11 Low Battery Symbol
12 Measuring Mode
General – any time of day
AC – before meal
PC – after meal
Test Strip
1Absorbent Hole 2Conrmation Window
3Test Strip Handle 4Contact Bars
ATTENTION:
The front side of test strip should face up when inserting test strip.
Test results might be wrong if the contact bar is not fully inserted into the test slot.
NOTE:
• The GoGlic blood glucose monitoring system shall only be used with GlicTest TD- 4340 glucose
test strips.
• The GlicTest glucose test strips are preserved completely in their original vial. Use each test strip
immediately after taking it out of the vial and keep the vial cap closed tightly at all times. Any damaged or
dirty test strips must not be used, it may lead to inaccurate results.

5
SETTING THE METER
Before using your meter for the first time or if you change the meter battery, you should check and update these
settings.
Entering the Setting Mode (a)
Start with the meter off (no test strip inserted). Press and hold ▲and ▼at
the same time.
1. Setting the date
The sequence of the date setting is: YEAR →MONTH →DAY. With the YEAR / MONTH / DAY flashing in
sequence, press ▲or ▼to select the correct number. Press C.
2. Setting the time format
Press ▲or ▼to select the desired time format (12h or 24h). Press C.
3. Setting the time
With the HOUR / MINUTE flashing in sequence, press ▲or ▼to select the correct number. Press C.
4. Setting the low and high target range for measuring mode
The sequence of the low and high target range setting is: Gen low →Gen high →AC low →AC high →PC
low →PC high. With the settings mentioned above flashing in sequence, press ▲or ▼until the desired target
appears. Press C.
Please consult your doctor to determine a target range that works best for you.
5. Setting the buzzer
With the buzzer displays, press ▲or ▼to switch between “On”and “OFF”. Press C.
6. Deleting the memory
With “dEL” and “ ” on the display, press ▲to select“no” to keep the results in memory, and then press C. To
delete all the results, press ▲to select “yes”, and then press Cto delete all the memory records.
7. Setting the reminder alarm
Your meter has four reminder alarms. The meter will display “OFF” and “AL1”. If you don’t want to set an
alarm, press ▲or ▼to select “OFF”, and then press Cto skip this step. Or select “On” and press Cto proceed.
With the hour/minute flashing in sequence, press ▲or ▼to select the correct hour/minute. Press C and go
to the next alarm setting.
NOTICE:
When the alarm beeps, press Cto switch it off. Otherwise, it will beep for 2 minutes then switch off.
8. Setting the Bluetooth function
With the BLE displays, press ▲or ▼to switch between “On” and “OFF”. Press C
NOTICE:
This function is referring to the Bluetooth data transmission. If “On” is selected, your result will be transmitted
automatically right after the test.
After all the settings are finished, the meter will display“OFF”and then switch it off.
Congratulations! You have completed all settings!
NOTE:
• These parameters can ONLY be changed in the setting mode.
• If the meter is idle for 3 minutes during the setting mode, it will switch off automatically.

6
HOW TO SWITCH THE BLOOD GLUCOSE METER ON AND OFF
The glucose meter is switched on by one of the following methods:
• Pressing the Cbutton once;
• Pressing the down scroll button (▼) once;
• Press and hold the up scroll button (▲) and the down scroll button (▼) at the same time.
• Inserting the reactive strip in the test strip slot.
The glucose meter is switched off by one of the following methods:
• Pressing the Cbutton for 3 seconds;
• Automatically after 3 minutes of idle time;
• Removing the reactive strip with test strip ejector.
THE FOUR MEASURING MODES
The meter provides you with four modes for measuring, General (no show), AC, PC and QC. You can switch
between each mode by:
• Start with the meter switched off. Insert a test strip to turn on the meter. The screen will display “CHK” and a
flashing “ ” .
• Press Cto switch between General (no show), AC, PC and QC mode.
QUALITY CONTROL TESTING
When Should the Control Solution Test be Performed?
• if it is mandatory following the local regulations in your country,
• if you suspect the meter or test strips are not working properly,
• if your blood glucose test results are not consistent with how you feel, or if you think the results are not accurate,
• to practice the testing process, or
• if you have dropped or think you may have damaged the meter.
The items specified below may not be included in the kit (please check the contents on your product box) but
are required for control solution test or blood glucose test. Please make sure you have those items needed for a
test beforehand: Test strips (c), control solutions (d), lancing device (e) or sterile lancets (f). Please contact the
consumers’toll-free number for Italy 800 900 080 and for France 01.55.93.26.48. to request the control solution.
Performing a Control Solution Test
To perform a control solution test, you will need: (b), (c) and (d).
1. Insert the test strip to turn on the meter
Insert the test strip into the meter. Wait for the meter to display “CHK”,and a flashing“ ”.
2. Press C to mark this test as a control solution test
With “QC” displayed, the meter will store your test result in memory under “QC”. If you press C again, the “QC”
will disappear and this test is no longer a control solution test.

7
WARNING:
When doing the control solution test, you have to mark it so that the test results will NOT mix with the test
results stored in the memory. Failure to do so will mix up the test results with the control solution test results
in memory.
3. Apply control solution (g)
Shake the control solution vial thoroughly before use. Squeeze out the first drop and wipe it off, then squeeze
out another drop and place it on the tip of the vial cap. Hold the meter to move the absorbent hole of the test
strip to touch the drop. Once the confirmation window fills completely, the meter will begin counting down.
NOTE:
To avoid contaminating the control solution, do not directly apply control solution onto a strip.
4. Read and compare the result
After counting down to 0, the control solution test result will appear on the display. Compare this result with
the range printed on the test strip vial and it should fall within this range. If not, please read the instructions
again and repeat the control solution test.
NOTE:
• The control solution range printed on the test strip vial is for control solution use only. It is not a recommended
range for your blood glucose level.
• See the MAINTENANCE section for important information about your control solutions.
• Use only GlicSolution TD-4908 and TD-4909 as control solution for your meter.
TESTING WITH BLOOD SAMPLE
WARNING:
To reduce the chance of infection:
• Never share a lancet or the lancing device.
• Always use a new, sterile lancet. Lancets are for single use only.
• Avoid getting hand lotion, oils, dirt, or debris in or on the lancets and the lancing device.
Preparing the Puncture Site
Stimulating blood perfusion by rubbing the puncture site before blood extraction has a significant influence on
the glucose value obtained. Blood from a site that has not been rubbed exhibits a measurably different glucose
concentration than blood from the finger. When the puncture site was rubbed prior to blood extraction, the
difference was significantly reduced.
Please follow the suggestions below before obtaining a drop of blood:
• Wash your hands in warm, soapy water. Rinse well and dry completely. Warming fingers can increase blood
flow.
• Select the puncture site either at fingertips or another body parts (please see section “Alternative Site Testing”
(AST) on how to select the appropriate sites).
• Rub the puncture site for about 20 seconds before penetration.

8
NOTE:
• Choose a different spot each time you test. Repeated punctures at the same spot may cause soreness and
calluses.
• Please consult your health care professional before you begin AST.
Getting a drop of blood (h)
1. Unscrew the cap of the device, insert the lancet in the appropriate support of the finger-pricking device and press firmly
downwards until it is fully engaged. Twist the lancet protective disk until it separates from the lancet.
DIGITEST
DIGITEST
2. Screw the device’s cap back on.
3. Adjust the pricking depth by rotating the selector. The selector includes positions from 1 to 6. The lowest depth is ideal for
delicate skin and paediatric use; the highest is ideal for thick and calloused skin.
DIGITEST
DIGITEST
4. After cocking the lancing device back, hold the lancing device firmly against the side of finger and then press the release
button.
DIGITEST
DIGITEST
5. In order to decrease the possibility of infection, dispose of the used lancets in accordance with local guidelines.
• Each lancet must be used one time only. Do not share used lancets with another person.
• Pay attention not to bring the lancet near the eyes, mouth, or an infected area.
• Keep the lancet and finger-pricking device away from the reach of children.
Performing a Blood Glucose Test
To perform a blood glucose test, you will need: (b), (c), (e) and (f).
WARNING:
The GoGlic blood glucose monitoring system shall only be used with GlicTest Test Strips. Using other test strips
with this meter can produce inaccurate results.
1. Insert the test strip to turn on the meter
Wait for the meter to display “CHK” and a flashing“ ”.
2. Select the appropriate measuring mode by pressing C.

9
3. Obtaining a blood sample (i)
Use the pre-set lancing device to puncture the desired site. The size of the drop should be at least 0.5 microliter
(μL) of volume for glucose test. Gently squeeze the punctured area to obtain another drop of blood. Be careful
NOT to smear the blood sample.
4. Apply the sample (j)
Gently apply the drop of blood to the absorbent hole of the test strip at a tilted angle.
Confirmation window should be completely filled if enough blood sample has been
applied. Do NOT remove your finger until you hear a beep sound.
If the blood volume is insufficient, the triangle icon with exclamation mark will appear
on the meter display to remind you to refill the second drop of blood to the same test
strip within 3 seconds.
If the blood volume is still underfill after the second drop of blood applying, E-3 error
message will appear on the display with the triangle icon with exclamation mark.
NOTE:
• Do not press the punctured site against the test strip or try to smear the blood.
• If you do not apply a blood sample to the test strip within 3 minutes, the meter will automatically turn off. You
must remove and reinsert the test strip to start a new test.
• The confirmation window should be filled with blood before the meter begins to count down. If there is
insufficient blood volume in the test strip confirmation window, you can apply second drop of blood to the
same strip before countdown begins. The meter will display an “E-3”error message if there is still underfill, in
which case discard the used test strip and retest with a new one.
• If you have trouble filling the confirmation window, please contact the consumers’ toll-free number for Italy
800 900 080 and for France 01.55.93.26.48. for assistance.
5. Read Your Result
The result of your blood glucose test will appear after the meter counts
down to 0. For result readings please refer to paragraph “Measurement Result
Readings”. The blood glucose result will be stored in the memory automatically.
6. Pull out the used test strip (k)
Pull out the used test strip. Use a sharp bin to dispose of used test strips. The
meter will switch itself off automatically.
WARNING:
The used lancet and test strip may be biohazardous. Please discard them carefully according to your local
regulations.

10
Alternative Site Testing
You can test on a variety of locations on your body.
Important:
There are limitations with AST
(Alternative Site Testing).
Please consult your health care
professional before you perform AST.
When to use AST?
Food, medication, illness, stress and exercise can affect blood glucose levels. Capillary blood at the fingertip reflects
these changes faster than capillary blood at other sites. Thus, when testing blood glucose during or immediately
after a meal, physical exercise, or any other event, take a blood sample from your nger only.
We strongly recommend that you perform AST ONLY at the following times:
• In a pre-meal or fasting state (more than 2 hours since the last meal).
• Two hours or more after taking insulin.
• Two hours or more after exercise.
Do NOT use AST if:
• You think your blood glucose is low.
• You are unaware of hypoglycemia.
• You are testing for hyperglycemia.
• Your AST results do not match the way you feel.
• Your routine glucose results often fluctuate.
METER MEMORY
The meter stores the 1000 most recent blood glucose test results along with respective dates and times in its
memory. To enter the meter memory, start with the meter switched o.
Reviewing Test Results
1. Press and release C.
“” will appear on the display and the first reading you see is the last testing result along with date, time
and the measuring mode.
2. Press ▲or ▼to scroll through all the test results stored in the meter each time you press. Press ▲to scroll up
to view the old test result and press ▼to scroll down to see the new one. Keep pressing ▲to scroll up to the
first reading, you will see“End”on the meter display; keep pressing ▼to scroll down to the last reading, you will
see “toP”on the meter display. Press and hold C to switch off the meter.

11
Reviewing Blood Glucose Day Average Results
1. Keep pressing C ▼for 3 seconds until the flashing “ ” appears. Release Cand
then your 7-day average result measured in general mode will appear on the display
2. Press ▲or ▼7-, 14-, 21-, 30-, 60- and 90- day average results stored in each measuring
mode in the order of General (no show), AC, then PC.
3. Exit the meter memory.
Keep pressing the Cand the meter will turn off.
NOTE:
• Any time you wish to exit the memory, keep pressing C for 3 seconds or leave it without any action for
3 minutes. The meter will switch off automatically.
• Control solution results are NOT included in the day average.
DOWNLOADING RESULTS ONTO A COMPUTER
Data Transmission via Cable
You can use the meter with a micro USB cable and Pic Glic Software to view test results on your personal computer.
To request a USB cable, please contact the consumers’ toll-free number for Italy 800 900 080 and for France
01.55.93.26.48. for assistance.
1. Obtaining the required cable and installing the software
To download the Pic Glic Software and the user manual (both free of charge), please visit http://web.
picsolution.com/picglicsoftware.html
2. Connecting to a personal computer
Connect the cable to a USB port on your computer. With the meter switched off, connect the other end of
the USB cable to the meter data port. “USb” will appear on the meter display, indicating that the meter is in
communication mode.
3. Data transmission
To transmit data, follow the instructions provided in the user manual. Results will be transmitted with date and
time. Remove the cable and the meter will automatically switch off.
WARNING:
While the meter is connecting to the PC, it will be unable to perform a test.
BLUETOOTH PAIRING
Data Transmission via Bluetooth
You can transmit your data from the meter to your device via Bluetooth. The Pic Health Station app is designed
to assist you easily monitoring your blood glucose levels.
How to Install and Update the Pic Health Station App
You must connect to the internet to download the Pic Health Station app. The App Store or Google Play can be
accessed by tapping the App Store or Play Store icon on your iOS or Android devices.
It is simple and intuitive to use, for better understanding of your current condition and to achieve better diabetes
control.

12
System Requirement
For the requirement of OS version, please find on App Store or Google Play when you download the app. Please
contact your consumers’toll-free number for Italy 800 900 080 and for France 01.55.93.26.48. for assistance. Please
note that you must complete the pairing between meter and Bluetooth receiver before transmitting data.
Pairing with your mobile device
1. Turn on the Bluetooth function on your mobile device.
2. This meter provides two methods to activate Bluetooth function of the meter: (a) With the meter off, press ▼
to turn Bluetooth on. “BLE” will appear on the meter display, and then the Bluetooth indicator will turn to flash
with the meter display is blank, which means that the Bluetooth of meter is turned on automatically. (b) After
the end of measuring mode, the Bluetooth indicator will turn to flash with the meter display is blank, which
means that the Bluetooth of meter is turned on automatically.
3. Follow the instructions of the Pic Health Station app user manual to pair the device. (Ex. Search to find the
meter and then add it into the app.)
4. After successfully pairing the app with the device, the Bluetooth function of meter shall be on before
transmitting data to the Pic Health Station app.
Bluetooth Indicator on the Meter:
BLUETOOTH INDICATOR STATUS
Flashing Blue The Bluetooth function is on and waiting for connection.
Solid Blue The Bluetooth connection is established.
WARNING:
• While the meter is in transmission mode, it will be unable to perform a test.
• Make sure your device supports Bluetooth Smart Technology. Also make sure the Bluetooth setting on your
device is turned on and the meter is within the receiving range before transmitting the data. Please find OS
version requirement on App Store or Google Play when you download the app.
• The Bluetooth functionality is implemented in different ways by the various mobile device manufacturers; the
compatibility issue between your mobile device and the meter may occur.
MAINTENANCE
Battery
Your meter comes with two 1.5V AAA size alkaline batteries.
Low Battery Signal
The meter will display one of the messages below to alert you when the meter power is getting low.
1. The “ ” symbol appears along with display messages: The meter is functional and the result remains
accurate, but it is time to change the batteries. After the first visualization, the device is still able to perform at
least 100 measurements.
2. The “ ” symbol appears with E-1, and“ ”: The power is not enough to do a test. Please change
the batteries immediately.
This manual suits for next models
1
Table of contents