FOR-A V10 User manual

FORA V10
BLOOD GLUCOSE
MONITORING SYSTEM
English
311-4244100-016
Version 5.0 2010/07

2
Thank you for choosing
V10
BLOOD GLUCOSE
MONITORING SYSTEM
Dear FORA V10 System Owner:
This product can assist you in monitoring your blood glucose level.
Please visit our website www.foracare.com/usa to view other up-
dated instructions or product information.
This manual contains important information you must know about
the system. Please read it thoroughly and carefully.
The most unique feature of this system is its speaking function,
which is an audible aid for users, especially those with visual
impairment.
Another unique feature of this system is its no code function, which
means that there is no need to calibrate your meter. You just sim-
ply insert the test strip into the meter and begin the test.
For other questions regarding this system, please contact our cus-
tomer service team at 1-888-307-8188, 1-866-469-2632. You can
also visit www.foracare.com/usa for helpful information.

3
IMPORTANT SAFETY INSTRUCTIONS
READ THIS BEFORE USE
The following basic safety precautions should always be taken.
1. Close supervision is necessary when the device is used by, on,
or near children, handicapped persons or invalids.
2. Use the device only for the intended use described in this
manual.
3. Do not use accessories which are not supplied by the manufac-
turer.
4. Do not let the device or its cord come into contact with surfaces
that are hot to the touch.
5. Do not use the device near aerosol sprays, or where oxygen is
being administered.
6. Do not use device if it is not working properly, or if it had suffered
any damages.
7. Read all instructions thoroughly and practice the test before using
the product to test your blood glucose. Do all quality control
checks as directed and consult with a diabetes healthcare
professional.
KEEP THESE INSTRUCTIONS

4
TABLE OF CONTENTS
IMPORTANT INFORMATION 06
ABOUT ALTERNATIVE SITE TESTING (AST) 07
INTRODUCTION TO THE SYSTEM 09
Intended Use 09
Principle of Measurement 09
Contents of the System 10
Appearance and Key Function of the Meter 11
Meter Display 12
Speaking Function 13
Test Strip 14
BEFORE USE 15
Battery Replacement 15
Setting the Meter and Deleting the Memory 17
BEFORE TESTING BLOOD SUGAR 20
Control Test 20
Important Control Solution Test Information 21
Performing a Control Solution Test 22
TESTING BLOOD SUGAR 25
Test Procedure 26
Expected Test Results 32
COMPARING METER AND LABORATORY RESULTS 33
USING THE METER MEMORY 34
Viewing Results on the Meter 34
Viewing Results on a Personal Computer 37

5
TAKING CARE OF YOUR METER AND TEST STRIPS 38
Cleaning 38
Storage 38
TROUBLESHOOTING GUIDE 40
Risk Message 41
Error Message 42
Operational problem 43
SPECIFICATIONS 45

6
IMPORTANT INFORMATION
Severe dehydration and excessive water loss may cause readings
which are lower than actual values. If you believe you are suffering
from severe dehydration, consult a healthcare professional
immediately.
If your blood glucose results are lower or higher than usual, and
you do not have symptoms of illness, rst repeat the test. If you
have symptoms or continue to get results higher or lower than
usual, follow the treatment advice of your healthcare professional.
Use only capillary whole blood sample to test your blood glucose.
Using other substances will cause wrong results.
If you are experiencing symptoms that are inconsistent with your
blood glucose test results and you have followed all instructions
described in this owner’s manual, call your healthcare professional.
Inaccurate results may occur in severely hypotensive individuals
or patients in shock. Readings which are lower than actual values
may occur for individuals experiencing a hyperglycemic-hyperosmolar
state, with or without ketosis.
Please refer to your test strip package insert for additional important
information.

7
Alternative Site Testing (AST)
Important: AST results serve as references only.
Please consult your healthcare professional before you begin AST.
What is AST?
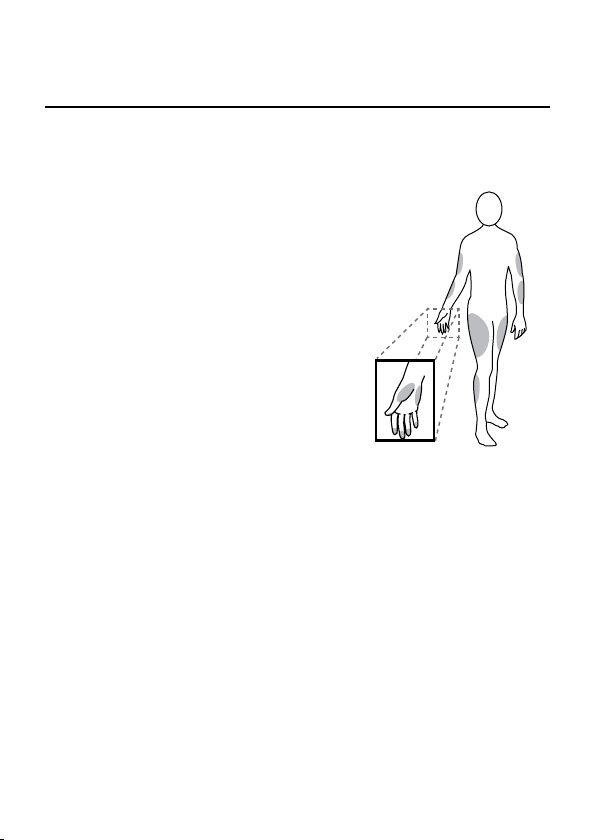
Alternative site testing (AST) refers to
when individuals check their blood glu-
cose levels using areas of the body other
than the ngertip. This system allows
AST at the palm, the forearm, the upper
arm, the calf or the thigh with results as
reliable as those obtained from ngertip
testing.
What’s the advantage?
Fingertips feel pain more readily because they are full of nerve endings
(receptors). Since nerve endings are not so condensed at other
body sites, tests performed there will be less painful.
When to use AST?
Food, medication, illness, stress and exercise can affect blood
glucose levels.
Capillary blood at the ngertip reects these changes faster than
capillary blood at other sites. Therefore, when testing blood glucose
during or immediately after a meal or physical exercise, results from
AST and ngertip may be signicantly different.

8
We strongly recommend you do AST in the following intervals:
˙In a pre-meal or fasting state (more than 2 hours since the last meal).
˙Two hours or more after taking insulin.
˙Two hours or more after exercise.
Do NOT use AST if:
˙You think your blood glucose is low.
˙You are unaware of hypoglycemia.
˙You are testing for hyperglycemia.
˙Your AST results do not correspond with the way you feel.
˙Your routine glucose results are often uctuating.
How to increase the accuracy?
Stimulating blood perfusion by rubbing the puncture site prior to
blood extraction has a signicant inuence on the glucose value
obtained. Blood from a site that has not been rubbed exhibits a
measurably different glucose concentration than blood from the nger.
When the puncture site is rubbed prior to blood extraction, the
difference is markedly reduced.
Please follow suggestions below before puncturing the skin:
˙Rub the puncture site approximately 20 seconds before penetration.
˙Use a clear cap (included in the kit) while setting the lancing device.

9
INTRODUCTION TO THE SYSTEM
Intended Use
The system is intended for use outside the body (in vitro diagnostic
use). It should be used only for testing glucose (sugar) and only
with fresh capillary whole blood samples (from the nger, the palm,
the forearm, the upper arm, the calf and the thigh). The system
is intended for use in the home and in clinical settings. It should
not be used for the diagnosis of diabetes or for the testing of new-
borns.
AST in this system can be used only during steady-state blood
glucose conditions described in the section of “About Alternative
Site Testing (AST).”
Principle of Measurement
The test is based on the measurement of electrical current gener-
ated by the reaction of glucose with the reagent of the strip. The
meter measures the current and displays the corresponding blood
glucose level. The strength of the current produced by the reaction
depends on the amount of glucose in the blood sample.

10
Contents of the System
The system consists of three main products: the blood glucose meter,
test strips, and a control solution. These products have been designed,
tested, and proven to work together as a system to produce accurate
blood glucose test results. Use only the FORA V10 test strips and
FORA brand control solution with the blood glucose meter.
Your system includes:
1 meter
Owner’s manual
Warranty card
Quick start user guide
Daily log book
Protective storage case
Batteries
10 Strips
1
2
3
5
4
7
8
6
1 32
54
7 8
6
PLEASE NOTE
1. If your system was opened prior to use or it did not contain all the parts
listed above, please return your system to the place of purchase.
2. Control solutions, lancing device, and lancets are optional. They are not
included in the standard kit. Please contact the Customer Care Line at
1-888-307-8188, 1-866-469-2632 or place of purchase for availability.
3. Only use the FORA V10 Blood Glucose Test Strip with this meter for
accurate measurement results.

11
Appearance and Key Function of the Meter
TEST SLOT is where you insert the test strip. The meter will turn
on automatically after insertion.
LCD SCREEN guides you through the test using symbols and
simple messages.
MAIN BUTTON located in front of the meter with "M" on it, is
used to turn on the meter, enter the memory mode and control
steps of setting.
SET BUTTON (in the back) located in the battery compartment,
is used to set up the meter.
DATA PORT located at the side, is for cable connection.
1
3
3
2
2
5
5
4
4
1

12
Meter Display
VOICE SYMBOL
Indicates speaking function is on/off.
LOW BATTERY SYMBOL
Appears when the battery power is
low.
TEST RESULT AREA
Displays glucose results.
UNIT OF MEASUREMENT
KETONE WARNING
Appears when the test result is equal
or higher than 240mg/dL(13.3mmol/L).
DAY AVERAGE
Indicates that the displayed test result
is an average.
FACE SYMBOL
Appears when memory deletion
completed.
MEMORY SYMBOL
Appears when you review the memory.
8
10
12
10
12
9
11
13
14
11
13
14
TEST STRIP SYMBOL
Appears when the meter is turned
on.
BLOOD DROP SYMBOL
Flashes when it is ready to apply
the sample.
TEMPERATURE SYMBOL
Appears when ambient tem-
perature is outside operating
temperature.
CTL SYMBOL
Appears when doing a
control test and indicates
that the result won’t be
stored in the memory.
DATE
TIME
1
1
3
3
2
2
5
5
8
4
4
7
7
6
6
9

13
Speaking Function
FORA V10 “speaks” aloud step by step instructions to guide you
through the process of blood glucose testing. The following table
tells you when and what the meter “speaks”.
WHEN does the meter speak? WHAT does the meter speak?
Thank you for using this product.
Please relax during measurement.
When you insert the strip into
the meter.
Room temperature out of range,
unable to measure.
When room temperature is outside op-
erating range, which is 50-104ºF(10-
40ºC).
When the meter is ready to test.
(symbol appears on display)
When the test is completed. (result
appears on display)
When the test result is outside
measurement range, which is 20-600
mg/dL(1.1-33.3 mmol/L).
Please apply blood into the strip.
The blood glucose is (number) milligram
per deciliter.
The blood glucose out of range,
unable to measure.

14
Test Strip
NOTE
The FORA V10 monitor should only be used with FORA V10 Test Strips.
Using other test strips with this meter can produce inaccurate results.
Absorbent Hole
Apply a drop of blood here.
The blood will be
automatically absorbed.
Conrmation Window
This is where you conrm if
enough blood has been
applied to the absorbent
hole in the strip.
Test Strip Handle
Hold this part to insert the
test strip into the slot.
Contact Bars
Insert this end of the test
strip into the meter. Push
it in rmly until it will go no
further.
ATTENTION:
Test results might be wrong if the contact
bar is not fully inserted into the test slot.
The front side of the
test strip should face
up when inserting
the test strip.
Front Back
1
4
3
2

15
BEFORE USE
Battery Replacement
Your meter comes with two 1.5V AAA alkaline batteries. The
meter will alert you when the power is low by displaying two
different messages:
1. With battery exhausted symbol ap-
pears on the display: the meter is functional
and the result remains accurate, but battery
should be replaced.
2.With battery exhausted symbol , low
and E-b symbols on the display: the batteries
can not provide enough power for a test. You
must replace the batteries immediately.
PLEASE NOTE
1.Replacing the batteries does not affect the meter’s memory (previous
test results stored in memory). The time and date settings may need to
be updated.
2.Batteries might leak chemicals if not used for a long time. Remove the
batteries if you are not going to use the device for an extended period
(i.e. 3 months or more).

16
WARNING
As with all small batteries, these batteries should be kept away from
small children. If they are swallowed, promptly see a doctor for help.
To replace the battery, make sure that the meter is turned off.
STEP 1
Press the buckle on
the battery cover and
lift it up to remove
cover.
STEP 2
Remove old batteries
and replace them with
two 1.5V AAA alkaline
batteries.
STEP 3
Close the battery
cover.
STEP 1 STEP 2 STEP 3

17
Your meter comes with the time, date, memory deletion, voice vol-
ume and language preset. If you need to change the time or replace
the batteries, you may have to enter the setting mode and reset.
Please set the time, date, memory deletion, voice volume and
language according to the following steps.
To set the time, you must rst enter the setting mode. Start with
the meter off. Then press the set button located in the battery
compartment. The meter is now in the setting mode.
STEP 1 Set the Year
The year appears rst, with the number ashing.
Press and release the M button to advance one
year. To move faster, hold the M button down.
With the correct year on the display, press the set
button and the date will appear on the display with
the month ashing.
STEP 2 Set the Month
Press and release the M button until the correct
month appears. To move faster, hold the M
button down. With the correct month on the dis-
play press the set button and the date will start
ashing.
Setting the Meter and Deleting the Memory

18
STEP 3 Set the Date
Press and release the M button until the correct
date appears. To move faster, hold the M button
down. With the correct date on the display, press
the set button and the time will appear on the
display with the hour ashing.
STEP 4 Set the Hour
Press and release the M button to advance one
hour. To move faster, hold the M button down.
With the correct hour on the display press the
set button and the minute will start ashing.
STEP 5 Set the Minutes
Press and release the M button to advance one
minute. To move faster, hold the M button down.
With the correct minute on the display, press the set
button and the memory deletion will start ashing.
STEP 6 Delete Memory
“dEL” and ashing “ ” symbol appear
on the display. If you didn't want to de-
lete memory, press the set button again
to skip this step. If you’d like to
delete ALL memory, press M button.
Both “dEL” and “ ” will ash. Press
the M button again to delete all memory.
The meter then displays " ", which means
that the memory has been deleted.

19
STEP 7 Select Speaking Function
The meter displays “VOL”, “ ” and ashing num-
ber. Press M button to select speaking volume
from 0 to 7. Then press the set button to proceed
to the next step.
STEP 8 Select Language
L1 (English) or L2 (Spanish) and “ ” display
on LCD. Press the M button to select one of the
two languages.
After the set-up is complete, press the set but-
ton to turn off the meter. “OFF” will be displayed
before shut down.
Congratulations! You have nished all settings now!
1. The time, date, memory deletion, voice volume and language can ONLY be
changed in the setting mode. Therefore, while performing a blood glucose,
these parameters cannot be changed.
2. Your meter displays 7-, 14-, 21-, 28-, 60- and 90-day averages which you can
access from the meter memory. These averages are calculated from results
obtained during the 7-, 14-, 21-, 28-, 60-and 90-days preceding the current
date and time settings. When the date and time are changed, the 7-, 14-, 21-,
28-, 60- and 90-day averages may change as well.
3. If the meter is at the setting mode, and if there is no button pressed for 3 min-
utes, the meter will turn off automatically.
Number 0 indicates that the speaking function is turned off. “ ”
will not display on LCD during testing. Numbers 1 to 7 indicates
speaking volume from low to high. At this time “ ” will be dis-
played on LCD during test.
NOTE

20
Control Test
FORA control solution contains a known amount of glucose that reacts with
test strips. By comparing your control solution test results with the expected
range printed on the test strip vial label, you can ensure that the meter and
the test strips are working together as a system and that you are performing
the test correctly. It is very important that you do this simple check routinely
to make sure your results are accurate.
How often should the control solution test be performed?
►When you use this system to test your blood for the rst time, practice the
procedure using control solution. When you can do three tests in a row that
are within the expected range, you are ready to test your blood.
►To routinely check the meter and test strips, perform a single test for each
level of control solution at least once a week.
When should the control solution test be performed?
►When you rst get your meter.
►When you begin using a new vial of test strips.
►Whenever you suspect that the meter or test strips are not working prop-
erly.
►When your blood glucose test results are inconsistent with how you feel, or
when you think your results are inaccurate.
►When your test strips are exposed to extreme environmental conditions
(See section TAKING CARE OF YOUR METER & STRIP ).
►When you want to practice running the test.
►If you drop the meter.
Table of contents
Other FOR-A Blood Glucose Meter manuals

FOR-A
FOR-A Diamond CUFF BP User manual

FOR-A
FOR-A TNG VOICE Setup guide

FOR-A
FOR-A Diamond PRIMA User manual

FOR-A
FOR-A Diamond PRIMA User manual

FOR-A
FOR-A Diamond Mini User manual

FOR-A
FOR-A Premium V10BLE User manual

FOR-A
FOR-A 6 Connect User manual

FOR-A
FOR-A D15 User manual

FOR-A
FOR-A DM40 User manual

FOR-A
FOR-A V30a Instruction sheet

FOR-A
FOR-A Advanced pro GD40g User manual

FOR-A
FOR-A GD20 User manual

FOR-A
FOR-A COMFORT pro GD40 User manual

FOR-A
FOR-A GD20FM01 Reference guide

FOR-A
FOR-A Advanced pro GD40g User manual

FOR-A
FOR-A TD-3261G User manual

FOR-A
FOR-A D40 Series User manual

FOR-A
FOR-A Diamond Mini User manual

FOR-A
FOR-A D30 User manual

FOR-A
FOR-A Premium V10a User manual