manuals.online logo
Brands
  1. Home
  2. •
  3. Brands
  4. •
  5. PIKA
  6. •
  7. Network Hardware
  8. •
  9. PIKA WARP Plus User manual

PIKA WARP Plus User manual

Other PIKA Network Hardware manuals

PIKA REbus Beacon User manual

PIKA

PIKA REbus Beacon User manual

PIKA WARP Plus User manual

PIKA

PIKA WARP Plus User manual

Popular Network Hardware manuals by other brands

socomec SNMP Card II quick start guide

socomec

socomec SNMP Card II quick start guide

NVR SYSTEMS 4-CH user manual

NVR SYSTEMS

NVR SYSTEMS 4-CH user manual

Draytek VigorSwitch G1240 quick start guide

Draytek

Draytek VigorSwitch G1240 quick start guide

Westermo TD-34 LV installation manual

Westermo

Westermo TD-34 LV installation manual

LaCie Network Space MAX Quick install guide

LaCie

LaCie Network Space MAX Quick install guide

ZoneVu ZSI-450-IP Installation guide & user manual

ZoneVu

ZoneVu ZSI-450-IP Installation guide & user manual

QNAP Turbo NAS Application notes

QNAP

QNAP Turbo NAS Application notes

OpenEye MV Series quick start guide

OpenEye

OpenEye MV Series quick start guide

Huawei SmartAX MT880a quick start guide

Huawei

Huawei SmartAX MT880a quick start guide

Proxim Tsunami QuickBridge 2454-R installation guide

Proxim

Proxim Tsunami QuickBridge 2454-R installation guide

Bay Networks CLAM quick start guide

Bay Networks

Bay Networks CLAM quick start guide

Innodisk SATADOM-SH 3SE Series manual

Innodisk

Innodisk SATADOM-SH 3SE Series manual

Cisco CGR 1000 Series Getting connected guide

Cisco

Cisco CGR 1000 Series Getting connected guide

Matrix Switch Corporation MSC-HD161DEL product manual

Matrix Switch Corporation

Matrix Switch Corporation MSC-HD161DEL product manual

National Instruments NI 653x user manual

National Instruments

National Instruments NI 653x user manual

B&B Electronics ZXT9-IO-222R2 product manual

B&B Electronics

B&B Electronics ZXT9-IO-222R2 product manual

Yudor YDS-16 user manual

Yudor

Yudor YDS-16 user manual

D-Link ShareCenter DNS-320L datasheet

D-Link

D-Link ShareCenter DNS-320L datasheet

manuals.online logo
manuals.online logoBrands
  • About & Mission
  • Contact us
  • Privacy Policy
  • Terms and Conditions

Copyright 2025 Manuals.Online. All Rights Reserved.

Copyright © 2011 PIKA Technologies – Version 1.1 September 2011
WARP Plus
GSM Least Cost Routing (LCR) Quick Start Configuration Guide
Visit the WARP Plus Support Page for related documents and the WARP Plus
Forum for additional help.
Requirements
•Non-VLAN tagged LAN port at the customer premise on same network as
the IP phones
•Unique SIP User Agent (UA) account for LCR.
•Feature code or extension for LCR provisioned on the BroadSoft switch
•Software license for GSM Least Cost Routing
•GSM Module, cable and antenna. Refer to the WARP Plus Quick Start Guide
for installation instructions.
Starting the WARP Appliance
•Ensure that you have installed the GSM module according to the instructions
in the WARP Plus Quick Start Guide.
•Start the WARP appliance at the customer premise.
•After approximately two minutes, the WARP appliance is ready to use when
the LCD displays WARP PLUS. Underneath, Version release indicates the
software version.
•The LCD has the following screens:
•WARP Plus title screen
•IP address screen
•Error codes screen.
•The first time the WARP appliance starts, errors may appear on the
Error codes screen if no features are provisioned. After subsequent
restarts, the screen should show ERROR CODES None. If not,
contact your system administrator for a list of error codes.
•Use the toggle button beside the LCD to switch between screens.
Logging on to the Web GUI
•Use the toggle button beside the LCD on the WARP appliance to switch to
the IP address screen.
•On the address bar of your browser, type the IP address of the WARP
appliance. The WARP Plus Login screen appears.
•In the Login box, type admin. In the Password box, type pikapika.
Activating the GSM Least Cost Routing License
•You need external WAN access to reach the PIKA license activation server.
•Under the System menu, click Licensing.
•In the Least Cost Routing row in the feature list table, type the license key
from the license email you received and click Apply.
•If license activation succeeds, in the feature list table, the Status column
shows the value Licensed.
Copyright © 2011 PIKA Technologies – Version 1.1 September 2011
WARP Plus
GSM Least Cost Routing (LCR) Quick Start Configuration Guide
Provisioning LCR
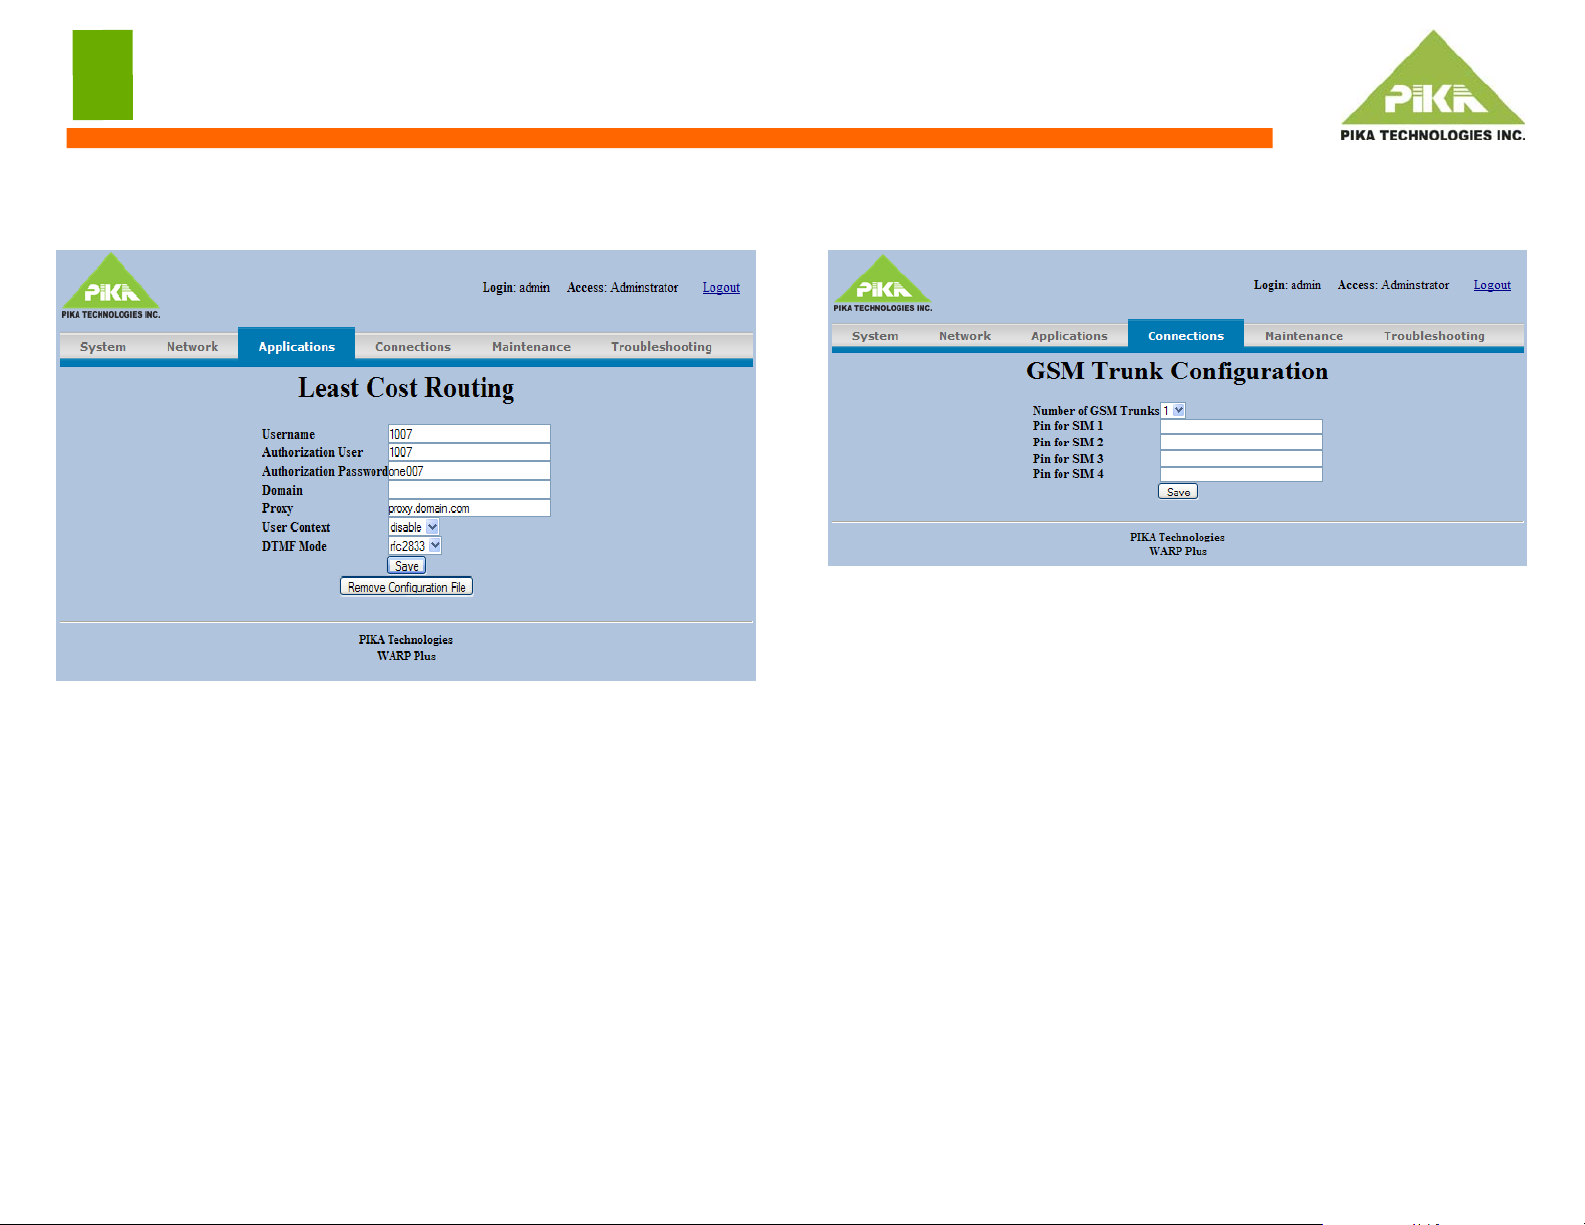
Under the Applications menu, click Least Cost Routing. The following page
appears.
•In the Username box, type the SIP UA user name (usually the same as
Authorization User).
•In the Authorization User box, type the SIP UA account username for
LCR.
•In the Authorization Password box, type the SIP UA account password for
LCR.
•In the Domain box, type the domain name of the external IP server to
register the WARP appliance against.
•In the Proxy box, type the address of the proxy for external IP server
domain to register the WARP appliance against.
•Optionally, modify the values for the following fields:
•User Context - Enables or disables use of the value of Username in the
Contact header.
•DTMF Mode - Mode used to receive DTMF digits from the external
SIP server or SIP phones.
After you finish, click Save.
Provisioning GSM Trunks
Changing these settings is optional. Under the Connections menu, click GSM
Settings. The following page appears.
Optionally, modify the values for the following fields:
•Number of GSM Trunks - Number of GSM trunks to use. The value must
not exceed the number of GSM radios present in the system. There are a
maximum of four radios, two per module.
•If your GSM SIM card requires a PIN, type the PIN in the box that
corresponds to the radio number used with the SIM card. Only provision this
parameter if your GSM SIM card requires a PIN. Refer to the Administrator’s
Guide for information about radio numbering.
After you finish, click Save.
Applying Configuration Changes
•After you finish provisioning, you must apply your changes. Under the
Maintenance menu, click Apply Configuration Settings. Click Apply
Changes.
Using GSM Least Cost Routing
•From an IP phone on the network, dial the LCR feature code or extension
assigned by the system administrator.
•When you hear dial tone, dial the number you want to call.
•When you finish dialling, there is a delay before the call connects. Press the
‘#’ key to indicate that you have finished dialling.